Setting Up PCS with Privilege Control Agent
This section tells how to install, configure, and start using Privilege Control for Servers (PCS) with the Privilege Control Agent. The Privilege Control Agent is one of two types of agent you can choose from; for information about the alternatives, see Privilege Control Agent and Platform Agent
For an overview of PCS and its components, see Privilege Control for Servers.
Prerequisites to PCS Installation with Privilege Control Agent
Before you start installing and using PCS, you must already have the Delinea Platform set up for fundamental tasks.
Follow these procedures and understand these concepts:
-
Using Platform Upgrade Center (for Secret Server customers who upgrade to Delinea Platform)
-
Discovery for Active Directory users and servers
-
Vaulting Secrets on the Delinea Platform (including how to place an account in the Secret Server vault)
PCS Installation Overview with Privilege Control Agent
Before installing Privilege Control for Servers on the Delinea Platform, you can watch a demonstration of the installation process:
When you are ready to set up Privilege Control for Servers to work on the Delinea Platform and start using it, perform the following tasks:
Task 1: Configure Firewall Ports for PCS with Privilege Control Agent
Task 2: Set Up PCS Service Account for Privilege Control Agent
Task 3: Install the AD Connector for Privilege Control Agent
Task 4: Enable IWA Service on Connectors for Privilege Control Agent
Task 5: Install the Platform for Privilege Control Agent
Task 6: Set Up AD Rapid Discovery for Privilege Control Agent
Task 7: Install the Privilege Control Agent
Task 8: Scan Computer Inventory
Task 9: Set Up Authentication Profiles for PCS
Task 11: Set Up Audit and Session Recording
Task 12: Set Up Use My Account
Task 1: Configure Firewall Ports for PCS with Privilege Control Agent
To use Privilege Control for Servers, be sure your firewall ports are configured appropriately. Use the procedure in Customer Firewall Requirements.
Task 2: Set Up PCS Service Account for Privilege Control Agent
On the Delinea Platform, create a domain service account with roles and permissions that are specific to PCS. The account must be placed in the Secret Server vault. It is used for setting up AD Rapid Discovery (see AD Rapid Discovery Workload) and the Command Relay workload, used for Delinea Platform engine management(see Command Relay Workload).
You must create at least one of these accounts, but you can also create more according to best practices for the Secret Server Discovery and Directory Services.
See also Delinea Platform Engine Management and Roles and Permissions.
Prerequisites
To configure an Active Directory account to be used for the AD Rapid Discovery and Command Relay workloads used for PCS, you first need the following prerequisites:
-
Active Directory Domain Administrator account
-
Active Directory Users and Computers MMC
The following steps tell how to set up the service account, including the following:
-
Create an AD service account (in this example, the account is named pcs_service_admin)
-
Configure the domain to permit monitoring of directory changes by the account
-
Configure an OU in AD named DelineaPlatform
-
Assign the service account permissions to edit the DelineaPlatform OU
To create the service account in ADUC
-
Launch Active Directory Users and Computers (ADUC) as a Domain Administrator.
-
Select the Managed Service Accounts OU.
-
Select New > User to create a service account in your domain for the PCS Command Relay and AD Rapid Discovery workloads.
In this example, the service account is named pcs_service_admin.
-
You can use any name for your service account. For example, construct it using your corporate naming convention.
The name must be 20 characters or fewer.
To configure the service account to monitor replication changes used by AD Rapid Discovery
-
At the root of your Active Directory domain, right-click and select Properties.
-
Select the Security tab.
If you do not see the Security tab, select View > Advanced Features.
-
Click Add.
This creates a new security record.
-
Add your pcs_service_admin account to the Security tab.
-
Select your pcs_service_admin account.
-
Scroll down and select Replicating Directory Changes.
-
Save your changes and close the dialog.
To create the AD OU named DelineaPlatform
-
Navigate to your preferred location in your Active Directory domain for the new OU. The OU can go in any location in the domain that conforms to your IT policy.
-
Right click and select New > Organizational Unit.
-
Name the OU DelineaPlatform.
-
Right-click the DelineaPlatform OU and select Properties.
-
Select the Security tab.
-
Click Add.
This adds a new user to the Security configuration.
-
Select your pcs_service_admin account and click OK.
-
Select your PCS Service Account and select Full Control.
-
Click Advanced.
-
In your PCS Service Account, click Edit.
-
In Applies to:, choose This object and all descendant objects.
-
Click OK.
-
Apply the changes and exit.
Task 3: Install the AD Connector for Privilege Control Agent
The AD Connector enables secure communication between the Delinea Platform and AD directories. Install the AD Connector on your target servers by following the procedures under Delinea AD Connector and in these sections:
Task 4: Enable IWA Service on Connectors for Privilege Control Agent
Enable Integrated Windows Authentication for PCS by following the procedure at Integrated Windows Authentication.
Task 5: Install the Platform for Privilege Control Agent
Delinea Platform Engine and Engine Management are components of the larger Delinea Platform product, and they are required by Privilege Control for Servers. The Delinea Platform Engine runs two workloads for PCS:
-
Command Relay
-
Audit Collector
To install the Delinea Platform Engine:
-
On the server where the Delinea Platform Engine will be running, along with its Command Relay and Audit Collector workloads, log in as a user with the custom role you created for viewing inventory.
-
Download and install the Delinea Platform Engine on your target servers by following the procedures in Delinea Platform Engine Management.
Updating the Platform Engine Management Settings
After installing the Delinea Platform Engine on your target servers, adjust the engine management settings.
-
From the left navigation, select Settings, then Engine Management.
-
Select the site that you want to update using the vaulted secret you just created.
-
Click the Settings tab.
-
Next to Audit Collector, click Edit.
-
Enter the following settings:
-
Collector Port: 5063
-
Session Recording: enabled
-
-
Click Save.
-
Next to Command Relay, click Edit.
-
Next to Command Relay Service Account, click Select.
-
Search for and select the vaulted engine management account you created earlier.
-
Click Turn off folder inheritance and share secret.
-
Click Save.
Updating the Platform Engine
The Delinea Platform Engine version 1.2.33.0 or later is required for PCS. You might need to update the software version for your Delinea Platform Engine.
-
Click Settings, then click Engine Management.
-
Click the name of the site where your Delinea Platform Engine is installed.
-
Click the Engines tab.
-
Look at the Version column.
If the version is not 1.2.33.0 or later, update the engine as follows:
-
In the Engines tab, click the name of the engine.
-
Click the Workloads tab.
-
In the Command Relay row, look at the Version column.
-
If the version is not 1.0.94 or higher, restart the Platform Engine service on the server that is running the Platform Engine. Wait for Command Relay to update.
-
Log in to the server running the Platform Engine.
-
Open PowerShell as an administrator.
-
Copy the following script:
Clear-Host;Write-Host "Uninstalling Delinea Engine"; $ZipFile = "$env:TEMP\DelineaEngineInstaller.zip"; $InstallerFolder = "$env:TEMP\$(New-Guid)"; $ProgramFilesFolder = 'C:\Program Files\Delinea Engine'; $ProgramDataFolder = 'C:\ProgramData\Delinea Engine'; $ProgressPreference = 'Continue'; Write-Host "Downloading latest installer packages. This may take a moment..."; if (Test-Path $ZipFile) { Remove-Item $ZipFile } if (Test-Path $InstallerFolder) { Remove-Item $InstallerFolder -Recurse -Force } $Uri = 'https://enginepoolupdatedev.blob.core.windows.net/shell-installer/555173/win-x64.zip'; if ($PSVersionTable.PSVersion -lt [Version]"6.0") { $ProgressPreference = 'SilentlyContinue' } Invoke-WebRequest $Uri -OutFile $ZipFile; $ProgressPreference = 'Continue'; Expand-Archive $ZipFile $InstallerFolder; Remove-Item $ZipFile;Set-Location -Path $InstallerFolder; ./Delinea.EnginePool.Engine.Installer.exe uninstall --keep-working-directory; if (Test-Path $ProgramFilesFolder) { Remove-Item -Recurse -Force $ProgramFilesFolder; } if (Test-Path $ProgramDataFolder) { Remove-Item -Recurse -Force $ProgramDataFolder; } -
Paste the script into PowerShell.
-
Run the script.
If errors happen during the uninstall, close the PowerShell windows, launch PowerShell again as administrator, and run the uninstall script.
-
On the Delinea Platform, click Settings, then click Engine Management.
-
Open the site where the Platform Engine is installed.
-
Click the Engines tab.
-
Click the engine name.
-
Click Delete Engine.
Task 6: Set Up AD Rapid Discovery for Privilege Control Agent
AD Rapid Discovery maintains continuous synchronization between Active Directory (AD) and the Delinea Platform. Any changes made to computers in AD trigger real-time synchronization through AD Rapid Discovery, and the changes appear on the Delinea Platform.
The AD Rapid Discovery workload can be installed on any domain joined machine. For details about how to set up the workload, see AD Rapid Discovery Workload.
Task 7: Install the Privilege Control Agent
Now that you have installed the Platform Engine, install the Privilege Control Agent on your servers.
Requirements for Privilege Control Agent Installation
Before you begin installing and setting up the Privilege Control Agent:
-
Make sure the servers where the Privilege Conrol Agent will be installed are using one of the supported operating systems. See Supported Operating Systems for Agents.
-
Before running the procedures in this section, we recommend you see the additional content at Managing Agents.
Checking for Agent Installation
To see whether the Privilege Control Agent is already installed on a given computer, view the computer's information in the Inventory page. See Inventory.
If the agent is installed, the Client Version field shows a software version number. You can skip the next few procedures for downloading and installing the agent, because the agent is already present. Go ahead to Task 8: Scan Computer Inventory.
Downloading the Privilege Control Agent
To download the agent software:
-
Log in to your Delinea Platform tenant.
-
From the left navigation, select Marketplace, then Download Center.
-
In the Search box, enter Agent.
-
Find the agent for your operating system.
-
Click the download icon.
-
Wait for the package to compile and download.
-
Copy the download package to the server you want to manage.
Installing the Linux Privilege Control Agent
To install the Privilege Control Agent on a server that is running the Linux operating system, use the steps in this section.
To get more details about the Linux agent, see Managing Agents.
Requirements:
-
Perl (and the following modules: lib, File::Basename, File::Copy, File::Find, File::stat, Getopt::Long, Sys::Hostname and Text::ParseWords)
-
Forward and Reverse DNS entries for each *nix server
If you require a different version of the *nix agent, visit the following site:
https://<tenant>.delinea.app/view/marketplace/browse/authorization/agent-downloads-grid
You can also update the agent installation script to use the new URL for the agent download.
Steps:
-
Log in to your Linux server as root user.
-
Create a folder (for example, delinea-agent) and extract the package that you downloaded in Downloading the Privilege Control Agent:
# mkdir delinea-agent
# tar -xzf rhel6-x86_64.tgz -C delinea-agent/
-
Navigate to the folder that you created in the previous step:
# cd delinea-agent/
-
Install the Linux Agent:
# ./agent_setup.sh --domain <domain name>There are several options you can specify if needed. For more information, display the documentation of
agent_setup.sh:
# ./agent_setup.sh --help -
For the UNIX computers where you have installed the Platform agent, you need to join them to the Active Directory domain and the Privilege Control zone DelineaZone. To do this, use the
adjoincommand, either interactively at the command line or in a script. To use this command, you need to have certain privileges, and it must be run with a set of required command-line options. For details, see Joining Linux/UNIX Hosts to a Domain/Zone.
Installing the Windows Privilege Control Agent
To install the Privilege Control Agent on a server that is running the Windows operating system, use the steps in this section.
Requirements:
-
.Net 4.8
-
Must be joined to the Active Directory domain and Privilege Control zone
Steps:
-
Log in to the server as domain administrator.
-
In the File Explorer, right-click the .zip file that you downloaded in Downloading the Privilege Control Agent and select Extract All....
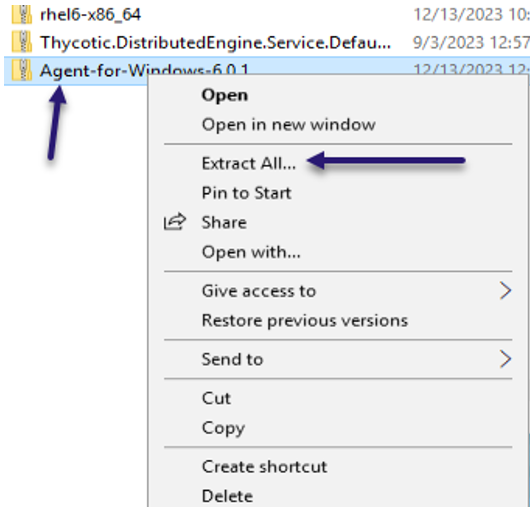
-
Click Extract.
When extraction is complete, the files appear in a new File Explorer window.
The container package is in Zip format, but the files inside are in TGZ format.
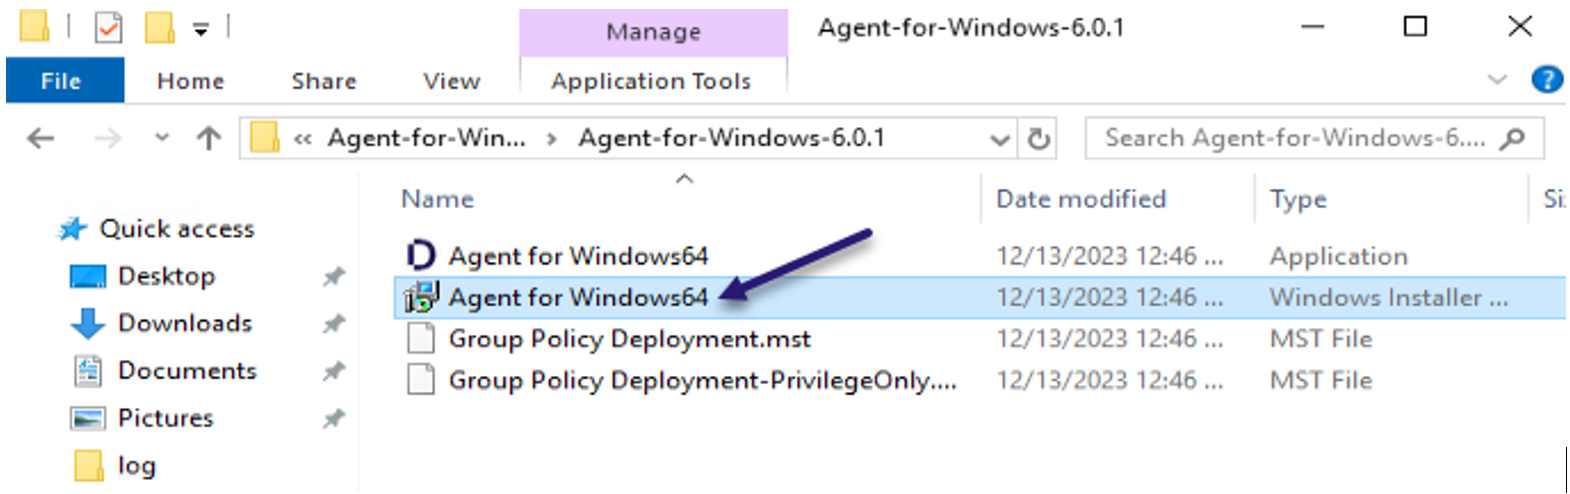
-
Open the Agent-for-Windows-6... folder.
-
Double-click the Windows 64 agent installer file.
-
Click Next. The Delinea Agent for Windows Wizard opens.
-
Click Next.
-
Accept the terms of the license agreement and click Next.
-
Keep the default destination folder and click Next.
-
Click Install.
-
Select Run Agent Configuration Wizard.
-
In the Agent Configuration Wizard, click Add Service.
-
Click Privilege Elevation Service, then click OK.
-
Select the DelineaZone, then click Next.
-
Click Yes to add the Domain Admins.
-
Click Yes to Restart.
Task 8: Scan Computer Inventory
At this point you must run Discovery to make the Platform aware of your newly added computers.
-
Follow the steps at Discovery.
-
To be sure that Discovery found all your added machines, check the Inventory. Follow the steps at Computer Assets
Task 9: Set Up Authentication Profiles for PCS
Authentication profiles are required for multi-factor authentication (MFA) to function. An authentication profile specifies the authentication challenges required to log in to the Platform and the length of time that must elapse before a user is prompted for authentication again.
To set up authentication profiles for PCS:
Follow the concepts and steps in Authentication Profiles. Follow these guidelines:
-
Endpoint Login Profiles: Authentication profiles for Endpoint Login policies should not have Challenge 1 set to Password, because the Platform will always present a password challenge to the user first.
-
Local Administrator Privilege Profiles: Profiles for Local Administrator Privilege policies should not have Challenge 1 set to Password, because the Platform will always present a password challenge to the user first.
-
Emergency Access Profiles: You do not need to create any profiles for Emergency Access policies, because their Rule Type is always Allow.
Task 10: Set Up PCS Policies
PCS authentication policies provide users with machine-level (server) permissions for logging in to remote computers and servers managed by Delinea Platform and performing actions on them. By assigning machine-level policies, you can ensure that each asset adheres to compliance standards, maintaining both security and efficiency across your network.
Follow the steps in Setting Up Policies.
Task 11: Set Up Audit and Session Recording
To track events on Delinea Platform, you can set up audit logs and session recordings. For more details, see Working with Session Review.
-
From the left navigation, select Insights, then Session review.
-
Log into the server as the administrator, root, or normal AD user.
To Configure on Linux:
-
Log in as root user.
-
Enter the following commands:
-
dacontrol -i DelineaPlatformAudit -
dacontrol -e -
dainfo
-
To Configure on Windows:
-
Log in a Domain Administrator.
-
Launch Agent Configuration.
-
Click Add Service.
-
Select Auditing and Monitoring Service.
- Click OK.
-
On the Enable session capture and replay page, select DelineaPlatformAudit.
-
Click Next.
Audit and Monitoring configuration is complete.
Viewing Audit Session Recordings
From the left navigation, select Insights, then Session review.
Log in to the Linux and Windows servers as the administrator, root, or a normal AD user.
Linux
When logging in to a Linux server, use one of the following options:
-
Run commands as root user.
-
Run commands as a normal AD user. Elevate commands as a normal AD user having the Local Administrator Privileges policy using the
dzdocommand.
Windows
When logging in to a Windows server, use one of the following options:
-
Run programs as the administrator.
-
Run commands as a normal AD user. Launch elevated desktop as a normal AD user having the Local Administrator Privileges policy.
Task 12: Set Up Use My Account
You can set up Use My Account (UMA) so you can access enrolled Linux systems without an additional login step. UMA provides single sign-on to Linux systems for users who are logged in to the Delinea Platform.