Installing the Delinea AD Connector
This topic explains how to install the Delinea AD Connector. Be sure you have first met the server requirements in the next section.
Server Requirements
The following list describes the requirements for the server or virtual machine where the Delinea AD Connector is installed:
-
Always running and accessible on the internal network.
-
Running Windows Server 2019 or newer.
-
Running in 64-bit mode with 8 GB of memory or more, of which 4 GB or more must be available for connector cache functions.
-
Running Microsoft .NET version 4.8 or newer. If it isn't already installed, the connector installer installs it for you. In this case, you must manually restart your machine to complete installation.
-
If the connector is integrating with an on-premises Active Directory, the machine where it is installed must be joined to Active Directory to use as the identity store.
-
Set up for outbound Internet access on port 443 (no Internet-facing ingress ports are required). For details on the connector's network requirements, see Delinea AD Connector. Use of deep packet inspection filtering of HTTPS or SSL traffic by web proxies or security software may cause connectivity issues. In all cases, the ports and addresses discussed should be excluded from packet inspection to allow for normal service operation.
-
If your network is configured with a web proxy server that you want to use to connect to the platform, you must specify this server during the installation process, and the web proxy server must support HTTP1.1 chunked encoding.
-
As a best practice, avoid installing the connector on a domain controller.
Account Permission Requirements
This section details the permissions required for installing the Delinea AD Connector including Platform, Connector, Connector security, alternate accounts and OUs, and read access permissions.
Platform Permissions
To generate a connector registration code or manage the connector settings, you must belong to the Administrator group on the Delinea Platform.
Delinea AD Connector Permissions
You must be a local administrator on the machine where you are installing Delinea AD Connector, so that you can copy files to Program Files, set up a Windows service, and make registry settings.
Connector Security Permissions
The machine where the Connector is installed should have user access and other permissions assigned the same way they are assigned to an Active Directory domain controller. Access to the registry on the Connector machine should be appropriately restricted, and not available to all users.
Account Types and Container Permissions
You can run the Delinea AD Connector service as a Local System account or as a Group Managed Service Account (GMSA). You should not run a Windows service with an Active Directory user account.
If you run the connector service as a GMSA, set up all required permissions before you run the installer. The following sections describe the required permissions by type.
Active Directory Permissions
The GMSA must have the following Active Directory permissions:
-
Member of the local Administrators group.
-
Read permission (at minimum) to the container with Platform user accounts and Active Directory groups used as members of Platform groups.
-
Read permission to the root DSE to gather necessary topology information.
Verify that the GMSA has permission to read Active Directory users and groups as if authentication would work. Each time role permissions are reassessed, the connector tries to resolve the Active Directory groups mapped to any role the Active Directory user could be assigned to.
The computer account of the server where the connector is installed must also have read access to the container or organizational unit (OU) that stores the user accounts. Without read access, the connector cannot authenticate the user. Domain computers have this permission by default, but the connector machine might not. This most often occurs in multi-forest or multi-domain setups, and can occur even when two-way trust is already defined. You can tell when this occurs because the connector log shows the error message "Unable to locate forest or user object." In this case, give the Local System account or GMSA read access permission to the containers.
Local Machine Permissions
The GMSA must also have Full Control on the following local resources. Without these permissions, the connector cannot write logs or sync with the cloud, and crashes on startup with no visible error.
-
Connector installation folder:
C:\Program Files\Delinea\Delinea Connector -
Registry key:
HKEY_LOCAL_MACHINE\Software\Delinea\Cloud
Required System Environment Variable
When running the connector under a GMSA, you must set the following environment variable on the connector machine before you run the installer or register the connector.
| Variable Name | Value | Scope |
|---|---|---|
DELINEA_CONNECTORSERVICE_PROTECTMACHINE
|
1
|
System (Machine) |
This variable switches Data Protection API (DPAPI) encryption from CurrentUser scope to LocalMachine scope. This allows the GMSA to decrypt the client secret stored during registration. Without this variable, the connector cannot decrypt its credentials and crashes on startup.
Warning: Set this variable before running the installer or registering the connector. If you set it after installation, you must re-register the connector.
Setting Read Access Permission to the User Account Container
-
Open Active Directory Users and Computers.
-
Select the user account container and open the Properties.
-
Select the Security tab.
-
Click Add to add the user account you are using to run the connector service.
-
Click OK after you add the user account.
-
Click the user account in Group or User Names and select the Allow checkbox for the Read permission.
-
Click OK.
Any user or group with permissions to read and write the LockoutTime attribute for an OU or other container can unlock user accounts that reside in that container.
Setting Read Access Permission to User Account Container with PowerShell
Requirements
-
Account with Domain Admin credentials.
-
dsacls.exe– This is installed on all Domain Controllers and can be installed on Member servers as part of the Delinea Connector deployment. -
Elevated PowerShell shell.
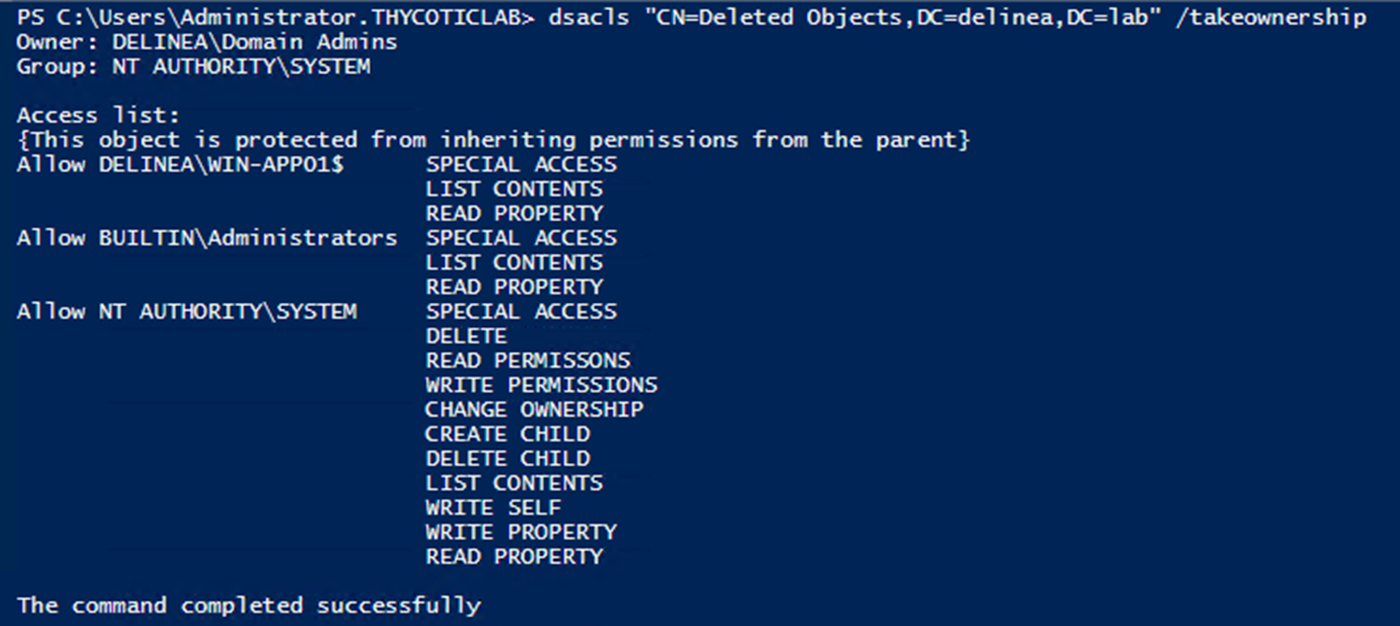
Step 1: Run the following test command from an elevated PowerShell session under Domain Admin credentials. This command returns the current permissions to the folder you need access to.
dsacls "CN=Deleted Objects,DC=delineacloud,DC=com" /takeownership
This example domain is delineacloud.com. Replace the delineacloud and com with the FQDN of your domain.
If the test command succeeds, the output looks similar to what appears in the following screen shot (these are the initial settings for this folder on a Windows 2022 Server).
Step 2: At the PowerShell prompt, enter the following command:
dsacls "CN=Deleted Objects,DC=delineacloud,DC=com" /g dcloud\adsync:LCRP
This command applies the user level account (not a Domain Admin) dcloud\adsync from the delineacloud.com domain to the folder.
Troubleshooting: If you run this command under Domain Admin credentials, and you get an INSUFF_ACCESS_RIGHTS error, the default settings for this container have been altered.
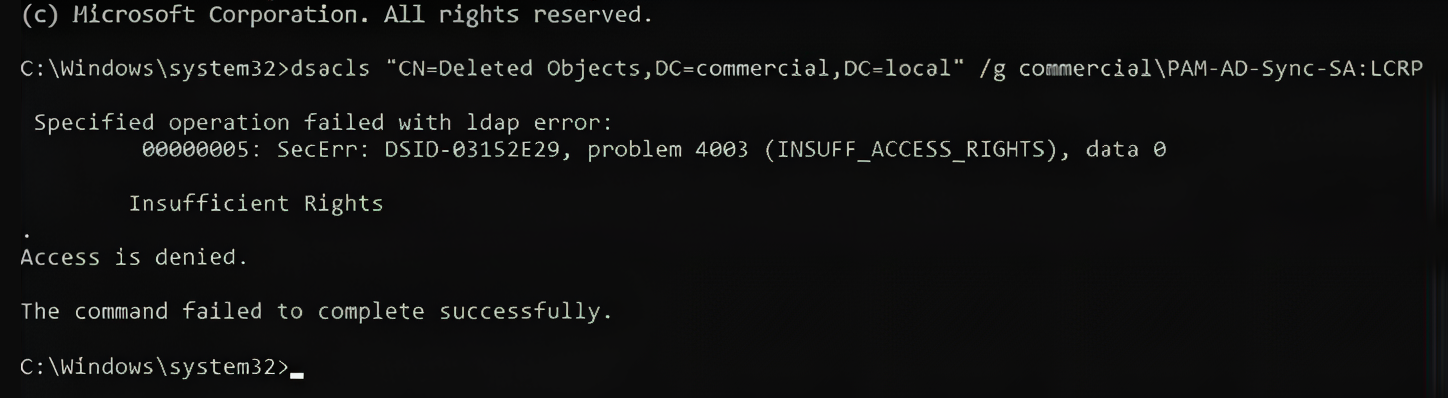
The workaround is to temporarily place the account with the Domain Admin credentials in the domain Builtin\Administrators group. Once that is done, run steps 1 and 2 again.
External References
Active Directory Connector Service Account Permissions
This reference lists the Active Directory (AD) permissions the Delinea connector service account requires for directory synchronization, password operations, and account lifecycle management.
Service Account Type
The connector requires one of the following:
- A domain user account with delegated permissions on the target Organizational Units (OUs).
- A Domain Admin account.
Read Permissions
The service account must have Read Property access to the following attributes on every OU containing users and groups to be synced.
User Attributes
| Category | Attributes |
|---|---|
| Identity | sAMAccountName, userPrincipalName, distinguishedName, objectGUID, objectSid, cn, name |
| Display | displayName, displayNamePrintable, description |
| Name | givenName, sn, middleName, initials, personalTitle, generationQualifier |
| Contact | mail, telephoneNumber, mobile, homePhone, homeTelephonenumber, ipPhone, facsimileTelephoneNumber, pager |
| Contact (Secondary) | otherHomePhone, otherMobile, otherTelephone, otherIpPhone, otherPager, otherFacsimileTelephoneNumber |
| Organization | title, department, departmentNumber, division, company, employeeID, employeeNumber, employeeType, manager, directReports, comment, carLicense |
| Address | streetAddress, postalAddress, physicalDeliveryOfficeName, postalCode, st, l, c, co, countryCode, homePostalAddress, postOfficeBox |
| Account State | userAccountControl, lockoutTime, accountExpires, logonHours |
| Password | pwdLastSet
|
| Group Membership | memberOf, primaryGroupID |
| Other | thumbnailPhoto, preferredLanguage, altSecurityIdentities |
| Object Classification | objectClass, objectCategory |
Constructed and Computed Attributes
These server-computed attributes require explicit read permission. DC version columns indicate the minimum domain controller release that supports each attribute.
| Attribute | Minimum DC Version | Purpose |
|---|---|---|
tokenGroups
|
Windows 2000+ | Returns all security group SIDs (domain-local, global, universal) for a user. |
tokenGroupsGlobalAndUniversal
|
Windows 2000+ | Returns global and universal security group SIDs for a user. |
msDS-User-Account-Control-Computed
|
Windows Server 2003+ | Real-time computed account control flags (for example, lockout state). |
msDS-UserPasswordExpiryTimeComputed
|
Windows Server 2008+ | Computed password expiration timestamp. |
allowedAttributesEffective
|
Windows 2000+ | Verifies which attributes the service account can modify. |
Group Attributes
| Category | Attributes |
|---|---|
| Identity | sAMAccountName, cn, name, displayName, distinguishedName, objectGUID, objectSid |
| Membership | member (including ranged retrieval member;range=N-M), primaryGroupID |
| Classification | objectClass, objectCategory, groupType, description, mail |
RFC 2307 / POSIX Attributes (Optional)
Required only if Unix/POSIX attribute synchronization is enabled.
| Attribute | Purpose |
|---|---|
uid
|
Unix user ID. |
uidNumber
|
Unix UID number. |
gidNumber
|
Unix GID number. |
gecos
|
GECOS field (general user information). |
unixHomeDirectory
|
Unix home directory path. |
loginShell
|
Unix login shell. |
Domain and Infrastructure Attributes
The connector reads these attributes from RootDSE and the Configuration and Schema partitions, which are typically accessible by default.
| Attribute | Purpose |
|---|---|
defaultNamingContext
|
Domain base DN. |
rootDomainNamingContext
|
Forest root DN. |
configurationNamingContext
|
Configuration partition DN. |
schemaNamingContext
|
Schema partition DN. |
dnsHostName
|
Domain controller DNS name. |
serverName
|
Domain controller server object DN. |
nETBIOSName
|
NetBIOS domain name. |
isGlobalCatalogReady
|
Global Catalog availability. |
supportedCapabilities
|
Server capability OIDs. |
supportedControl
|
Supported LDAP controls. |
domainControllerFunctionality
|
Domain controller functional level. |
currentTime
|
Server time, used for clock skew detection. |
Domain Password Policy
Read from the domain root.
| Attribute | Purpose |
|---|---|
maxPwdAge
|
Maximum password age. |
lockoutDuration
|
Account lockout duration. |
Change Detection Attributes
| Attribute | Purpose |
|---|---|
highestCommittedUSN
|
Highest committed Update Sequence Number, read from RootDSE. |
uSNChanged
|
Per-object change sequence number, used for incremental sync. |
Write Permissions (Feature-Dependent)
Grant the following permissions only when the corresponding feature is enabled.
Account Lifecycle Management
| Permission | Attribute | Operations Enabled |
|---|---|---|
| Write Property | userAccountControl
|
Enable, disable, and unlock user accounts. |
| Write Property | lockoutTime
|
Unlock user accounts. |
| Write Property | pwdLastSet
|
Force "must change password at next logon". |
Password Management
| Permission | Operations Enabled |
|---|---|
| Reset Password (Extended Right) | Administrator password reset, which sets a new password without knowing the old one. |
| Change Password (Extended Right) | User self-service password change, which requires the old password. |
Password operations require an encrypted LDAP channel (LDAPS on port 636 or StartTLS). The unicodePwd attribute used for password modification is write-only and requires SSL/TLS.
Group Membership Management
| Permission | Attribute | Operations Enabled |
|---|---|---|
| Write Property | member (on group objects) |
Add and remove users from groups. |
User Profile Sync-Back (Optional)
If bidirectional profile synchronization is enabled, the service account needs Write Property access to whichever user attributes are configured for write-back. Common examples include mail, telephoneNumber, mobile, displayName, title, and department.
Security Descriptor Access (Delegation Setup Only)
During initial connector installation and delegation setup, the installer may need the following permission. This permission is not required during normal connector operation.
| Permission | Attribute | Purpose |
|---|---|---|
| Read/Write | nTSecurityDescriptor
|
One-time DACL (Discretionary Access Control List) configuration during delegation setup. |
Group Lookup Modes
The connector supports multiple modes for resolving a user's group memberships. The mode determines which Active Directory attributes are used.
| Mode | Attributes Required | Description |
|---|---|---|
| Token Groups | tokenGroups
|
Returns domain-local, global, and universal security groups. |
| Global and Universal Only | tokenGroupsGlobalAndUniversal
|
Returns global and universal security groups only. |
| Global/Universal + Direct | tokenGroupsGlobalAndUniversal, memberOf |
Combines token groups with direct membership. |
| Legacy | Standard read access | Uses .NET authorization group enumeration. |
Delinea recommends granting read access to both tokenGroups and tokenGroupsGlobalAndUniversal so that the connector can support all modes.
LDAP Search Filters Used
Use these filter patterns when configuring LDAP traffic monitoring or firewall rules.
| Filter Pattern | Purpose |
|---|---|
(&(objectCategory=Person)(objectClass=user))
|
User enumeration. |
(&(objectCategory=group)(objectClass=group))
|
Group enumeration. |
(objectClass=organizationalUnit)
|
OU enumeration. |
(&(objectClass=user)(primaryGroupID=<RID>))
|
Primary group member lookup. |
(&(objectClass=group)(member=<DN>))
|
Groups containing a specific member. |
(&(objectClass=foreignSecurityPrincipal)(cn=<SID>))
|
Cross-domain member resolution. |
(&(objectCategory=computer)(objectSid=<SID>))
|
Computer object lookup. |
(&(objectCategory=crossRef)(ncName=<context>))
|
Domain cross-reference. |
(&(objectCategory=serviceConnectionPoint)(keywords=<value>))
|
Service connection point discovery. |
Network Requirements
| Protocol | Port | Purpose | Required |
|---|---|---|---|
| LDAP | TCP 389 | Standard directory operations. | Yes |
| LDAPS | TCP 636 | Encrypted directory operations (required for password operations). | Yes, if password management is enabled |
| Global Catalog | TCP 3268 | Cross-domain group membership resolution. | Yes, for multi-domain forests |
| Global Catalog SSL | TCP 3269 | Encrypted cross-domain queries. | Recommended |
| Kerberos | TCP/UDP 88 | Authentication when using Negotiate or Kerberos. | Yes |
| DNS | TCP/UDP 53 | Domain controller discovery. | Yes |
Quick Reference: Delegation Summary
Minimum Delegation (Read-Only Sync)
Target:   OUs containing users and groups to sync
			Applies:  Descendant User objects, Descendant Group objects
			Grant:
			- Read All Properties
			- List Contents
		- Read (on organizationalUnit objects)
Full Feature Set (Sync + Password + Account Management)
Target:   OUs containing managed users and groups
			Applies:  Descendant User objects
			Grant:
			- Read All Properties
			- Reset Password (Extended Right)
			- Write userAccountControl
			- Write lockoutTime
			- Write pwdLastSet
			Applies:  Descendant Group objects
			Grant:
			- Read All Properties
			- Write member
			Domain Root (read-only):
		- Read maxPwdAge, lockoutDuration
The constructed attributes tokenGroups, tokenGroupsGlobalAndUniversal, msDS-User-Account-Control-Computed, and msDS-UserPasswordExpiryTimeComputed are typically readable with standard Read All Properties delegation. If you use fine-grained property-level delegation, include these attributes explicitly.
Downloading the Delinea AD Connector and Getting a Registration Code
To download the Delinea Connector:
-
Log in to the Delinea Platform.
-
From the left navigation, select Settings, then select Connectors.
-
Click Add connector.
-
On the Add connector page, download the connector installation package.
-
Copy the tenant URL and save it for use during the connector installation process.
-
Create a new registration code or copy an existing one and save it for use during the connector installation process.
The auto-generated registration code is created with default values only. It does not have an expiration time or limits on how many times the registration code should be used.
Installing and Configuring the Delinea AD Connector
To install and configure the Connector:
Warning: If you are running the connector under a GMSA, you must set the DELINEA_CONNECTORSERVICE_PROTECTMACHINE system environment variable before completing this procedure. See Account Types and Container Permissions for details.
-
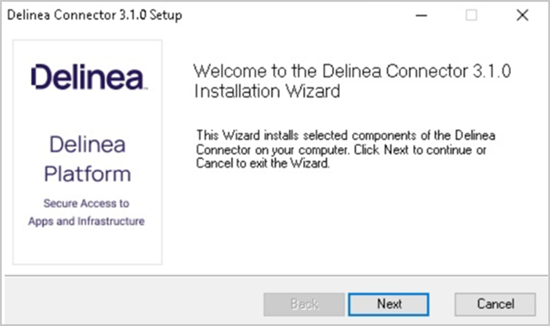
On the Delinea AD Connector machine, run the connector Installer file you downloaded in the previous section. The connector Installation Wizard opens.
-
Click Next.
-
Select the Connector tab.
-
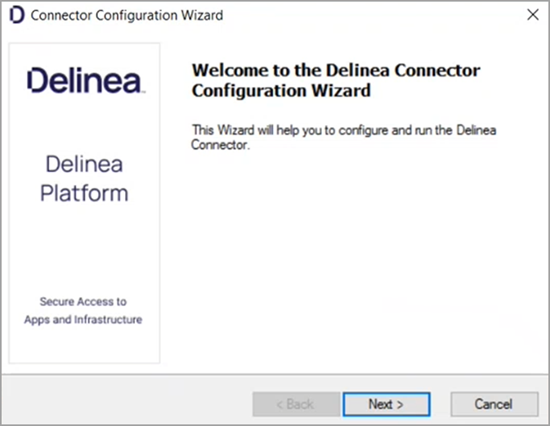
Click Register. The Connector Configuration Wizard opens.
During the configuration process, we recommend keeping default settings, except where these instructions indicate otherwise. You can choose to configure the connector to change TLS to 1.2 for every .net app on the machine globally.
-
Click Next.
-
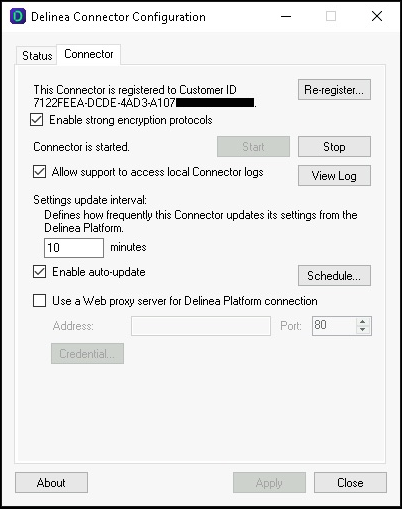
Select the Enable strong encryption protocols system-wide checkbox.
-
If you are using a web proxy server to connect to the platform, select the Use a web proxy server for the Delinea Platform connection checkbox. Specify the IP Address, Port, User name, and Password.
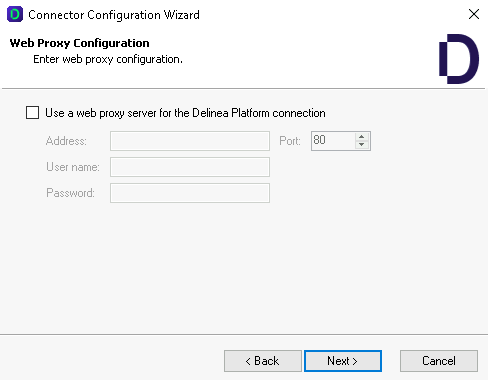
-
Click Next.
-
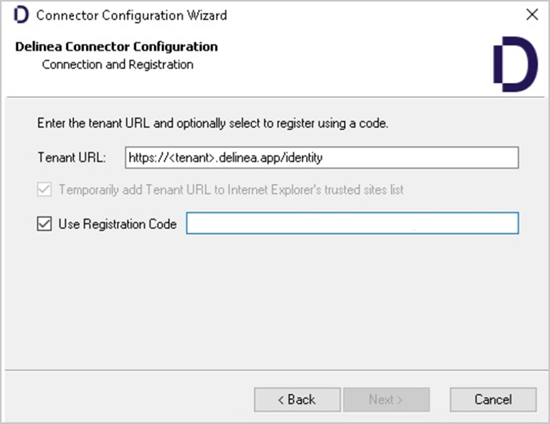
In the Tenant URL field, paste the tenant URL you copied and saved earlier.
-
Select the Temporarily add Tenant URL to [browser's] trusted sites list checkbox.
-
Select the Use Registration Code checkbox.
-
Paste the registration code you copied and saved earlier into the Use Registration Code field.
-
(Optional) You must be the domain administrator of the Active Directory domain for the relevant deleted objects container. If you are deleting users in multiple domains, make sure you are the domain administrator for all those domains. If you wish to enable the synchronization of user deletions in Active Directory with the Delinea Platform, follow these instructions:
-
Choose the domain(s) you wish to monitor and provide the required credentials for permission assignment.
-
Essential: grant the connector read access to the deleted objects container. You can provide the necessary permission by running the following commands on each connector:
-
If you do not already have the necessary permissions to change the permissions of the deleted objects container, run this command:
dsacls "CN=Deleted Objects,DC=\<EXAMPLE\>,DC=\<COM\>" /takeownership
-
The following command grants the Delinea Connector permission to read the deleted objects container in Active Directory:
dsacls "CN=Deleted Objects,DC=\<EXAMPLE\>,DC=\<COM\>" /user:administrator@\<EXAMPLE.COM\> /passwd:\* /g \<EXAMPLE\>\\\<MACHINENAME\>\$:LCRP /I:T
If this command fails, the default settings for this container have been altered. The workaround is to temporarily place the account with the Domain Admin credentials in the domain Builtin\Administrators group, then run the steps again.
Apply read permissions to the service account for the deleted objects container in the corresponding domain.
If you fail to perform any of these actions, users deleted in Active Directory will still be listed on the Users page in the Delinea Platform until you manually remove them. However, these users will not have access to any platform functionality.

-
-
-
Click Next.
The wizard performs checks to validate the network environment. Wait for the checks to complete.
-
Click Next.
The screen displays a bar indicating the progress of the configuration. Wait for the bar to be full.
-
Click Next.
You should see a notice saying, "Connector setup is complete."
-
Click Finish.
Enabling Auto-Update for the Delinea AD Connector
You can configure the connector to automatically poll the Delinea Platform for software updates and install them. If an update is available, the connector downloads and installs the update, then restarts. The connector is enabled to poll automatically by default. You can also specify the auto-update time windows as needed.
-
Log in to the Delinea Connector server.
-
Open the Windows Start menu and start the Delinea AD Connector Configuration program.
-
Select the Enable auto-update checkbox to enable automatic updates.
-
In Enable auto-update, click Schedule to configure the auto-update time window.
-
Click Apply.
Updating the Delinea AD Connector
To update the Delinea Connector:
-
Open the Windows Start menu and start the Delinea Connector Configuration program.
-
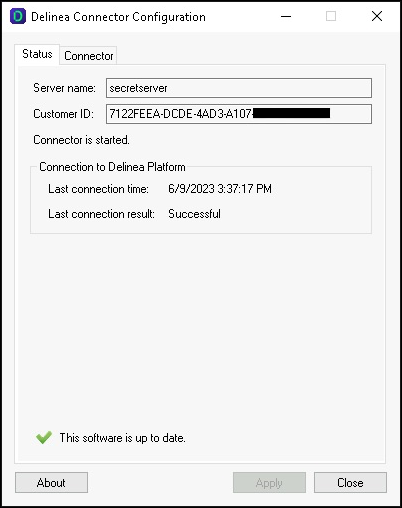
In the lower left of the Status tab, right-click the update icon and select Update.
The connector updates and displays a message indicating that the software is up to date.
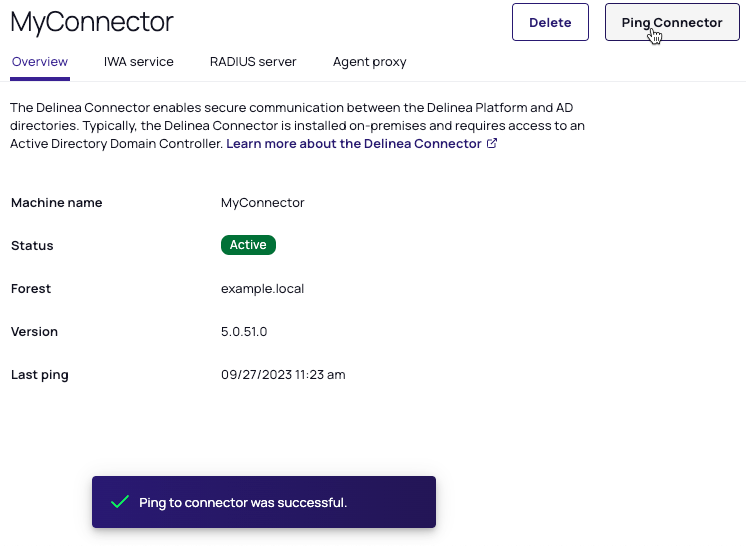
Checking the Delinea AD Connector Status
To verify the status of the connector, click Ping connector.
If all components are functioning correctly, a success banner displays the message Ping to connector was successful. If any communication issues are detected between the platform and the connector, an error message is displayed. The timestamp for the last ping is updated to reflect the most recent successful ping check.
Supported AD Group Types on the Delinea Platform
The Delinea Platform supports the following types of Active Directory (AD) groups for access control:
-
Global AD Security Groups
-
Universal AD Security Groups
These group types are designed to manage and enforce access control effectively, leveraging their compatibility with access control systems such as the Delinea Platform.
Why Distribution Lists Are Not Supported
The Delinea Platform does not support distribution lists for access control. While distribution lists, sometimes referred to as "distribution groups," are useful for communication purposes (for example, sending emails to a specified set of users), they are fundamentally unsuitable for managing access permissions.
Purpose of Distribution Lists:
-
A distribution list is a mechanism for sending emails to a defined group of recipients. It is optimized for messaging and not for permission management.
Limitations in Access Control:
-
Distribution lists cannot be included in Discretionary Access Control Lists (DACLs), which are essential for determining access permissions in systems like the Delinea Platform.
-
Unlike security groups, distribution lists do not have an index that can be queried to confirm whether a specific user is a member of the list.
-
This lack of searchability makes it impossible to verify if a user attempting to access a resource is part of a distribution list, rendering them ineffective for access control purposes.
Difference Between Security Groups and Distribution Lists:
-
Security Groups: Used explicitly for access control and can be referenced in DACLs to enforce permissions.
-
Distribution Lists: Only serve as a tool for communication and are not designed to interact with access control mechanisms.