Managing Groups
This page explains how to manage groups and Linux/UNIX group profiles.
Types of Groups
The platform supports the following types of groups: global AD security groups, universal AD security groups, Entra ID security groups, and user attributes/claims named groups.
It does not support domain local groups. It also does not support distribution lists. A distribution list, sometimes inaccurately called a distribution group , is used to send email to users specified on the list. But on any access control system including the Delinea Platform, groups are used for access control. A distribution list cannot be used for access control because it cannot be listed in discretionary access control lists (DACLs). A distribution list has no index, so you can’t query it to determine if a user (trying to access something) is or is not on the list, rendering the distribution list useless for purposes of controlling access.
For more information on groups, roles, and permissions, see Roles and Permissions.
Adding a Group
To add a group:
-
Log in to the Platform and open the Groups page. (Use the Search bar to find it.)
-
Click Add Group.
-
Enter a group Name and Description.
-
Click Save.
Adding Members to a Group
You can add several types of members to a group, including users, directory groups such as AD, and Delinea groups. To add a member to a group:
- Open the Groups page. (Use the Search bar to find it.)
-
On the Groups page, click a group.
-
Click the Members tab.
-
Click Assign Members.
-
Select the checkbox next to each member you want to add, then click Add.
Configuring a User Directory Service
-
Click Settings from the left navigation, then select Directory services.
-
Select the checkbox next to a directory service you want to use or remove. Actions available for a selected directory service vary:
- Platform and Federated directory are read only (no actions).
- Active directory can only be moved (no remove).
- Other directory types can be removed.
A dialog appears with options that include one or more of the following, depending on the type of directory or directories you selected: Clear Selected, Move Down, Move Up, or Remove Selected.

Understanding Directory Service Lookup Order
The Platform searches directory services sequentially and uses the first match it finds. Only two positions in this order are fixed:
- Delinea Directory is always first. You cannot move it.
- Federated Directory is always last. You cannot move it.
Active Directory and Entra ID occupy the positions between Delinea Directory and Federated Directory. Select Reorder to arrange these two to fit your needs.
Because Federated Directory is always last, every other active directory service resolves a matching user before Federation does — regardless of how you reorder Active Directory and Entra ID. If you activate Entra ID as a directory service (for example, by selecting Entra ID - Read during Entra ID API Integration ) for users you already provision through Federation, Entra ID always takes precedence, and you cannot reorder Federated Directory ahead of it. This can result in duplicate user accounts. If you only need read access to Entra ID for CID or ITP discovery, do not activate Entra ID as a directory service. See Integrating Microsoft Entra ID & Azure Cloud for ITP/PCCE Discovery with the Delinea Platform instead.
Additional Attributes
On the Configuration page, click the Additional Attributes tab.

Click Add Attributes.
On the Add Attributes page, enter a name in the Name field. The name can contain only letters, numbers, and underscores. It must begin with a letter and contain at least one underscore.
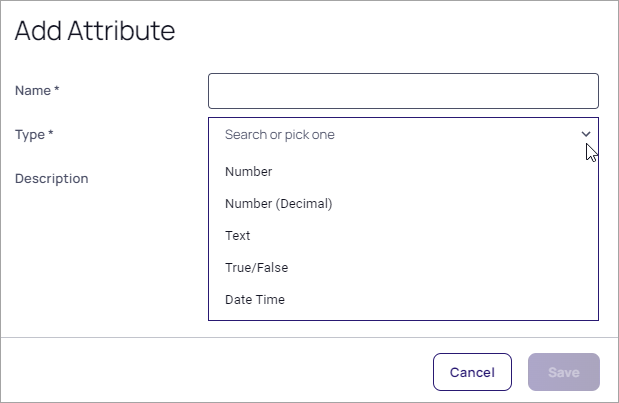
In the Type field, search for a type or click the dropdown arrow and pick one of the following:
- Number
- Number (Decimal)
- Text
- True/False
- Data Time
Click Save. A message appears: Your Attribute has been Added Successfully.
On the platform, user roles and their associated permissions are assigned to users through the users' memberships in Platform groups, including Platform groups mapped to federated groups (see Mapping Federated Groups). For more information on groups, roles, and permissions, see Understanding Roles and Permissions.
For related content, see the following:
External Directory Group Allowlist
External directory groups are security groups managed by an external identity provider (IdP), such as Microsoft Entra ID or Active Directory. The Delinea Platform does not create or maintain these groups directly.
By default, when you integrate with Entra ID, every security group is available for use. The External Directory Group Allowlist lets Platform administrators narrow that scope. Add a group to the allowlist to make it available for role assignment, identity policy configuration, secret sharing, and group mapping. To do this, simply add the desired groups to the platform’s External Groups list. Once this list is defined, only the specified groups will be available when managing roles, applying identity policies, or sharing secrets. This global change allows you to ensure that only relevant groups are used across your tenant, enhancing usability, security, and administrative control.
When to use the allowlist
Use the allowlist whenever you integrate Entra ID through the API (registered apps) path. External groups do not appear automatically — you must add each group you want to use.
Creating or Updating an External Group List
Log in to the Delinea Platform and open the Groups page. (Use the Search bar to find it.)
Select the External groups tab.
Click Set external group availability.
Select the Directory source to start browsing for groups.
Select the desired groups for use on the Delinea Platform.
Click Add.
The selected groups now appear in the External Groups list. Only these groups will be available in the Platform for assigning roles, applying identity policies, and managing secret permissions. To restore the default experience—where all groups from all external directories are browsable—simply clear the external group list.
Deleting Groups from the External Group List
Log in to the Delinea Platform and open the Groups page. (Use the Search bar to find it.)
Select the External groups tab.
Select the groups to be removed by selecting the checkbox next to the group.
Click Remove.
At the confirmation dialog click Remove.
The selected groups are now removed from the External Groups list. Removing all groups restores the default browsing experience.
Linux/UNIX Group Profiles (for PCS)
To manage Linux and UNIX groups on the Delinea Platform, you need group profiles for them. Administrators can create group profiles for Active Directory groups and—in hierarchical zone environments—local groups. At minimum, a Linux/UNIX group profile consists of a list of group members and two attributes:
Unique numeric identifier (GID)
Group name
A group must have a complete profile with these attributes defined to be recognized as a valid group in a zone or on a specific computer. These are the same attributes you define locally for Linux and UNIX groups in the /etc/group file.
Linux/UNIX group profiles on the Delinea Platform are created in the following ways:
You can import Linux/UNIX group profiles. See Importing Linux/UNIX Group Profiles.
You can also create group profiles manually. See Creating a Linux/UNIX Group Profile Manually.
Permissions Required
To work with Linux/UNIX group profiles, you need the appropriate permissions.
If you have the Platform Admin role, you can perform all tasks related to Linux/UNIX group profiles. For information about this role, see Built-in Roles.
If you do not have the Platform Admin role, your user account must have one or more of the following task-specific permissions, depending on what you want to do:
Create Linux group profiles
Update Linux group profiles
Delete Linux group profiles
Read Linux group profiles
For more information about these permissions, see Linux/UNIX Profile Permissions.
Viewing Linux/UNIX Group Profiles
To view a list of all the Linux/UNIX group profiles currently defined in your Platform tenant, use the Search bar to find the Group Profiles page.
A list screen appears that shows the profile attributes for every Linux/UNIX group profile on the platform. In addition to the required attributes, this screen also shows a Type column. If the value in the Type column is Global, the row shows the global profile settings that have been defined for the group. If the value is Computer, the row shows settings that apply only when the user logs in to the computer shown in the DNS Computer Name column.
To view the members of a Linux/UNIX group, access them directly in Active Directory, not on the Delinea Platform.
Importing Linux/UNIX Group Profiles
You can create or update Linux/UNIX profiles for Delinea Platform groups by doing a bulk import from Active Directory, rather than manually adding each one by one. This saves time and effort by eliminating repetitive data entry and reducing errors. The Platform provides an import wizard for this purpose. The wizard accepts a comma-separated value (CSV) file with the group profile data and uses it to create group profiles on the platform.
For the import to work, the following prerequisites must be in place:
Connector must be installed and the Platform connected to the external Active Directory instance that contains the existing groups.
Command Relay must be installed so the imported groups can be written to the platform's Active Directory.
A group must have a complete profile with all of the required attributes defined to be
recognized as a valid group on a specific computer. These are the same attributes you would define locally for Linux and UNIX groups in the
/etc/group file.
After you have imported the group, new users might be added to the group in AD. To automatically check for these new users and create profiles for them in Delinea Platform, you can schedule periodic provisioning. See Scheduling Provisioning of Linux/UNIX AD Group Users.
Creating the CSV File
You can create the CSV file that provides input to the Linux/UNIX group import wizard in two different ways:
Create the CSV file manually. Download the template CSV file from the first page of the import wizard. The template shows which fields you need to specify for each group profile. In Template for import, select Download template to get Delinea's provided CSV template. Open the downloaded CSV file and update it with the group profile information you wish to add. See Running the Import Wizard.
Export a CSV file from Active Directory. See Exporting Linux/UNIX Group Profiles.
In the CSV file, follow these guidelines:
The maximum file size is 100 KB.
All required fields must be present.
Each field must have a header.
When specifying new GID values, it is not recommended to use 0 through 999, because these GID values might collide with system accounts.
Headers must match exactly as shown in the following table, including uppercase characters and spaces.
| Attribute | Description |
|---|---|
| Group name | A name for the group profile. This name must be unique, and can not be changed after the group profile is created. |
| DNS computer name | (Optional) If not specified, this is a global profile. If specified, the values in this profile apply only on the given computer. If the DNS computer name is provided, it must be present in the computers inventory on the platform. See Inventory. |
| GID | A unique identifying number. You can specify the GID manually in the CSV file or leave it blank and let Delinea Platform automatically generate a unique ID number based on the Active Directory group's RFC 2307 attribute or, if not present, its globally unique identifying number (GUID). |
Running the Import Wizard
To bulk import Linux/UNIX group profiles:
Log in to the Platform and open the Group profiles page. (Use the Search bar to find it.)
Select Import group profiles.
Prepare the CSV file. Be sure to follow the guidelines in Creating the CSV File.
In CSV file importer, click Select file and upload your CSV file.
Select Next.
The import wizard compares the CSV file to Active Directory and displays a status screen with a sample of the profiles to be imported. If any errors are found, the wizard lists them in this screen.
If needed, fix any errors in the CSV file and start again. You can choose to ignore the errors and import only the group profiles that passed the validity check.
When you are ready, select Proceed.
Select Import.
If any of the group profiles already exist on the platform, a popup is displayed with a list of the duplicates. Select the checkboxes next to the profiles you want to overwrite with the new profile data. Deselect the checkboxes next to any profiles you want to preserve as is. Click Confirm.
When the import is complete, a summary window is displayed to show the results.
If desired, click Download CSV Summary to get a report of the import results. If the import skipped any profiles because of errors, the report lists them, and you can review the details in the CSV file.
Exporting Linux/UNIX Group Profiles
You can export Linux/UNIX group profiles from Active Directory to a CSV file so you can import them into your Delinea Platform instance.
Prerequisites:
PowerShell modules for Server Suite and PowerShell modules for Active Directory Users and Computers must be installed. If you run the PowerShell script on the Platform Engine server where the Command Relay is installed, these required PowerShell modules are already installed. See Command Relay Workload.
User account that can read the DelineaZone within the Active Directory Platform OU.
To export Linux/UNIX group profiles:
Log in to a computer that has the required PowerShell modules (recommended: the Platform Engine server where Command Relay is installed) with a user account that can read the DelineaZone within the Active Directory Delinea Platform OU.
Open Platform Marketplace.
Download the Platform PCS Tools zip file.
In the zip file, find and unzip one of the following PowerShell scripts:
export-serversuite-groups.ps1export-rfc2307-groups.ps1Use this script to export AD groups that include RFC 2307 attributes. These attributes are used to store Linux/UNIX user and group information in an LDAP directory. The script exports only those AD group profiles that have RFC 2307 attributes, and ignores any other profiles in AD that do not have them.
Run the script. In the
-CsvFilePathparameter, give a name for the output file. For example:.\export-serversuite-groups.ps1 -CsvFilePath D:\export\export-serversuite-groups.csv
Or:
.\export-rfc2307-groups.ps1 -CsvFilePath D:\export\rfc2307-export-groups.csv
To see diagnostic output from the script, including any errors or omitted groups, look at the file
export-groups-serversuite_skipped_profiles.logorexport-rfc2307-groups_skipped_profiles.log.
Creating a Linux/UNIX Group Profile Manually
To create a Linux group profile:
Log in to the Platform and open the Group profiles page. (Use the Search bar to find it.)
Select Create group profile.
In Source, select an Active Directory domain, or accept the displayed domain.
Select a group.
Give the group a Unix group name.
In GID, choose one of the following options:
Generated GID from GUID. The Platform creates a GID for you based on the group's GUID.
Generate from RFC 2307 value. The Platform creates a GID for you based on the group's RFC 2307 attribute.
If the group you selected does not have an RFC 2307 value, the Platform generates the GID from the GUID instead.
Manual. Type the ID number in the blank field below.
Select Create.