Configuration
To enable the integration between ServiceNow and the Delinea Platform, you must complete the following configuration tasks:
-
Configure a Delinea Platform connection
-
Configure the integration settings
-
Configure data synchronization from the Delinea Platform
-
Create approval rules for submitted privilege elevation requests
The following sections describe how to perform these tasks.
Configuring a Delinea Platform Connection
Your ServiceNow instance needs to be able to connect to the Delinea Platform to synchronize computers and PCS policy command groups from the platform.
To configure a connection to your instance of the Delinea Platform, you must provide the username and password of a service user that has access to the instance. The service user must have specific role permissions in the platform. For information about creating a service user, see Service Users in the Delinea Platform documentation. For detailed information about assigning the required permissions to the service user, see Setting Up the Delinea Platform.
This section explains how to configure a connection to the Delinea Platform in ServiceNow.
To configure a connection to the Delinea Platform:
-
In the ServiceNow UI, in the left navigation pane, go to All and search for Delinea in the search box at the top.
-
Locate Delinea Platform Integration in the search results and navigate to Admin > Properties.
-
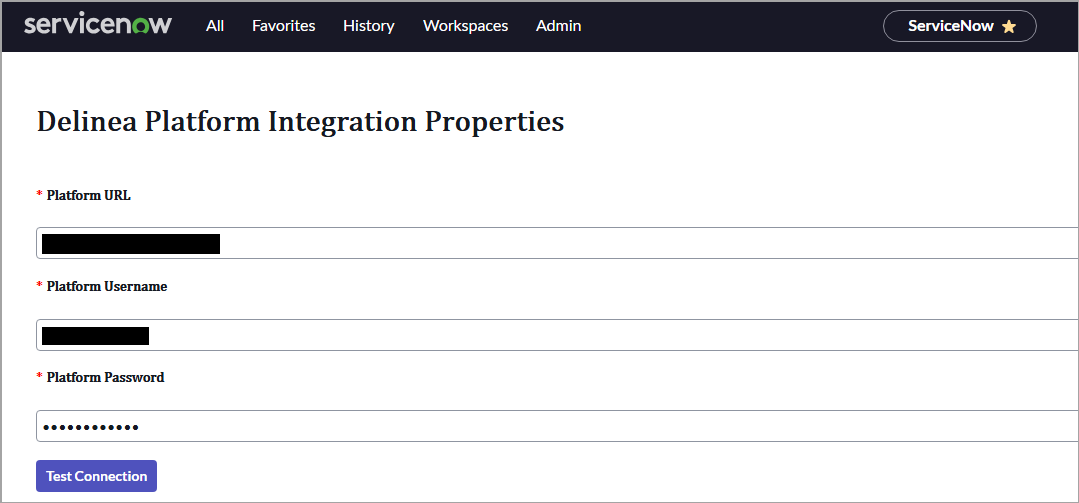
On the Delinea Platform Integration Properties page, provide the following connection settings:
-
Platform URL: The URL of your Delinea Platform tenant.
-
Platform Username: The username of the service user that you created in the Delinea Platform for this integration.
-
Platform Password: The password of the service user that you created in the Delinea Platform.
-
-
Select Test Connection.
If a connection is successfully established and the prerequisites are met, a message Authentication completed successfully appears.
If an incorrect URL or invalid credentials were entered, an error message appears. For information about how to troubleshoot the connection errors, see Troubleshooting Connection Errors.
-
Select OK in the message box.
If the Privilege Control for Servers (PCS) feature is not enabled for your tenant in the Delinea Platform, an error message appears. For information about how to troubleshoot the connection errors, see Troubleshooting Connection Errors.
A Save Credentials button appears.
-
Select Save Credentials to save the connection settings.
A message Credentials saved successfully appears.
-
Select OK in the message box and then select OK in the message that asks you to select an authentication profile.
Additional configuration fields become available below.
Configuring the Integration Settings
You must configure certain settings in ServiceNow that are required for the integration between ServiceNow and the Delinea Platform.
To configure the integration settings:
-
On the Delinea Platform Integration Properties page, provide the integration settings:
-
Log: Select the type of logs to create for the integration:
-
Debug: Only error information that is useful for debugging issues will be logged.
-
Info: All information messages will be logged.
-
-
Authentication Profile: Select a default authentication profile in the list. By default, the first authentication profile in the list is selected, but you can select a different profile.
The list of authentication profiles is fetched from the Delinea Platform. Authentication profiles are required to enabled multi-factor authentication (MFA). When logging to endpoints, the subjects (users or user groups) of PCS policies that will be created in the Delinea Platform will be required to complete the authentication challenges defined in the selected authentication profile. For more information about authentication profiles and how to create them, see the Creating Authentication Profiles in the Delinea Platform documentation.
-
Policy Type (Default): Select a default policy type. The approvers of a specific request can override the default policy type for that request.
-
Allow Requester to Select Policy Type: Specify whether requesters can override the default policy type selected in Policy Type (Default) and select a different policy type. Select one of the following values:
-
No: Requesters must use the default policy type for their policy elevation requests.
-
Yes: Requesters can select a policy type for their policy elevation requests.
-
-
Allow Request Auto Approval (if no Approval Rule is created): Select one of the following values:
-
No: If you select No and no approval rules are set up in ServiceNow, all user-submitted requests will be automatically denied. No is selected by default.
-
Yes: If you select Yes and no approval rules are set up in ServiceNow, all privilege elevation requests submitted by users will be automatically approved.
-

-
Configuring Data Synchronization from the Delinea Platform
To enable users to select computers and command groups when they create privilege elevation requests in ServiceNow, you must configure ServiceNow to synchronize this data from the Delinea Platform. Once synchronization with the Delinea Platform is configured, computers and command groups become available in ServiceNow.
You can run data synchronization on demand or configure synchronization to run at scheduled intervals to fetch data from the Delinea Platform. You can also validate that data synchronization runs correctly and can view the data fetched from the Delinea Platform in ServiceNow. See the following sections for details.
Running Data Synchronization on Demand
To synchronize data from the Delinea Platform to ServiceNow on demand:
-
In ServiceNow, navigate to All > Delinea Platform Integration > Customized API Sync.
-
To immediately initiate a synchronization task, in the upper-right corner of the Scheduled Script Execution - Delinea Platform API Sync page, select Execute Now.
When the synchronization task runs to completion, the computers and command groups are synchronized from the Delinea Platform and become available in ServiceNow. For information about how to view the computers and command groups synchronized from the Delinea Platform, see Validating Data Synchronization between ServiceNow and the Delinea Platform in this topic.
Configuring Scheduled Synchronization
To configure a schedule for data synchronization from the Delinea Platform:
-
On the Scheduled Script Execution - Delinea Platform API Sync page, leave the default name for this synchronization configuration in the Name box and select the Active checkbox.
-
Provide the following settings:
-
Run: Specify how often synchronization will run. In the list, select an appropriate frequency value, for example, Daily, Weekly, or Periodically.
-
Repeat Interval: If you select Periodically in the Run list, specify a repeat interval in days and/or hours (for example, 1 day and 1 hour).
-
Starting: Specify the date and time from when synchronization will begin.
-
Run the script: Contains the synchronization script. Do not change the script.
Do not select the Conditional checkbox.
-
A synchronization task will be created and will run periodically according to the specified schedule to fetch computers and commands from the Delinea Platform. The computers and command groups synchronized from the Delinea Platform will become available in ServiceNow. For information about how to view the computers and command groups synchronized from the Delinea Platform, see Validating Data Synchronization between ServiceNow and the Delinea Platform in this topic.
Validating Data Synchronization between ServiceNow and the Delinea Platform
This section provides steps to verify that data synchronization between Service Now and the Delinea Platform works and that the data is fetched from the Delinea Platform and becomes available in ServiceNow.
To verify data synchronization between ServiceNow and the Delinea Platform:
-
Run a data synchronization process (on demand or scheduled).
If the synchronization was successful, the computers and command groups fetched from the Delinea Platform become available in ServiceNow.
-
View the fetched computers and command groups in ServiceNow as follows:
-
To view the computers, navigate to All > Delinea Platform Integration > Computers.
-
To view the command groups, navigate to All > Delinea Platform Integration > Command Groups.
-
Creating Approval Rules for Submitted Privilege Elevation Requests
The integration between the Delinea Platform and ServiceNow uses a standard ServiceNow approval flow. The approval workflow requires that appropriate approval rules be set up in ServiceNow. You can choose between creating manual or automatic approval rules.
For a manual approval rule, you must define one or more approvers for requests and specify a condition for requests (for example, a specific period when requests were created). If a request matches the condition in an approval rule, an approval requested item, RITM, is created for each approver in ServiceNow. The approver needs to consider the request in the RITM to decide whether to approve or deny it. If the request is approved, a PCS policy is created for the request in the Delinea Platform.
Make sure that each user that you define as an approver in an approval rule is assigned the x_delin_platform.approver role and the ITIL base system role in ServiceNow.
An automatic approval rule also specifies conditions for requests, but it doesn't require a manual approval workflow involving approvers. If a request matches the conditions in the approval rule, it is automatically approved, and a policy is created for the request in the Delinea Platform.
The following sections provide steps for creating manual and automatic approval rules.
Creating a Manual Approval Rule
-
Log in to ServiceNow with an admin account.
-
Navigate to All > Delinea Platform Integration > Approval Rules.
-
In the upper-right corner of the Approval Rules page, select New.
-
Provide the following information:
-
Short Description: Enter a description of the approval rule to help identify it in ServiceNow.
-
Variable Condition: Specify the condition that requests need to satisfy for this approval rule to apply to them.
To have the approval rule apply to all requests, in the lists, select Created, after, and Yesterday.
To create a complex conditional expression, select AND and/or OR to add clauses with the
ANDandORoperators. -
Order: Enter 2. This is necessary if rules are already set up for automatic approvals.
-
Approval Type: Select Required.
-
Active: Select this checkbox.
-
(Optional) Manager Approval: Select this checkbox to configure manager approval.
-
User Approval: Select this checkbox to define approvers for the approval rule. Next to Approval Users, select
 and select a user who you want to define as an approver. To define additional approvers, select
  and select the users.
If only one approver is defined in an approval rule and a request is initiated by the same approver, that request will be automatically rejected.
-
(Optional) Group Approval: Select this checkbox if you want to define group approvals for the approval rule. To define one or more groups whose approval is required, select
and then select the groups.
-
-
To save the approval rule, select Update.
Creating an Automatic Approval Rule
-
Log in to ServiceNow with an admin account.
-
Navigate to All > Delinea Platform Integration > Approval Rules.
-
In the upper-right corner of the Approval Rules page, select New.
-
Provide the following information:
-
Short Description: Enter a description of the approval rule to help identify it in ServiceNow.
-
Variable Condition: Specify the condition that requests need to satisfy for this approval rule to apply to them. In the drop-down list under Variable Condition, select Show related fields and then select Variables. Select appropriate options.
To create a complex conditional expression, select AND and/or OR to add clauses with the
ANDandORoperators. -
Order: Enter 1.
-
Approval Type: Select Automatic.
-
Active: Select this checkbox.
-
-
To save the approval rule, select Update.