Setup
To set up the integration between the Delinea Platform and ServiceNow, you must perform the following tasks:
-
Install the Delinea Platform extension for the integration in ServiceNow.
-
Set up the Delinea Platform.
The following sections describe how to perform these setup tasks.
Installing the Delinea Platform Extension
To set up ServiceNow for the integration with the Delinea Platform, you must install the Delinea Platform extension in ServiceNow and verify that the user role required for request approval is present in ServiceNow.
You can install the Delinea Platform extension through the ServiceNow Store (the recommended method) or by manually importing the XML file that contains the extension code into ServiceNow.
Installing the Delinea Platform Extension via the ServiceNow Store
This section describes how to install the Delinea Platform extension through the ServiceNow Store.
To install the Delinea Platform extension through the ServiceNow Store:
-
Go to the ServiceNow Store and log in with your ServiceNow ID.
-
Go to the Delinea Platform Integration page in the ServiceNow Store.
You can search for "Delinea Platform Integration" in the ServiceNow Store.
-
In the upper-right corner of the page, select Get.
-
Install the extension from the store by following the ServiceNow process.
Installing the Delinea Platform Extension via Manual XML Import
If you cannot use the ServiceNow Store for installation or prefer a manual setup, you can import the XML file containing the code of the extension into ServiceNow.
To manually import an XML file into ServiceNow:
-
Download the XML file that contains the most recent version of the Delinea Platform extension.
-
Log in to ServiceNow.
-
In ServiceNow, go to All > Retrieved Update Sets.
-
Go to the Child Update Sets tab and under Related Links, select Import Update Set from XML.
-
Select the XML file and select Upload.
Once the import of the file is complete, a Delinea Platform Integration entry is added to the Retrieved Update Sets page.
-
On the Retrieved Update Set Delinea Platform Integration page, select Preview Update Set.
A progress bar shows the percentage of the preview that is complete.
-
If errors are shown after previewing, perform the following steps to address the errors:
-
In the Update Review Set window, select Close.
-
On the Retrieved Update Set Delinea Platform Integration page, go to the Update Set Preview Problems tab.
-
Select all the errors.
-
In the upper-right corner, in the Actions on selected rows list, select Accept remote update.
Accepting the errors won't affect the functionality of the extension.
The State on the Retrieved Update Set Delinea Platform Integration page changes to Previewed.
-
-
In the Name column, select the Delinea Platform Integration link.
-
Select Commit Update Set.
After the commit is complete, the State changes to Committed. This indicates that the extension has been successfully installed.
Verifying the Delinea Platform Approver Role
To approve privilege elevation requests in ServiceNow, a user must have the x_delin_platform.approver role in ServiceNow. After you install the Delinea Platform extension, this role becomes available in ServiceNow, and you must assign it to each user that you want to define as a request approver. Perform the following steps to verify that the x_delin_platform.approver role is available in ServiceNow.
-
In ServiceNow, go to All and search for roles in the search box at the top.
-
In the search results, navigate to System Security > Users and Groups and select Roles.
-
On the Roles page, search for a role name of x_, as shown.
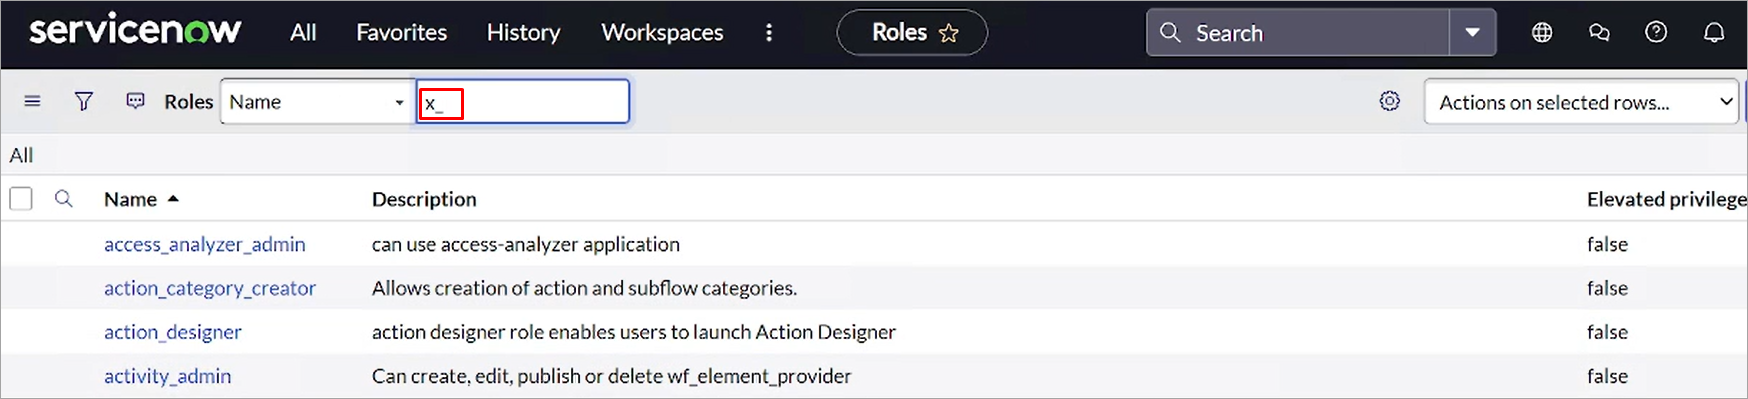 .
.The Roles page shows the x_delin_platform.approver role.

Setting Up the Delinea Platform
The integration requires a dedicated service user in the Delinea Platform to access the Delinea Platform APIs during data synchronization. If you don't have a service user, you can create one. For detailed information about creating a service user, see Service Users in the Delinea Platform documentation.
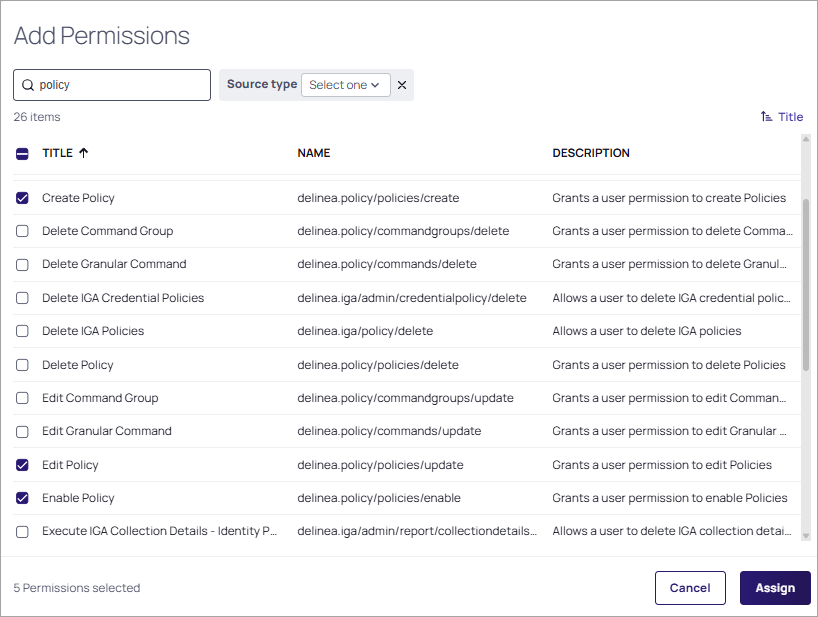
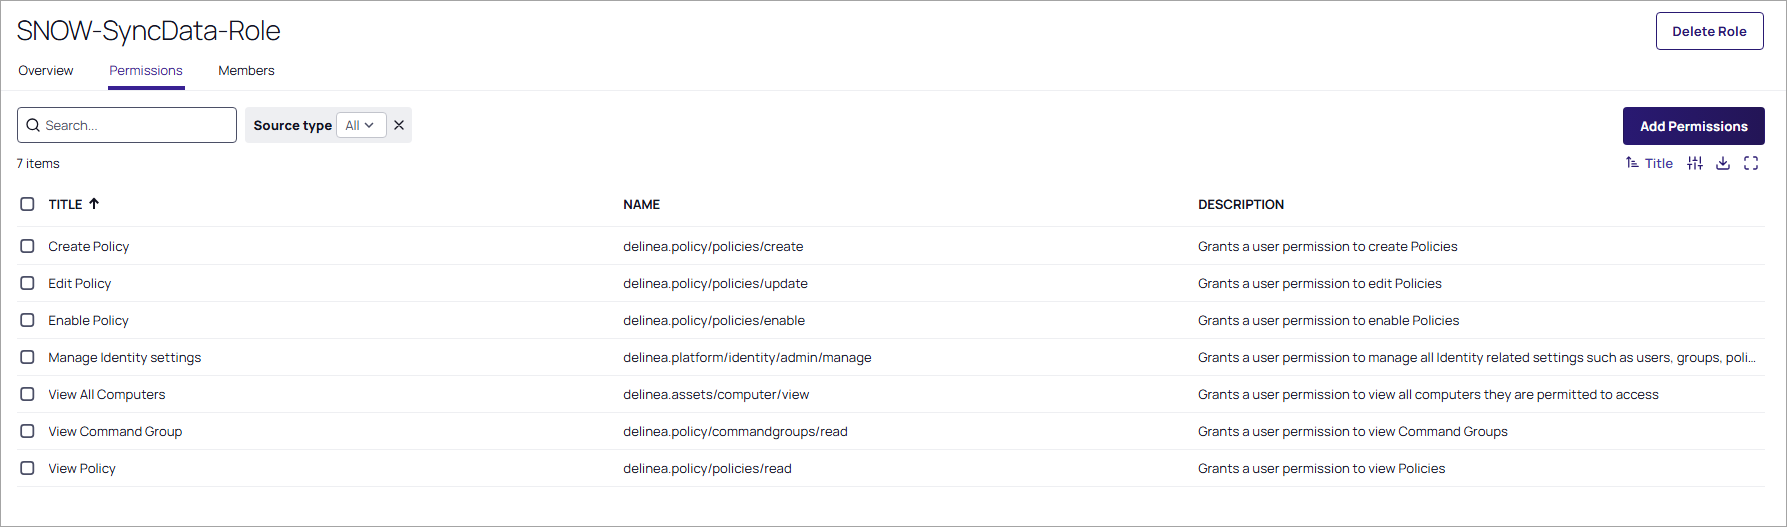
The service user must have a role with the following permissions in the Delinea Platform:
-
Create Policy
-
Edit Policy
-
Enable Policy
-
Manage Identity settings
-
View All Computers
-
View Command Group
-
View Policy
The following procedure describes how to create a role with these permissions and how to assign the role to the service user.
To create a role with the required permissions and assign it to the service user:
-
In the Delinea Platform, navigate to Access > Roles.
-
Select Add Role to create a new role.
-
In the New Role dialog, select Add New Custom Role, provide a name and an optional description for the new role, and select Save.
-
Go to the Permissions tab for the role.
-
Select Add Permissions and in the Add Permissions window, select the required permissions and select Assign.
You can search for the permissions by using the search box at the top, as shown below.
The Permissions tab shows the permissions added to the role.
-
Assign the role to the service user:
-
Navigate to Access > Users.
-
On the Users page, search for and select the service user.
-
On the user page, go to the Roles tab and select Assign Roles.
-
In the Assign Roles window, search for and select the role that you created and select Assign.
-