Adding Users
You can add local users directly to the platform. You can also add non-local users from Active Directories and Federation providers.
Although the Platform uses the terms, IT User and Business User, these are not user classifications but rather license types.
For more information see User Classifications.
Local Users
Adding local users to the Platform is not considered a best practice for privileged access management. Local user accounts should be added only rarely, and for very specific purposes. For example, you might need to add a local user account for someone who needs to try out Platform functionality for a very limited time. Vendors are also added as local users.
Typically, the Delinea Platform is used by a corporate enterprise to manage privileged access for their employees and contractors. A local user would typically be added by a Platform administrator, but a Platform administrator is not legally authorized to formally establish a person's identity. Only human resources personnel are legally authorized to formally establish a new employee's identity, for example by confirming their proof of residency, asking to see their driver's license or work visa, and taking their photograph. And only human resources can authorize that person to be added as a new employee to the corporate Active Directory, and to authorize their removal from the employee Active Directory.
Local users cannot be converted to external (Active Directory or federated) users.
(customers upgrading from Secret Server only) After the Connector is installed and Active Directory is set up on the platform, do not add an existing Secret Server user as a local Platform user, because doing so could cause synchronization issues between the Platform and Secret Server.
Adding Local Users
-
Open the Users page. (Use the Search box to find it, or from the left navigation, select Access > Users.)
-
Click Add Local User.
-
Fill in the required fields for Login name, Email, and Display name.
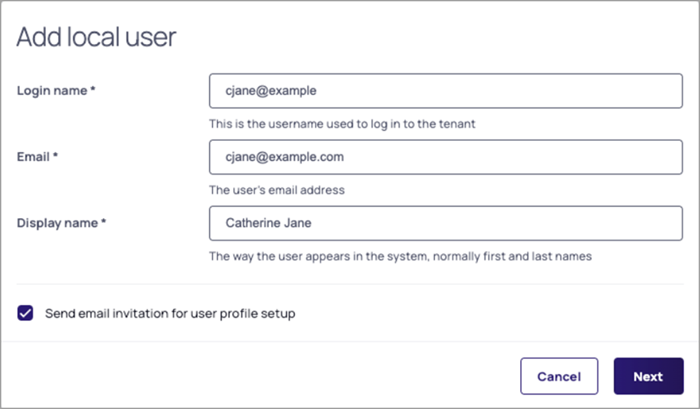
The checkbox Send email invitation for user profile setup is selected by default. If you leave this option selected, the user will automatically receive an email containing an Accept button, with a one-time password embedded in the button. When the user clicks the button, the Delinea Platform opens, and the user is automatically logged in with the one-time password. The user is then required to immediately change the password to log in again. The email invitation expires after 15 days.
If you choose to deselect Send email invitation for user profile setup, a panel opens where you can set a password for the user either manually or automatically. The user will not receive an email invitation to log in to the platform. Copy and save the password and deliver it to the user some other way.
-
Click Next.
-
(Optional) In the Advanced Settings window, you can make several optional settings to further define the user account. If you choose not to make these settings now, you can modify them later, after the user account is created. For more information, see Advanced Settings.
When finished, click Next.
-
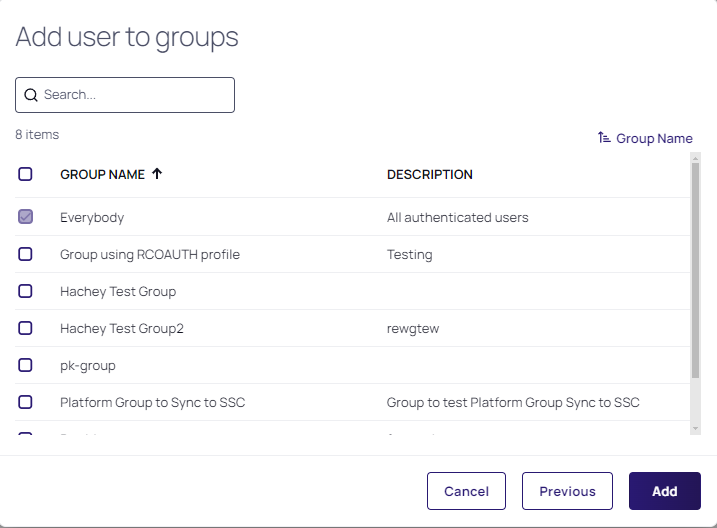
(Optional) Add the new user to one or more groups, if needed. Select the checkbox next to the name of each desired group.
When finished, click Add.
.
Bulk Importing Local Users
With the bulk import feature, administrators can import a large number of local users in a single operation, rather than manually adding each user one by one to the Delinea Platform Directory. This feature saves administrators time and effort by eliminating repetitive data entry and reducing errors. Additionally, it supports a CSV format template, allowing for offline preparation of user data, which can be efficiently organized before import.
The Platform does not natively support bulk import and synchronization of all users from an external source such as AD, or from a federation service. Platform administrators can find AD users to add to the Platform by performing filtered searches through external AD directories, but federated directories cannot be searched.
Workflow:
Steps:
-
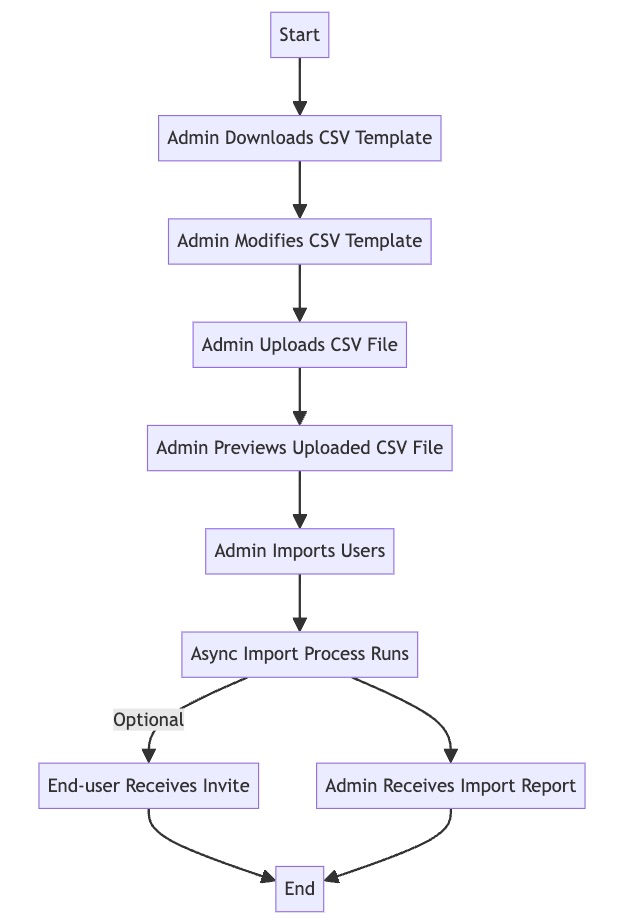
Log in to the platform.
-
Click Access from the left navigation, then select Users.
-
In the Users section, click Import Users.
-
Download the provided CSV template by clicking the respective option.
-
Open the downloaded CSV template and update it with the user account information you wish to add. Refer to the following guidelines:
-
All required fields must be present.
-
Each field must have a header.
-
Headers must match exactly as shown in the following table, including uppercase characters and spaces.
-
Attributes not listed in the following table must be defined in Settings > User attributes > Additional attributes. If the additional attributes are not defined, they will not be uploaded. The attribute names you define on the Additional Attributes page must exactly match the corresponding headers in the CSV file.
-
| Default Fields | Rules |
|---|---|
| Login Name | Required - Enter the full username, including the login suffix, in the form <login name>@<loginsuffix>. The login suffix must already exist. |
| Email Address | Required - You can specify one email address only. The email address must be of a valid form. Plain text strings, such as “N/A” or “unavailable”, are not allowed. |
| Display Name |
Optional - You can enter the display name in Excel using either format: This field is optional, but highly recommended. |
| Description | Optional - A description of the user. Do not use punctuation. The limit is 128 characters. |
|
Office Number Mobile number Home number |
Optional - You must enter the area code. You can enter domestic U.S. numbers in the following forms:
To enter an international number, use E.164 number formatting. If you use the phone or text message options for multi-factor authentication, the Office and/or Mobile numbers must be accurate. If the numbers are not accurate, the user cannot log in. |
| Groups | Optional - All regular users are automatically added to the Everybody group. You can specify multiple groups. Use commas to separate the groups. If you are editing the CSV file, surround the groups with quotes; for example, "group1,group2,group3". The group must already exist, and the names are case-sensitive. Service users are excluded from the Everybody group. |
| Expiration Date | Optional - Enter a date when the user account expires. If you do not set a date, the account does not expire. This field is not in the CSV template. |
| Password | Optional - Sets the password for the user. Password requirements are based on the password policy settings in Access > Identity Policies > [User] > User security > Password settings. |
| Require Password Change |
Optional - Specifies whether users must change the password upon the first successful login. The supported inputs are: False, f, no, n -- No password change required True, t, yes, y -- Password change required |
| Platform User Membership Type |
Optional - By default, the membership type is Employee. If you are adding vendors, be sure to change the membership type to Vendor. |
| Reports to | Optional - Name of the reporting manager. This field is not in the CSV template. |
-
After updating the CSV template, return to the Platform to upload the CSV file. Follow the same steps as before if you have exited from the Import Users flow. The file to upload must be: in CSV format, with a max size of 100 KB.
-
Proceed by clicking Next .
-
Review the first 15 records displayed in the preview. Use this opportunity to ensure that the entries are correctly formatted.
-
Once reviewed, click Next to proceed.
-
By default, the option Send email invite for user profile setup will be selected. If you wish to proceed with this option, the user will automatically receive an email invite to log into the platform. They will be prompted to change their password immediately upon login.
-
Finally, click the Import button to initiate the import of the users.
The user import process operates asynchronously and the duration of completion depends on the number of users being added. Following the import, two email messages will be dispatched:
-
Bulk import report: Sent to the initiating Admin, this email provides details on the number of new users specified in the file and the successful additions. Additionally, explanations are given for any failed user import.
-
Platform Invite: Sent to each newly created user if the "Send email invite for user profile setup" option was chosen. This email contains a link that directs users to the platform, where they can set up a new password unless configured otherwise.
Service Users
Service user accounts are designed for non-interactive, programmatic access to the Platform for scenarios such as API integrations and automation scripts. Service user accounts are not associated with regular users, and they are intentionally excluded from the predefined Everybody user group. Service users can be created directly within the Platform or sourced from existing Active Directory accounts.
Key Points:
-
Service users are not added to the predefined Everybody group. For more information on predefined groups, see Group Management.
-
Service users have no permissions by default. Add the user to the appropriate group or role to give it only the permissions it needs for its headless use case.
-
Service users cannot be invited like regular users; an administrator must manually create and configure them.
-
When a service user is created, a corresponding application account is automatically generated in Secret Server, requiring no additional actions.
The auto-generated Secret Server Application Account is sufficient for most API integration and automation use cases. However, some Secret Server features — such as Session Connector — require Application Accounts created directly in Secret Server with an explicitly set password. For these features, create the account in Secret Server rather than through the Platform Service User workflow.
-
Service users can log in interactively through the Platform UI by default. You can disable this feature through Identity policies by selecting the Disable interactive service user login option.
For details, see Creating and Assigning an Identity Policy. -
MFA is not applicable for non-interactive service users.
Adding Service Users
-
Navigate to the Users page to view the list of existing users.
-
On the Users page, click More in the top-right corner.
-
From the drop-down menu, select Add service user or Add external service user. If Add service user was selected, complete the required fields on the form.
-
Complete the required fields on the form:
-
Username: A unique identifier for the service user.
-
Email address: This field is optional.
-
Display name: A descriptive name for the service user, typically reflecting its purpose.
-
Set password: Set a secure password for the service user (Manual or Generated).
-
-
Assign the service user to the appropriate group based on its intended role and permissions. For external service users, you may view their existing group memberships from your external directory by toggling View AD Group Membership.
-
Save the service user details.
-
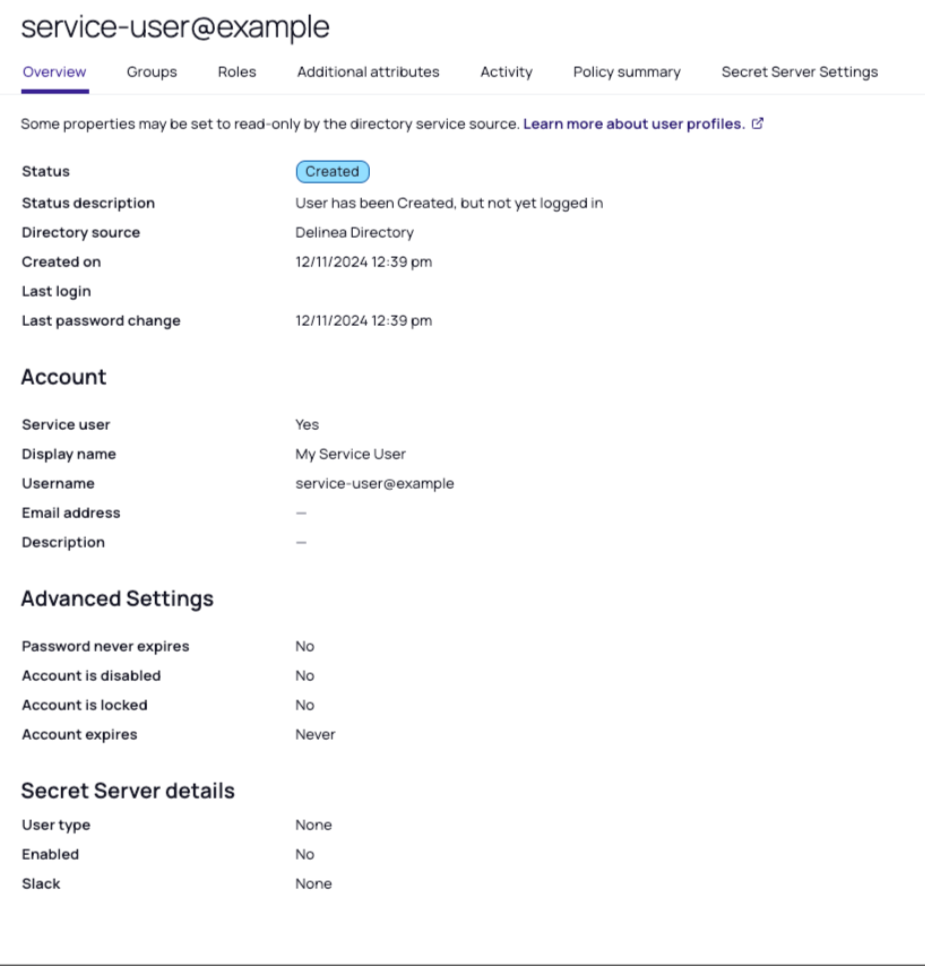
Verify that the service user appears on the Users list.
-
Click the service user name in the Users list to open the user page and ensure that the user has the correct groups and permissions assigned.
For more information, see: