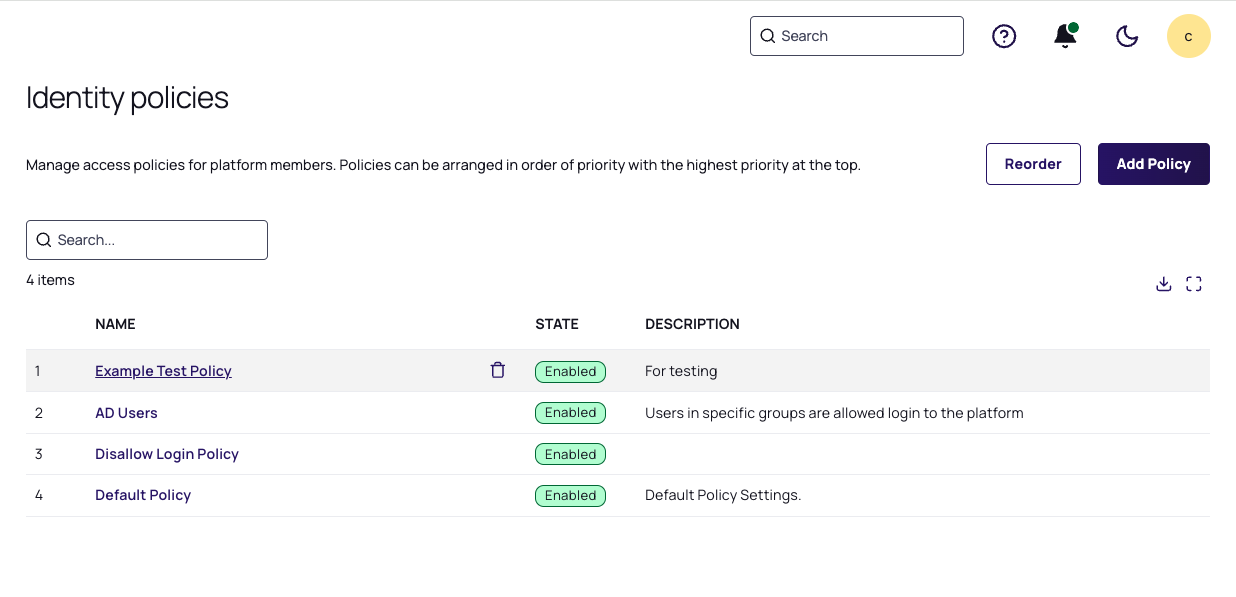
Identity Policies
To enable MFA on the Delinea Platform, you must set up identity policies and assign them to users. An identity policy determines whether and when a user is presented with the challenges specified in the associated Authentication profile (see Creating Authentication Profiles). Identity policies apply to all web log-ins to the Delinea Platform.
When creating a policy enabling a user to select or modify their authentication challenges (such as phone call, SMS, or FIDO2), do not require the user to complete the same challenge they are trying to set up. For example, when creating a policy enabling a user to select FIDO2 as an authentication challenge, do not use a profile that requires the user to complete the FIDO2 challenge. If you create such a defective policy, the user will be presented with the following error message: "Authentication Challenge Required. Cannot start step-up authentication flow. User does not have the attributes required to log in. Please contact your administrator."
Creating and Assigning an Identity Policy
-
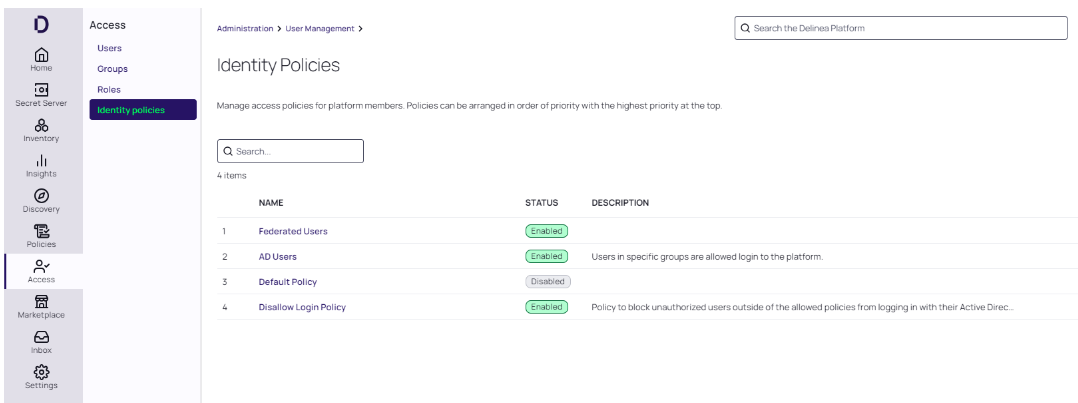
Navigate to the Identity Policies page.
-
Click Add Policy.
-
Optional: Select the box next to State if you wish to activate the policy.
-
Fill in the fields:
- Name: (required) The name must be unique on the platform.
- Description: (optional) The description should make it easy for others to identify the purpose of the policy.
-
At the top, select the Enabled checkbox if you wish to activate the policy.
-
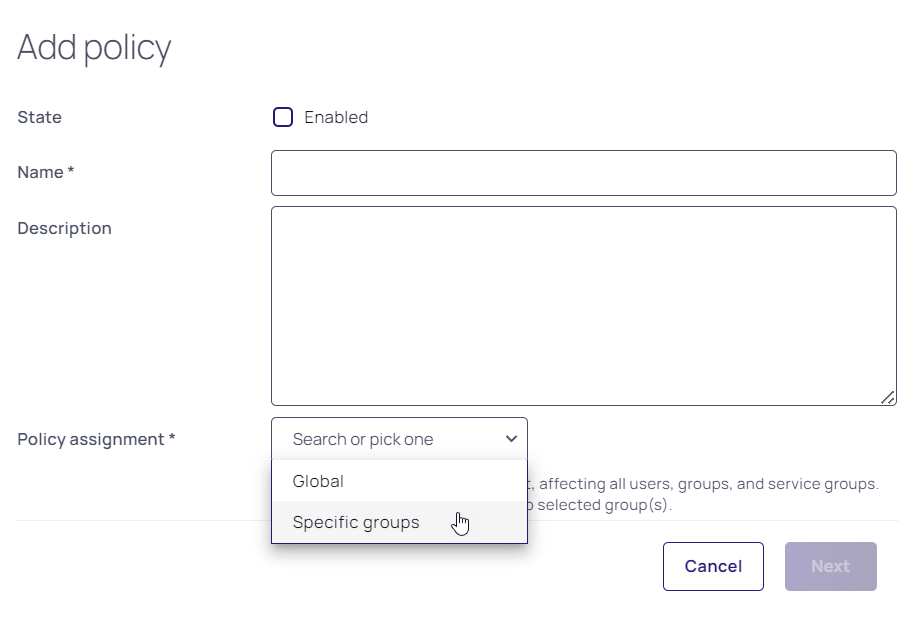
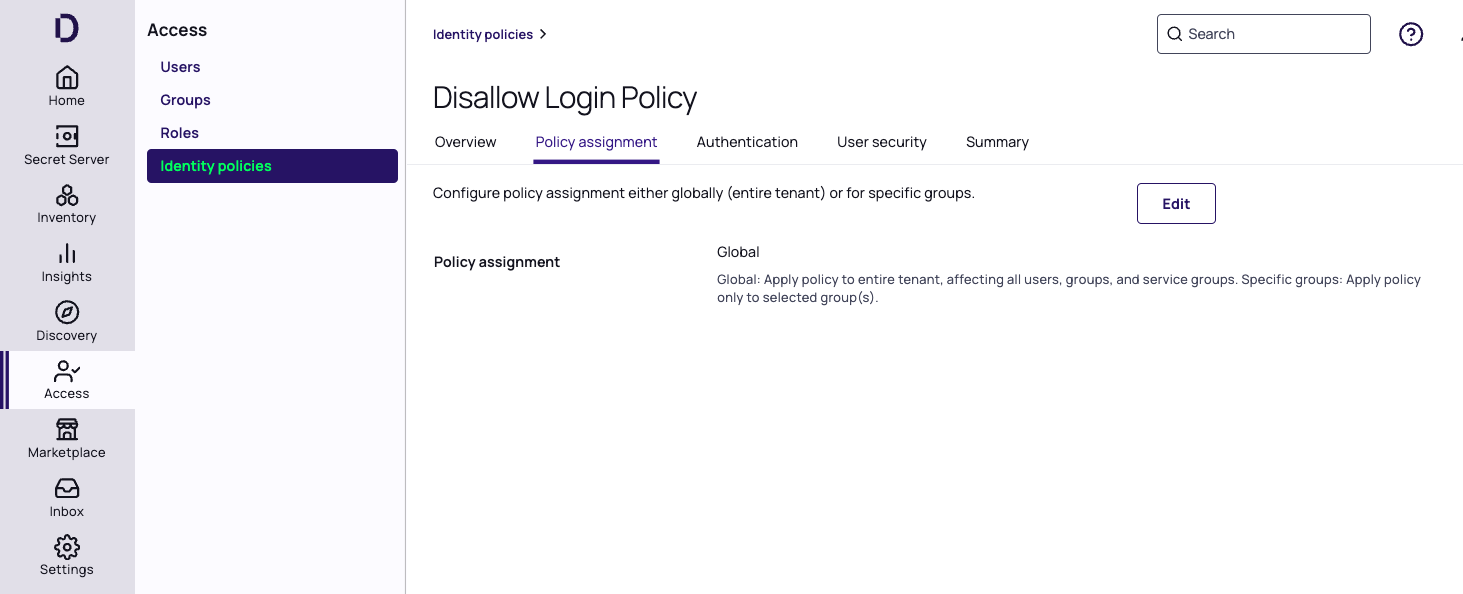
Next to Policy assignment, choose Specific groups. You can then apply the policy to specific users, groups, or service groups, tailoring the policy to the unique needs of different departments within your organization. If you select Global, the policy will apply to all users, groups, and service groups across the entire tenant. For example, you could lock yourself and everyone else out of the platform, so choose this option with great care.
-
Click Next.
-
Search for a group or select one or more groups from the list.
-
Click Add to create the policy.
For optimal policy implementation, consider assigning a new policy to a small test user group initially, before assigning it for real-world use. This approach allows you to recover gracefully from issues that might arise, with minimal impact.
Creating a Conditional Access Policy
On the Delinea Platform, a platform admin must limit platform log in access to specific groups while denying that access to other groups, using a combination of specific profile and policy settings.
If you select Deny platform authentication in the Default profile drop-down, and you configure no authentication rules in the next section, users will not be able to log in to the platform. This can be an efficient way to restrict users from gaining access to the platform.
To ensure that not ALL users are prevented from logging into the platform, make sure you assign some users appropriate log in policies and verify that those users can log in as expected.
Steps
-
Create a new policy with an intuitive name, such as Disallow Login Policy.
-
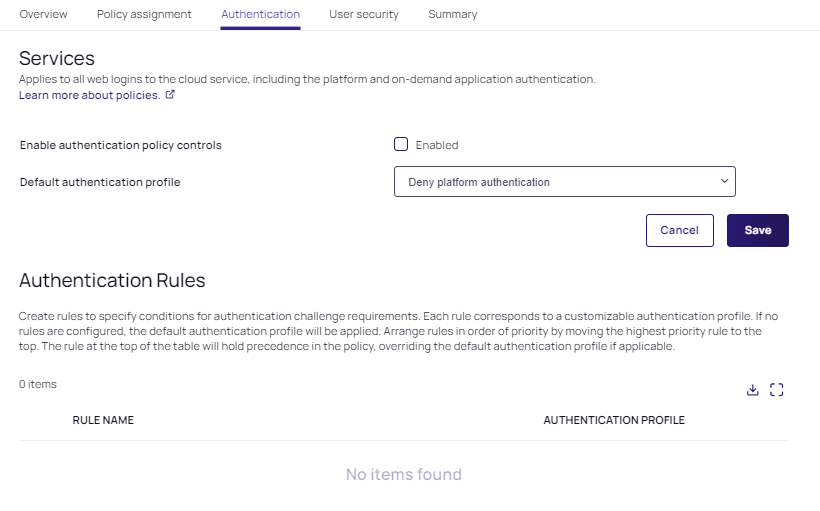
On the Authentication tab next to Default authentication profile, select Deny platform authentication from the drop-down.
-
Configure no authentication rules.
-
Apply the policy to users you wish to prevent from logging into the platform.
-
Send the Disallow Login Policy you created to the bottom of the list to trigger last, because the platform searches policies for rules in stack ranked order. All policies not at the bottom should target the groups of users that need access to login to the platform.
The policy and policy order creates conditional access where only the Active Directory Group users are granted access...
... and all other users, per the Global assignment, are not allowed to log in:
Updating an Identity Policy
-
Navigate to the Identity Policies page.
-
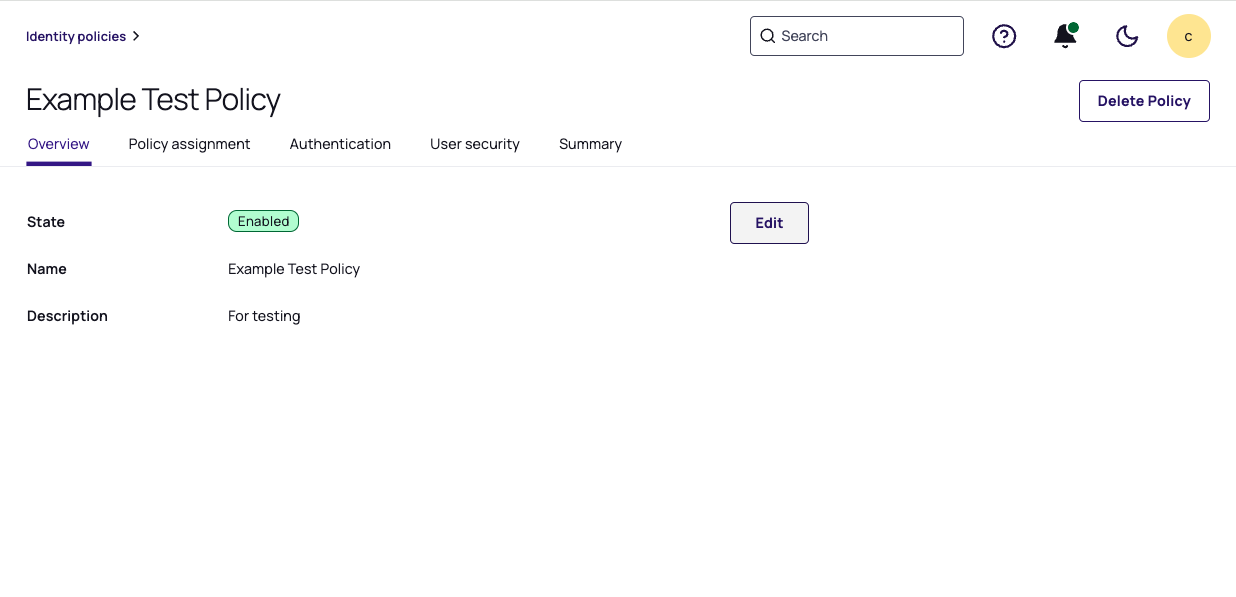
Click the policy you want to edit.
The policy page opens to the Overview tab, which displays the policy state, name, and description.
-
Click Edit.
-
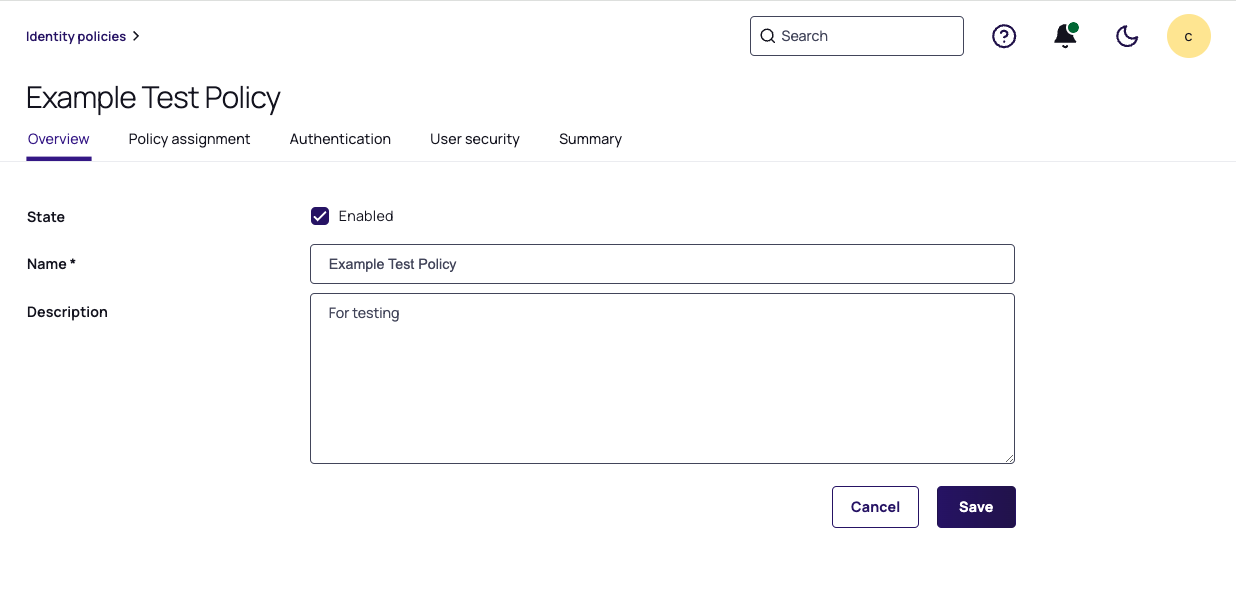
If you want the policy to be active, select the box next to Enabled if it is not already selected.
-
Update the Name and Description fields as desired.
-
To update the group policy assignment:
-
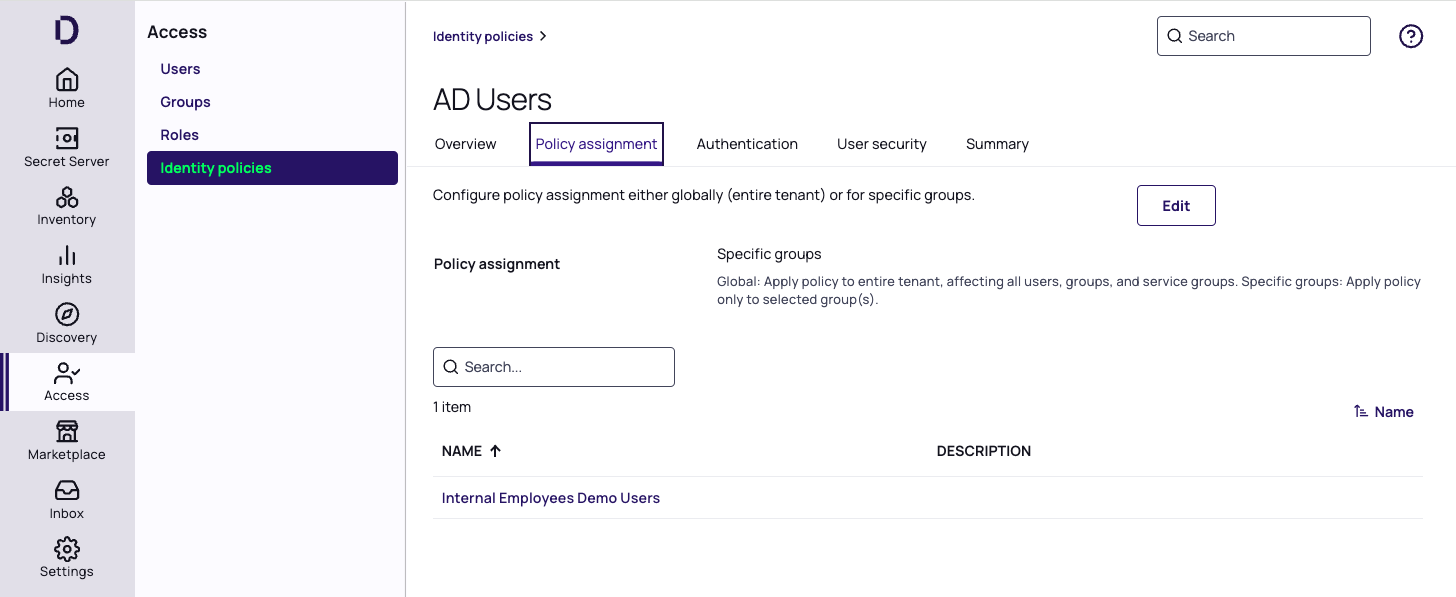
Click the Policy assignment tab.
-
Click Edit.
-
Click Assign Groups.
-
Search for or select one or more groups from the list.
-
Click Assign.
-
To unassign a group from the policy, select the policy and click the trash icon next to the group name.
-
-
Click Save.
Authentication
Click the Authentication tab. The tab displays information on the policy's Services, Authentication Rules, Browser Session Parameters, Credential Manager Application Session Parameters, and Other Settings.
Services
-
In the Services section, click Edit.
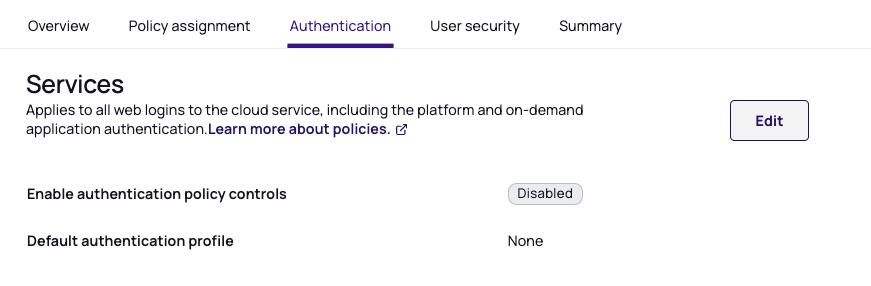
-
For Enable authentication policy controls, select the box next to Enabled.
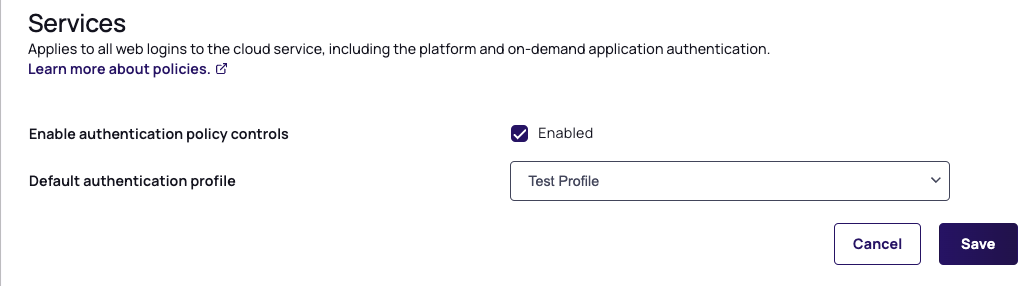
-
Select a default profile from the dropdown options.
If you select Deny platform authentication from the Default authentication profile drop-down, and you configure no authentication rules in the next section, users will not be able to log in to the service.
-
Click Save.
Once you enable authentication policy controls, you can configure the rest of the policy options on the same page.
Authentication Rules
Build rules to define conditions for authentication challenge requirements. Each rule maps to a customizable authentication profile. The default profile is used if no rules are configured. See Tenant IP Restrictions
-
In the Authentication Rules section, click Edit.
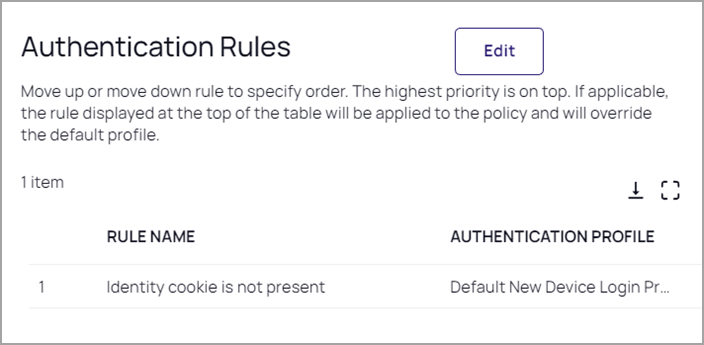
-
Click Add rule.
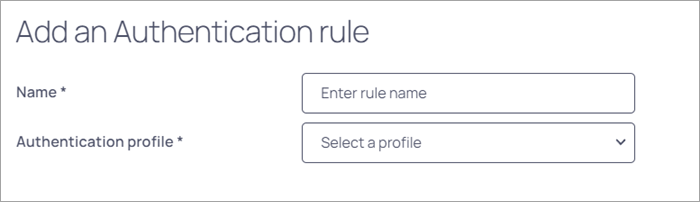
-
Enter a Name for your new authentication rule.
-
Select an Authentication profile to associate with the rule.
-
Click Add new filter.
-
Select the desired Filter.
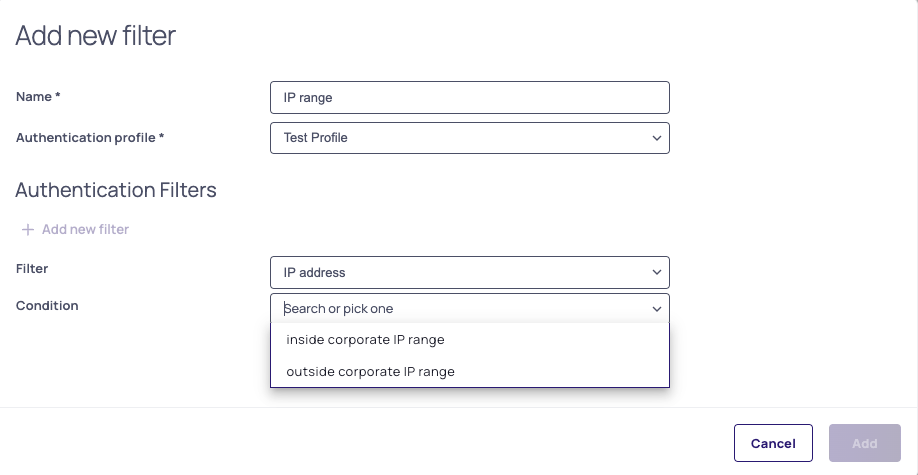
-
Select the desired Condition.
-
Click Save.
-
Add more filters as desired.
-
After adding filters, click Add. Your new rule appears on the Authentication Rules page, with its name and authentication profile displayed.
| Available Settings | Description |
|---|---|
| Authentication Rules | Build rules to define conditions for authentication challenge requirements. Each rule maps to a customizable authentication profile. The default profile is used if no rules are configured. |
| Default Profile | The profile platform used if no profile is added/selected. New profiles can be added from here or from Settings > Authentication Profiles. |
Browser Session Parameters
- In the Browser Session Parameters section, click Edit.
- Use the following table to make your selections, then click Save.
| Available Settings | Description |
|---|---|
| Allow 'Keep me logged in' checkbox option at login (session spans browser sessions) | Enables the user to select the option to select Keep me logged in at login. Persists session cookies across browser sessions. |
| Session Length (in Hours)when 'Keep me logged in' option enabled | Number of hours "Keep me logged in" checkbox enabled by default for users. Default = 12 hours, minimum value = 1 hour, maximum value = 24 hours |
| User Idle Timeout | The value is set in minutes. It controls the idle time before the user's session expires. Default = 15 minutes, minimum value = 1 minute, maximum value = 720 minutes. |
The platform's User Idle Timeout for browser sessions applies equally to PRA sessions. You cannot modify user idle timeout settings specifically for PRA connections.
Session lifetime also depends on Connector-to-AD health and reachability, and a QuickValidate process can revoke sessions independently of the idle/session timers.
See Federated Users Experiencing Unexpected Session Logouts.
Mobile Session App Parameters
- In the Mobile Session App Parameters section, click Edit.
- Use the following table to make your selections, then click Save.
| Available Settings | Description |
|---|---|
| Session Length (Days) | Applicable to the mobile app only. This setting keeps the user's session alive on the mobile app. When the session length is reached, the user must authenticate with the platform again. Default = 14 days, minimum value = 1 day, maximum value = 90 days. |
Other Settings
In the Other Settings section, click Edit. 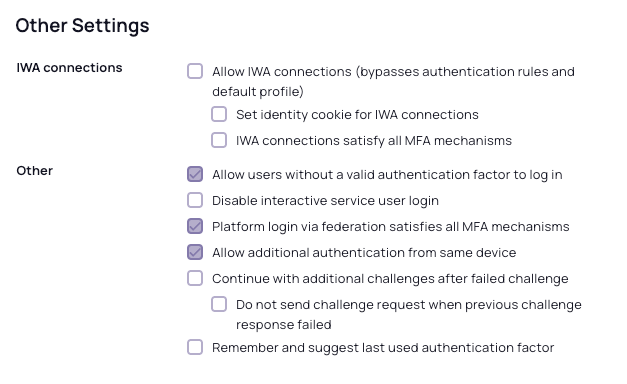
Use the following information to make your selections, then click Save.
IWA Connections
-
Allow IWA Connections (bypasses authentication rules and default profile)
Allows platform to bypass already configured authentication rules and default authentication profiles when IWA is configured. This option is configured by default.-
Set identity cookie for IWA Connections
Enables the platform to write a cookie in the current browser after a successful IWA-based log in. The platform checks the browser for this cookie when the user logs in to the platform. As long as the cookie is there, the user is not prompted for multi-factor authentication. -
IWA Connections satisfy all MFA mechanisms
Optional. Configure Delinea Platform to use IWA to override all application-specific authentication requirements.
-
Other
-
Allow users without a valid authentication factor to log in
Exempts users from multi-factor authentication when their account does not contain a mobile phone number and email address, and cannot satisfy the applied policies. -
Disable interactive service user login
Disabled by default. Enabling this option disables interactive login for service users. -
Platform log in via federation satisfies all MFA mechanisms
Enabled by default. If a user is successfully authenticated through Federation, they will not be required to complete additional MFA steps. -
Allow additional authentication from same device
Disable this option to block all authentication methods to the same device except Password, Email, Security Questions, and 3rd Party RADIUS. -
Continue with additional challenges after failed challenge
Notifies users of a failed authentication after the first failed challenge.-
Do not send challenge request when previous challenge response failed
Configures the platform to handle the default MFA behavior (allow users to step through all the relevant MFA challenges before we notify them of their failed authentication attempt) differently, based on the challenge type.
-
-
Remember and suggest last used authentication factor
Remember the authentication method that was used most recently.
User Security
Click the User Security tab, where you can configure settings under sub-tabs for Self Service, Password Settings, OATH OTP, RADIUS, User Account Settings, and Authentication Settings.
Self Service
-
Click the Self Service sub-tab.
-
Click Edit, then select Enabled.
-
Click Save.
The page displays three configuration areas:
- Password Reset
- Account Unlock
- Additional Policy Parameters
Password Reset
-
Click Edit.
-
Password reset status: select Enabled.
-
Select one or more of the checkboxes:
- Allow for Active Directory Users
- Only allow from browsers with identity cookie
- User must log in after successful password reset
-
Password reset authentication profile: Select Default Password Reset Profile from the drop-down. When a user clicks "forgot password" at the platform log in page, the Default Password Reset Profile presents the user with one or two non-password challenges. When the user meets these challenges, the user is presented with the reset password workflow.
-
Maximum consecutive password reset attempts per session: Select the desired number of reset attempts from the dropdown list.
Account Unlock
Account Unlock applies to local/AD accounts only. It does not apply to federated accounts.
-
Account unlock status: select Unlocked.
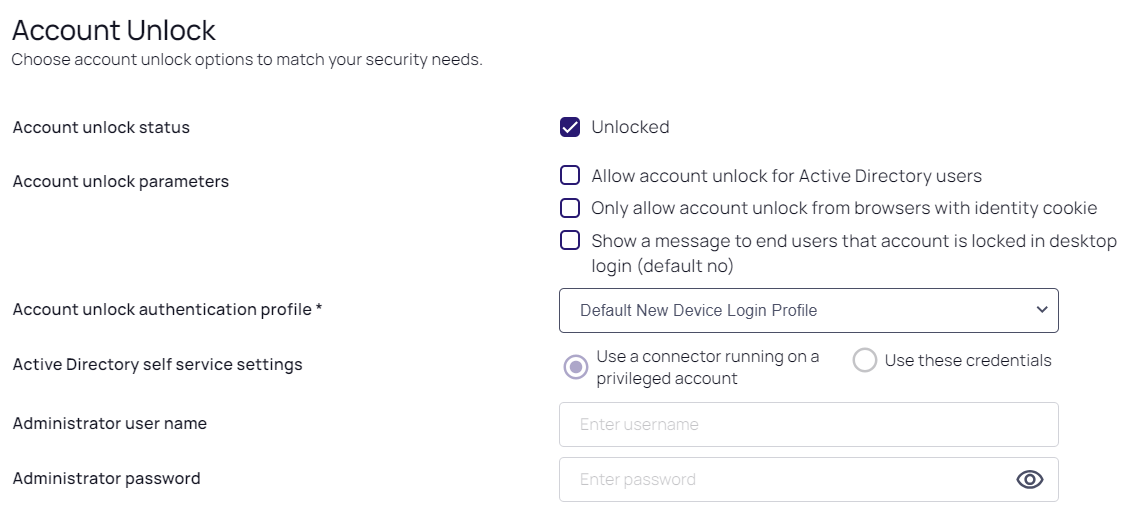
-
Account Unlock Parameters: Select one or more checkboxes:
-
Allow account unlock for Active Directory Users
-
Only use account unlock from browsers with identity cookie
-
Show a message to end users in desktop login that account is locked (default: no)
-
-
Account unlock authentication profile: Select a profile from the dropdown list.
-
If you checked Allow account unlock for Active Directory Users, you can choose a setting in Active Directory self service settings:
- Use connector running on privileged account
- Use these credentials
-
If you select Use these credentials, fill in the fields for Admin User Name and Admin User Password.
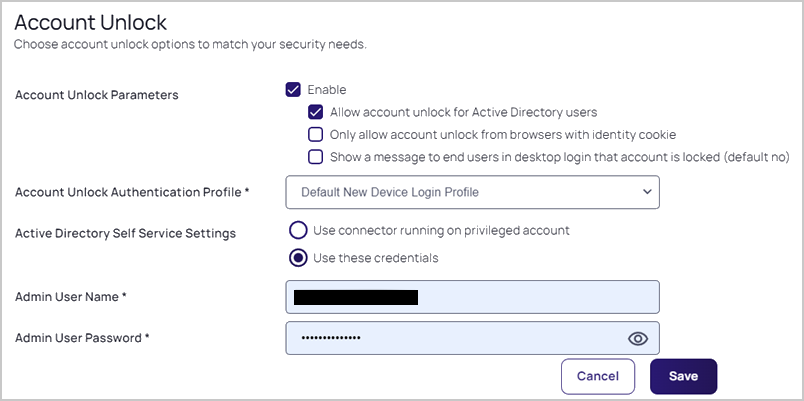
-
Click Save.
Additional Policy Parameters
-
Click Edit.
-
Select the desired options from the dropdown menus:
- Maximum forgotten password resets allowed within window (default: 10)
- Capture window for forgotten password resets (default: 60 minutes)
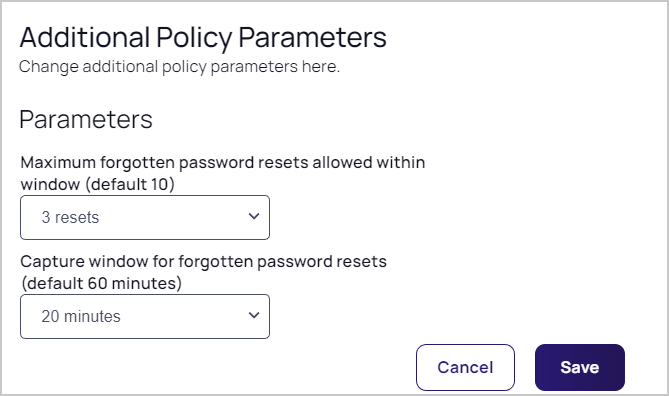
-
Click Save.
Password Settings
You can enable users to perform certain tasks related to their accounts.
To access and enable the Password Settings options:
- Select User Security > Password Settings.
- Configure the options below.
Password Requirements
| Available Settings | Description |
|---|---|
| Minimum password length (default 8) | Use the drop-down list to select the minimum length required for a password or "--" to use the default setting, which is 8. |
| Maximum password length (default 64) | Use the drop-down list to select the maximum length required for a password or "--" to use the default setting, which is 64. |
| Require at least one digit (default yes) | Select Yes to require the user to have at least one digit in the password, No to require no digits in the password, or "--" to use the default setting, which is Yes. |
| Require at least one upper case and one lower case letter (default yes) | Select Yes to require the user to have at least one upper case and one lower case (total two letters) in the password, No to require no letters in the password, or "--" to use the default setting, which is Yes. |
| Require at least one symbol (default no) | Select Yes to require at least one symbol, No to require no symbols, or "--" to use the default setting. The default is No. |
Display Requirements
| Available Settings | Description |
|---|---|
| Show password complexity requirements when entering a new password (default no) | Enabling this policy displays the password complexity requirements when updating a user account password. The default value "--" is equivalent to No. |
| Password complexity requirements for directory services other than Delinea Directory | Password complexity requirements for Delinea Directory users are automatically discovered but all other directory services require manually entering a complexity requirement string. |
Additional Password Setting Requirements
| Available Settings | Description |
|---|---|
| Limit the number of consecutive repeated characters | Password cannot contain consecutive repeated characters equal to or more than the set value. The default is to allow consecutive repeated characters. |
| Check against weak password | Select Yes to check password-strength, No to save password without password-strength checking, or "--" to use the default setting, which is No. |
| Allow username as part of password | Select Yes to allow username in the password, No to disallow username in the password, or "--" to use the default setting, which is Yes. |
| Allow display name as part of password | Select Yes to allow part of displayname in the password, No to disallow part of displayname in the password, or "--" to use the default setting, which is Yes. |
Password Age
| Available Settings | Description |
|---|---|
| Minimum password age before change is allowed (default 0 days) | The default is 0 days. Users will not be allowed to change or reset their password until the current password is at least this old. |
| Maximum password age (default 365 days) | The default is 365 days. After the password expires, users are prompted to enter their current password and then enter a new one. Enter 0 (zero) if you do not want to specify a password expiration period. |
| Password history (default 3) | Use the drop-down list to select the number of most recent passwords to save or "--" to use the default setting. The user cannot re-use the passwords on this list. The number you enter is displayed in the message when the user is prompted to enter a new password. |
| Password Expiration Notification (default 14 days) | Select the number of days before a user's password expires to begin posting a notification of expiration through a portal banner. This policy applies to Delinea Directory (local Platform) users. |
| Escalated Password Expiration Notification (default 48 hours | Select the number of hours before a user's password expires to present a change password dialog. The dialog is automatically displayed when the user logs in. This policy applies to Delinea Directory (local Platform) users. Note: This policy is not supported on mobile clients. |
| Enable password expiration notifications on enrolled mobile devices | When enabled, password expiration notifications are sent to registered mobile devices. The default setting "--" is equivalent to Yes. |
Capture Settings
| Available Settings | Description |
|---|---|
| Maximum consecutive bad login attempts allowed within window (default Off) | Use the drop-down list to select the number of failed password attempts allowed within the period you specify in the "Capture window for consecutive bad password attempts" policy before the user is locked out, Off to allow the user an unlimited number of failed attempts, or "--" to use the default setting. Users are locked out for the time period you specify in the "Lockout duration before password re-attempt allowed" policy when they fail in the attempt after the number you select. |
| Capture window for consecutive bad login attempts (default 30 minutes) | Enter the number of minutes to define the time period before the number of failed password attempts is reset. This time period is only applicable when the "Maximum consecutive bad password attempts allowed within window" policy defines the number of failed attempts allowed and is not set to Off. The user is locked out for the time period you set in the "Lockout duration before password re-attempt allowed" policy. After that, the user can attempt to log in again. |
| Lockout duration before login re-attempt allowed (default 30 minutes) | Enter the number of minutes users must wait before they can attempt to log in again after lockout. |
| Limit number of login attempts | Account locks after exceeding this number of failed login attempts. |
OATH OTP
-
Click the OATH OTP sub-tab.
-
Click Edit.
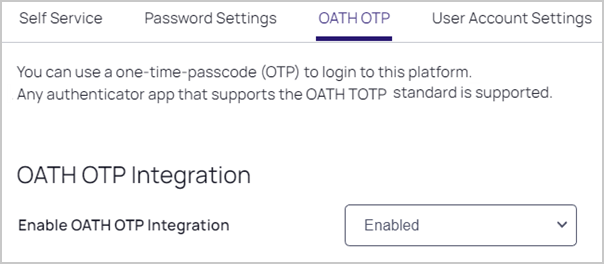
-
Select Enabled from the dropdown list.
-
Click Save.
RADIUS
-
Click the RADIUS sub-tab.
-
Select Enabled from the dropdown list to enable RADIUS.
User Account Settings
-
Click the User Account Settings sub-tab.
-
Click Edit.
-
Make your selection from the dropdown list.
-
Click Save.
Authentication Settings
-
Click the Authentication Settings sub-tab. Each authentication setting is labeled either Active or Not Set.
-
Click Edit.
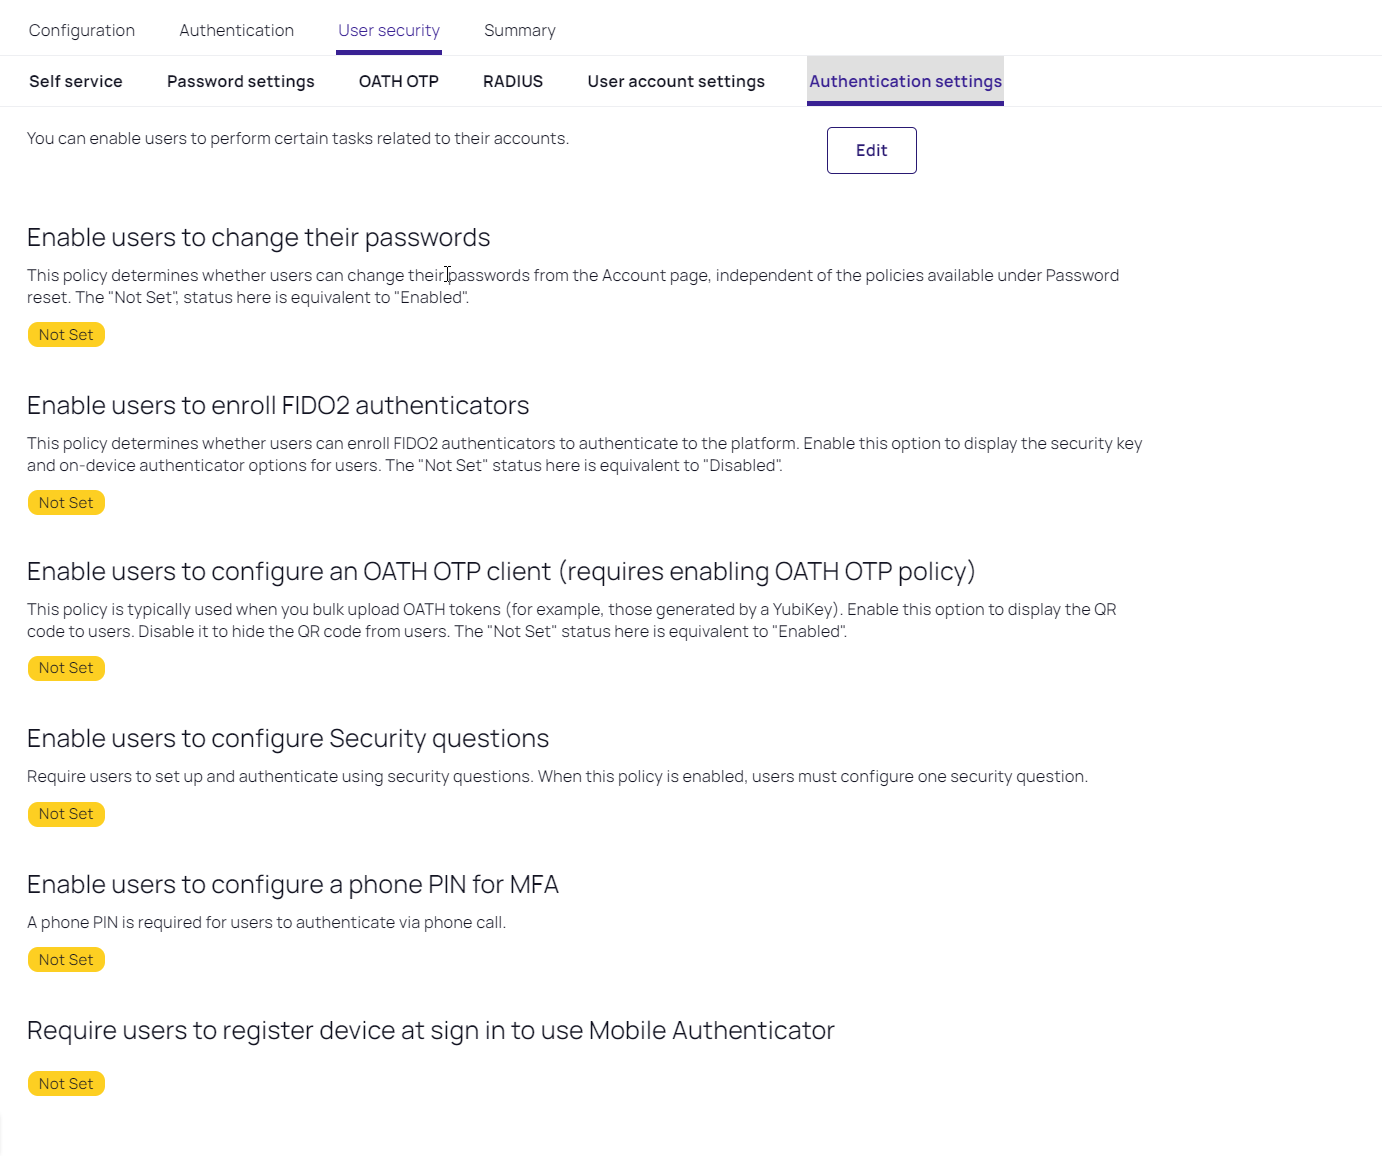
The page displays the following sections. Under each section heading is a dropdown list where you can choose Enabled, Disabled, or Not Set:
-
Enable users to change their passwords
-
Enable users to enroll FIDO2 authenticators
-
Enable users to configure OATH OTP client (requires enabling OATH OTP policy)
-
Enable users to configure Security questions
-
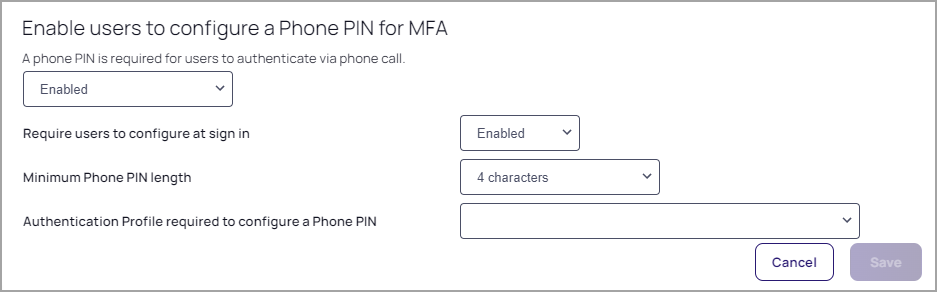
Enable users to configure a Phone PIN for MFA
-
Require users to register device at sign in to use Mobile Authenticator.
-
-
Make your desired choices in each section.
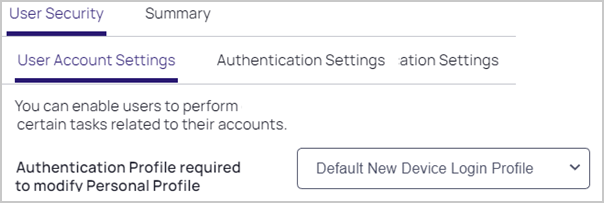
For each user capability that you enable, more fields appear where you can configure additional settings, including the authentication profile required for the user to access the capability, as shown in the images below.
When selecting a profile in Authentication profile required to..., do not select the default user login profile. If you do, the user could get locked out of the platform by entering an endless authentication loop.
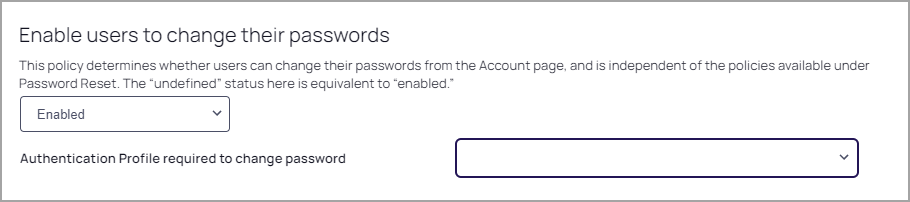
Enable users to change their passwords
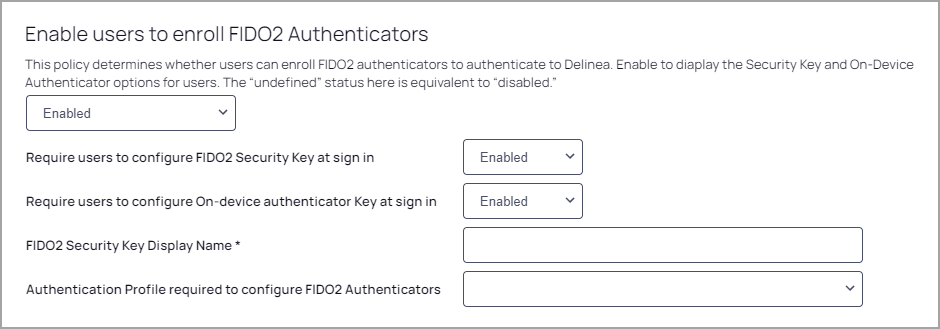
Enable users to enroll FIDO2 Authenticators
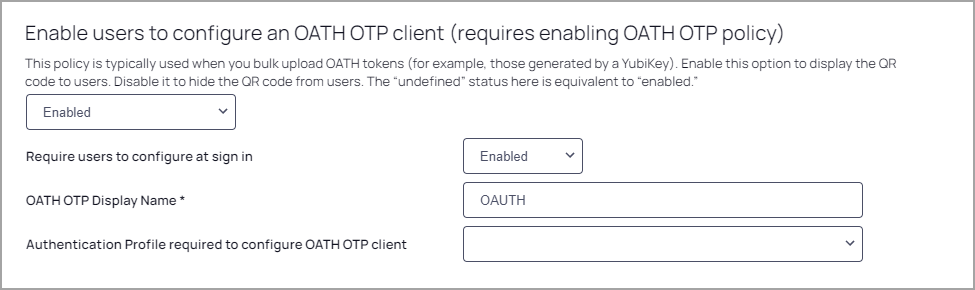
Enable users to configure an OATH OTP client
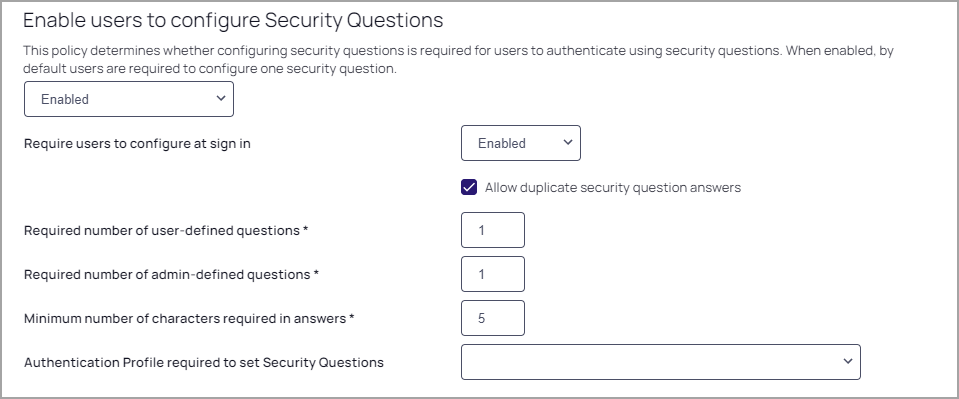
Enable users to configure Security Questions
Enable users to configure a Phone PIN for MFA
Require users to register device at sign in to use Mobile Authenticator

-
When you are finished making your selections, click Save.
The page displays the sections listed below, and under each section heading is a dropdown menu where you can choose Enabled, Disabled, or Not Set:
-
Enable users to change their passwords
-
Enable users to enroll FIDO2 Authenticators
-
Enable users to configure OATH OTP client (requires enabling OATH OTP policy)
-
Enable users to configure Security Questions
-
Enable users to configure a Phone PIN for MFA
-
Require users to register device at sign-in to use Mobile Authenticator.
For each user capability that you enable, more fields appear where you can configure additional settings, including the authentication profile required for the user to access the capability, as shown in the images below.
When selecting an Authentication profile required to..., do not select the default user login profile. If you do, the user could get locked out of the platform by entering an endless authentication loop.
Enable users to change their passwords
Enable users to enroll FIDO2 Authenticators
Enable users to configure an OATH OTP client
Enable users to configure Security Questions
Enable users to configure a Phone PIN for MFA
Require users to register device at sign-in to use Mobile Authenticator
When you are finished making your selections, click Save at the bottom of the page.
Users with the Manage Identity Settings permission can bypass the required MFA setup.
See Platform Permissions
Summary
The Summary tab displays comprehensive information about the configured identity policy settings. The page does not provide editing capabilities, because all of these policies are added, changed, and removed elsewhere.