Configuring Delinea MidServer Utility for PAS
After establishing the basic requirements for creating a service account and a discovery secret, you need to run the Delinea MidServer Setup Utility. This utility is designed to generate all necessary parameters while providing a secure and reliable method for storing user credentials, avoiding the use of plain text in the MidServer configuration file. It facilitates the configuration of the connection between your MID Server and Delinea Platform.
Starting with version 5.0, the Delinea MidServer Setup Utility introduces a graphical UI mode that simplifies configuration. You can now launch the setup utility and complete MID Server configuration directly through the UI instead of manually editing files or running all commands from the console.
UI Restrictions
If the Linux system runs in a headless configuration (for example, when the DISPLAY environment variable is unset or no GUI session is active), JavaFX fails to initialize its graphics subsystem. As a result, the UI utility does not launch and throws a toolkit initialization exception.
If you cannot enable or access a graphical display session on the Linux VM, use the command-line utility instead. The command-line utility provides the same configuration capabilities and does not require a graphical environment.
Step 1: Run the Delinea MidServer Setup Utility
Before running the Delinea MidServer Setup Utility, ensure the following:
-
Java Requirement:
-
You can use the bundled Java included with the ServiceNow MID Server to run the setup utility. No separate Java installation is required.
-
Open Command Prompt and navigate to the following folder:
C:\servicenow\agent\jre\bin -
Then run the setup command to open the Delinea MID Server Setup Utility UI:
java -jar C:\servicenow\agent\extlib\DelineaMidServerSetupUtility.jar
-
This uses the same built-in Java runtime that the ServiceNow MID Server uses (<MID Server>\agent\jre\bin), ensuring compatibility and eliminating the need for an external Java installation.
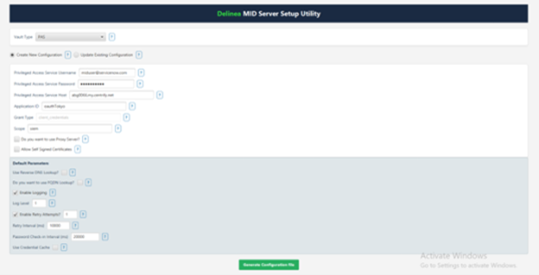
Step 2: Create New Configuration
This section guides you through creating or updating a PAS configuration for your MID Server. The setup generates the required parameters and updates the config.xml file.
-
In the Vault Type field, select PAS from the dropdown.
-
Select the Create New Configuration checkbox.
-
Provide the following information:
-
In the Privileged Access Service Username field, enter the PAS service account username. This account is used to authenticate the MID Server with PAS.
-
In the Privileged Access Service Password field, enter the PAS service account password. Credentials are encrypted in the configuration file.
-
In the Privileged Access Service Host field, enter the PAS host URL. This is the endpoint your MID Server connects to.
-
In the Application ID field, enter the application ID registered in PAS for this integration.
-
The Grant Type field is set to client_credentials by default; this determines the OAuth2 flow used for authentication.
-
In the Scope field enter the OAuth scope that matches what your Secret Server (PAS) API requires for authentication.
-
-
Select additional(optional) parameters as needed.
-
If you want to allow self signed certificates select the Allow Self Signed Certificates checkbox.
-
If you know you want to use a proxy server, select the Use Proxy Server checkbox and then provide the Proxy host and port.
-
-
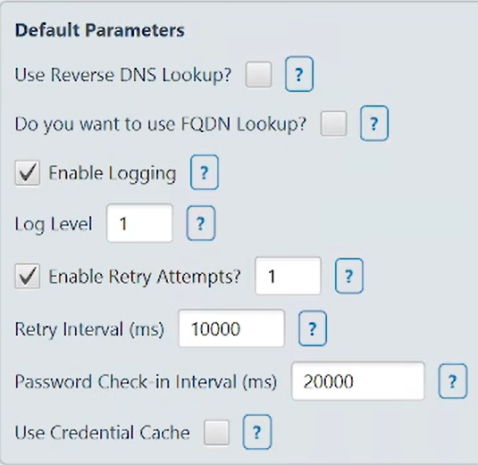
Default Parameters
-
Select the Use Reserve DNS Lookup? checkbox to enable the plugin to perform a reverse DNS lookup.
-
Select the Do you want to use FQDN Lookup? checkbox to enable the plugin to perform a FQDN lookup.
-
Select the Enable Logging checkbox to to enable additional logging other than the default one.
-
In the Log Level field, log the information based on the requirement. Value can be either 1, 2, 3 or 4.
-
In the Enable Retry Attempts? field, set custom retry attempts to handle request failures. The value should be a number between 0 and 5.
-
In the Retry Interval (ms) field, set custom retry interval for each retry attempt.
-
The default value is 3000 (in milliseconds) when this parameter is not defined.
-
The minimum value should be 1000 and maximum should be 10000.
-
-
In the Password Check-in Interval (ms) field, set the delay (in milliseconds) before the retrieved password is checked back into PAS. This allows sufficient time for tasks to complete when password rotation after check-in is enabled.
-
When Use Credential Cache is enabled, Resolver creates a cache file named DelineaCredCache.properties in the MID Server directory. This file securely stores encrypted account passwords and maintains Base64-encoded mappings of FQDNs to IP addresses, allowing faster access to previously retrieved credentials.
-
-
Click Generate Configuration File, and then select the Config.xml file located in the mid server's agent folder to save your updates.
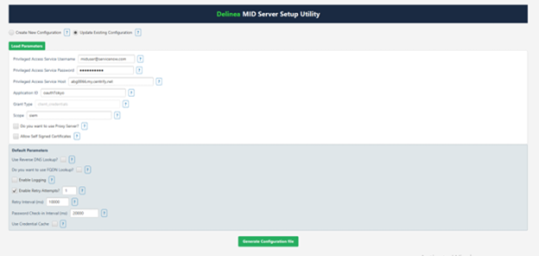
Step 3: Update Existing Configuration
The Update Existing Configuration option lets you modify an existing config.xml file for your MID Server.
-
In the Vault Type field, select PAS from the dropdown.
-
Select the Update Existing Configuration checkbox.
-
Click Load Parameters to import the current settings from your config.xml file.
-
Modify any parameters as needed.
-
Click Generate Configuration File, and then select the Config.xml file located in the mid server's agent folder to save your updates.
A confirmation message appears: Parameters updated in config.xml
-
Click Ok.
-
Open the config.xml file to see all the parameters that you just configured being reflected in the file.
The config.xml file contains the following attributes:
| Parameter | Value Description |
|---|---|
| pas_auth_str | This parameter is set to an encrypted string generated by the encryption utility containing the username and password of the PAS Server. |
| host | The URL you use to access PAS. |
| application_id | Required value: oauth_2_client. |
| grant_type | Required value: client_credentials. |
| scope | Required value: passwordCheckout. |
| proxy_host | This field will likely be blank, unless you know a proxy needs to be used to get out to the internet from your MID Server. |
| proxy_port | This field will likely be blank, unless you know a proxy needs to be used to get out to the internet from your MID Server. |
| vault_type | This parameter should set to PAS as the credentials are to be validated with Privileged Access Service. |
| credential_lookup_type | Required value: narrow. |
| is_logging | This parameter can be set to either true or false to enable additional logging other than the default one. Along with this parameter we have to set the LogLevel. |
| log_level |
This parameter allows you to log based on the requirement. Value can be either 1, 2, 3 or 4.
|
| allow_self_signed_certificates | This parameter can be set to either true or false to allow self-signed certificates for getting a token. By default the plugin does not allow self-signed certificate so if a PAS is using a self-signed Certificate then we need to add this parameter and set it to true. |
| password_checkin_interval | An optional parameter to delay the password check-in. It can be beneficial when a configuration to rotate a password after check-in is set to true in PAS. User will get some period to perform required task at ServiceNow before the password is rotated. The required value for this parameter is 60000 (in milliseconds). It is available to set another value as per the requirement. |
| use_reverse_dns_lookup | This parameter allows plugin to perform a reverse DNS lookup. This can be set to either true or false. It is optional and the default value is false, if undefined. |
| use_fqdn_lookup | This parameter allows plugin to perform a FQDN lookup. This can be set to either true or false. It is optional and the default value is false, if undefined. |
| look_up_order | This parameter is a list of three values IP, DNS and FQDN. User to enter at-least one of the three values. It is an optional parameter and the default value is IP, if undefined. Refer to Performing Lookups to identify the resources in PAS Server section for more details about lookups. |
| allow_fqdn_based_on_localhost | In some networks, the remote machine does not return the FQDN, so this parameter will be useful to increase the success rate to identify the systems having FQDN configured in PAS. This parameter allows a plugin to form an FQDN by identifying the domain name of its localhost/MID Server and append it with the FQDN of a remote machine. This can be set to either true or false. |
| retry_attempts |
This is an optional parameter to set custom retry attempts to handle request failures. The value should be a number between 0 and 5. If the parameter is not defined, then the default retry attempt is 3. If the value is 0 then no retries will be attempted. The maximum supported retries are 5. Any value greater than 5 will be ignored and considered to be max value (5). Retry attempts are performed if there are failures in fetching systems from the PAS. When lookup parameters are defined, then the lookUpOrder items will be executed sequentially in each retry attempt considering the failure in fetching the details. |
| retry_interval |
This is an optional parameter to set custom retry interval for each retry attempt. The default value is 3000 (in milliseconds) when this parameter is not defined. The minimum value should be 1000 and maximum should be 10000. If the value is less than 1000 then it will be considered as 1000 and if the value provided is greater than 10000 then it will be considered as 10000. |
| use_cred_cache | This is an optional parameter and can be set to either true or false. Setting it to true enables the caching and saves the credential in the encrypted format in the DelineaCredCache.properties file. |