Installing Delinea Credentials Cache on Windows
This topic describes how to install Delinea Credentials Cache on Windows and host it in IIS. The steps cover enabling IIS, installing the ASP.NET Core Hosting Bundle, downloading and extracting the package, configuring the IIS application, and optionally setting up HTTPS.
Before you begin, make sure that the requirements in Prerequisites are met.
Step 1: Enable IIS
Delinea Credentials Cache on Windows is hosted in IIS. If IIS is not already enabled on the host, complete the following steps before installing the package.
-
Open Server Manager and select Add Roles and Features.
-
In the Add Roles and Features Wizard, proceed to the Server Roles page.
-
Select the checkbox next to Web Server (IIS) and select Add Features when prompted.
-
Proceed through the wizard and select Install. Wait until the installation completes.
If IIS is already enabled on the host, skip this step and proceed to Step 2.
Step 2: Install the ASP.NET Core Hosting Bundle
Delinea Credentials Cache requires the ASP.NET Core Hosting Bundle to run under IIS. The Hosting Bundle installs the .NET 10.0 runtime and the IIS module required to host ASP.NET Core applications.
-
Download the ASP.NET Core 10.0 Hosting Bundle from the Microsoft .NET download page.
-
Run the installer and follow the on-screen instructions to complete the installation.
-
After the installer finishes, restart IIS to apply the changes. Open a command prompt with administrator privileges and run:
iisreset
If the ASP.NET Core 10.0 Hosting Bundle is already installed on the host, skip this step and proceed to Step 3.
Step 3: Download and Install the Package
To download and install the Delinea Credentials Cache package for Windows:
-
Download the Windows package (a zip archive).
-
Extract the contents of the archive.
-
Open the properties of the extracted
DelineaCredentialCache_Windowsfolder. On the Security tab, grant the IIS_IUSRS group Full control permission, as shown.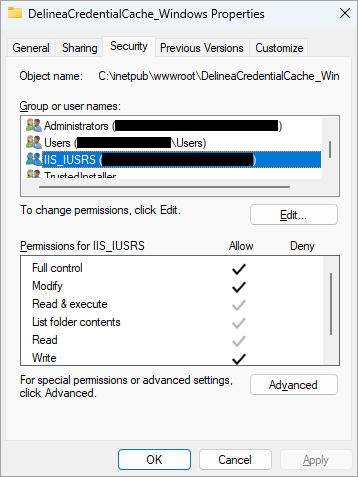
-
Move the
DelineaCredentialCache_Windowsfolder toC:\inetpub\wwwroot.
Step 4: Configure the IIS Application
Register the Credentials Cache application in IIS and confirm that its application pool is running.
-
Open IIS Manager.
-
In the Connections pane, expand the server node, then expand Sites.
-
Right-click Default Web Site and select Add Application.
-
In the Add Application dialog, enter the following values:
-
Alias: Enter a name for the application, for example
DelineaCredCache. This alias becomes part of the service URL (for examplehttps://your-host/DelineaCredCache/swagger/index.html). -
Application pool: Select an existing ASP.NET Core application pool, or create a new one with No Managed Code selected.
-
Physical path: Enter
C:\inetpub\wwwroot\DelineaCredentialCache_Windows.
-
-
Select OK.
-
In the Connections pane, select Application Pools and confirm that the application pool used by the Credentials Cache application shows a status of Started.
If the application pool does not start, open Event Viewer > Windows Logs > Application and review any IIS or ASP.NET Core hosting errors. See also Troubleshooting.
Step 5: Configure HTTPS (Optional)
If you require HTTPS access to Delinea Credentials Cache, add an HTTPS binding to the IIS site and bind a certificate to it. The following steps use a self-signed certificate for testing purposes. For production environments, use a certificate issued by a trusted certificate authority.
Create a Self-Signed Certificate
-
Open a PowerShell prompt with administrator privileges and run the following command. Replace
your-host.your-domain.comwith your server's fully qualified domain name.New-SelfSignedCertificate -DnsName "your-host.your-domain.com" -CertStoreLocation "cert:\LocalMachine\My" -
Note the thumbprint returned by the command. You will need it in the next section.
Add an HTTPS Binding in IIS
-
In IIS Manager, in the Connections pane, select Default Web Site.
-
In the Actions pane, select Bindings.
-
In the Site Bindings dialog, select Add.
-
In the Add Site Binding dialog, enter the following values:
-
Type: Select https.
-
IP address: Select All Unassigned or enter a specific IP address.
-
Port: Enter
443. -
Host name: Enter your server's fully qualified domain name, for example
your-host.your-domain.com. -
SSL certificate: Select the certificate created in the previous section.
-
-
Select OK, then select Close.
If you are using a certificate from a trusted certificate authority, import the certificate into the Windows certificate store before adding the HTTPS binding. To import a certificate, open Certificates (Local Computer) via certlm.msc and import the certificate into the Personal store.
Next Steps
-
Confirm that the service is running and the Swagger UI loads: Verifying the Deployment.
-
Adjust the cache expiration and logging settings in
appsettings.json: Configuring Delinea Credentials Cache.


