Entra ID API Integration
This documentation provides a detailed guide for integrating Entra ID with the Delinea Platform. The integration enables the Delinea Platform to use Microsoft APIs directly to access your Entra ID users and groups.
You cannot use this Entra
implementation simultaneously with the
Entra ID SAML/OIDC Federation
implementation on the same Entra ID tenant. If you add a native registered app
with the Log-in to Entra ID permission enabled on a tenant that
already has Entra ID federation configured, the Platform blocks the attempt and
returns: Entra Tenant ID <id> is already configured in a SAML provider. Tenants configured before this block was enforced may still
experience login failures, caching conflicts, and provisioning errors. Customers
migrating between the two need a planned cutover, not a parallel run. To switch,
follow
Federation Management. See
Entra ID API Integration FAQs
for a full list of validation errors.
This integration is for Delinea Platform login and directory services (single sign-on and user provisioning). If you only need read-only visibility into Microsoft Entra ID for Identity Threat Protection (ITP), Privilege Control for Cloud Entitlements (PCCE), or Continuous Identity Discovery (CID), do not use this integration. Selecting Entra ID - Read below activates Microsoft Entra ID as a directory service and begins user provisioning, even if you only want read access for discovery. Use Integrating Entra ID & Azure Cloud for ITP/PCCE Discovery with the Platform instead.
If you are completing the Platform Upgrade Center and need to configure both SAML federation and an Entra ID registered app on the same tenant, follow the required cutover sequence in Using Platform Upgrade Center. Deviating from that sequence causes the authentication failures described above.
When you enable Log-in to Entra ID on this registered app, configure the federation provider to use SAML. OIDC is available if your organization requires it. For instructions on locating the federation provider after setup, see Federation Management.
The integration supports the following:
-
Log-in and authentication using Entra ID credentials.
-
Browsing and searching for Entra ID users and security groups. Distribution lists (groups) are not supported.
-
Direct use of Entra ID security groups on the Platform without mapping them to Platform groups.
-
Pre-assignment of Entra ID users to groups, roles, identity policies, and sharing secrets.
-
Inviting/adding Entra ID users directly to the platform.
-
User deactivation or deletion in Entra ID is reflected in the platform.
-
Easily manage which groups from Entra ID are visible and usable within the platform. See External Directory Group Allowlist.
-
Paginated results are returned when browsing Entra ID users and groups when managing role and identity policy member assignment and sharing secrets.
This topic walks you through setting up an Entra ID API integration on the Delinea Platform. The Platform provides two options for this integration. You only need to choose one of these methods:
-
Creating a Delinea-Managed Entra ID app. This approach is recommended if you prefer to configure the Entra ID integration entirely within the Delinea Platform and let Delinea handle the creation and management of the necessary Azure components.
-
Creating a customer-Managed Entra ID app. This approach is suitable if you prefer to maintain full control over the integration and manage the Azure resources yourself.
Prerequisites
-
On the Delinea Platform, you must be a Platform Admin.
-
In Azure, you must be able to create an app registration and manage API permissions. Roles that satisfy these requirements are:
-
Global Administrator
-
Privileged Role Administrator
-
Each Entra ID user authenticating to the Delinea Platform must have a populated mail attribute. Users synced from an external directory typically inherit one; users created directly in the tenant often do not.
Restrict Access After Federation
By default, any user in your Entra tenant who can sign in to the registered application can sign in to the Delinea Platform. Apply at least one of the controls below before completing federation in a production tenant.
To enforce least privilege, combine controls from more than one layer.
Control 1 — Apply a Delinea Platform identity policy
Identity policies in the Delinea Platform restrict who can authenticate and under what conditions. Scope a policy to your Entra federation source to limit sign-in to named users, groups, or contexts.
For configuration steps, see Identity Policies.
Control 2 — Restrict the Entra registered application to specific users or groups
In Entra ID, you can require users to be explicitly assigned to the registered application before they can authenticate through it. Unassigned users are blocked at the Entra layer, before any request reaches the Delinea Platform.
For configuration steps, see Microsoft's documentation on assigning users and groups to an application.
Control 3 — Apply Entra conditional access policies
Entra conditional access policies enforce sign-in requirements such as multi-factor authentication, compliant devices, or trusted network locations. Apply a policy that targets your Delinea Platform registered application.
For configuration steps, see Microsoft's documentation on conditional access policies.
Apply Control 1 at minimum. Controls 2 and 3 add defense-in-depth and are recommended for production tenants.
Creating a Delinea-Managed Registered App
This procedure walks you through setting up Entra ID on the Delinea Platform using a Delinea-managed registered app. To complete and test the integration you will need to do the following:
-
Add a Delinea-managed registered app.
-
Grant Delinea permission to create and manage application registrations in Azure.
Warning: Do not create, delete, or modify the Azure objects that the Delinea Platform creates and manages. For a Delinea-managed app, the Platform owns the Azure enterprise application, app registrations, and client secret, and rotates the secret automatically every 180 days. The Platform sends client secret expiration notices for awareness only, and no action is required. Client secret rotation is handled automatically. If you delete the Delinea-created client secret in Azure, the Platform loses its connection to Entra ID and cannot recover it. To remove the integration, delete the registered app from the Delinea Platform (Settings > Registered apps), not from Azure.
Delinea-Managed Components
Created Resources
-
Orchestration registered app
-
Service principal
-
Client secret
-
Any delegated or application permissions granted
Lifecycle Management
-
Client secret rotation is handled automatically
Adding a Delinea-Managed Registered App
-
On the Delinea Platform, navigate to Settings > Registered apps.
-
Click Add App.
-
Select Platform Managed Entra ID.
-
On the Add Platform managed Entra ID App page, complete the following fields:
Platform Field
Description
Location in Azure App
Name
A unique identifier for the registered app in the Delinea Platform.
User-defined; choose a descriptive name when configuring in Delinea Platform.
Description
Optional field to add details or context about the registered app.
User-defined; optional entry in Delinea Platform.
Directory (tenant) ID
The unique identifier for your Entra ID tenant.
Found on the Azure App Registration → Overview page under "Directory (tenant) ID".
-
Select all settings in the table below, then Save:
Platform Field
Description
Entra ID - Read
Grants the Delinea Platform the ability to query Entra ID users and groups. This permission is Azure tenant-wide and can only be granted once per Platform tenant.
Log-in to Entra ID
Allows the creation of a Federation Provider within the Delinea Platform. This enables users to log in to the Delinea Platform using their Entra ID credentials. If needed, you can create multiple registered apps with Log-in permissions, each associated with a unique domain. When this option is selected, specifying the domains becomes mandatory. If you are completing the Platform Upgrade Center and configuring both SAML federation and this app on the same tenant, follow the required sequence in Using Platform Upgrade Center before enabling this permission.
Selecting Entra ID - Read activates Microsoft Entra ID as a directory service on the Delinea Platform. Directory services resolve users in a fixed priority order, and Entra ID takes precedence over Federation. If your tenant already provisions these same users through Federation, this can create duplicate user accounts. If you only need read access for CID or ITP discovery, do not select this permission. Use Integrating Entra ID & Azure Cloud for ITP/PCCE Discovery with the Delinea Platform instead.
Granting Delinea Permission to Create and Manage App Registrations in Azure
-
Grant Consent for the Entra ID Management App
-
On the next screen in the Entra ID app management section, select Grant consent.
-
In the Microsoft Pick an account dialog, log in with your Microsoft account credentials.
-
In the Permissions requested dialog for Delinea Platform Azure Registered Apps:
-
Review the required permissions.
-
Select Accept.
-
-
-
Grant Consent to Read the Entra ID Users and Groups
-
In the Entra ID – Read section, select Grant consent.
-
In the Microsoft Pick an account dialog, log in with your Microsoft account credentials.
-
In the Permissions requested dialog for Platform Managed azure-entra-read:
-
Review the required permissions.
-
Select Accept.
-
-
-
Select Domains for User Login
-
Click Edit.
-
In the Log-in to Entra ID section, select the desired domains for user login.
-
Click Save.
-
-
Grant Consent to User Login
-
In the Log-in to Entra ID section click Grant consent.
-
In the Microsoft Pick an account dialog, log in with your Microsoft account credentials.
-
In the Permissions requested dialog for Platform Managed azure-entra-login:
-
Review the required permissions.
-
Select Consent on behalf of your organization.
-
Click Accept.
-
-
-
Limit User Access You must limit user login access to specific groups within your allowed domains, using one or both of the following methods:
-
Configure External Group Visibility. External groups do not appear in the platform until you add them to the External Directory Group Allowlist. See External Directory Group Allowlist.
-
Set up Conditional Access. See Conditional Access Policy.
-
After you have completed the steps above, the following three apps should be created in Azure and should reflect the state, Consent granted on the Delinea Platform:
-
Entra ID app management (Delinea Platform Azure Registered Apps)
-
Entra ID – Read (Delinea Managed azure-entra-read)
-
Log-in to Entra ID (Delinea Managed azure-entra-login)
The Delinea Platform is now fully integrated with Entra ID, enabling a seamless, streamlined user management experience. You can now browse Entra ID users and groups directly on the platform, pre-assign permissions, add users instantly, and allow users to log in with their Entra ID credentials.
Creating a Customer-Managed Registered App
This procedure walks you through setting up and testing Entra ID on the Delinea Platform using a customer-managed registered app.
-
Register an App in Azure:
-
Generate a Client Secret: Create a client secret, copy its value, and note the expiration date.
-
Configure Token Claims: Add the required claims for the Platform.
-
Set API Permissions: Assign the necessary Microsoft Graph permissions and grant admin consent.
-
-
Register a customer-managed app on the Delinea Platform: Enter the app credentials, permissions and domains.
-
Test the Integration: Verify the integration by logging into the Platform with an Entra ID user.
The following procedures require copying and pasting information between Azure Portal and the Delinea Platform. We recommend opening both applications before you begin and keeping both open until you are finished.
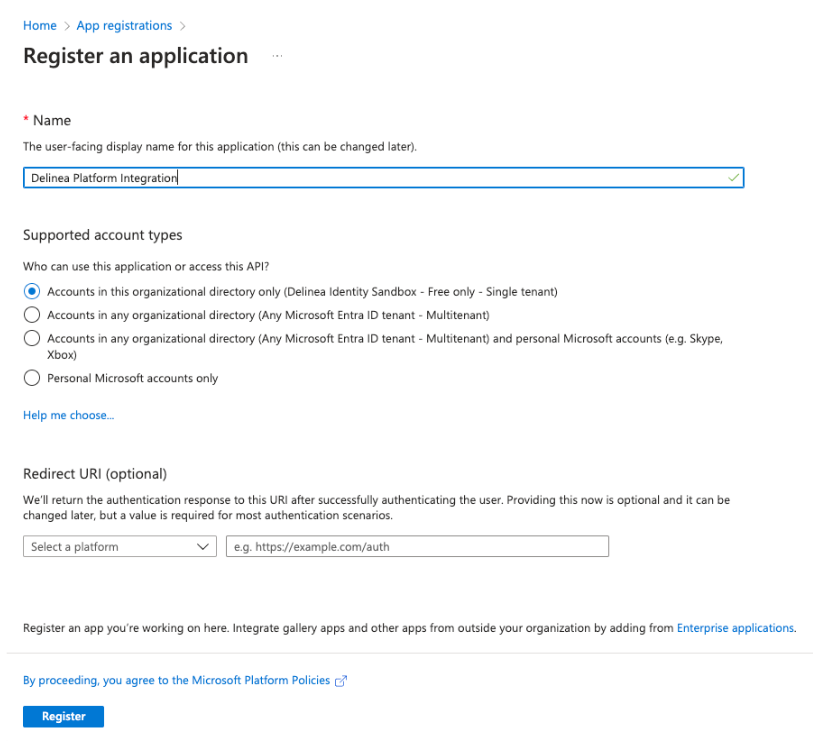
Creating an Azure Application Registration
-
Go to the Azure portal and log in.
-
Select (or search for) App registrations.
-
Click New registration.
-
In the Name field, enter a name for your application registration. (Under Supported account types, only Single tenant is supported).
-
Click Register. The application registration's overview page opens.
-
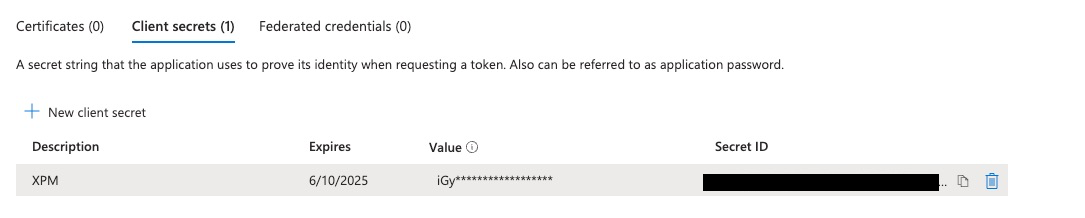
From the left navigation menu, under Manage, click Certificate & secrets.
-
Click New client secret to create a secret for authenticating to this Entra ID tenant with this application registration.
-
(Optional): Complete the Description field for the new client secret.
-
Update the Expires field to set the credentials expiration date.
-
Click Add.
-
Copy and save the Client secret's Value and its Expiration date because you will need them later when configuring the Delinea Platform. If you leave this page without saving the information, you may lose access to the client secret Value and you will need to generate a new secret. Note: The Platform sends client secret expiration notices for awareness only, and no action is required. Client secret rotation is handled automatically. If automatic rotation fails, contact Delinea customer support.
-
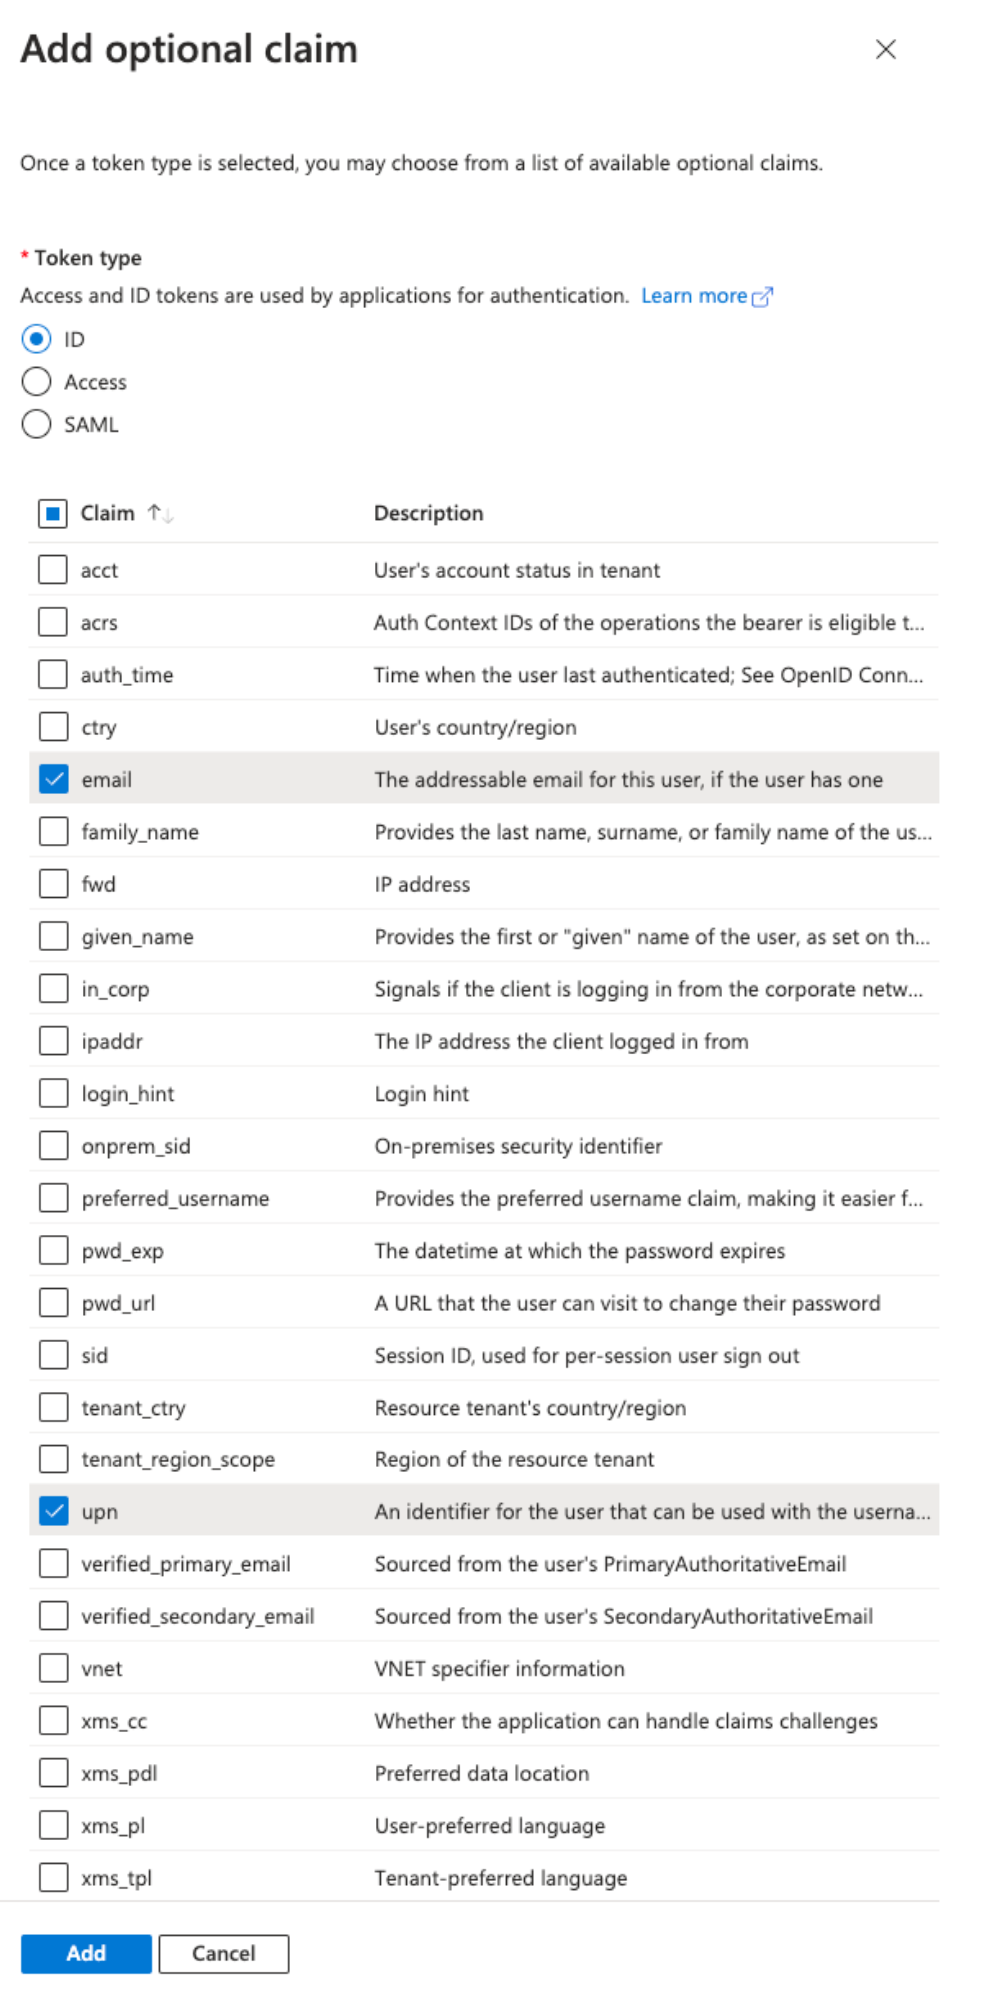
From the left navigation menu, click Token configuration.
-
Click Add optional claim.
-
In the Add optional claim dialog, select ID under Token type.
-
Select the following claims:
-
email
-
upn
-
-
Click Add.
-
In the dialog box that opens, select Turn on the Microsoft Graph email, profile permission (required for claims to appear in token).
-
Click Add to add the optional claims to the app registration token.
-
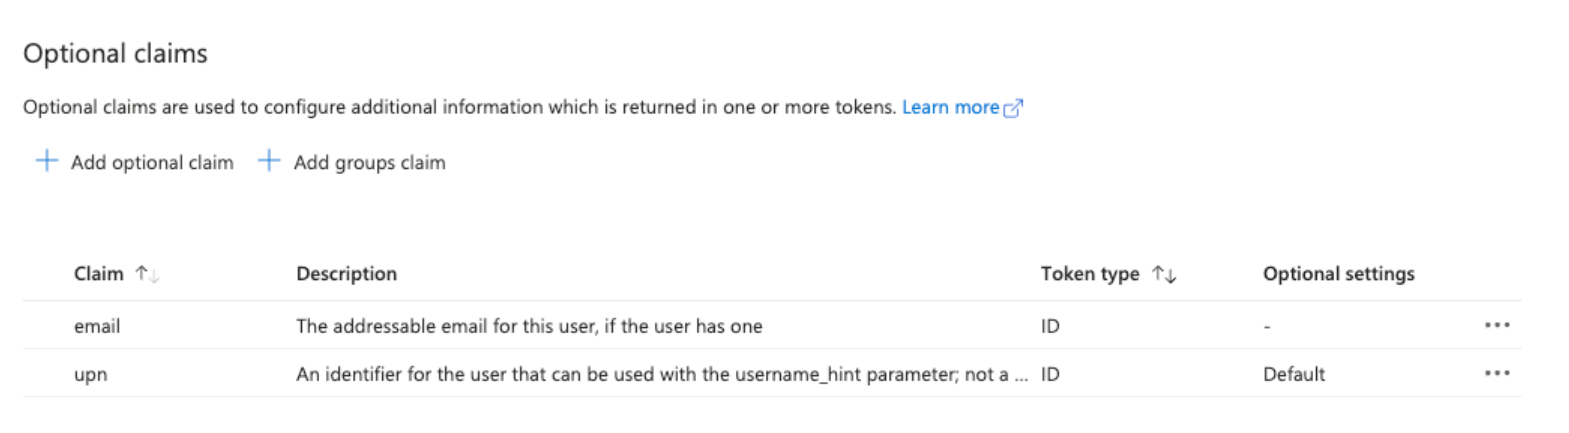
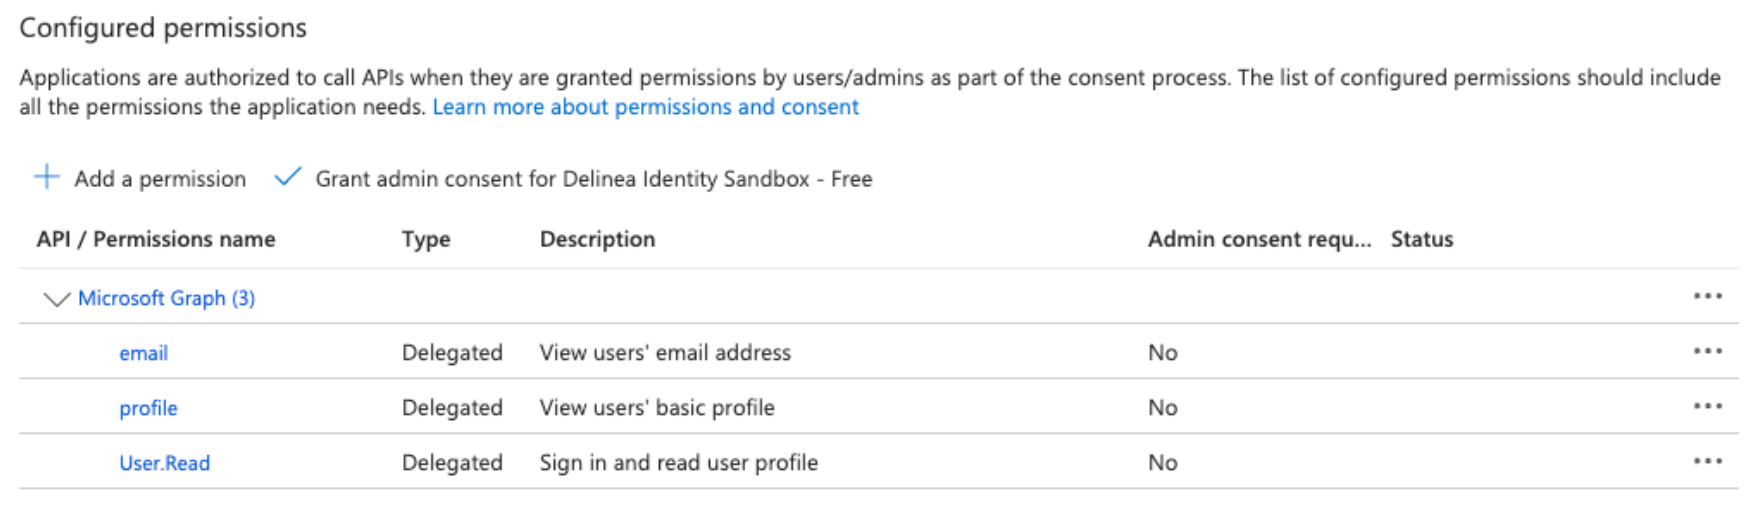
From the left navigation menu, click API Permissions. API Permissions include all permissions required for the platform.
-
These three permissions will be on the Configured permissions list:
-
email
-
profile
-
User.Read
-
-
Click Add a permission.
-
Click Microsoft Graph.
-
Click Application permissions and select the following:
-
Group.Read.All
-
GroupMember.Read.All
-
Member.Read.Hidden
-
User.Read.All
-
-
Click Add permissions.
-
Click Grant admin consent for <azure directory name> for the API permissions you just added.
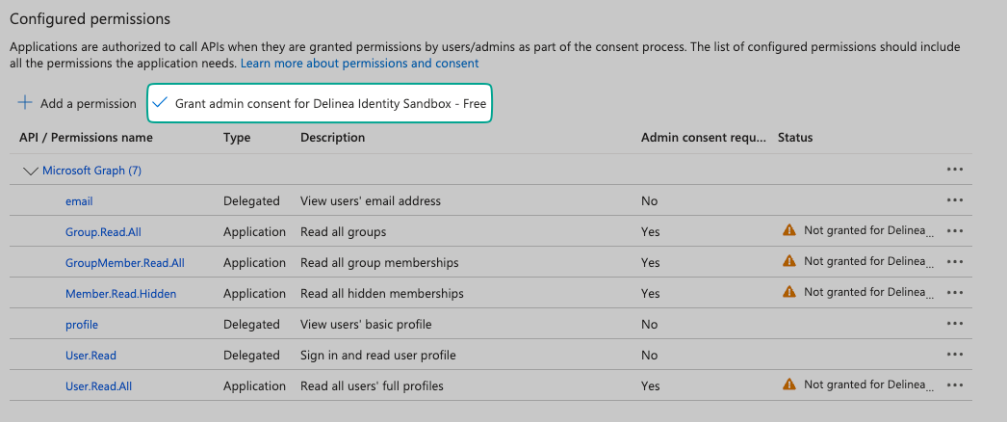
-
In the Grant admin consent confirmation dialog, click Yes.
-
You are now ready to create a registered app on the Delinea Platform in the next section.
Creating a Customer-Managed Registered App on the Delinea Platform
-
On the Delinea Platform, navigate to Settings > Registered apps.
-
Click Add App. Select Customer Managed Entra ID.
-
On the Add registered app page, complete the following fields:
Delinea Platform Field
Description
Location in Azure App
Name
A unique identifier for the registered app in the Delinea Platform.
User-defined; choose a descriptive name when configuring in Delinea Platform.
Description
Optional field to add details or context about the registered app.
User-defined; optional entry in Delinea Platform.
Directory (tenant) ID
The unique identifier for your Entra ID tenant.
Found on the Azure App Registration → Overview page under "Directory (tenant) ID".
Application (client) ID
The unique identifier for the Azure app being registered.
Found on the Azure App Registration → Overview page under "Application (client) ID".
Client Secret Value
The value of the client secret generated for the app, used for authentication.
Generated in Azure App Registration → Certificates & Secrets. Copy the value immediately when creating the client secret.
Credential Expiration Date
The expiration date of the client secret used for authentication.
Found in Azure App Registration → Certificates & Secrets under "Expires". Match this value in Delinea Platform.
Note: The Platform sends client secret expiration notices for awareness only, and no action is required. Client secret rotation is handled automatically. If automatic rotation fails, contact Delinea customer support. -
Select all settings in the table below:
Delinea Platform Field
Description
State
Indicates whether the integration is active. Ensure this is set to Enabled to allow seamless operation.
Entra ID - Read
Grants the platform the ability to query Entra ID users and groups. This permission is Azure tenant-wide and can only be granted once per Platform tenant.
Log-in to Entra ID
Allows the creation of a Federation Provider within the Delinea Platform. This enables users to log in to the Delinea Platform using their Entra ID credentials. If needed, you can create multiple registered apps with Log-in permissions, each associated with a unique domain. When this option is selected, specifying the domains becomes mandatory. Add at least one domain, such as the primary domain for your Microsoft Entra organization and any custom domains your users use to sign in. You can find custom domains in the Azure portal under Custom domain names. If you are completing the Platform Upgrade Center and configuring both SAML federation and this app on the same tenant, follow the required sequence in Using Platform Upgrade Center before enabling this permission.
Provision Directory Services
This setting is required when creating the registered app, to ensure that the directory service and federation provider settings are created. This setting will be deprecated in future releases.
The same directory service and duplicate-account risk applies here. See the note above.
-
Domain Names: Add at least one domain, including the primary domain for your Microsoft Entra organization and any custom domains your users will use to log in. Custom domains are found in the Azure Portal Custom domain names list.
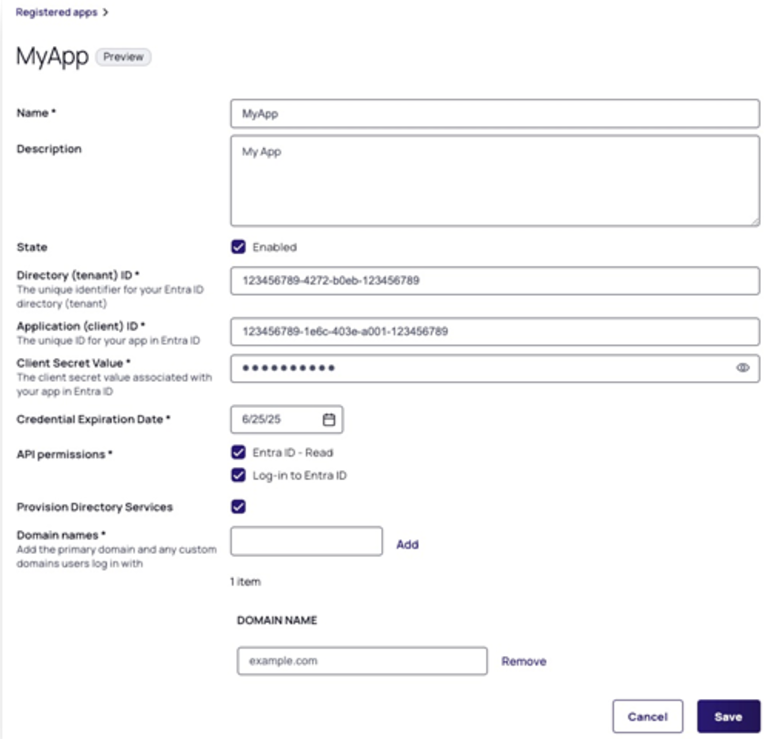
-
Click Save.
Once the registered app is saved, the Platform generates an OIDC federation configuration that can be viewed under Settings > Federation Providers, which gives Directory Services access to the Entra ID directory. To enable user login with Entra ID credentials, add the Platform Callback URL to the Azure app registration as described in the next section.
Updating the Azure App Registration with the Platform Callback URL
Add the Platform Callback URL from the generated Federation configuration to the Azure app registration. The URL will be generated after you save the registered app.
-
On the Delinea Platform, navigate to Settings > Registered apps.
-
Select the registered app.
-
Copy the Platform Callback URL.
-
Navigate to the Azure portal.
-
From the app registration Overview page, select Redirect URIs and click Add a Redirect URL.
-
In the Platform configurations section, click Add a platform.
-
Select Web.
-
In the Redirect URIs field, enter the Platform callback URL that you copied and saved.
-
Click Configure.
The Delinea Platform is now fully integrated with Entra ID, enabling a seamless, streamlined user management experience. You can now browse Entra ID users and groups directly on the platform, pre-assign permissions, add users instantly, and allow users to log in with their Entra ID credentials.
Automating Entra ID Integration Setup
You may streamline the Entra ID provisioning process by leveraging the automation script available in the Delinea XPM GitHub repository. This script provides a simple and repeatable setup experience by automating the creation of the necessary Azure and Delinea Platform application objects. For more details and usage instructions, refer to the Entra ID App Registration Automation Script repository.
Testing the API-Based Entra ID Integration
Create a test user in the Azure Portal and use the account to verify user login to the Delinea Platform.
-
Go to the Azure portal and log in.
-
Select or search for Users.
-
Click New user > Create new user.
-
Add the following:
-
User principal name
-
Display name
-
-
Copy the generated Password because you will need it to log on to the Delinea Platform.
-
Click Next > Properties.
-
Add Email.
-
Click Review + create.
-
Click Create.
Test User Log-on to the Delinea Platform
-
On the Delinea Platform, navigate to Settings > Federation providers.
-
Select the generated OIDC federation configuration.
-
Select Federation console.
-
Click Start Debug Log.
-
From a private browser window, navigate to your tenant and log on with the test user credentials.
The test user should be able to log on to the platform. If the user cannot log on, the Debug Log can help diagnose and resolve issues by capturing detailed information about the communication between the Platform and the Identity Provider (IdP). The log provides insights into federation messages, claims, and potential misconfigurations, making it easier to pinpoint errors or inconsistencies in the authentication process.
Troubleshooting
Federation Error Occurred
If user mapping is set to Required, but a federated user cannot be matched to a directory user, the federation debug console will indicate that User mapping was not applied and you will receive an error message about a federation error in the login dialog. Take the following steps to resolve this issue:
-
Set user mapping to Optional or Disabled.
-
Enable Create local user if unable to map.
-
Verify the User Principal Name (UPN) on the federated identity matches the directory user.
Also see Group Mapping Troubleshooting.
Related Topics
-
Federation Management (user mapping, group mapping, debug console)
-
Group Mapping Troubleshooting