Secret Server On-Prem Upgrade Checklist
1. Make sure the environment complies with Secret Server’s system requirements.
-
Run the PowerShell command below on each server node and confirm that it has .NET Framework 4.8 or newer:
(Get-ItemProperty "HKLM:SOFTWARE\Microsoft\NET Framework Setup\NDP\v4\Full").version
-
SQL Express is intended for POC environments only.
-
SQL Server and the Secret Server database should be set to the collation SQL_Latin1_General_CP1_CI_AS.
-
Run the SQL query below against the Secret Server database to confirm that the SQL compatibility level is 110 and above:
2. Check if DPAPI is enabled by navigating to the Admin > DPAPI. If yes, disable it by clicking on the Decrypt Key Using DPAPI button. Repeat and perform this step on each server node.
3. Check if Integrated Windows Authentication is enabled in Secret Server by navigating to the Admin > Directory services configuration. If yes, make sure that ONLY Windows Authentication is enabled, and all other authentication is disabled for the Secret Server site on all server nodes. Otherwise, both Forms and Anonymous Authentication should be enabled, and all other authentication is disabled. For steps on how to do so, click here.
4. Save a full back-up of the application files (C:\inetpub\wwwroot\SecretServer) of each server node. NOTE: The backed-up encryption.config file should be the unencrypted version.
5. Save a full back-up of the Secret Server database.
6. Make sure there is enough disk space on the database server, specifically the drive where the database and transaction log files are stored.
7. If the environment has SQL merge replication, be aware that support for this scenario is a deprecated feature no longer supported by Delinea with additional requirements around upgrades. Please review this documentation. In most scenarios, we would recommend AlwaysOn.
8. Get the current version of the Secret Server instance using the SQL query below, then request for the upgrade script from Delinea Support. Ensure to provide the exact current version of your Secret Server instance.
9. Download the correct Secret Server application files and extract ss_update.zip to a temporary folder on each server node (e.g., Desktop, C:\Temp).
-
For the latest release: https://updates.thycotic.net/secretserver/getlatestversion.aspx?alwayslatest=true
10. Make sure there is an account with the permissions below that can be used at the time of the upgrade:
-
Administrator access on all server nodes or machines where Secret Server is installed.
-
Can log in via SQL Server Management Studio, has Write/Alter SQL Server permission to the Secret Server database and has ability to restore from the full backup if needed.
-
Local Account which can be used to log into the Secret Server application as an Admin.
11. Open Programs and Features on the server node and make sure Microsoft Monitoring Agent is not installed. Repeat and perform this step on each server node.
The APM feature in SCOM Agent on the server node causes the IIS application pool to crash. If it is necessary to have the SCOM Agent on the server node, reinstall it with the “NOAPM = 1” switch using msiexec.exe to exclude the APM feature.
12. Plan a sufficient change window, typically two hours, to accommodate the work needed for the upgrade, as well as any rollbacks that need to happen if errors are encountered. Although, the method of upgrade, size and complexity of the environment will determine the amount of actual service disruption to the end users.
Don'ts:
1. Do not proceed with the upgrade without a full back-up of the Secret Server application files with the unencrypted version of encryption.config and database.config files.
2. Do not proceed with the upgrade if you encounter any SQL error when running the upgrade script against the Secret Server database in SQL Server Management Studio. Take a screenshot of the error message, then rollback the transaction.
3. If the environment has a SQL High Availability setup, do not run the upgrade script against all databases. Run it on the primary database or listener.
Do's:
1. Stop the Secret Server application pool before starting the upgrade process. If it is a clustered Secret Server instance, the application pool can be stopped one at a time.
2. Add BEGIN TRANSACTION on top (Line 1) of the upgrade script, search for COMMIT TRAN at the end of the script and mark it as a comment (i.e., --COMMIT TRAN;). If the upgrade script ran successfully, proceed with commit by removing the comment tag (i.e., COMMIT TRAN;). Otherwise, take a screenshot of the error message in SQL Server Management Studio and run ROLLBACK TRANSACTION in the same query window.
3. After upgrading the database and overwriting the server node’s application files, start the Secret Server application pool on it and perform an IISRESET. If it is a clustered Secret Server instance, make sure that Secret Server is accessible on the first server node, then proceed with overwriting the application files on the second node. Once done, make sure that Secret Server is accessible on the second node, then repeat the process on the remaining server nodes. Remember to stop the Secret Server application pool, overwrite the application files, start the application pool, and perform an IISRESET on each server node.
Post upgrade tasks & issues
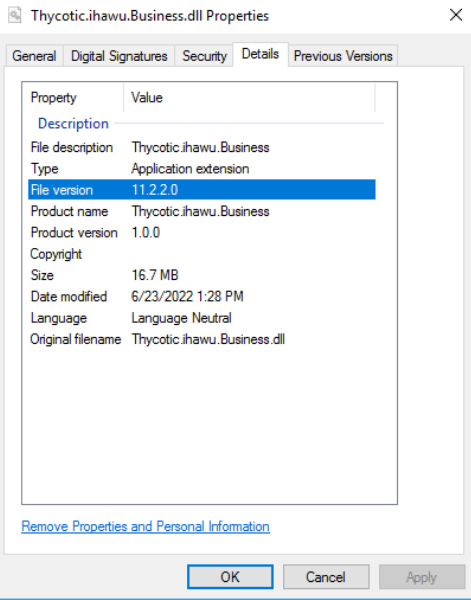
1. For the "Binary Version Mismatch” error, make sure the Thycotic.ihawu.Business.dll file has the correct upgraded version.
a. Navigate to the C:\inetpub\wwwroot\SecretServer\bin folder of the server node/s.
b. Right-click on the Thycotic.ihawu.Business.dll file and select Properties.
c. Click on the Details tab and check the File Version.
d. If the version is incorrect, stop the Secret Server application pool and overwrite application files (C:\inetpub\wwwroot\SecretServer) with the same version as the database.
2. For “The version of your database does not match the version of your application” error, get the current version of Secret Server in the database by running the SQL query below:
If the version is incorrect, please do the following:
a. Restore a working back-up copy of the Secret Server database.
b. Run the upgrade script provided by Delinea Support.
3. For IIS errors, make sure the Secret Server application pool on all server nodes has the following Advanced Settings:
-
Managed Pipeline Mode: Integrated
-
Start Mode: AlwaysRunning
-
Identity: Should be the application pool service account running Secret Server
-
Idle Timeout(minutes): 0
-
Load User Profile: True
-
Regular Time Interval (minutes): 0
4. The application pool service account should have the following required permissions:
-
Modify Windows NTFS permission on the C:\Windows\Temp and C:\inetpub\wwwroot\SecretServer on all server nodes
-
Computer Configuration > Windows Settings > Security Settings > Local Policies > User Rights Assignment > “Log on as a batch job” policy
-
Computer Configuration > Windows Settings > Security Settings > Local Policies > User Rights Assignment > “Impersonate a client after authentication” policy
5. Re-enter the application pool service account credentials in case its password has changed.
6. If the server nodes are behind a load balancer and Secret Server is not loading via load-balanced URL, access Secret Server directly from each server node using localhost.
7. If issue persists, open a support case, and attach a zipped Secret Server logs located in
C:\inetpub\wwwroot\SecretServer\log of the server node(s) having an issue.