Secret Server Clustering
This document is a guide to Delinea's Secret Server clusters for administrators and advanced users. Secret Server can run with multiple front-end Web servers. For a critical instance, clustering offers a redundant system to limit potential down time from a single point of failure. Clustering also allows users to load balance for better performance.
Overview
Clustering and Background Thread Changes in 10.7.
There are two major architectural changes in Secret Server 10.7:
- Primary Node: We eliminated "primary nodes." Previously, some important background operations, such as password changing and heartbeat, would only run from the primary node. Now they run from all nodes. Given that, there is no longer a "Make Primary" button, and the ValidPrimaryNode setting no longer applies.
- Background Operations: There are no longer background threads for scheduled operations. Instead, operations are scheduled by Quartz.
Clustering Overview
With Secret Server clustering, you can easily scale Secret Server for redundancy and performance. Basic Secret Server clustering is simple—you install Secret Server and then copy the installation to another machine. Secret Server clustering has four core concepts or components:
Nodes
Each machine with Secret Server installed on it, pointing to the same database, is a node. All nodes respond to Web requests and thus are Web servers.
Backbone Bus
The backbone bus Internally handles all communication between the roles. In a clustered environment, the backbone bus should always be an installed RabbitMq messaging queue. This allows every node in the cluster to help with the workload. If the backbone bus is set to "internal," then each node is using its own internal backbone bus.
Engine Response Bus
The engine response bus facilitates communication from Secret Server to distributed engines and back.
Worker Roles
Each node can optionally run one or more worker roles: background Worker, engine worker, and session recording worker. Though they may run on the same machine, the roles do not directly communicate with each other.
Each node that is set to run the background worker role automatically runs the scheduler role as well. The scheduler role is responsible for running the vast majority of Secret Server background operations. It uses Quartz to run "trigger jobs" that send a message on the backbone bus for each scheduled operation. One or more background worker roles then processes those messages.
Component Communication
Figure:Secret Server Internal Cluster-Component Communication
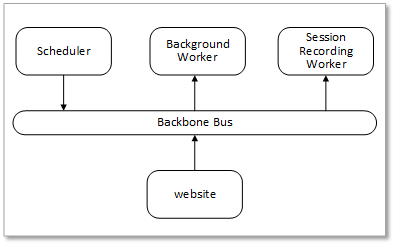
Messages are placed on the backbone bus by the Scheduler role and the website. Messages are retrieved from the backbone bus.
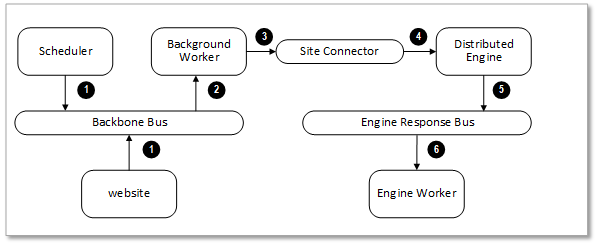
Figure:Secret Server Distributed Engine Communication
-
Manual or scheduled operation.
-
Background worker processes a message.
-
Outbound messages (password changes, heartbeats, and others) are placed on the site connector.
-
Distributed engine performs the operation.
-
Engine worker processes the response.
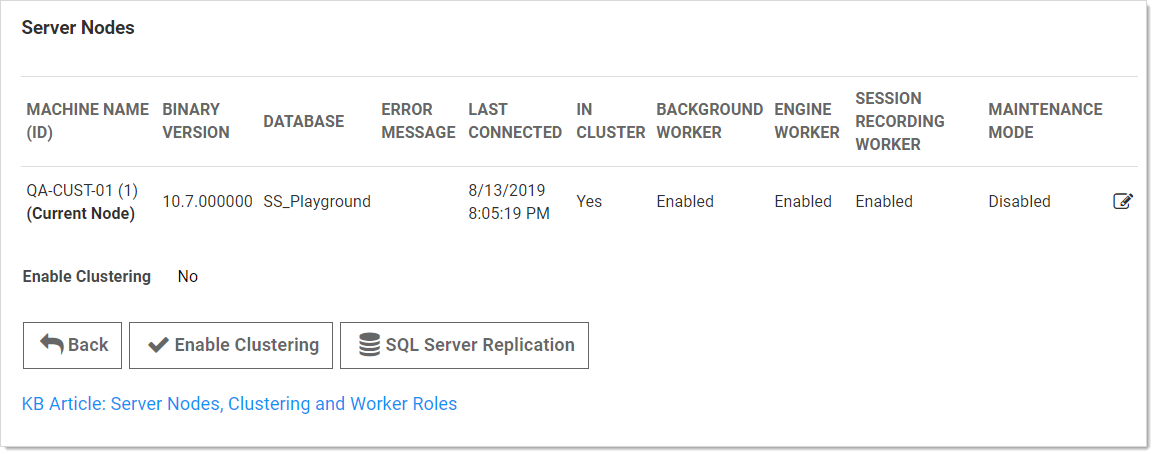
Server Node Configurations
The work an individual node handles depends entirely on which boxes are checked on the Server Nodes page (in edit mode):
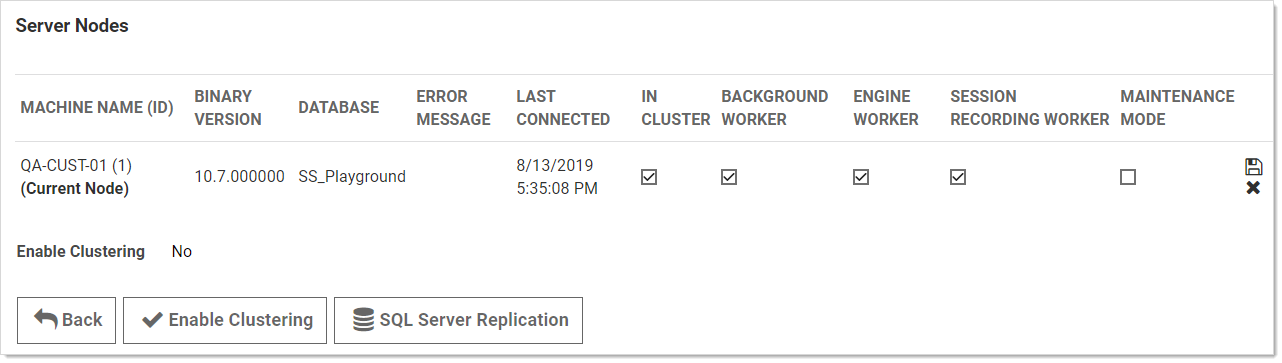
- In Cluster is a toggle that turns a server node on or off. If enabled this node can process Web requests, and (if configured) will run the background, engine, and session recording roles. If disabled, the node is just a backup—it cannot run any roles, and trying to access the website on the node will redirect to the server nodes page.
- Background Worker is a toggle for all background operations, such as password changing, heartbeat, and discovery. When it is set to false, only the bulk operations, password generation, email, and secret import operations run on the node. See the list of background operations below.
- The Background Worker, Engine Worker, and Session Recording Worker check boxes enable the corresponding roles for that node.
- Engine Worker enables or disables the engine worker role, which processes responses from distributed engines.
- Session Recording Worker enables or disables the session recording role, which encodes session videos.
- Maintenance Mode enables or disables a read-only mode where the node cannot change secrets or related data.
Scheduled Background Operations
The current scheduled background operations in Secret Server are:
- ActiveDirectorySynchronizationMonitor
- BackgroundWorkerTaskTriggerJob
- BackupMonitor
- Bulk Operations When triggered by user
- CheckOutMonitor
- ComputerScanMonitor
- ConnectWiseMonitor
- DatabaseCleanupTriggerJob
- DiscoveryMonitor
- EventQueueMonitor
- ExpiredSecretPasswordChangeTriggerJob
- ExpiringLicenseTaskTriggerJob
- ExpiringSecretTaskTriggerJob
- HeartbeatMonitor
- Local Heartbeat Trigger Job
- Local Password Change Trigger Job
- NodeClusteringMonitor
- NodeTaskTriggerJob
- PasswordRequirementTriggerJob
- PbaDirectiveTriggerJob
- PbaMetadataUploadTriggerJob
- PrimaryNodeTaskMonitor
- Process Field Encryption Changes Task
- ProcessDashboardJsonValidationTask
- ProcessSecretPolicyChangesMessage
- ScheduledReportMonitor
- SecretComputerMatcherMonitor
- SecretItemHashMonitor
- SqlReplicationConflictMonitor
- TelemetryTriggerJob
- ThycoticOneSyncUserTriggerJob
- TruncateDatabaseCacheTriggerJob
- TruncateEngineLogTriggerJob
- VideoConversionTriggerJob
To see the current state of these jobs, such as the last time they ran and how long until they run again, Search for Diagnostics.
Procedures
Setting up Clustering
-
Have Secret Server upgraded or installed and running on a server.
-
Enable clustering on the node:
-
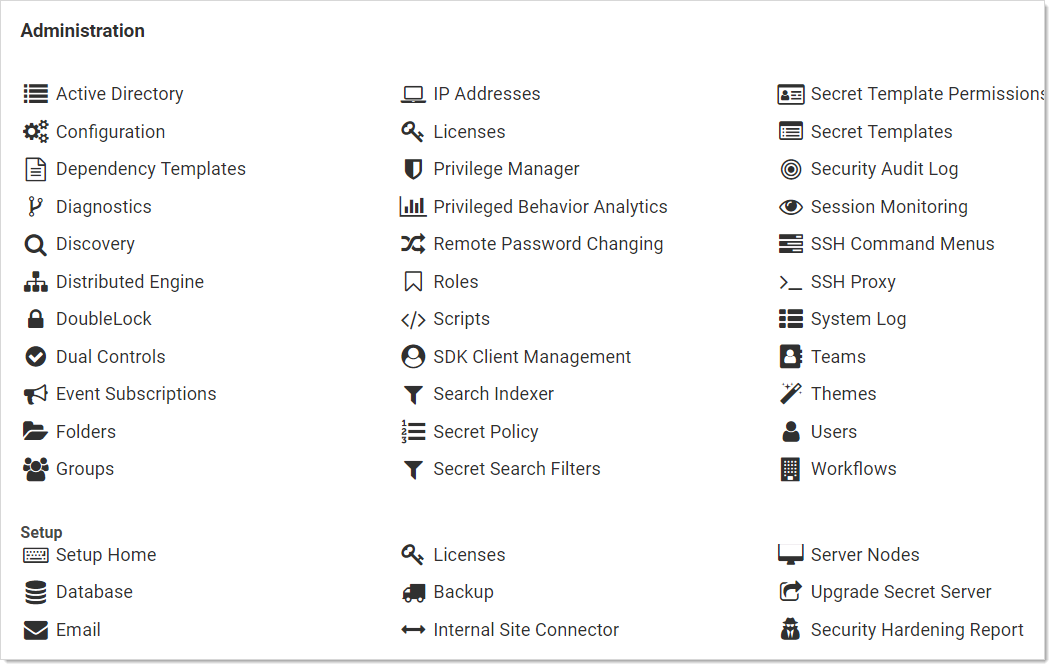
In Secret Server, click Admin > See All. The Administration page appears:
-
Click the Server Nodes button in the Setup section. The Server Nodes page appears:
-
Click the Enable Clustering button.
-
-
Copy the entire Secret Server application folder (typically
c:\inetpub\wwwroot\SecretServer) from the existing node to the secondary node. -
Follow the steps in the Installation Guide for setting up the Step 3: Configuring IIS and Step 4a: Installing Secret Server as a Virtual Directory.
If you use DPAPI encryption for your encryption.config file, you need to transfer the non-DPAPI-encrypted version of the file to the secondary node. You can turn on DPAPI encryption from that server node locally after Secret Server is running. This setting can be found at ADMIN > Configuration on the Security tab. -
If running Secret Server 8.9.300000 or later, ensure that both servers are using the same date and time.
-
Once the secondary server is running, navigate to its Secret Server using a Web browser.
-
Reset the database connection, following the instructions at Changing SQL Server Connection Parameters.
-
Activate licenses for the new node. You can do this on either server once the database connection is established on the secondary node.
-
Configure your load balancer for the two sites to have "sticky sessions" to prevent a user from bouncing between server on each request.
We recommend cookie-based session persistence at the load balancer. Cookie stickiness is more reliable than source-IP–based affinity (which can break with NAT, VPNs, mobile clients, or proxy chains) and helps ensure each user’s authenticated session stays on a single node. -
Configure the worker roles for the cluster:
-
Each server node can optionally run the background worker, engine worker, and session recording worker roles.
-
At least one instance of each type of those roles must be active in the cluster for the clustered Secret Server application to function.
-
You may run more than one instance of each role as desired to improve the performance of the clustered Secret Server application.
-
Upgrading Secret Server in a Clustered Environment
Overview
Secret Server has a built-in Web installer. That installer is a series of pages inside Secret Server for downloading and updating Secret Server. Secret Server is accessible by users for most of the upgrade process. You can stop outside access to the site if you want to prevent users from making changes during the upgrade. Preventing user access will make restoring the database and site backups simpler if you decide to roll back the upgrade immediately afterward.
Procedure
-
Before you start:
-
Ensure that you have account credentials information and access for the server hosting Secret Server and the SQL Server instance hosting your Secret Server database.
-
Have a recent backup of the application files and database available.
-
Stop the application pools on all of the servers except the one that you have chosen to upgrade.
-
-
Choose one Secret Server server to upgrade
-
Perform a backup of that server.
-
Stop the Web servers of all other nodes.
-
Perform the upgrade using the same procedure as a single instance.
If applicable, see Upgrading Secret Server Without Outbound Access. -
Once Secret Server is upgraded and working, copy the Web application folder (without the database.config or encryption.config files) to all other servers.
Never overwrite or delete the encryption.config file on a Secret Server server.Both encryption.config and database.config are automatically propagated to the new servers from the original. If you need to copy those files because of database configuration changes and are using DPAPI, disable DPAPI encryption in Secret Server by going to Admin > Configuration on the Security tab. and clicking Decrypt Key to not use DPAPIbefore copying those files to secondary servers. Please note, that DPAPI is system specific. Do not copy the database.config or the encryption.config from machine to machine if they are protected by DPAPI.EFS encryption is tied to the user account running the Secret Server application pool, so it is not machine-specific. Thus, it is not necessary to copy EFS encrypted files between Secret Server instances, but it is allowed. -
If Delinea management server (TMS) is installed and clustered, copy the TMS directory to the secondary servers as well. The TMS directory is included by default for new installs of Secret Server 10.2+. TMS is used by advanced session recording and Privilege Manager. If the TMS folder and site does not exist in IIS, then no additional actions are needed.
-
Start the secondary servers to confirm they still work.
Upgrading Database Mirroring
-
If there is more than one Web server running Secret Server, ensure all instances are pointing to their primary database.
-
Select one server to perform the upgrade on, stop all other web servers.
-
Perform the upgrade on the single instance.
-
Once upgraded and working, copy the Web application folder to all other Web servers.
-
Start all other Web servers and confirm they work
-
Ensure all instances are properly activated
-
Ensure that the primary database changes have been replicated to the mirror database.
-
If one of the servers was pointing originally to the secondary database, adjust it to point there again.
Upgrading Disaster Recovery Installations
-
Perform the upgrade on the production instance.
-
Backup the production instance.
-
Copy the database backup to the remote DR instance and restore the database.
-
Once the database is upgraded and working, copy the web application folder (but not the database.config or encryption.config files) to the remote DR instance, overwriting the existing files.
-
Restart IIS or recycle the application pool running Secret Server on the remote DR instance.
-
Confirm that the remote DR instance is working correctly.
Load Balancing Secret Server Clusters
In a clustered Secret Server environment set up behind a load balancer, the accessible outside URL may be something other than the server name.
login.aspx. This can cause performance issues and memory leaks. We strongly suggest hitting healthcheck.aspx instead.Custom URL Configuration
In Secret Server 8.5 and later, the Custom URL setting can be configured to ensure that links and resources are resolved correctly and are not based upon the server name. The Custom URL sets a definitive URL for Secret Server. Without it, features in Secret Server that need to build a link back to the server must construct the link using the host value on the request, which is susceptible to manipulation.
-
Search for Configuration.
-
On the General tab, click the Edit button.
-
Go to the Application Settings section.
-
Click to select the Custom URL check box.
-
Type the desired URL in the Secret Server Custom URL text box.
SSL Recommendations
For the best security, we recommend placing the SSL certificate on each of the Web servers. This ensures the traffic leaving the server is encrypted by SSL. Optionally, the load balancer would need the certificates as well for adding the client's IP address.
If the connection between the load balancer and the server is isolated in a security zone, you could leave HTTP between the load balancer and the server and have the SSL on the load balancer.
Configuring Client's IP Address (X-Forwarded-For)
Routing traffic through a load balancer will cause Secret Server to audit the IP address of the load balancer instead of the business user. To avoid this:
First, configure the load balancer to pass along the client's IP address in the header.
Then add the appSettings key IpAddressHeader with the value of the name of the header field containing the client's IP address. This setting must be added to allSecret Server Web servers. Depending on your Secret Server version, do this in one of two ways:
For Secret Server prior to 10.5.000000:
In the web-appSetting.config file in your Secret Server directory, add the following key:
<?xml version="1.0" encoding="utf-8" ?>
<appSettings>
  <add key="IpAddressHeader" value="X-Forwarded-For" />
</appSettings>
For Secret Server 10.5.000000 and later:
-
Go to
https://<SecretServerAddress>/ConfigurationAdvanced.aspx. -
Scroll to the bottom and click Edit.
-
Locate the IP Address Header text box, type
X-Forwarded-For. -
Click the Save button.
Clustering Errors
The following error may arise when setting up or operating Secret Server clustering:
-
Server dates do not match: If the Web server dates do not match, the audit records could be bad. The fix is to set the servers to the same time.
This only applies to Secret Server before version 8.9.300000. -
Secret Server version does not match: If some of the cluster nodes have been upgraded and others have not, their versions will conflict, producing this error. Nodes which have the wrong (older) version will not function correctly. To fix this issue, ensure that all the nodes in your cluster are upgraded. For nodes that are having this issue, you can copy the application folder (minus the database.config file) to replace the server files with the correct version.