Clustering
The RabbitMQ Helper is a tool that streamlines the RabbitMQ clustering process on Windows. For instructions, see Clustering Guide and Quorum Queues in the RabbitMQ documentation.
RabbitMQ сlusters must have an odd number of nodes (typically three), or your cluster cannot tolerate a node fault.
Before selecting your RabbitMQ cluster as the Site Connector in Secret Server, ensure that you have a fully operational, multi‑node RabbitMQ cluster. Quorum queues pin their replica‐hosts at creation and do not adjust automatically.
If you’re decommissioning or shutting down a node, then you must run rabbitmq-queues shrink <vhost> <queue> <node> before you remove it. Otherwise, RabbitMQ will still expect replicas there and may lose quorum (making the queue unavailable).
If you’re adding a new node to the cluster, then you must run rabbitmq-queues grow <vhost> <queue> <node> for each existing quorum queue you want on the newcomer; otherwise, your new hardware won’t host any replicas (under‑utilizing capacity).
If you skip these commands, quorum queues remain bound to the old node list—risking unavailability on down‑nodes or wasted resources on up‑nodes. Alternatively, you can follow the steps in this Delinea Knowledge Base article to purge and re-create the queues, but this will require downtime.
For full details, see the RabbitMQ Quorum Queues documentation.
This topic covers forming and modifying clusters. If you need to take an existing node offline temporarily for maintenance (such as patching or a server restart), see Taking a Node Offline for Maintenance.
The Helper does not assist with load-balancing. For details, see Load Balancing.
You can perform RabbitMQ cluster-management tasks by using a special UI in RabbitMQ Helper. For more information, see Using the RabbitMQ Clustering User Interface. You can also join nodes in a cluster by using PowerShell cmdlets. For more information, see Joining a Cluster Using the RabbitMQ Helper.
Make sure that the clustering prerequisites are met.
Clustering Prerequisites
When RabbitMQ is installed on a virtual or physical machine, it is already in a cluster of one node. To add another node to the cluster, you need to install RabbitMQ on a different virtual or physical machine and then join either of the nodes to the other cluster. The cluster name is irrelevant and can be changed later.
-
Ensure that you have at least three RabbitMQ nodes already installed following the appropriate installation process. For more information, see Installing RabbitMQ with RabbitMQ Helper.
-
Ensure that all cluster nodes can resolve each others’ DNS names to the correct IPs.
-
Install RabbitMQ on N+1 virtual or physical machines.
The cluster must have an odd number of nodes, such as 3.
-
Check the availability of open firewall for cluster ports:
- Make sure the firewall rule is open for the network type (private/domain only) on each virtual/physical machine where RabbitMQ nodes will be installed.
- Required TCP ports: 4369, 25672,44002.
- See RabbitMQ Clustering to find more about the clustering details.
-
On Erlang versions starting with 20.2, the cookie file locations are:
-
\%HOMEPATH%\.erlang.cookie(usuallyC:\Users\%USERNAME%\.erlang.cookie for user %USERNAME%) if both HOMEPATH environment variables are set. -
%USERPROFILE%\.erlang.cookie(usuallyC:\Users\%USERNAME%\.erlang.cookie) if HOMEPATH is not set.
-
-
For the RabbitMQ Windows service:
%USERPROFILE%\.erlang.cookie(usuallyC:\WINDOWS\system32\config\systemprofile). The cookie file used by the Windows service account and the user running CLI tools must be synchronized.
-
For the RabbitMQ Windows service:
%WINDIR%\Users\%USER%\.erlang.cookie(usually%WINDIR%\Users\%USER%\.erlang.cookie). The cookie file used by the Windows service account and the user running CLI tools must be synchronized.
Usually, the cookie location is the following: C:\WINDOWS\system32\config\systemprofile. That cookie value is the shared secret for the cluster, so all nodes joining the cluster must use this shared secret. By retrieving the value from the cookie in the above node's location, try to use it with the Set ErlangCookieFileCommand on another node. The other node will have its Erlang cookie set to match the first node. Clustering commands join the other node to the first node and then bring the first node into the mirror.
Using the RabbitMQ Clustering User Interface
When you run RabbitMQ Helper, a welcome window with a documentation hyperlink appears for any related help. Select Next to see all the options available for the RabbitMQ installation.
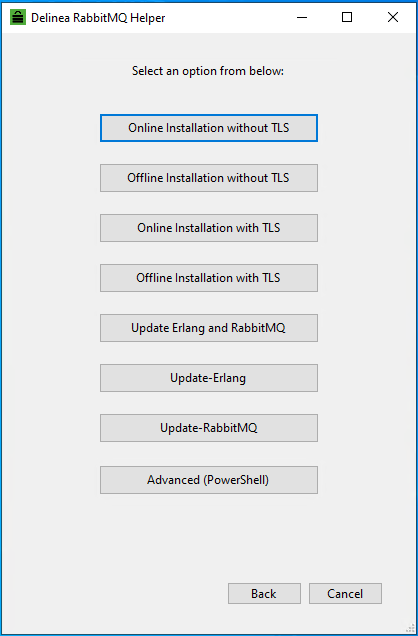
Select the Cluster option to see the clustering-related options.
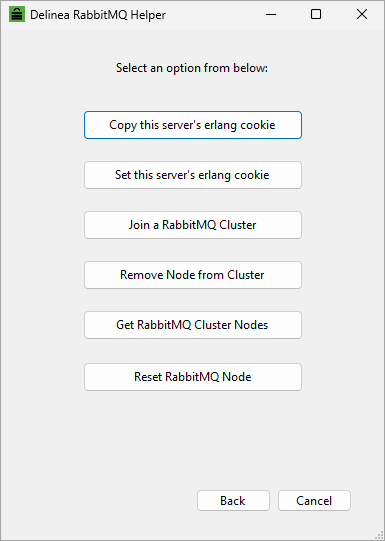
The following table describes the RabbitMQ clustering options.
| Option | Description |
|---|---|
| Copy this server’s erlang cookie | Copies the system’s Erlang cookie value to the clipboard and creates a copy of the cookie file in the user’s profile. |
| Set this server’s erlang cookie | Sets the Erlang cookie value. |
| Join a RabbitMQ Cluster | Helps you join this RabbitMQ node to another to form or join a cluster. |
| Remove this Node from Cluster | Removes a node from a cluster. |
| Get RabbitMQ Cluster Nodes | Gets the information about the nodes in the RabbitMQ cluster. |
| Reset RabbitMQ Node | Resets the current node in the RabbitMQ cluster. |
The following sections describe these options.
Copying the Server’s Erlang Cookie
Select the Copy this server’s erlang cookie option to copy the Erlang cookie value present in the system directory (C:\Windows\System32\config\systemprofile\.erlang.cookie). For information about the related PowerShell command, see Copy-ErlangCookieFile.
Setting the Server’s Erlang Cookie
When you select the Set this server’s erlang cookie option, you are asked to enter the cookie content.
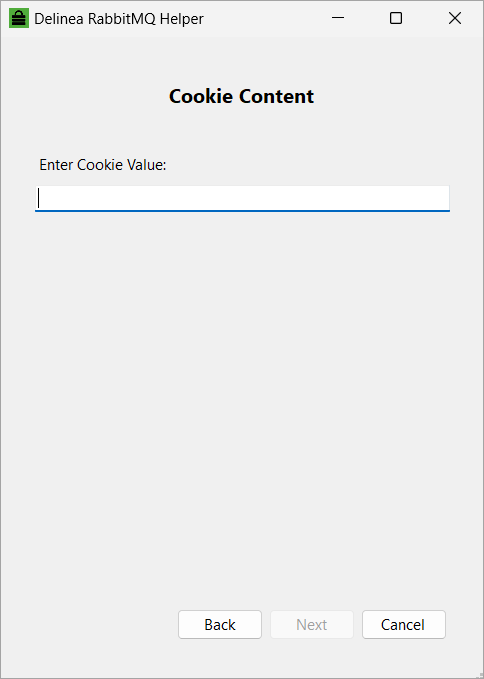
When you enter the cookie content, select Next to set the Erlang cookie value.
For information about the related PowerShell command, see Set-ErlangCookieFileCommand.
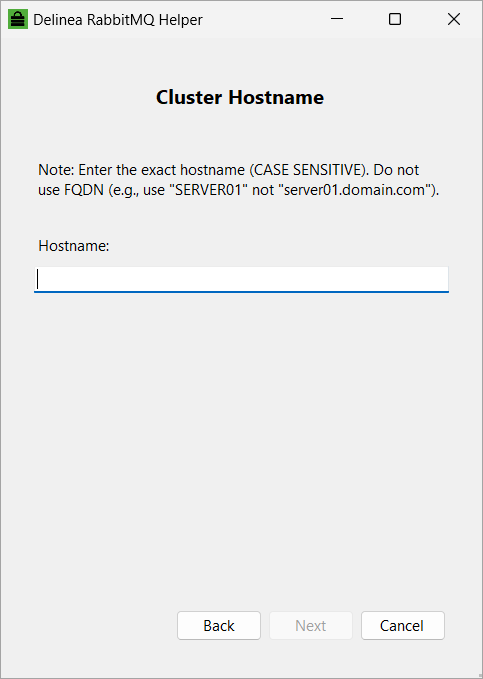
Joining a RabbitMQ Cluster
Select the Join a RabbitMQ Cluster option to join the current RabbitMQ node to another to form or join a cluster through the user interface. For information about the related PowerShell command, see Join-RabbitMQCluster.
-
Select Join a RabbitMQ Cluster and enter the cluster hostname.
-
Check off the clustering prerequisites and select Next.
For more information about the clustering prerequisites, see Clustering Prerequisites.
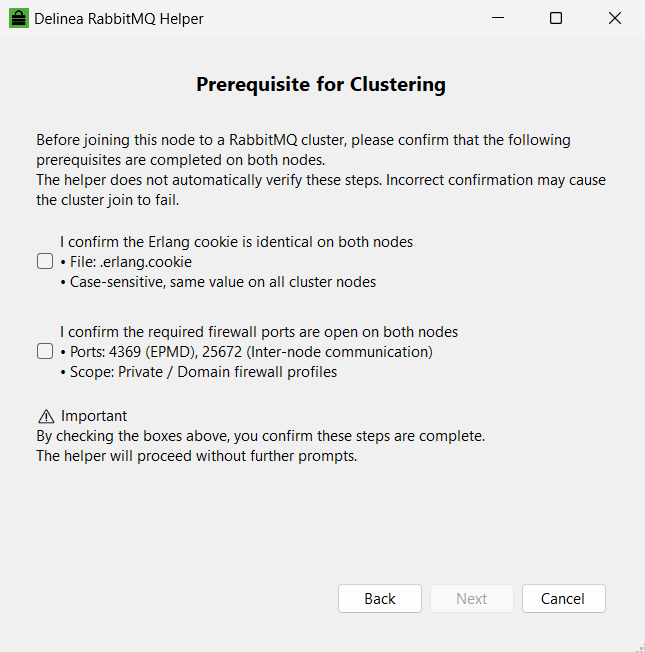
RabbitMQ Helper will proceed to join the node to the cluster.
Removing a Node from a Cluster
Select the Remove this Node from Cluster option to remove a node from a RabbitMQ cluster. For information about the related PowerShell command, see Remove-RabbitMQClusterNode.
When you select Remove this Node from Cluster, you are asked to enter the hostname of the node that you want to remove from the cluster.
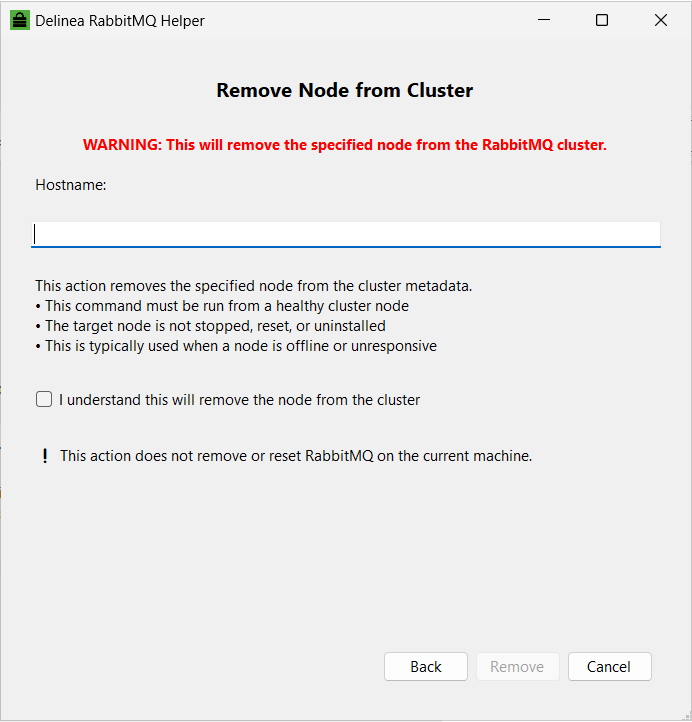
After you enter the hostname, select the I understand this will remove the node from the cluster checkbox and select Remove to start the removal process.
Getting the RabbitMQ Cluster Node Information
Select the Get RabbitMQ Cluster Nodes option to get the details about the nodes in the RabbitMQ cluster. For information about the related PowerShell command, see Remove-RabbitMQClusterNode.
When you select Get RabbitMQ Cluster Nodes, you are asked to enter the RabbitMQ Management UI admin credentials.
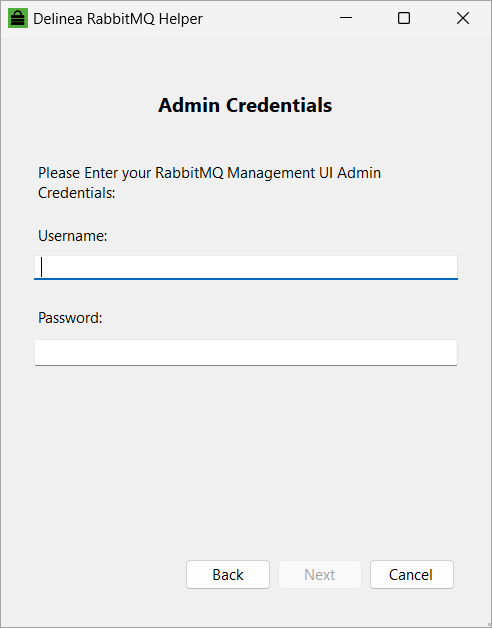
After you enter the credentials, you will see the details about the cluster nodes in the Command Output window.
Resetting a RabbitMQ Node
Select the Reset RabbitMQ Node option to reset the current cluster node. For information about the related PowerShell command, see Reset-RabbitMQNodeCommand.
Resetting a node results in the following changes:
-
Removes the cluster membership of the node.
-
Wipes the configuration data, including all configured vhosts, users, exchanges, queues, bindings, and policies.
-
Deletes all messages.
-
Resets the runtime state.
-
Restores the default credentials; that is, you can use the default
guestuser (with the defaultguestpassword) and the default/virtual host.
When you select Reset RabbitMQ Node, you are asked to confirm and verify the resetting of the node.
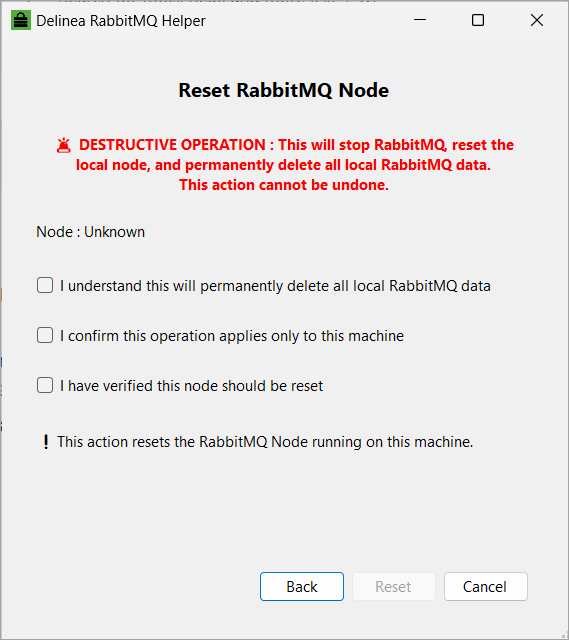
Select all the checkboxes and select Reset to reset your node and remove it from the cluster.
Joining a Cluster Using the RabbitMQ Helper
To join a cluster using the RabbitMQ Helper, run the commands listed below.
- Run the following commands from the RabbitMQ Helper Advanced PowerShell window. You can open this window by selecting Advanced (PowerShell) in the RabbitMQ Helper window. For more information about the RabbitMQ Helper window, see Installing RabbitMQ via User Interface.
- You don't need to stop services on the joining nodes because the commands will do that automatically.
-
Set-ErlangCookieFileCommand: Updates the Erlang Cookie file with values given by the user. For nodes to communicate, they must have the same shared secret called the Erlang cookie. For details, see Clustering Prerequisites above.You can update the existing erlang cookie file values to the nodes that need to be joined for clustering. Alternatively, use the same command with an arbitrary cookie on all nodes (if you want to use a new value or cannot look the existing one up).
-
Join-RabbitMqCluster: Joins the other node in a cluster.You don't need to run the
Join-RabbitMqClustercommand on the first node.
Joining a Cluster PowerShell Example
#on the node which you are joining into the target node/cluster
#Use the value for cookie from the target node, collected in the prerequisite steps.
# <cluster-cookie-value> can be found inside the Erlang Cookie File
Set-ErlangCookieFileCommand -CookieContent <cluster-cookie-value> -Verbose
#using the CookieSet and FirewallConfigured will prevent the helper from prompting. Only use if you have actually already set the cluster cookie and you have configured your firewall
#The value of the -StrictHostname parameter is CASE SENSITIVE and is the exact hostname of a machine that you are trying to join this machine into a cluster with. The -StrictHostname parameter does not take an FQDN.
Join-RabbitMqCluster -StrictHostname OTHERHOSTNAME -CookieSet - FirewallConfigured -Verbose
Clustering a RabbitMQ Node Without the Helper
The steps below are for joining a new node to a cluster. If you want to temporarily take an existing cluster node offline for maintenance, see Taking a Node Offline for Maintenance instead. Running rabbitmqctl stop_app and start_app in isolation, without the join_cluster step, is covered there.
Prerequisites
-
Ensure that RabbitMQ is installed and running on each machine you want to include in the cluster
-
Each node must have a unique name. By default, it is rabbit@hostname. You can change this value using the RABBITMQ_NODENAME environment variable
To cluster a Rabbit node in an alternative way:
-
Copy the
.erlang.cookiefrom one node to all nodes in the system profile (usuallyC:\Windows\System32\config\systemprofile) and the user profile running rabbitmqctl.bat. -
Restart the RabbitMQ nodes.
-
Go to the RabbitMQ Bin Directory and run the following command:
- rabbitmqctl stop_appAn example of the RabbitMQ Bin Directory: -
C:\Program Files\RabbitMQ Server\rabbitmq_server-xx.xx.xx\sbin. -
Join the cluster by running the
- rabbitmqctl join_cluster rabbit@OTHERHOSTNAMEcommand. -
Start the RabbitMQ nodes by running the
- rabbitmqct start_appcommand. -
Verify the cluster by running the
rabbitmqctl cluster_statuscommand.