Verification
You can easily correlate Secret Server syslog data using Splunk’s field-extraction capabilities. Secret Server’s detailed Syslog currently contains 44 different events, tracking more than 20 unique data fields. For more information about events that are reported by Secret Server, see Secret Server Reported Events.
Accessing Secret Server Events in Splunk Cloud Platform
To access the Secret Server reported events in Splunk Cloud Platform:
-
Log in to Splunk Cloud.
-
In the upper-right corner, select Search and Reporting.
-
Under New Search, enter the query
source=”syslog”and select the green Search icon.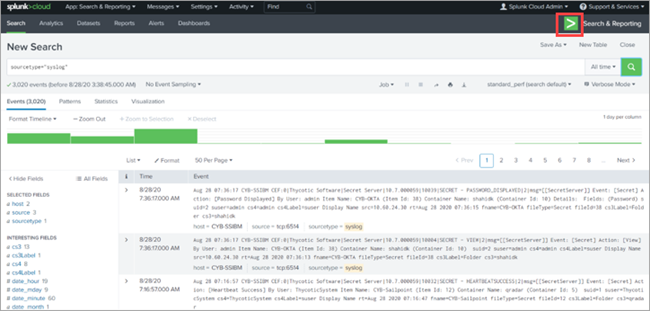
Filtering the Secret Server Events in Splunk
To filter the reported Secret Server events in Splunk to just specific events you want, you can create a custom field extraction in Splunk and enter a search query that includes the custom field extraction into Splunk to retrieve the matching events. For information about creating custom field extractions, see the Splunk documentation. For details about the Splunk search syntax, see the Splunk documentation.
For example, you can create a full_suser custom field extraction to extract fields that have a space in the reported events (for example, a user’s full name). By default, Splunk identifies Secret Server users by their user IDs stored in the database.
You can then enter the following query, which includes the full_suser field extraction, into the search field in Splunk to show all SECRET - VIEW events (events for when secrets are viewed in Secret Server). This query helps identify frequently used user accounts, which can be useful for monitoring privileged access, detecting potential security risks, or analyzing user activity trends in Secret Server.
source="\<instance\>" "SECRET - VIEW" stats count by suid,full_suser \| table suid full_suser count \| search count > 2
In the query, source="\<instance\>" specifies the data stream from which Secret Server events in Syslog format originate, for example, source="tcp:200".