Zone Role Workflow Integration in ServiceNow
Set Up Server Suite for Windows
-
Click here to set up Server Suite for Windows computers.
-
Click here to download the Delinea Server Suite Privilege Access Request integration from the ServiceNow store.
Set Up Evaluation Environment for Zone Role
- Zones enable you to grant specific rights to users in specific roles on specific computers. By assigning roles, you can control the scope of resources any group of users can access and what those users can do. For example, all the computers in the finance department could be grouped into a single zone called “finance” and the members of that zone could be restricted to finance employees and senior managers, each with specific rights, such as permission to log on locally, access a database, update certain files, or generate reports.
- Rights represent specific operations users are allowed to perform. A role is a collection of rights that can be defined in a parent or child zone and inherited. For example, a role defined in a parent zone can be used in a child zone, in a computer role, or at the computer level.
- While it is possible to give users access by statically assigning them to a role with specific administrative rights, a more secure method for controlling access is to establish a request and approval workflow. A request and approval workflow give specific users or members of specific roles the ability to approve or reject access requests. A request and approval workflow improve security by controlling which users can request access, which users can grant access, and how long access is allowed if it is granted.
The Delinea Zone Role Workflow integration allows you to use ServiceNow to request and approve access to multiple zone roles. The Zone Role Workflow integration is a feature of the Delinea Privileged Access Request application available through the ServiceNow store. See Managing Zone Role Assignment Requests for more information about zone role workflow.
The Zone Role Workflow integration requires the following:
- The ServiceNow app is configured.
- Zones and roles configured on the registered and verified ServiceNow domain.
- Zone Role Workflow enabled in the Admin Portal tenant.
- A registered and verified ServiceNow domain.
- A ServiceNow account with administrator privileges.
Configure Zone Role Workflow Integration
- Create role mappings for users and approvers.
- Map the user(s)’ role to the Destination Role user.
- Map the approver(s)’ role to two Destination Roles (ITIL and x_cenr3_priv_access.approver).
The Destination Role ITIL gives approvers the ability to process or fulfill requests through the ServiceNow Catalog. The Destination Role x_cenr3_app_access.approver limits the approver’s scope to the functionality provided under Centrify Privileged Access Request. For example:
| Name | Destination Role |
|---|---|
| ServiceNow Approvers Role | ITIL, x_cenr3_priv_access.approver |
| ServiceNow End Users Role | user |
| User | Experience |
|---|---|
| Requester | 1. Access ServiceNow through the Admin Portal. This should be an AD user in the domain that is registered and verified with ServiceNow. 2. Select the Service Catalog, then search for Centrify Zone Role Workflow. 3. Create the request for the resource(s) and the role you need, then click Order Now. The fields for the request mirror those in the Admin Portal. ServiceNow generates a request number that you can use to track the request. 4. Once the request is approved, ServiceNow contacts the Centrify PAS through an API and the requester is given access to the requested role. Users can then access computers in the zone and perform tasks available to the role they were granted access. |
| Approver | 1. Access ServiceNow through the Admin Portal. 2. Select ServiceNow > Centrify Privileged Access Request, then click My Approvals. 3. Close the task by granting windowed, temporary, or permanent access, then click Close Task. See Responding to zone-based role assignment requests for more information. |
Request Role Assignment
-
Go to the Zone Role Workflow and provide information for the following fields:
- Resource
- Role
- Assignment Type
- Duration Type
- Duration
- Priority
- Parent Task
- Request Justification
-
Go to the top right corner and select the quantity and Add to Cart or Order Now the request.
-
Once submitted, the Order Status window displays.
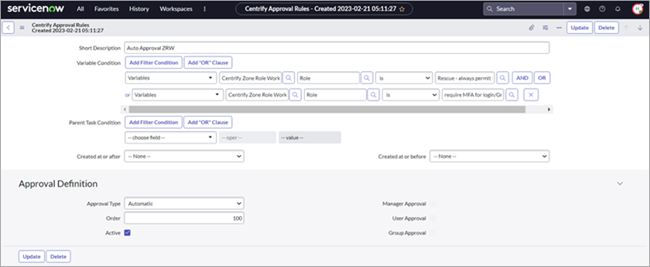
Automatic Approvals for Specific Zone Rule Workflow Roles
Create an Approval Rule for automatic approvals for specific roles:
-
Log in to ServiceNow with an Admin account.
-
Go to All > Centrify Privilege Access Request > Approval Rules.
-
When New is selected**,** you will be able to create a new Approval Rule.
-
Give the Approval Rule an appropriate name.
-
In Variable Condition, click the dropdown menu and click Show related fields, and select Variables.
-
Select the application and Role (Role Name).
You can add multiple roles in a single Approval Rule.
- Select the Approval Type as Automatic.
- In the Order field, enter 100.
- Select the Active checkbox and click Update to save.
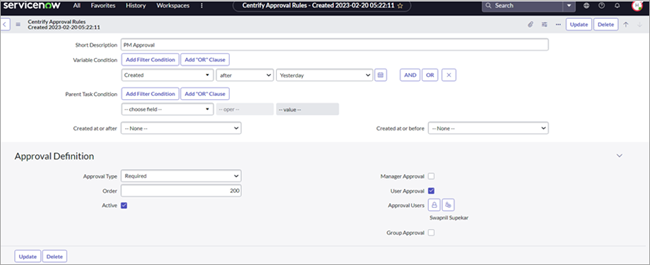
Create Approval Rule for PM Approvals
-
Log in to ServiceNow with an Admin account.
-
Go to All > Centrify Privilege Access Request > Approval Rules.
-
When New is selected, you will be able to create a new Approval Rule.
-
Give the Approval Rule an appropriate name.
-
In Variable Condition, select Created after Yesterday.
-
For the Approval Type, select Required.
-
In the Order field, enter 200.
-
Select the Active checkbox.
-
Select the User Approval checkbox.
-
For Approval Users, select the approver and click Update to save.
The Auto Approval rule order must be before the PM Approval. If the order value of the PM approval is 100 and the Auto approval is 200, then the auto-approval request will not be auto-approved. It will go to the approver for approval instead.