Setup
If a version of the PAS for Servers–ServiceNow integration supports multiple ServiceNow releases, you can upgrade from one ServiceNow release to another without needing to make any additional changes. All supported versions will continue to function as expected. For information about the ServiceNow releases that the PAS for Servers–ServiceNow integration supports, see ServiceNow Release Integration Matrix.
Download the Integration Package
The PAS for Servers can be installed through the ServiceNow store or by manually importing XML files.
Automated Installation via ServiceNow Store
-
To get the PAS for Servers integration from the ServiceNow store, click here.
-
Install the integration from the store following the ServiceNow process. To get instructions on installing the PAS for Servers, click here.
Manual Installation via XML Import
If you are unable to use the ServiceNow Store for installation or prefer a manual setup, you can import the plugin XML file into ServiceNow.
Download the most recent version of the integration.
To import an XML file into ServiceNow using the Privileged Access Service integration:
-
Unzip an XML file with the application.
-
Log into the ServiceNow.
-
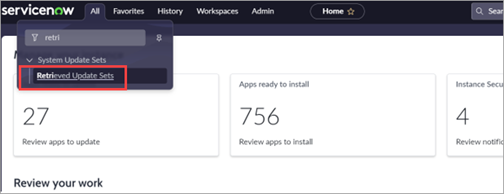
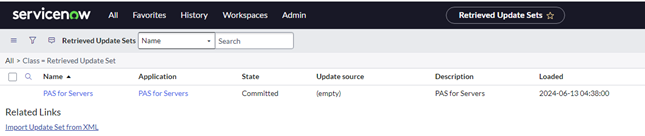
In ServiceNow, go to All > Retrieved Update Sets:
-
Select the Import Update Set from XML button:
-
Open the unzipped XML file and select Upload.
-
Once the file is imported it will appear in the Retrieved Update Sets list.
-
Open the uploaded file and select Preview Update Set.
-
The state is then changed to Previewed.
-
Select Commit Update Set.
-
After the commit is successful, the state is changed to Committed.
-
Once the state changes to Committed, it indicates that the application has been successfully installed.

If errors are shown after preview, select them and then select the Accept the Remote Set option from the dropdown Actions on selected rows. Accepting errors won't affect the application's functionality.