Verification
Catalog Requests Workflow
The Catalog Requests Workflow is a structured process for requesting access to applications, roles, or commands within an organization. Below are instructions on how to create typical requests in ServiceNow.
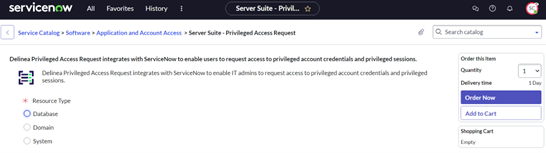
Server Suite – Privileged Access Request
Delinea Privileged Access Request integrates with ServiceNow to enable IT admins to request access to privileged account credentials and privileged sessions. The requestor can raise requests for temporary and permanent assignments. Once the request is approved, user gets the specified privileged access to the account.
To initiate a request:
-
Log in to the ServiceNow.
-
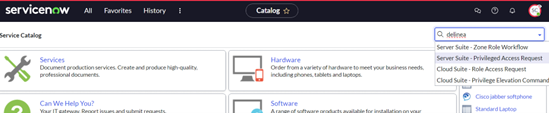
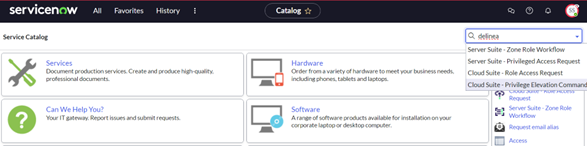
In ServiceNow, go to All > Service Catalog.
-
Select the Server Suite – Privileged Access Request option from the dropdown to search for the application.
-
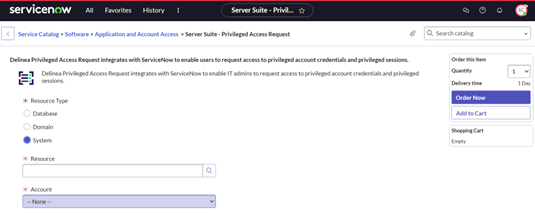
Select the Resource Type. (Database/ Domain/ System)
-
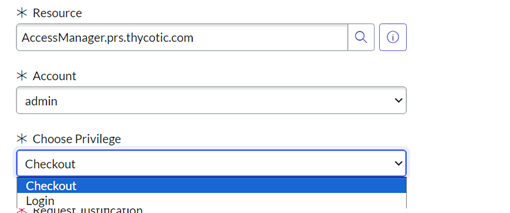
Select the Resource and the Account from the dropdown list.
-
In the Choose Privilege field, select the privilege from the dropdown list.(Checkout / Login)
-
Select the type of access:
-
Temporary
-
Permanent
-
-
Enter the reason and submit the request.
-
Login with the Approver user in ServiceNow.
-
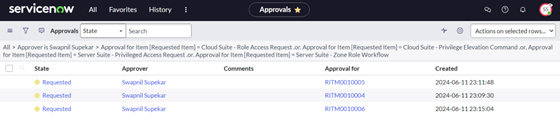
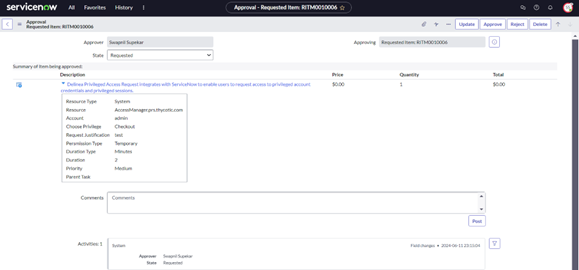
Navigate to All > PAS for Servers > My approvals.
-
Open the request and approve it.
-
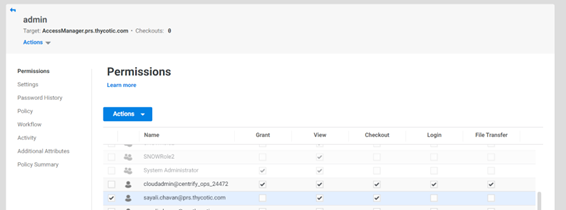
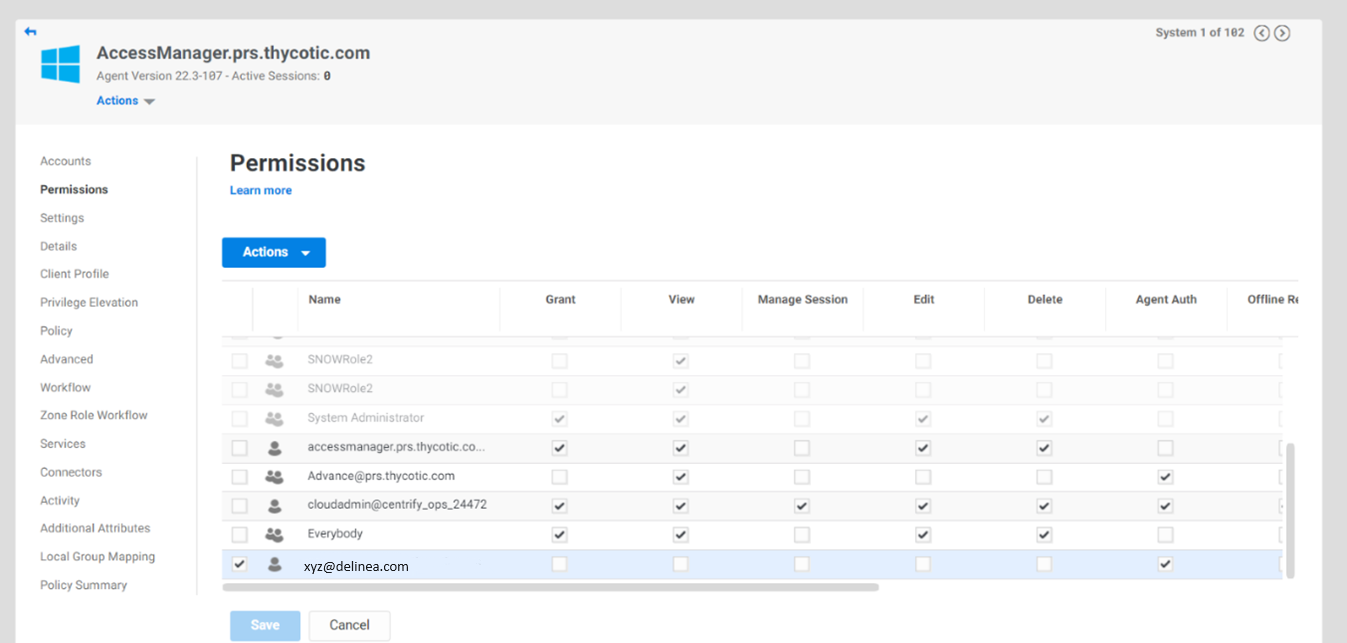
Once the request is approved, that user is added in the Permissions section of the specified account in PAS.
By default, only the Temporary type option is available in the dropdown. Users with Permanent Access role (x_delinea.permanent_access_user) can see the Permanent access type in the dropdown.
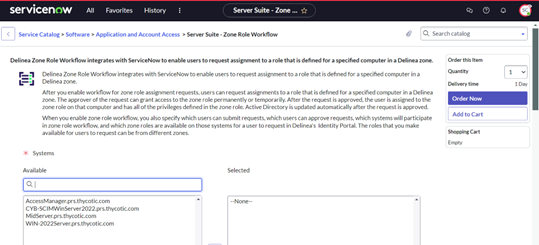
Server Suite – Zone Role Workflow
Key features of Zone Role Workflow requests:
-
The Zone Role Workflow integration allows users to use ServiceNow to request and approve access to multiple zone roles.
-
Zones allow you to assign specific permissions to users based on their roles and specific computers. For instance, you can group all the computers in the finance department into a zone called "finance" and then restrict access to only finance employees and senior managers. Each user within this zone can be given specific rights, such as the ability to log on locally, access a database, update specific files, or generate reports.
-
"Rights" refer to specific actions that users can perform. A "role" consists of a set of rights that can be defined in a parent or child zone and inherited. For example, a role defined in a parent zone can be utilized in a child zone, in a computer role, or at the computer level.
-
While it is possible to give users access by statically assigning them to a role with specific administrative rights, a more secure method for controlling access is to establish a request and approval workflow. A request and approval workflow gives specific users or members of specific roles the ability to approve or reject access requests. A request and approval workflow improves security by controlling which users can request access, which users can grant access, and how long access is allowed if it is granted.
See Managing Zone Role Assignment Requests for more information about zone role workflow.
To initiate a request:
-
In ServiceNow, go to the All > Service Catalog.
-
Select the Server Suite – Zone Role Request option from the dropdown to search for the application.
-
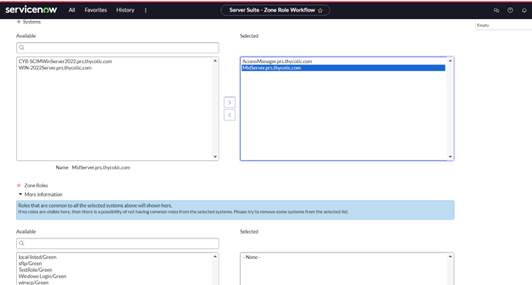
Select the System. Multiple systems can be selected.
-
Select the Roles. Multiple roles can be selected.
-
Select the type of access:
-
Temporary
-
Permanent
-
Windowed
-
-
The Temporary and Windowed types require the input of a time parameter.
-
Enter the reason and submit the request.
-
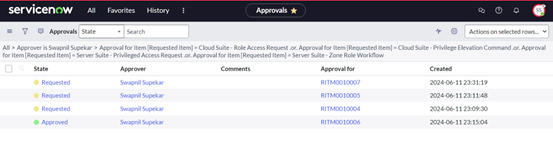
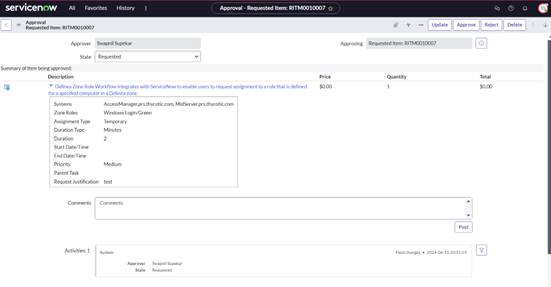
Login with the Approver user into ServiceNow.
-
Navigate to All > PAS for Servers > My approvals.
-
Open the request and approve it.
-
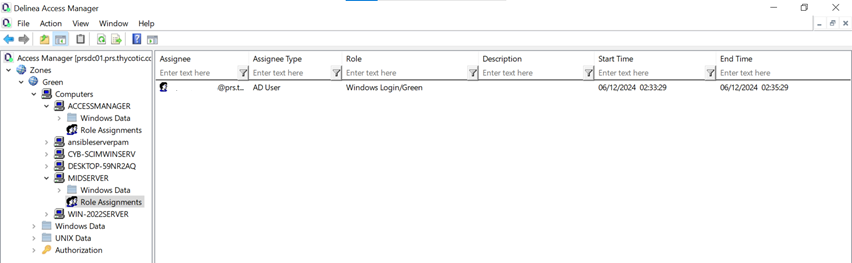
Once the request is approved, the user will be added to the selected system in the Access Manager application.

The systems are displayed based on User’s Request Zone Role permission.
Roles that are common to all the selected systems above are displayed here. If no roles are displayed, then there is a possibility of not having common roles from the selected systems. Please try to remove some systems from the selected list.
By default, only Temporary and Windowed access type options are available in the dropdown. Users with Permanent access role (x_delinea.permanent_access_user) can see the Permanent access type in the dropdown.
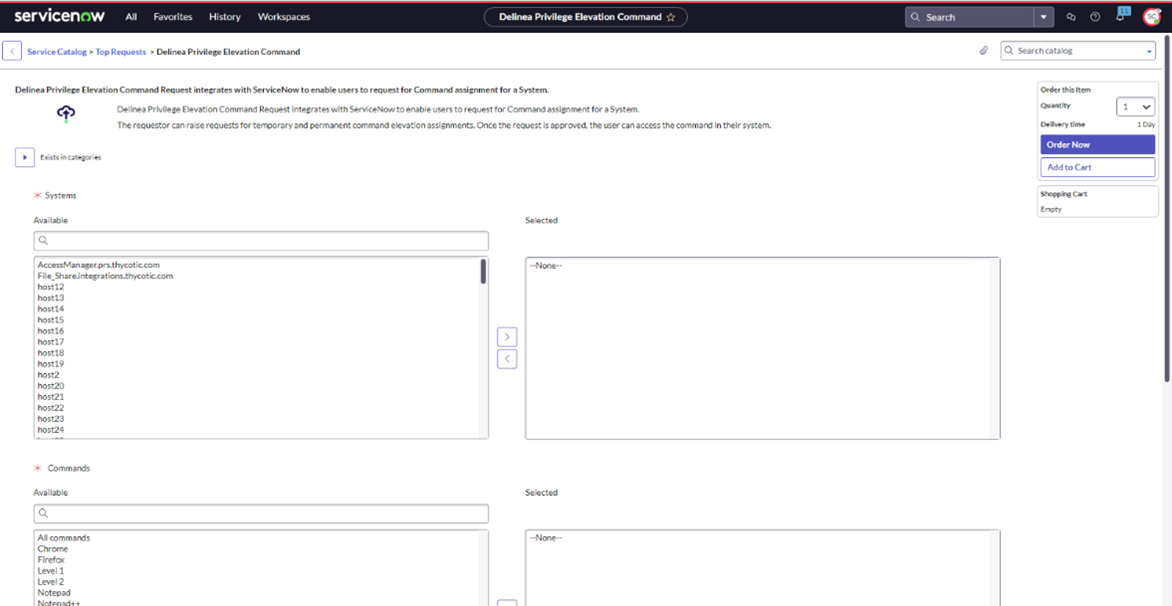
Cloud Suite – Privilege Elevation Command
Privilege Elevation Command Request integrates with ServiceNow to allow you to request command assignments for a system. You can submit requests for temporary and permanent command elevation assignments. Upon approval of the request, you will be able to access the command in your system.
To initiate a request:
-
In ServiceNow, go to the All > Service Catalog.
-
Select the Cloud Suite - Privilege Elevation Command option from the dropdown to search for the application.
-
Select the System set and then Systems. You can select multiple systems.
-
Select the Commands or the Command set. You can select multiple Commands or Command sets.
-
Select the type of access:
-
Temporary
-
Permanent
-
Windowed
-
Select the required ticket or provide the reason.
-
Submit the request.
-
Login with the Approver user into ServiceNow.
-
Navigate to All > PAS for Servers > My approvals.
-
Open the request and approve it.
-
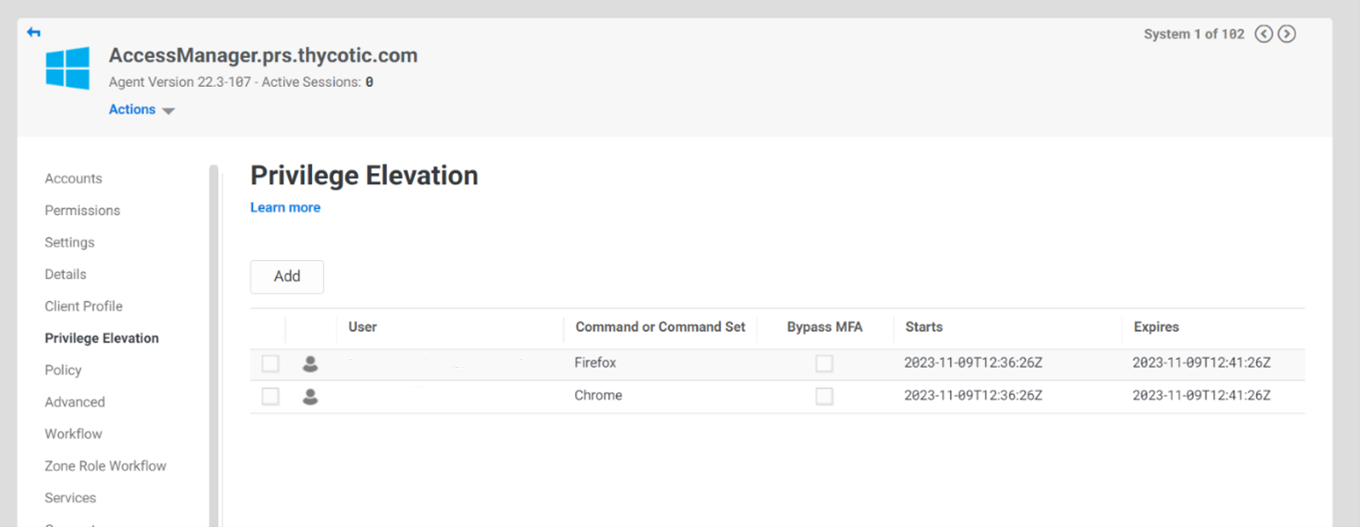
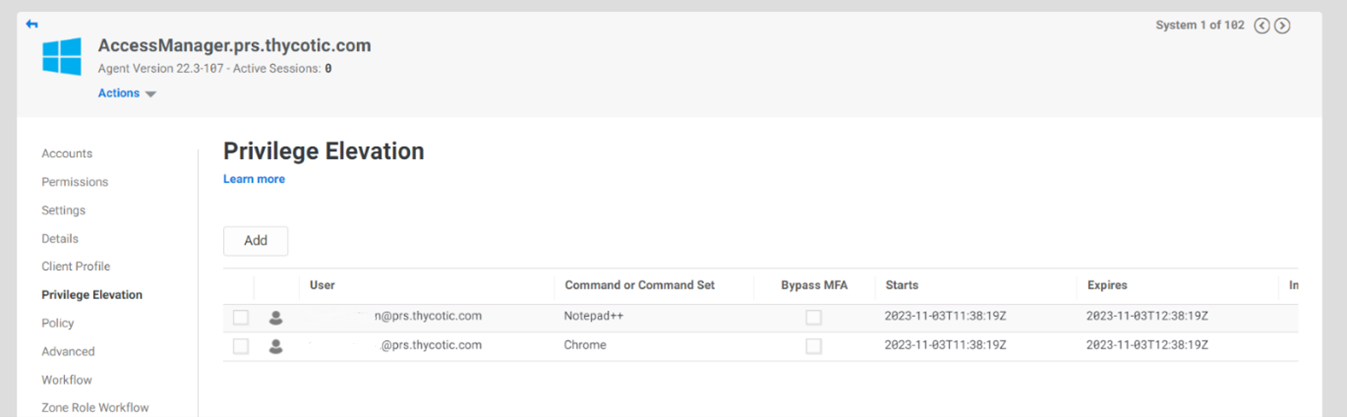
Once the request is approved, the user can be found under Privilege Elevation , in the left pane in PAS.
Only 100 systems can be selected at a time.
By default, only Temporary and Windowed access type options are available in the dropdown. Users with Permanent access role (x_delinea.permanent_access_user) can see the Permanent access type in the dropdown.


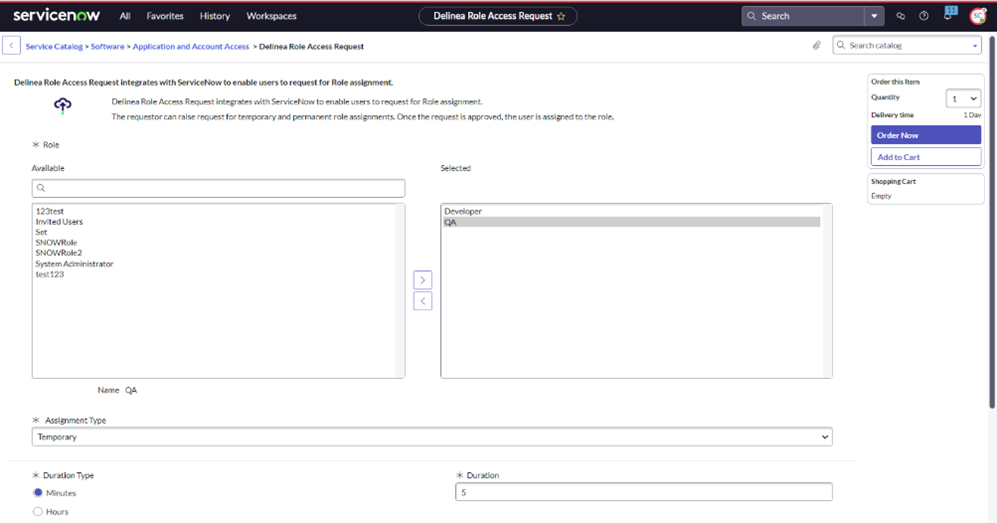
Cloud Suite – Role Access Request
Role Access Request integrates with ServiceNow to enable users to request a Role assignment. The requester can ask for temporary and permanent role assignments. Once the request is approved, the user is assigned to the role.
To initiate a request:
-
In ServiceNow, go to All > Service Catalog.
-
Select the Cloud Suite - Role Access Request option from the drop-down to search for the application.

-
Select the Role. You can select multiple roles.
-
Select the type of access:
-
Temporary
-
Permanent
-
Windowed
-
Enter the reason and submit the request.
-
Log in with the Approver user into ServiceNow.
-
Navigate to All > PAS for Servers > My approvals.
-
Open the request and approve it.
-
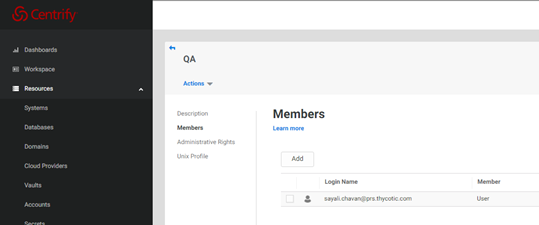
Once the request is approved, you can find the user in PAS under the Members item in the left pane.
By default, only Temporary and Windowed access type options are available in the drop-down. Users with the Permanent access role (x_delinea.permanent_access_user) can see the Permanent access type in the drop-down.

Privilege Access Workflow Using Incident and Change Management
If you have PAS for Servers configured, you have the ability to create just-in-time access requests for Systems, Commands, Roles, and Zone Roles using the Delinea Privilege Elevation section in the Incident and Change Management forms.
You don't have to be logged into ServiceNow or PAS, to access these forms. Instead, you can find any user by accessing the Search any user in the Directory Service field from the Directory Services associated with Cloud Suite.
To view the System Sets, you must have the View permission for the required System Set.
Additional Configuration Options for Incident and Change Management Tickets
The following table provides further details about the properties associated with Incident and Change Management tickets:
| Field | Values | Used for Incident | Used for Change Management |
|---|---|---|---|
| Maximum Access Duration limit |
Days - Upper limit is 90 days. Value set in this field will be considered as the maximum access duration limit for users while initiating the request. |
Yes | Yes |
| Allow All Systems Section | Select the Yes/No box if you want to allow All System Selection instead of System Sets, or leave it unselected if you want the System Sets to be allowed and displayed based on the user's view permission of the System Set. | Yes | Yes |
| Hide Delinea tab on Change request & Incident |
Enable - The Delinea tab is added on the Incident and Change Request forms. Disable - The Delinea tab is removed from the Incident and Change Request forms. |
Yes | Yes |
| Allow only static duration for Incidents |
YES - Static duration value set in Default Access limit for Incident tickets (Hours) field is considered as the access time for Incident tickets. NO - You need to provide the duration manually while creating the Incident. |
Yes | No |
| Default Access limit for Incident tickets (Hours) |
Hours 1-24.
The upper limit for this field is set based on the value provided in the Maximum Access Duration Limit field. |
Yes | No |
| Valid States for Incident Tickets |
Provide the State’s value in this field (numeric value). A valid state requires access to the System/Command/Role/Zone Role/System (Account). |
Yes | No |
| End States for Incident Tickets |
Provide the State’s value in this field (numeric value). End state means the end of the workflow. (Access cannot be regranted once the Incident moves into the End state. |
Yes | No |
| Affected/Impacted CIs for Incident |
Available options:
|
Yes | No |
| Valid States for Change Tickets |
Enter the State's value (numeric) for the access of the System/Command/Role. A valid state requires access to the System/Command/Role/Zone Role/System (Account). |
No | Yes |
| End States for Change Tickets |
Enter the State value in this field as a numeric value. Once the Incident moves to the End state, access cannot be regranted. |
No | Yes |
| Affected/Impacted CI for Change Request |
Available options:
|
No | Yes |
Incident Ticket Workflow
To create an Incident ticket, follow these steps:
-
In ServiceNow, navigate to All > Incident > Create New.
-
Select the Delinea Privilege Elevation Section tab and complete all the mandatory fields.
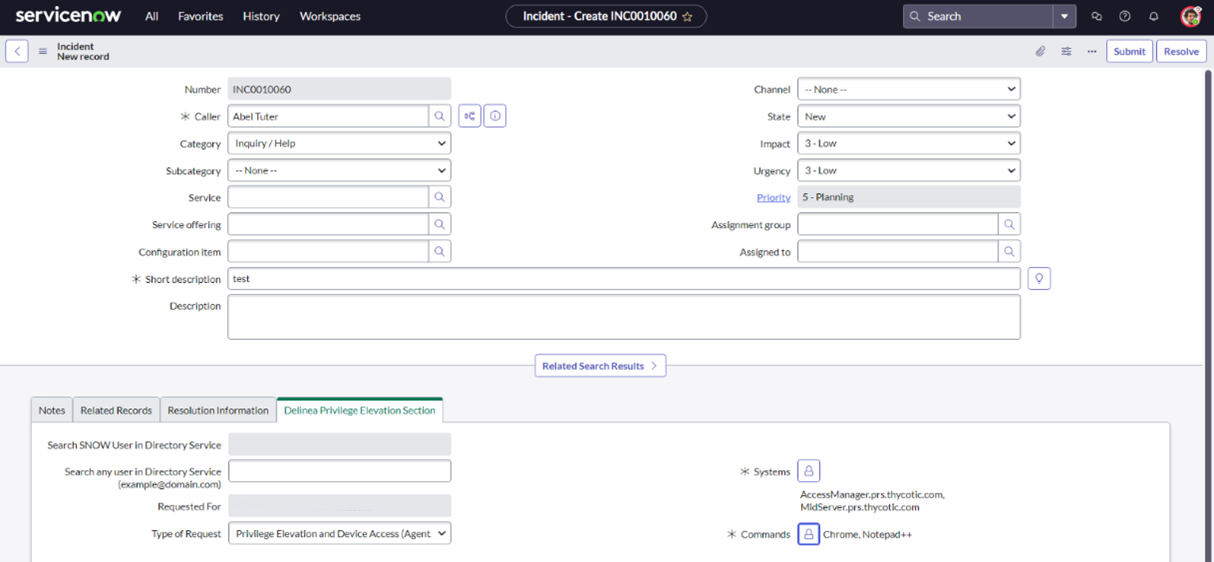
-
Search for the user using the Search SNOW User in Directory Service field or Search any user in Directory Service.
-
Select Submit to submit the request.
-
Specify the user in the Assigned to field.
-
Log in with the Assigned user.
-
Navigate to All > Incident > Assigned to me.

-
Change the Incident state to a valid state and access is granted when the state is valid.
-
Verify that the user is added to the Permissions section of the specified account in PAS and the Privilege Elevation section.
- Check the Notes section for details.
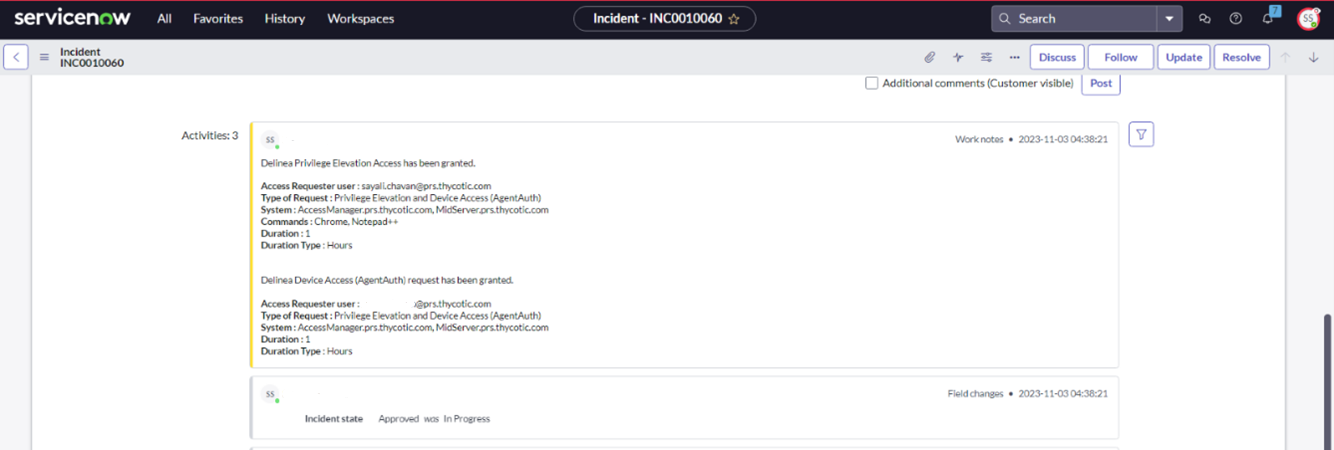
If the state of the Incident is changed to any state other than a valid state, access will be revoked, and the request will be put on hold. If the state is changed back to the Approved State, access will be granted again.
Change Request Workflow
To create a Change ticket, follow these steps:
-
In ServiceNow, navigate to All > Change > Create New.
-
Select the Delinea Privilege Elevation Section tab and complete all the mandatory fields.
-
Select the Schedule tab and provide the dates in the Planned Start Date and Planned End Date fields to schedule the change request.
-
Select Submit to submit the request.
-
Move the Change request to the next available state and select the required Assignment group.
-
Log in as any of the assignment group members and approve the request.
Access is granted when the state becomes valid, and the Planned Start Date time activates.
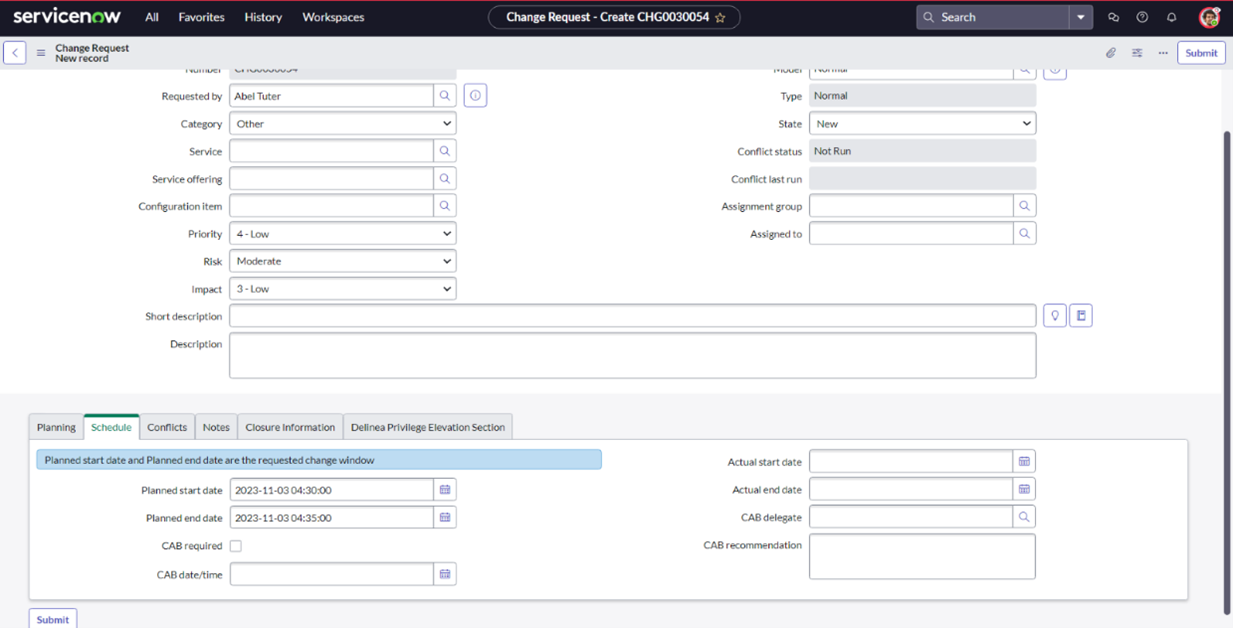
Access will only be revoked after the Planned End Date or when the Change is moved to the End State.