Configuration
Step 1: Create an API User
-
Log into the Privilege Manager console using admin credentials.
-
Navigate to Admin -> Users and select Create.
-
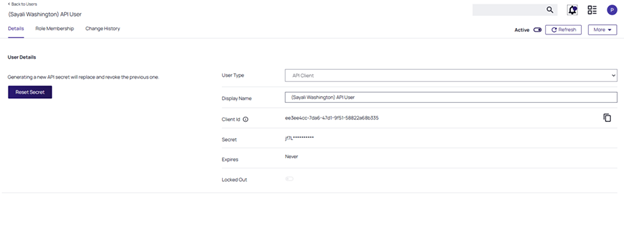
In the User Type dropdown list, select the API Client option .
-
Copy the Client ID and Secret value (make sure to store these securely).
- Select Create.
Step 2: Create API User Credentials
-
Log into the Privilege Manager console using admin credentials.
-
Navigate to Admin -> Configuration and select the Credentials tab.
-
Select Create.
-
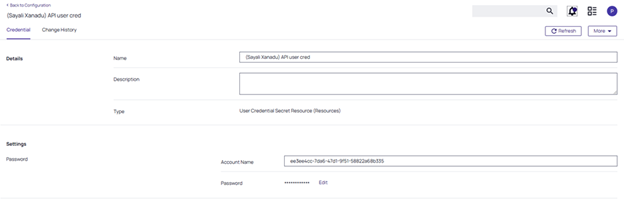
In the Details field, enter a name for the API user credentials.
-
Under the Settings section complete the following fields:
-
Account Name: Enter the Client ID from Step 1.
-
Password: Select Edit, and enter the Secret from Step 1.
-
-
Select Save Password and then Save.

Step 3: Create ServiceNow Admin Credential
-
Log into the Privilege Manager console using admin credentials.
-
Navigate to Admin -> Configuration and select the Credentials tab.
-
Select Create.
-
In the Name field enter a name for the ServiceNow user credentials.
-
In the Description field, enter a description for the ServiceNow user credentials.
-
Under the Settings section complete the following fields:
-
Account Name: Enter the ServiceNow Admin Username.
-
Password: Select Edit, and enter the ServiceNow Admin Password.
-
-
Select Save Password and then Save.
Step 4: Configure ServiceNow Webhook
-
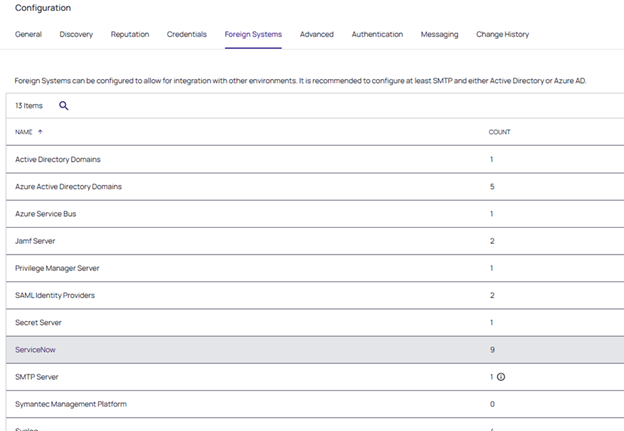
In Privilege Manager, navigate to the Foreign Systems tab.
-
Select the ServiceNow link from the list of available foreign systems.
-
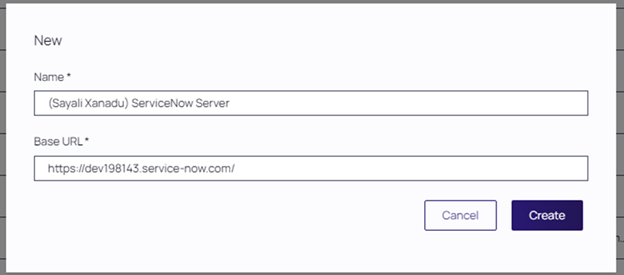
Select Create to add a new configuration. The New page opens.
-
In the Name field, enter a Name for the ServiceNow server.
-
In the Base URL field, enter the Base URL for your ServiceNow instance:
-
https://[InstanceName].service-now.com/ (replace [InstanceName] with your ServiceNow instance name).
-
Select Create to proceed. The ServiceNow Server page opens.
-
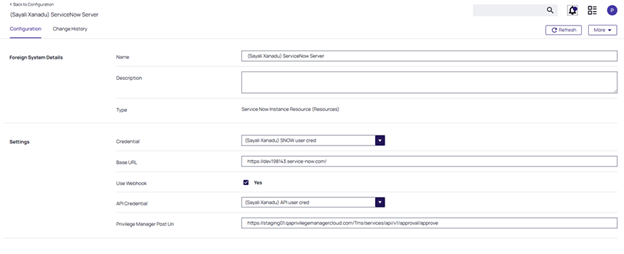
In the Foreign System Details section, enter a name for your ServiceNow Server and a short description.
-
In the Settings section complete the following fields:
-
Credential: Select the ServiceNow Admin Credentials you created earlier.
-
Base URL: Enter the ServiceNow Base URL from Step 5.
-
Use Webhook: Select the Use Webhook checkbox to enable real-time communication.
-
API Credential: Select the API Credentials you created earlier.
-
Privilege Manager Post Uri: Enter the API endpoint for Privilege Manager:
-
https://[PrivilegeManagerInstance].com/Tms/services/api/v1/approval/approve (replace [PrivilegeManagerInstance] with your Privilege Manager instance).
-
Save the changes.
-
This will automatically trigger a webhook registration in the background and initiate a server task to register the webhook with the ServiceNow app.
Step 5: Check the newly created webhook
-
Log into the Privilege Manager console using admin credentials.
-
Navigate to Admin -> Configuration and go to the Messaging tab.
-
Locate and select the webhook that matches the ServiceNow configuration name.
-
The settings are automatically saved; no further changes are needed.
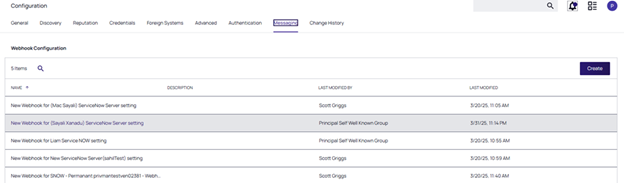
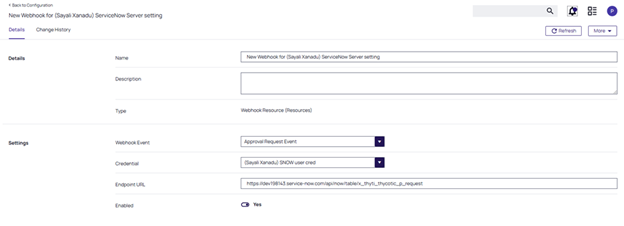
By default, the Approval Request Event option is selected as the webhook event.
Step 6: Check Registration in ServiceNow App
-
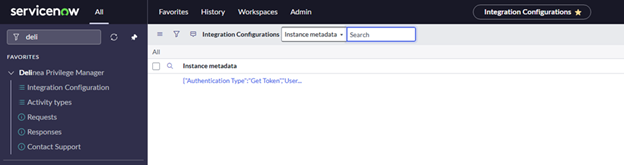
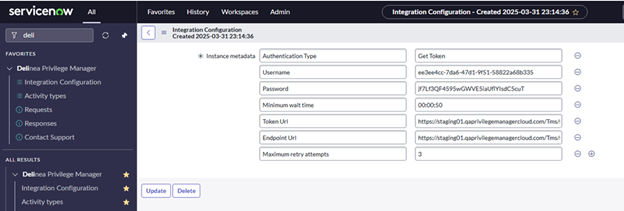
Log in to ServiceNow using your admin credentials, and go to All > Delinea Privilege Manager > Integration Configuration.
-
The registration happens automatically once the Use Webhook checkbox is checked in the Privilege Manager ServiceNow Server configuration (Foreign Systems).
-
The registration will return an Instance Id (sys_id) for use in subsequent requests.
-
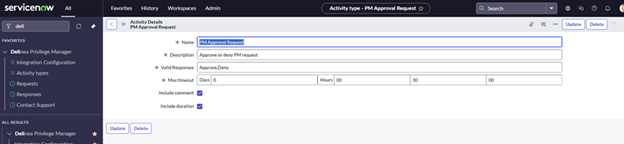
Navigate to All > Delinea Privilege Manager > Activity Type.
-
Register the supported Activity Type before sending any requests. The registration returns the Activity Type Id (sys_id).
-
In the Name field enter the name of the request.
-
In the Description field enter a description of the reason of this request.
-
In the Valid Responses field enter valid responses for the activity type are: Approve.Deny. because the activity type supports only these 2 responses.
-
Select Update.