Configuring Delinea MidServer Setup Utility for Secret Server
After establishing the basic requirements for creating a service account and a discovery secret, you need to run the Delinea MidServer Setup Utility. This utility is designed to generate all necessary parameters while providing a secure and reliable method for storing user credentials, avoiding the use of plain text in the MidServer configuration file. It facilitates the configuration of the connection between your MID Server and Secret Server.
Starting with version 5.0, the Delinea MidServer Setup Utility introduces a graphical UI mode that simplifies configuration. You can now launch the setup utility and complete MID Server configuration directly through the UI instead of manually editing files or running all commands from the console.
During Discovery, ServiceNow does not treat credentials as "once per device"; instead, credentials are resolved per probe and per discovery phase. For a single machine, different discovery activities such as port scanning, OS detection, and horizontal discovery run independently and each one may issue its own credential request. As a result, the same credential can be resolved multiple times during a single discovery run. This behavior is by design in ServiceNow.
UI Restrictions
If the Linux system runs in a headless configuration (for example, when the DISPLAY environment variable is unset or no GUI session is active), JavaFX fails to initialize its graphics subsystem. As a result, the UI utility does not launch and throws a toolkit initialization exception.
If you cannot enable or access a graphical display session on the Linux VM, use the command-line utility instead. The command-line utility provides the same configuration capabilities and does not require a graphical environment.
Step 1: Run the Delinea MidServer Setup Utility
Before running the Delinea MidServer Setup Utility, ensure the following:
-
Java Requirement:
-
You can use the bundled Java included with the ServiceNow MID Server to run the setup utility. No separate Java installation is required.
-
Open Command Prompt and navigate to the following folder:
C:\servicenow\agent\jre\bin -
Then run the setup command to open the Delinea MID Server Setup Utility UI:
java -jar C:\servicenow\agent\extlib\DelineaMIDServerUIUtility-5.2.0.jar -
This uses the same built-in Java runtime that the ServiceNow MID Server uses (
<MID Server>\agent\jre\bin), ensuring compatibility and eliminating the need for an external Java installation.
Step 2: Create New Configuration
The Delinea MidServer Setup Utility supports two authentication modes for connecting to Secret Server:
-
Just-in-Time (JIT) mode: Recommended only for small test environments.
-
Grant File mode: Strongly recommended for large scale deployments.
JIT Mode
In this mode, the utility authenticates with Secret Server using a service account on every credential request, generating a new token each time. For production deployments, use Grant File mode instead.
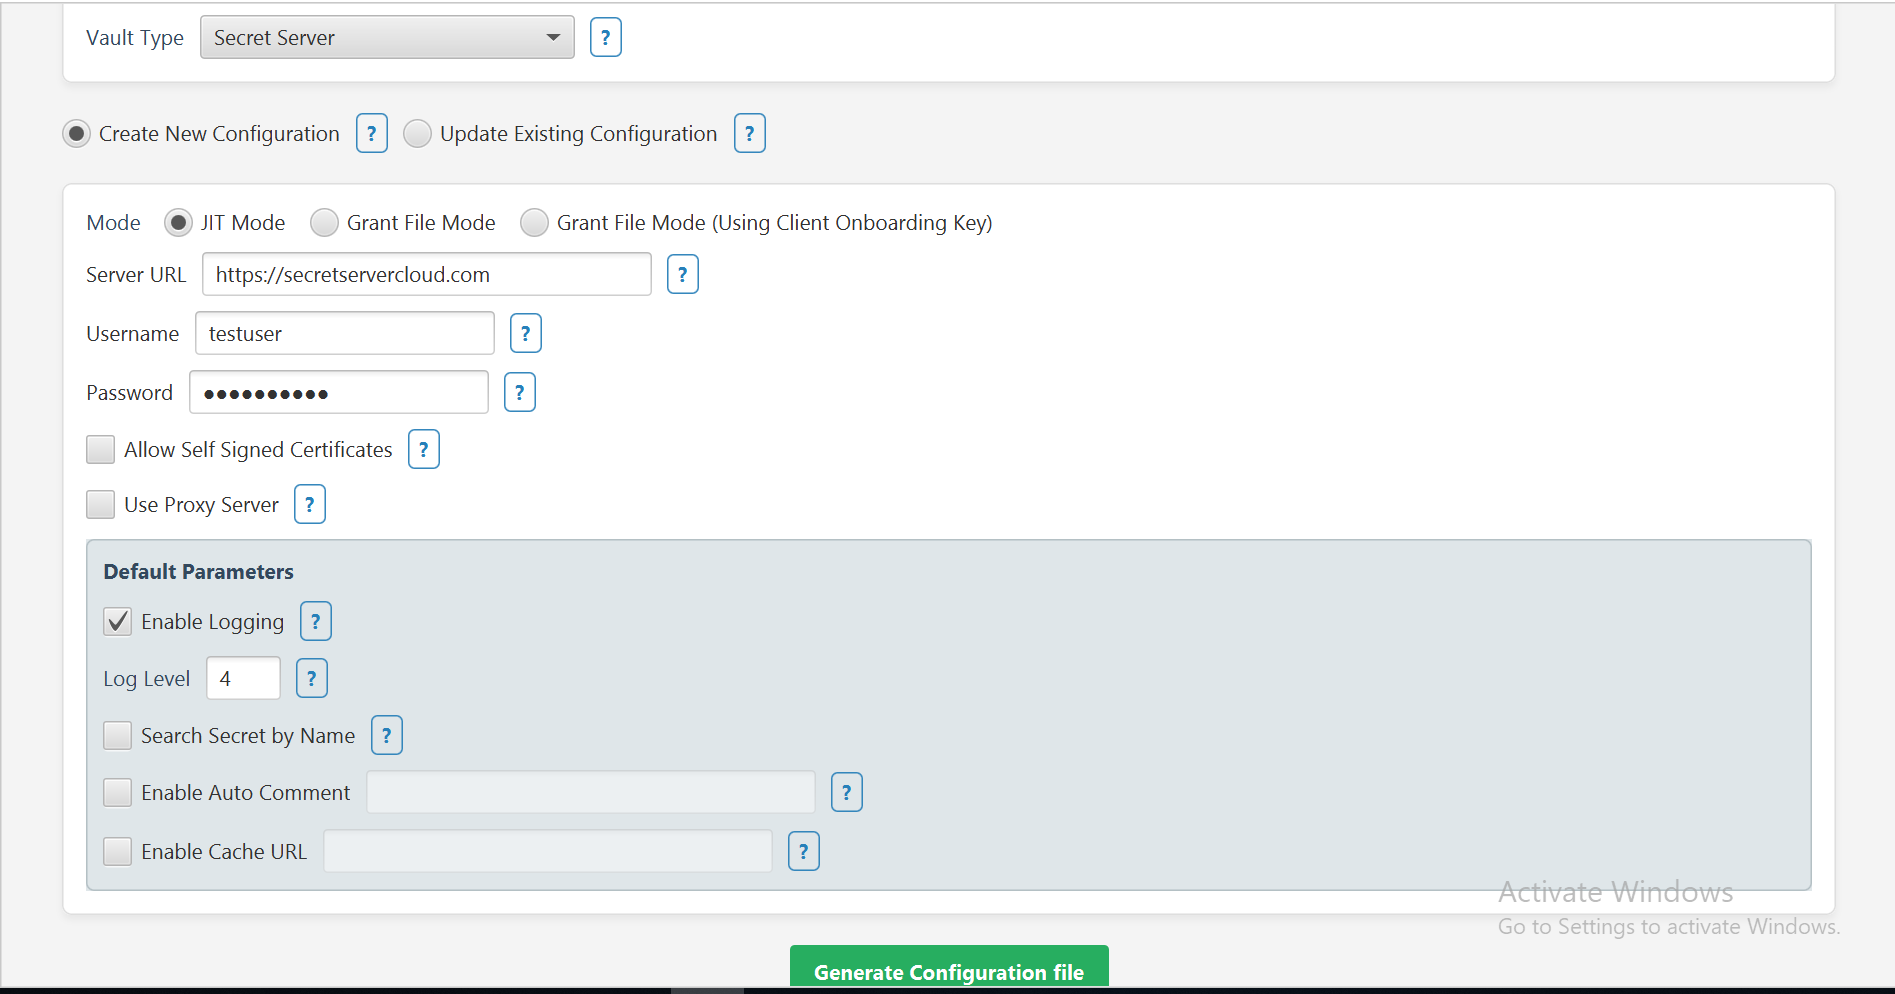
JIT mode is intended for small environments only. It generates all necessary parameters, encrypts credentials, and produces a config.xml file for your MID Server, ensuring a safe and reliable connection.
-
In the Vault Type field, select Secret Server from the dropdown.
-
Select the Create New Configuration checkbox.
-
In the Mode field, select the JIT Mode checkbox.
-
Provide the following information:
-
In the Server URL field, provide the Secret Server URL.
-
Username and Password for the SS service/application account
-
-
Select additional parameters as needed.
-
If you want to allow self signed certificates select the Allow Self Signed Certificates checkbox.
-
If you know you want to use a proxy server, select the Use Proxy Server checkbox and then provide the Proxy host and port.
-
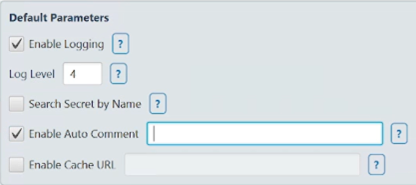
Default Parameters:
-
Select the Enable Logging checkbox to enable additional logging other than the default one.
-
The Log Level is set to 4 by default which means that all three logs type will get printed.
-
Select the Search Secret by Name checkbox if you want to validate the secret based on the secret name. For detailed configuration, go here.
-
Select the Enable Auto Comment checkbox if you want to enable auto comment. In the text box next to it type the comment. For detailed configuration, go here.
-
Select the Enable Cache URL checkbox if you want to use the Delinea Credential Cache. In the text box next to it type the Cache URL (e.g: "
https://10.XX.XX.XX:80XX"). For detailed configuration, go here.
-
-
Click Generate Configuration File and then select the
config.xmlfile available in the mid server's agent folder to save the updates.A confirmation message appears: Parameters updated in config.xml
-
Click Ok.
-
Open the
config.xmlfile to see all the parameters that you just configured being reflected in the file.
Grant File Mode
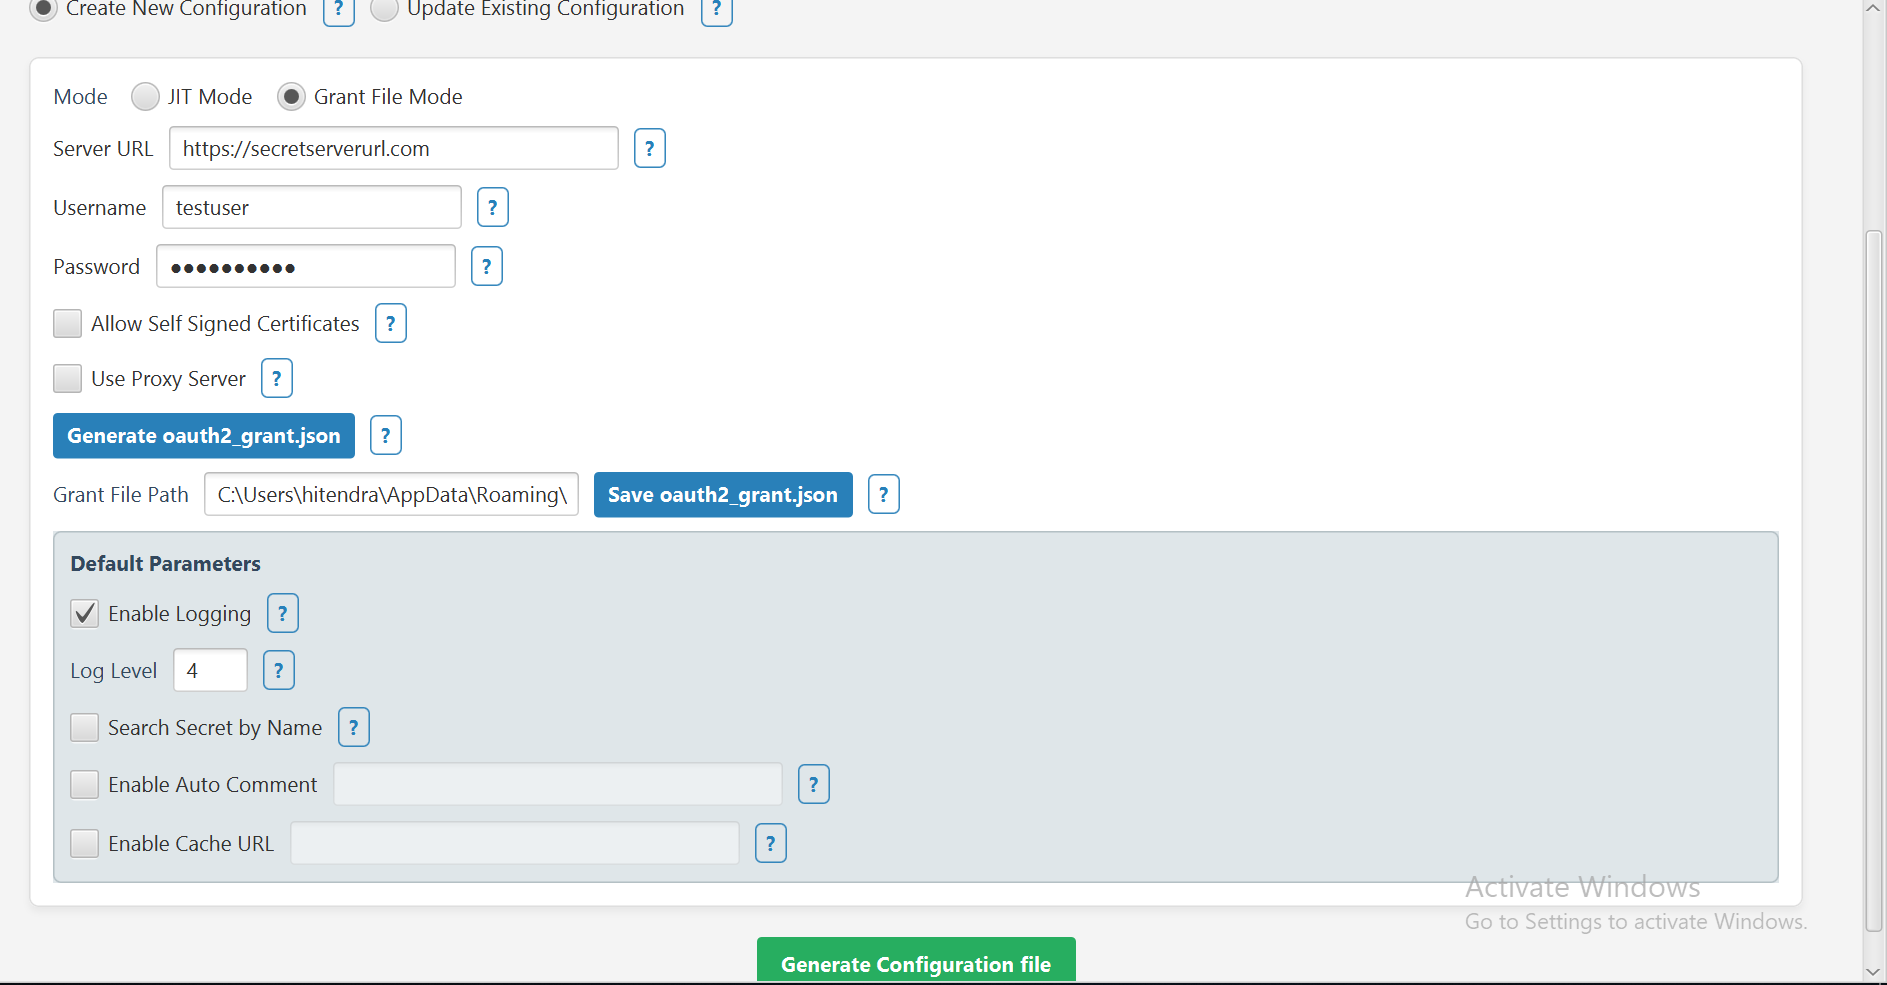
Grant File mode allows you to authenticate with Secret Server using an OAuth2 grant file. This mode produces both an oauth2_grant.json file and a config.xml file for your MID Server. By storing the access token locally, Grant File Mode prevents repeated token generation and significantly reduces API calls to Secret Server.
As of v5.2.0, oauth2_grant.json contains access_token, refresh_token, and expires_in, which are required for automatic token refresh to work.
Upgrading from a pre-5.2.0 version: If you upgrade the Credential Resolver JAR to v5.2.0 or later, you must regenerate oauth2_grant.json using the v5.2.0 Setup Utility (DelineaMidServerUIUtility-5.2.0.jar or DelineaMidServerCLIUtility-5.2.0.jar). Grant files generated by older utilities do not contain a refresh_token field, so the automatic token refresh will not work and you will see repeated Platform token expired. Cannot refresh. Please regenerate token manually messages in wrapper.log.
Key points about refresh token functionality:
-
If Credential Validation or Discovery is initiated, the access token is automatically refreshed within the last 3 minutes before expiration.
-
If token is not refreshed automatically while performing the Credential Validation or Discovery, please check if the Enable refresh tokens for webservices is enabled and the Maximum token refreshes allowed is set in Secret Server.
-
In the Vault Type field, select Secret Server from the dropdown.
-
Select the Create New Configuration checkbox.
-
In the Mode field, select the Grant File checkbox.
The Mode field determines how the Delinea MidServer Setup Utility authenticates with Secret Server.
-
Provide the following information:
-
In the Server URL field, enter the Secret Server URL.
-
Provide the Username and Password for the SS service/application account.
-
-
Select Generate oauth2_grant.json to create the grant file.
-
Select Save oauth2_grant.json to store it locally.
Save in the oauth2_grant.json file in MidServer’s agent folder only.
-
Adjust additional parameters as needed.
-
Default Parameters:
-
Select the Enable Logging checkbox to enable additional logging other than the default one.
-
The Log Level is set to 4 by default which means that all three logs type will get printed.
-
Select the Search Secret by Name checkbox if you want to validate the secret based on the secret name. For detailed configuration, go here.
-
Select the Enable Auto Comment checkbox if you want to enable auto comment. In the text box next to it type the comment. For detailed configuration, go here.
-
Select the Enable Cache URL checkbox if you want to use the Delinea Credential Cache. In the text box next to it type the Cache URL (e.g: "https://10.XX.XX.XX:80XX"). For detailed configuration, go here.
-
-
Click Generate Configuration File, and then select the Config.xml file located in the mid server's agent folder to save your updates.
A confirmation message appears: Parameters updated in config.xml
-
Click Ok.
-
Open the config.xml file to see all the parameters that you just configured being reflected in the file.
Grant File using Client Onboarding Key
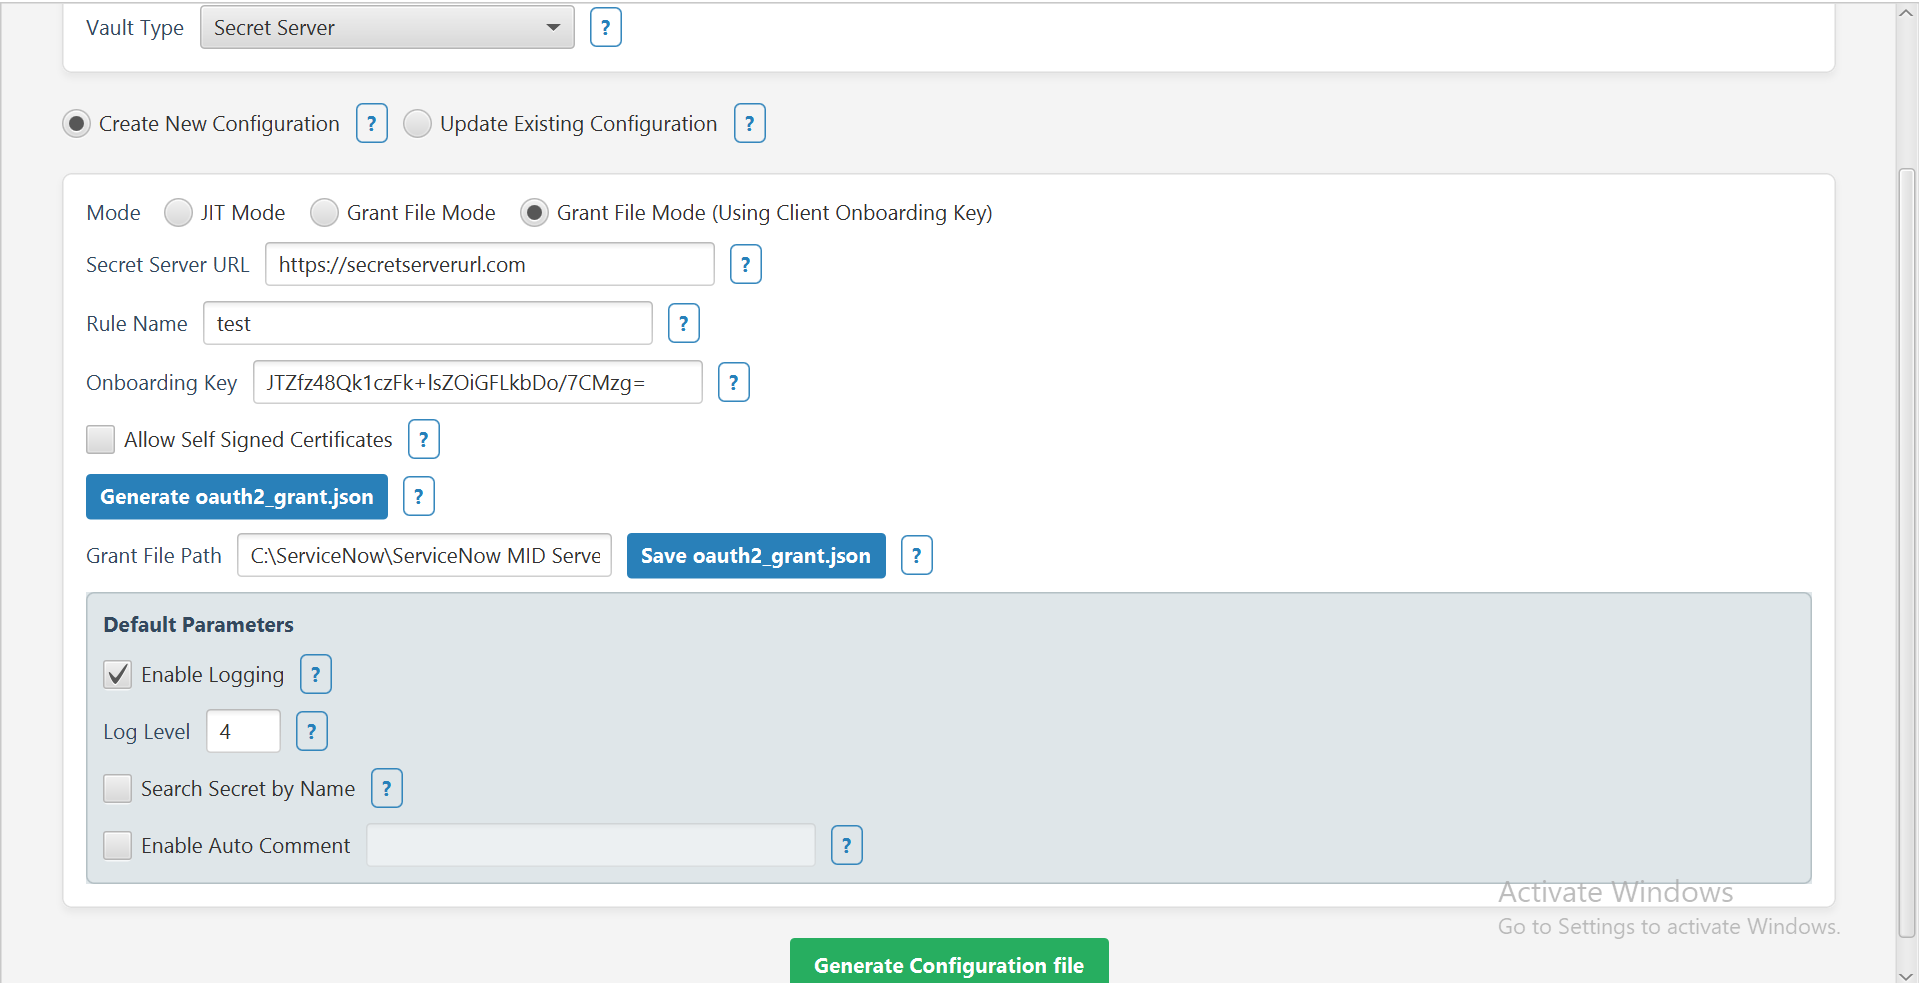
This mode allows authentication with Secret Server using a Client Onboarding key instead of a username/password or OAuth2 grant file. It generates the required parameters and updates the config.xml file for your MID Server.
-
In the Vault Type field, select Secret Server from the dropdown.
-
In the Mode field select the Grant File (Using Client Onboarding Key) checkbox.
-
Provide the following information:
-
In the Server URL field provide the Secret Server URL.
-
In the Rule Name field provide the name of the rule.
-
In the Onboarding Key field, enter your onboarding key.
-
-
Select Generate oauth2_grant.json to create the grant file.
-
Select Save oauth2_grant.json to store it locally.
-
Adjust additional parameters as needed.
-
Click Generate Configuration File and then select the Config.xml file.
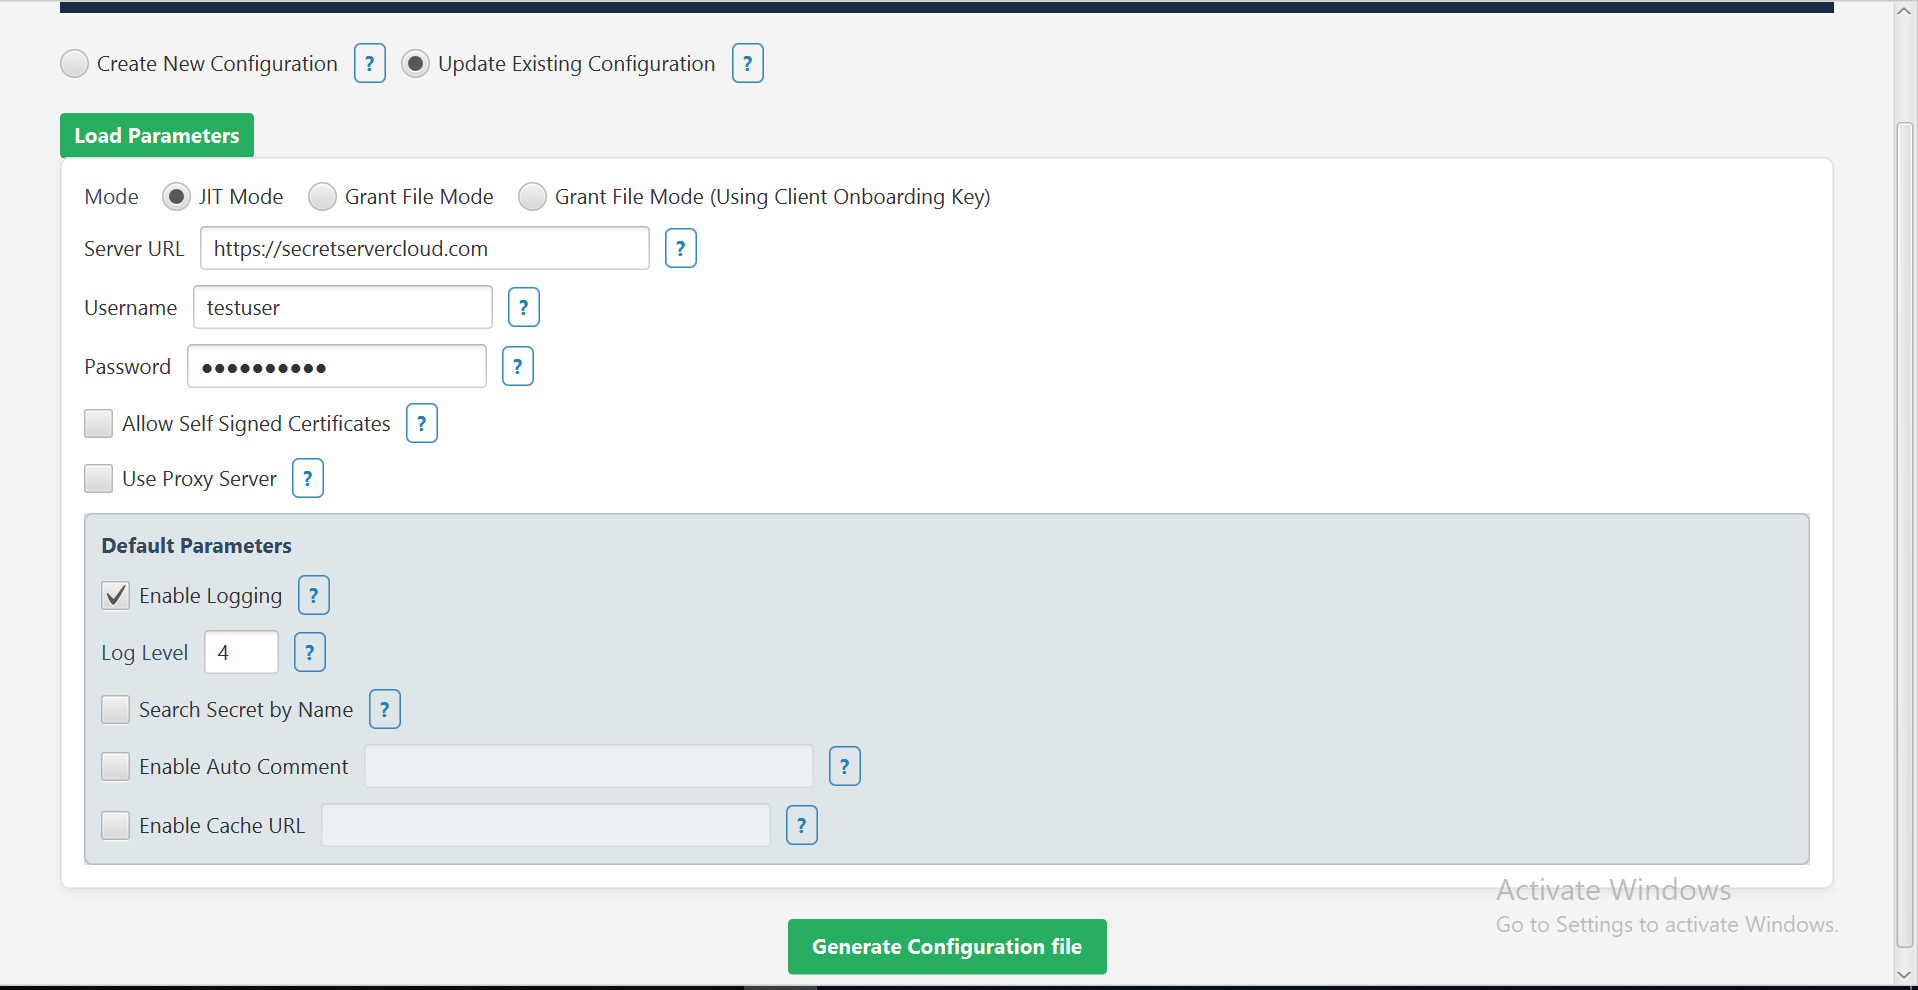
Step 3: Update Existing Configuration
The Update Existing Configuration option lets you modify an existing config.xml file for your MID Server.
-
In the Vault Type field, select Secret Server from the dropdown.
-
Select the Update Existing Configuration checkbox.
-
Click Load Parameters to import the current settings from your config.xml file.
-
Select additional parameters as needed.
-
If you want to allow self signed certificates select the Allow Self Signed Certificates checkbox.
-
If you know you want to use a proxy server, select the Use Proxy Server checkbox and then provide the Proxy host and port.
-
-
Default Parameters:
-
Select the Enable Logging checkbox to enable additional logging other than the default one.
-
The Log Level is set to 4 by default which means that all three logs type will get printed.
-
Select the Search Secret by Name checkbox if you want to validate the secret based on the secret name. For detailed configuration, go here.
-
Select the Enable Auto Comment checkbox if you want to enable auto comment. In the text box next to it type the comment. For detailed configuration, go here.
-
Select the Enable Cache URL checkbox if you want to use the Delinea Credential Cache. In the text box next to it type the URL. For detailed configuration, go here.
-
Click Generate Configuration File and then select the Config.xml file available in the mid server's agent folder to save the updates.
A confirmation message appears: Parameters updated in config.xml
-
Click Ok.
-
Open the config.xml file to see all the parameters that you just configured being reflected in the file.
The Mode field determines how the Delinea MidServer Setup Utility authenticates with Secret Server. It is selected based on your config.xml file, but you can change the Mode or any parameter values as needed before generating the configuration file.
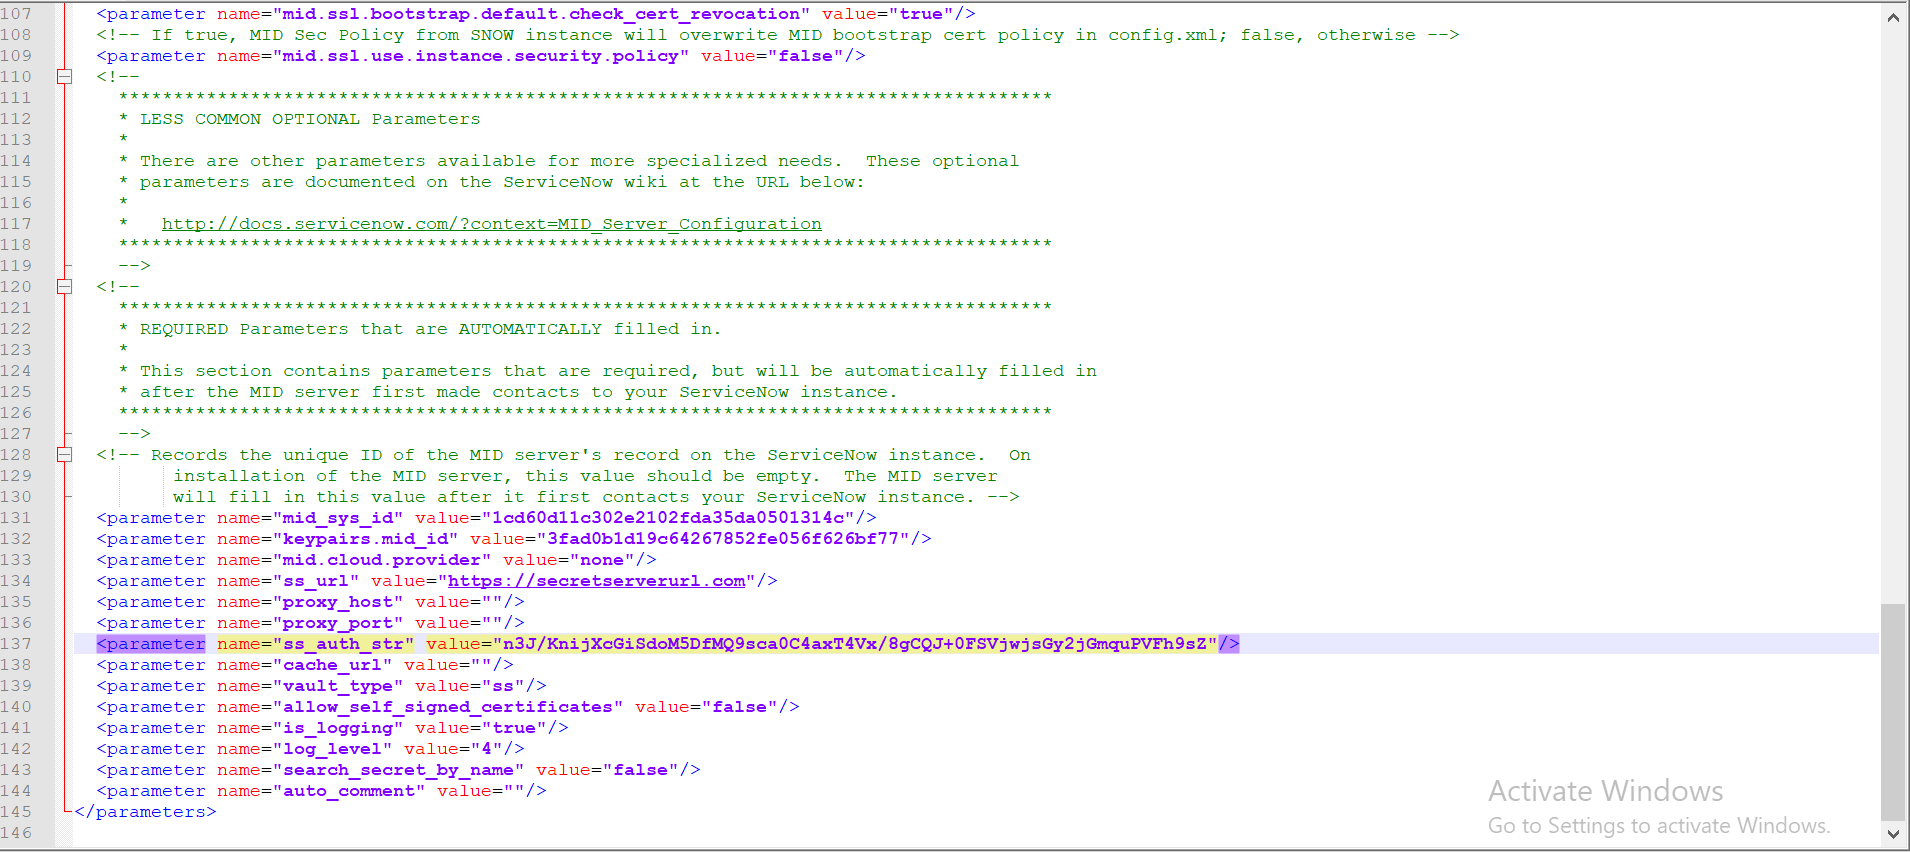
The config.xml file contains the following attributes for each mode:
| Parameter Name | Usage in Authentication Modes |
|---|---|
ss_url
|
For both Just-in-Time and Grant File modes use the URL of your Secret Server instance. |
ss_auth_str
|
|
oauth2_grant_file
|
|
allow_self_signed_certificate
|
For both Just-in-Time and Grant File modes, set to true to accept self-signed SSL certificates if applicable; otherwise, set to false. |
vault_type
|
For both Just-in-Time and Grant File modes, set to ss to indicate Secret Server. |
is_logging
|
For both Just-in-Time and Grant File modes, set to true or false to enable or disable verbose logging If not specified, defaults to true. |
log_level
|
Log Level 1 (Logs Info): logs Information Log Level 2 (Logs Debug): logs for developer Log Level 3 (Logs Error): if any error logs will get printedLog Level 4 (Logs all): all above three logs type will get printed |
proxy_host
|
For both Just-in-Time and Grant File modes, specify proxy host if required. Leave blank if no proxy is needed. |
proxy_port
|
For both Just-in-Time and Grant File modes, specify proxy port if required. Leave blank if no proxy is needed. |
proxy_auth_str
|
For both Just-in-Time and Grant File modes, provide encrypted proxy credentials generated by the setup utility if a proxy requires authentication, otherwise leave blank |
search_secret_by_name
|
For both Just-in-Time and Grant File modes set to true to validate credentials using secret name instead of secret ID, otherwise, set to false. |
auto_comment
|
For both Just-in-Time and Grant File modes provide a string to include an auto comment when accessing secrets if Require comment is enabled in Secret Server, leave empty if not used. |
cache_url
|
For both Just-in-Time and Grant File modes provide the Delinea Credentials Cache URL in format https://host:port if credential caching is enabled. Leave blank if not used. |
If you do not include the is_logging and log_level parameters in the configuration file, the plugin uses these defaults: is_logging: true, log_level: 3 (Error level).
If you leave any of the proxy-related parameters blank, the plugin does not use a proxy server.
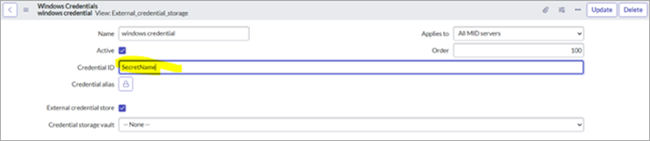
Enabling the Search Secret by Name
-
Set the following parameter as true in the MID Server config.xml file to enable secret search by name.
\<parameter name="**search_secret_by_name**" value="true"/\> -
Pass the secret name from the ServiceNow MID Server in the Credential ID field.
-
Provide a complete name of the secret because a partial name will not work.
Searching for the secret by name is not recommended because Secret Server can have the same name for two different secrets. This functionality will not work correctly if multiple secrets have the same name.
Enabling Auto Comment on Secrets
-
In Secret Server, select your secret.
-
Go to the Security tab.

-
In the Other security section, select the edit pencil icon and select the Require comment checkbox. Select Save.

-
The Require comment field is now set to Yes.
-
In the
Mid Server config.xmlfile, set the following parameter as a string as follows:<parameter name="auto_comment " value="Enter your comment"/>.
If the auto_comment parameter is empty, it will not provide any comment while viewing the secret.
Enabling Delinea Credentials Cache
To enable Delinea Credential Cache, please check the checkbox and set the cache url. "https://10.XX.XX.XX:80XX". For more details, see Delinea Credentials Cache.
The Delinea Cred Cache does not support validating credentials using a secret name. Users can only validate the credentials using the secret ID. Also, it does not support SSH private key credentials.