Configuring the Delinea Privileged Access Service (PAS) Instance
Setting up the Delinea Privileged Access Service (PAS) instance requires several configurations on the Delinea Mid Server Credential Resolver and ServiceNow sides.
To ensure secure and successful automation workflows, the Privileged Access Service (PAS) integration with the ServiceNow MID Server Credential Resolver supports a defined set of credential types.
The following are the supported credential types:
-
Windows
-
JDBC
-
SSH
-
SSH PrivateKey
-
Active Directory
Creating a User
The first step in the setting up process is creating of a new Delinea user.
-
In the Admin Portal, go to Users and select Add User.
-
Enter the following information:
- Login name, also select a suffix
- E-mail address
- Display Name
- Password
-
Under the Status, select Is OAuth confidential client.
Protect, harden, and review access to the MID Server and the properties file. The MID Server and properties file grants you the ability to use the credentials and perform API calls against the tenant. While this restricts you from logging into the portal interactively, you can perform API calls to "RedRock/Query", "ServerManage/CheckoutPassword" and “ServerManage/RetrieveSshKey”, "ServerManage/CheckinPassword". -
Select Create User.
Setting Up OAuth Client Application
OAuth allows you to authenticate a token that will time out (five hours is the default value). You can use it without additional authentication and an account password within the default period.
When the token expires, it is still the default authentication mechanism for the profile or configuration.
To set up an OAuth:
-
Once the user is created, go to Apps > Web Apps and select Add Web Apps.
-
Select Custom and add OAuthClient.
-
Update the settings of the OAuth Client application.
-
Select Apps > Web Apps again and then the OAuth Client row you just created.
-
Under the Settings tab enter as follows:
- Application ID: set to oauth_2_client.
- Name: OAuth Client.
- Description: “Use this template to set up an application that is making OAuth secured REST calls to the Server Suite”.
-
-
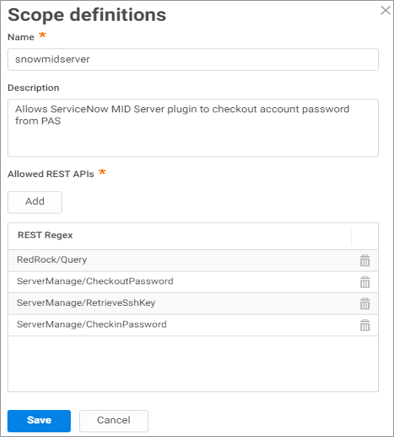
Select Scope and create a new Scope Definition using the following properties.
-
Add a scope named snowmidserver—This is the scope the application will look for.
-
The REST Regex—The pattern to enable for the ServiceNow plugin. For example, a scope that is defined to allow REST API calls ".*" will enable all API calls, while 'UserMgmt/.' would restrict calls to just the User Management section. Security best practice recommends using this setting for the minimal APIs needed. For details, see Check row ACLs.
-
The scope of the ServiceNow plugin must be set to the following: "RedRock/Query", "ServerManage/CheckoutPassword", “ServerManage/RetrieveSshKey” and “ServerManage/CheckinPassword”.
- Name: passwordCheckout
- Description: "Allows ServiceNow MID Server plugin to checkout account password from PAS."
-
Under Allowed REST APIs, select Add and enter the following:
-
RedRock/Query
-
ServerManage/CheckoutPassword
-
ServerManage/RetrieveSshKey
-
ServerManage/CheckinPassword
-
-
Select Save
-
-
Select Permissions > Add. Search for, select, and add that user.
This user is restricted to the permissions View and Run.
-
Under General Usage tab, deselect the Must be OAuth Client checkbox and enter the following:
- Issuer: default.
- Client ID Type: Confidential.
You created a special cloud OAuth user (above) for this purpose.
-
Go to the Tokens > Auth Methods tab and select Client Credentials.
Deselect the other Auth Methods if desired.
-
You can accept the defaults or change the token lifetime. To reduce re-authentication, you may prefer a longer token lifetime.
-
Select Save.