Configuring Delinea
This section describes how to configure either Delinea Secret Server or the Delinea Platform for use with the Delinea Unified Integration in Cortex XSOAR. Configure the option that applies to your environment.
Cortex XSOAR requires a Service User (Platform) or an Application Account (Secret Server), depending on which product you are configuring, to authenticate and retrieve secrets. This account must be assigned a least-privilege role with the required permissions. Additional configuration is required for authentication, credential syncing, commenting, and command testing.
Configuring Delinea Platform
Step 1: Create a Service User
The integration requires a service user in the Delinea Platform to log in your Delinea Platform instance to create, fetch, or update secrets for use in XSOAR. If you don't have a service user, you can create one. For detailed information about creating a service user, see Service Users in the Delinea Platform documentation.
Step 2: Create a Custom Role for XSOAR
A least-privilege role must be assigned to the service user.
-
Navigate to Access > Roles.
-
Select Add Role.
-
Enter a role name and optional description.
-
Select Save.
-
Go to the Permissions tab and select Add Permissions.
-
Add the following minimum permissions:
-
Administer Secret Server Folders
-
Administer Secret Server Reports
-
Create Root Folders in Secret Server
-
Manage Identity settings
-
Own Secret
-
Personal Folder in Secret Server
-
View Secret
-
-
Select Assign.
When you create an Service user, the Platform User role is assigned by default. In addition to the User role, you must create the following custom role:
Step 3: Assign the Role to the Service User
For information about how to view the user's role, see Managing User Accounts in the Delinea Platform documentation (go to the "Roles Tab" section on the page). For information about how to view the permissions assigned to a role, see Roles and Permissions in the Delinea Platform documentation (go to the "Editing Role Permissions" section on the page).
Step 4: Configure and Share Secrets
You must create a secret in Delinea Platform to store the credentials you want to retrieve for use within XSOAR tasks.
-
Log into the Delinea Platform using you admin credentials.
-
Navigate to Secret Server >All secrets and then select Create secret.
- In the Create new secret dialog, select the secret template.
- Once you found your template, select Create secret.
- In the Create new secret dialog complete the following fields:
- Enter a name for your secret in the Secret name field.
- Username
- Password.
- Enter any additional required fields.
- Select Create secret.
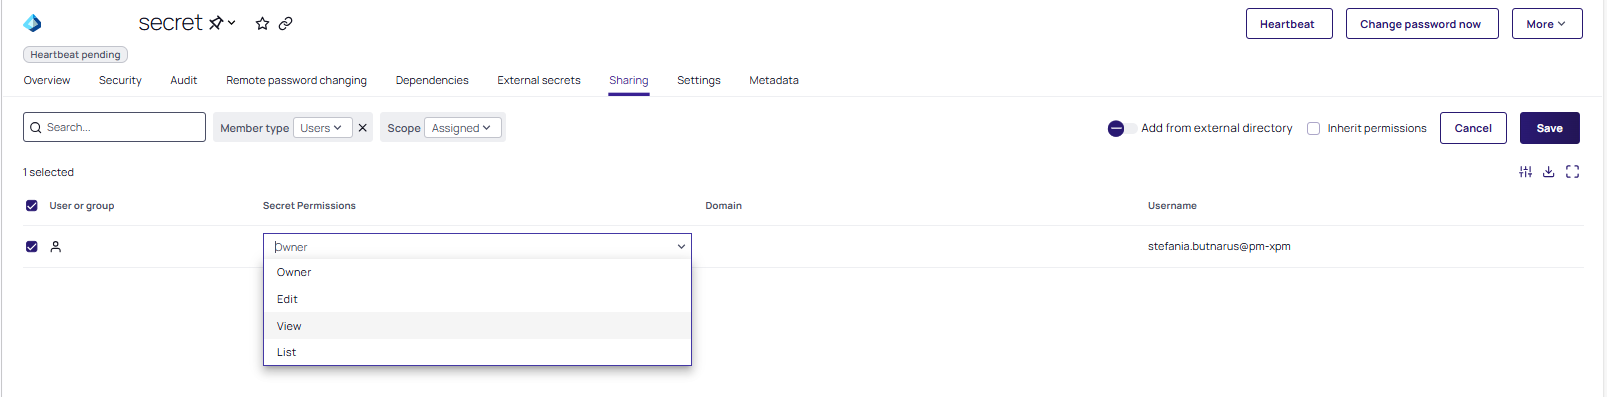
To share the secret with the service user:
- Go to the Sharing tab of the secret.
- Select Edit.
- Clear the Inherit permissions checkbox.
- Search for the service user.
- Select the View permission from the dropdown.
- Select Save.

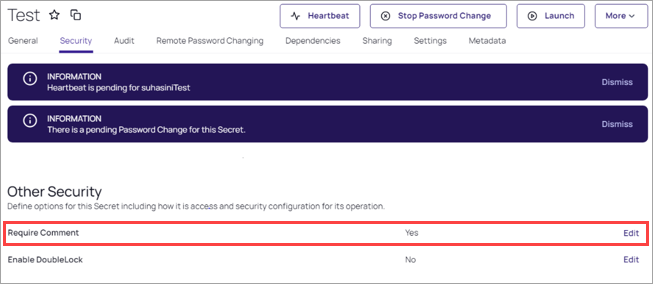
Step 5: Configure Auto Comment
Some secrets enforce comment auditing. Auto Comment must be enabled for these operations:
-
Log in to Delinea Secret Server.
-
Open the secret.
-
Go to Security > Other Security.
-
Select Edit to enable Require Comment.
If Auto Comment is enabled, the following commands require the auto comment parameter:
delinea-secret-getdelinea-secret-rpc-changepassworddelinea-secret-password-updatedelinea-secret-delete
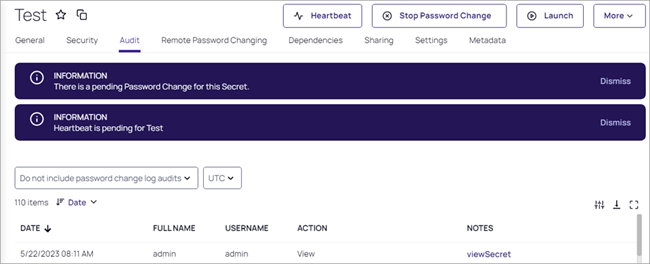
Example:
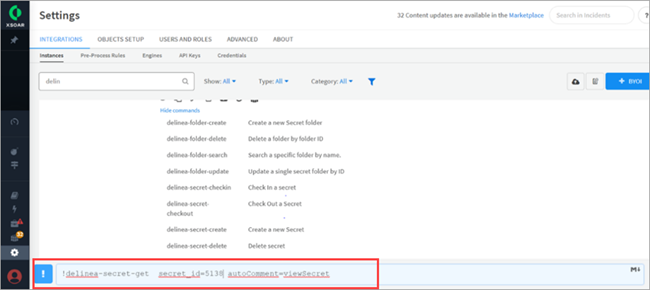
Auto Comment in Secret Server (Notes):
Configuring Secret Server
Step 1: Create Application Account
The application account's credentials will be used to log in your Secret Server instance to create, fetch, or update secrets for use in XSOAR. For more information about creating an application account, see Application Accounts in the Secret Server documentation.
This account is used exclusively by the XSOAR pipeline and must not require interactive login or MFA.
The Delinea Secret Server plugin requires an application account in Secret Server to
connect to your Secret Server.
-
Log in to Secret Server.
-
Navigate to Users > Application Accounts.
-
Create an application account (example: svc_xoar_ss).
-
This account will authenticate API requests made from XSOAR.
Step 2: Create a Custom Role for the XSOAR Integration
You must create a least-privilege role and assign it to the application account.
For Secret Server (On-Prem or Cloud)
- Navigate to Access > Roles.
- Select Create Role.
-
In the Create Role dialog, enter the following:
- Role Name: XSOAR Integration
- Description: Type a descriptio for your role.
- Set Scope to All.
- Go to the Permissions tab, and click Edit to start adding the required permissions:
The application account must have the following permissions:
Administer Reports
Create Root Folders
Own Secret
Personal Folder in Secret Server
View Secret
View Launcher Password
Administer Folders
Select Save to apply the permissions.
When you create an application account, the User role is assigned by default. In addition to the User role, you must create the following custom role
Step 3: Assign the Role to the Application Account
To learn how to create a role with these permissions and how to assign the role to your application account in Secret Server open the Creating Roles topic in Secret Server.
Step 4: Configure and Share Secrets
You must create a secret in Secret Server to store the credentials you want to retrieve for use within XSOAR tasks.
-
Navigate to Secrets > All secrets.
- (Optional) Change the default folder for the secret. Make sure the application account has View permission for the folder.
-
In the Create new secret dialog:
- Select the secret template.
- Enter a name, username, and password.
- Enter any additional required fields.
- Select Create secret.
To share the secret with the application account:
- Go to the Sharing tab of the secret.
- Select Edit.
- Clear Inherit permissions.
- Search for the application account.
- Select the checkbox next to the account and choose View permission.
- Select Save.
Step 5: Configure Auto Comment
Some secrets enforce comment auditing. Auto Comment must be enabled for these operations:
-
Log in to Delinea Secret Server.
-
Open the secret.
-
Go to Security > Other Security.
-
Select Edit to enable Require Comment.
If Auto Comment is enabled, the following commands require the auto comment parameter:
delinea-secret-getdelinea-secret-rpc-changepassworddelinea-secret-password-updatedelinea-secret-delete
Example:
Auto Comment in Secret Server (Notes):