Integrating Microsoft Entra ID & Azure Cloud for ITP/PCCE Discovery with the Delinea Platform
At the end of 2023, Microsoft completed the change of their product name from Microsoft Azure Active Directory (Azure AD or ADD) to Microsoft Entra ID (Entra or Entra ID).
Integrating Microsoft Entra ID with the Delinea Platform enables Identity Threat Protection (ITP) and Privilege Control for Cloud Entitlements (PCCE) so you can discover identities, groups, assets, and access information related to your Microsoft Entra ID account.
Information such as users, groups, and roles are synchronized during the integration and then updated regularly.
Identity Threat Protection (ITP)
This integration covers Microsoft Entra ID:
-
Users
-
Groups
-
Roles and admins
-
Applications, Application Access, and Azure Managed Identities
-
App Registrations
-
Sign in and Audit Log activities
-
SharePoint Sites
-
Office 365 Audit Log Activities
Privilege Control for Cloud Entitlements (PCCE)
This integration covers Azure Cloud and Microsoft Entra ID:
-
Subscriptions, Resource Groups, and Resources
-
Roles and privileges
-
Management log Activities
-
Users
-
Groups
-
Roles and admins
-
Applications, Application Access, and Azure Managed Identities
-
App Registrations
-
Sign in and Audit Log activities
-
SharePoint Sites
-
Office 365 Audit Log Activities
-
LLMs and AI Agents
To integrate Microsoft Entra ID with the Delinea Platform, you have two options:
-
Creating a Delinea-managed Microsoft Entra ID app. This approach is recommended if you prefer to configure the Microsoft Entra ID integration entirely within the Delinea Platform and let Delinea handle the creation and management of the necessary Azure components.
-
Creating a customer-managed Microsoft Entra ID app. This approach is suitable if you prefer to maintain full control over the integration and manage the Azure resources yourself.
This integration is separate from the Entra ID API Integration used for Delinea Platform login and directory services. That integration's Entra ID - Read permission activates Microsoft Entra ID as a directory service and provisions users. The Delinea ITP/PCCE EntraID - Read-Only capability described in this topic does not activate directory services or provision users — it only enables discovery for Identity Threat Protection (ITP), Privilege Control for Cloud Entitlements (PCCE), and Continuous Identity Discovery (CID).
Prerequisites
-
On the Delinea Platform, you must be a Platform Admin.
-
Ensure you have a local user account that does not contain "#EXT" in its principal name.
-
In Azure, you must be able to create an app registration and manage API permissions. Roles that satisfy these requirements are:
-
Global Administrator
-
Privileged Role Administrator
-
Creating a Delinea-Managed Registered App
This procedure walks you through setting up Microsoft Entra ID on the Delinea Platform using a Delinea-managed registered app. To complete and test the integration you will need to do the following:
-
Add a Delinea-managed registered app.
-
Grant Delinea permission to create and manage application registrations in Azure.
Adding a Delinea-Managed Registered App
-
On the Delinea Platform, navigate to Settings > Registered apps.
-
Click Add App.
-
Select Delinea Managed Entra ID.
-
On the Add Delinea managed Entra ID App page, complete the following fields:
Delinea Platform Field Description Location in Azure App Name A unique identifier for the registered app in the Delinea Platform. User-defined; choose a descriptive name when configuring in Delinea Platform. Description Optional field to add details or context about the registered app. User-defined; optional entry in Delinea Platform. Directory (tenant) ID The unique identifier for your Azure AD tenant. Found on the Azure App Registration → Overview page under "Directory (tenant) ID". -
Select the application capability you would like to activate:
-
Delinea ITP/PCCE EntraID - Read-Only – full integration with read-only capabilities
-
Delinea ITP/PCCE - Read/Write - Same capabilities as the read-only + the ability to trigger automated responses like disable/enable a user, revoke their sessions, and add/remove users from groups
-
-
Click Save.
Granting Delinea Permission to Create and Manage App Registrations in Azure
-
Grant Consent for the Delinea Entra ID Management App
-
On the next screen in the Entra ID app management section, select Grant consent.
-
In the Microsoft Pick an account dialog, log in with your Microsoft account credentials.
-
In the Permissions requested dialog for Delinea Platform Azure Registered Apps:
-
Review the required permissions.
-
Select Accept.
-
-
-
Grant Consent to Delinea ITP/PCCE
-
In the Delinea ITP/PCCE – Read section, select Grant consent.
-
In the Microsoft Pick an account dialog, log in with your Microsoft account credentials.
-
In the Permissions requested dialog for Delinea Managed ITP/PCCE:
-
Review the required permissions.
-
Select Accept.
-
-
After you have completed the steps above, the following three apps should be created in Azure and should reflect the state, Consent granted on the Delinea Platform:
-
Entra ID app management (Delinea Platform Azure Registered Apps)
-
Delinea ITP/PCCE read/write or read only application
The Delinea Platform is now fully integrated with Entra to read data, but before insights can be generated follow the rest of the guide to add Entra as a source.
Creating a Customer-Managed Registered App
This procedure walks you through setting up a customer managed registered app
-
Register an App in Azure:
-
Generate a Client Secret: Create a client secret, copy its value, and note the expiration date.
-
Configure Token Claims: Add the required claims for the Platform.
-
Set API Permissions: Assign the necessary Microsoft Graph permissions and grant admin consent.
-
-
Register a customer-managed app on the Delinea Platform: Enter the app credentials, permissions, and domains.
-
Test the Integration: Verify the integration by logging into the Platform with a Microsoft Entra ID user.
The following procedures require copying and pasting information between Azure Portal and the Delinea Platform. We recommend opening both applications before you begin and keeping both open until you are finished.
Creating an Azure Application Registration
-
Go to the Azure portal and log in.
-
Select (or search for) App registrations.
-
Click New registration.
-
In the Name field, enter a name for your application registration. (Under Supported account types, only Single tenant is supported)
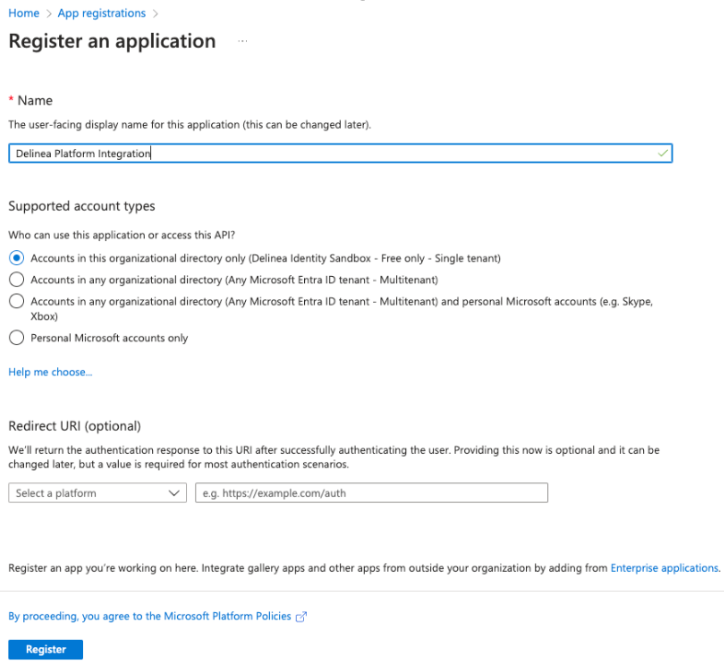
-
Click Register. The application registration's overview page opens.
-
From the left navigation menu, under Manage, click Certificate & secrets.
-
Click New client secret to create a secret for authenticating to this Microsoft Entra ID tenant with this application registration.
-
(Optional): Complete the Description field for the new client secret.
-
Update the Expires field to set the credentials expiration date.
-
Click Add.
-
Copy and save the Client secret's Value and its Expiration date because you will need them later when configuring the Delinea Platform. If you leave this page without saving the information, you may lose access to the client secret Value and you will need to generate a new secret.

-
From the left navigation menu, click API Permissions. API Permissions include all permissions required for the platform:
Office 365 Management
-
ActivityFeed.Read
Microsoft Graph
-
AuditLog.Read.All
-
Directory.Read.All
-
Domain.Read.All
-
Group.Read.All
-
GroupMember.Read.All
-
IdentityProvider.Read.All
-
IdentityRiskyUser.Read.All
-
Member.Read.Hidden
-
Policy.Read.All
-
PrivilegedAccess.Read.AzureResources
-
Reports.Read.All
-
User.Read
-
User.Read.All
-
UserAuthenticationMethod.Read.All
-
RoleEligibilitySchedule.Read.Directory
-
PrivilegedAccess.Read.AzureADGroup
-
RoleAssignmentSchedule.Read.Directory
-
DeviceManagementRBAC.Read.All
-
-
Click Add a permission.
-
Click Microsoft Graph.
-
Click Application permissions and select the following:
-
Add a permission.
-
Grant admin consent for <azure directory name> for the API permissions you just added.

-
-
In the Grant admin consent confirmation dialog, click Yes.
You are now ready to create a registered app on the Delinea Platform in the next section.
Creating a Customer-Managed Registered App on the Delinea Platform
-
On the Delinea Platform, navigate to Settings > Registered apps.
-
Click Add App.
-
Select Customer Managed Entra ID.
-
On the next page, complete the fields in the table below:
| Delinea Platform Field | Description | Location in Azure App |
|---|---|---|
| Name | A unique identifier for the registered app in the Delinea Platform. | User-defined; choose a descriptive name when configuring in Delinea Platform. |
| Description | Optional field to add details or context about the registered app. | User-defined; optional entry in Delinea Platform. |
| Directory (tenant) ID | The unique identifier for your Azure AD tenant. | Found on the Azure App Registration → Overview page under "Directory (tenant) ID". |
| Application (client) ID | The unique identifier for the Azure app being registered. | Found on the Azure App Registration → Overview page under "Application (client) ID". |
| Client Secret Value | The value of the client secret generated for the app, used for authentication. | Generated in Azure App Registration → Certificates & Secrets. Copy the value immediately when creating the client secret. |
| Credential Expiration Date | The expiration date of the client secret used for authentication. | Found in Azure App Registration → Certificates & Secrets under "Expires". Match this value in Delinea Platform. |
-
Select the application capability you would like to activate:
-
Delinea ITP/PCCE EntraID - Read-Only – full integration with read-only capabilities
-
Delinea ITP/PCCE - Read/Write - Same capabilities as the read-only + the ability to trigger automated responses like disable/enable a user, revoke their sessions, and add/remove users from groups
-
-
Click Save.
Integrating Azure with the Delinea Platform
Adding required permissions for Azure
Once you have created a managed or custom app and completed the Microsoft Entra ID integration steps, follow the procedures below to grant the required permissions for the integration to read data from your Azure subscriptions.
Add a Reader Role in Azure
Assign the Reader role to the Delinea service principal on the Tenant Root Group. This role allows the integration to read most necessary Azure resources and configurations.
-
Log in to Azure and search for Management groups in the search bar, then select it.
If you cannot select the Management Groups option, even with global admin permissions, the "global admin can change Azure subscription" flag may be turned off. You may need to temporarily elevate access for your Global Administrator account. For more information, see Elevate access to manage all Azure subscriptions and management groups in the Microsoft documentation.
-
On the Management groups page, select Tenant Root Group.
-
On the Tenant Root Group page, select Access Control (IAM), then select the Role assignments tab.
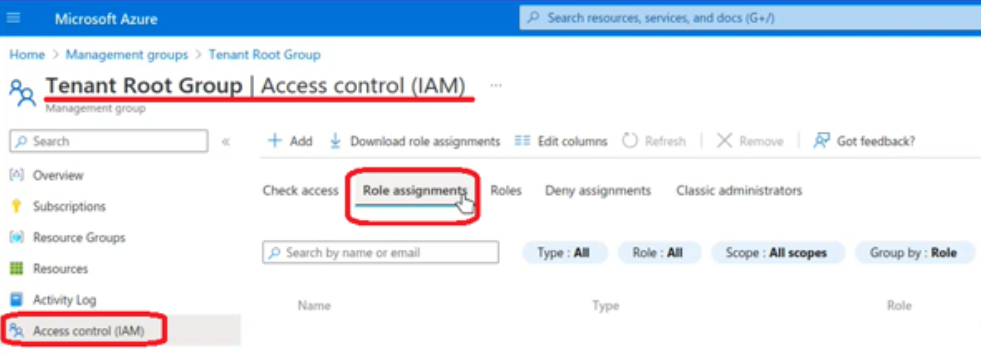
-
Select + Add, then select Add role assignment.
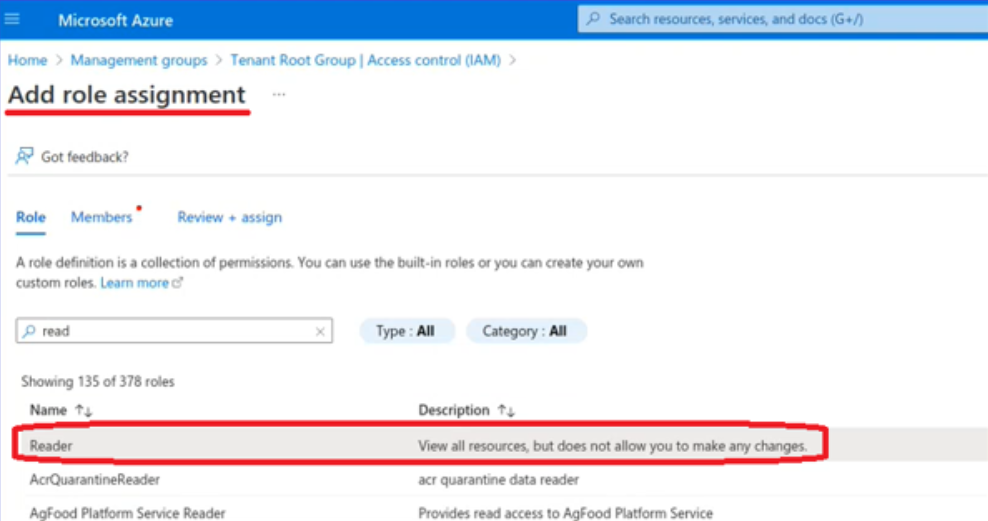
-
On the Role tab of the Add role assignment dialog, select Reader, then select Next.
-
On the Members tab, select + Select members.
-
In the Select members list, search for and select Delinea, then click Select.
-
Select the Review + assign tab to verify the role assignment. The selected member displays in the Members section.
Optional: Add an Azure AI User Role
If your environment uses Azure AI services (including AI agents, Azure OpenAI, or large language models), assign the Azure AI User role to the Delinea service principal. This role allows the integration to collect detailed data about AI workloads.
Without this role, AI-specific data will not be available in the Delinea Platform.
Follow the same role assignment steps above, selecting Azure AI User instead of Reader on the Role tab.
Optional: Configure Key Vault Permissions
To allow the platform to identify secrets inside Azure Key Vaults, configure permissions based on your Key Vault permission model:
Access Policy Model
Assign the delinea-itp-pcce-read service principal:
-
Key Management Operations: Get, List.
-
Rotation Policy Operations: Get Rotation Policy.
-
Secret Management Operations: Get, List.
-
Certificate Management Operations: Get, List.
Azure Role-Based Access Control (RBAC) Model
Assign the Key Vault Reader role to the delinea-itp-pcce-read service principal. For more information about enabling Azure RBAC permissions on Key Vault, see the Microsoft documentation.
The Azure Cloud integration and Azure AI User role are optional and should be configured based on your organization's requirements. If you choose not to enable Azure Cloud data fetching or assign the Azure AI User role, the integration will still work with Microsoft Entra ID data only.
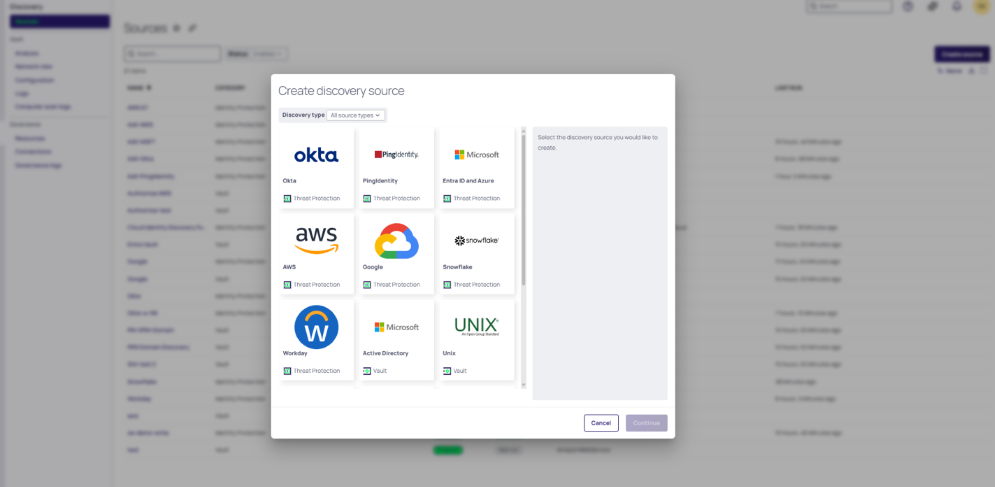
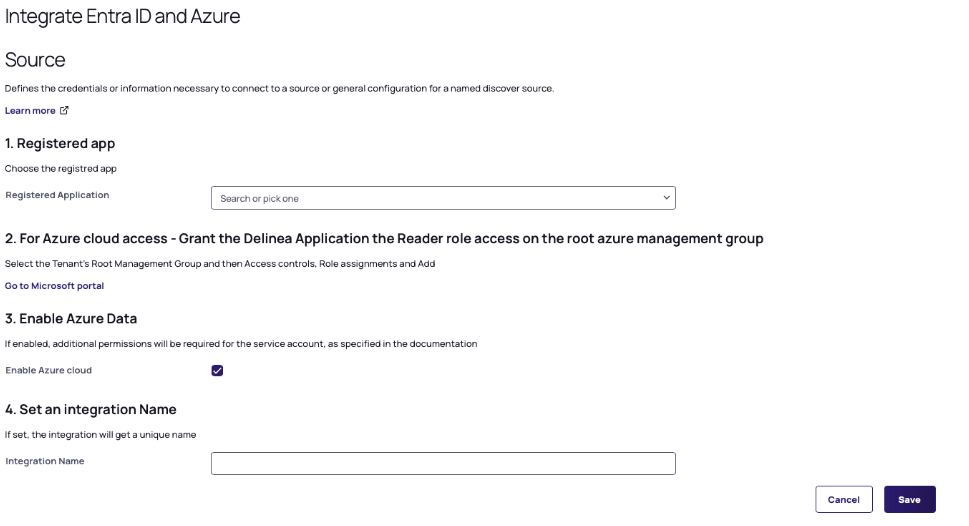
Configure the Source under Platform Discovery
To integrate the Microsoft Entra ID account with the Delinea Platform:
-
Navigate to Discovery > Sources > Create source.
-
Select the Microsoft Entra ID and Azure source.
-
Select Continue. The Integrate Entra ID and Azure page opens.
-
(Optional) Select the Enable Azure cloud check box to fetch Azure Cloud Data along with the Microsoft Entra ID data.
-
Leave it unselected if you are only integrating Microsoft Entra ID. In this case, Azure permissions are not required.
-
If you select this option, make sure you followed the steps above to grant Azure permissions
-
-
Select the relevant application you have created in the Registration service. If you are updating an existing Entra application, make sure to select an application with the same tenant ID.
-
Select Save.
Verify the Integration
-
Navigate to Discovery and verify the status in the Status column:
-
Synced it means that the integration was successful.
-
Fetching it means that the integration is still fetching data.
-
After refreshing, this status might change to Synced if everything is correct. If there was an error while fetching data, the status will be changed to Authorization Error.
-
Authorization Error: select the integration name, then select the Workflow tab to see the detailed error history
-