Authentication Google Cloud Platform (GCP)
DevOps Secrets Vault provides two ways to authenticate using GCP. One is through a Google service account and the other is through Google Compute Engine (GCE) metadata.
Google Service Account Authentication
To setup GCP authentication using service accounts in DSV, a GCP service account must be provided that DSV can use as the authentication provider. This service account must be assigned to the project you are working in, have the role Service Account Key Admin so that it can issue and manage service account tokens, and a key must be generated.
These steps can be done programmatically, but we will use the GCP Console.
GCP Service Account Setup
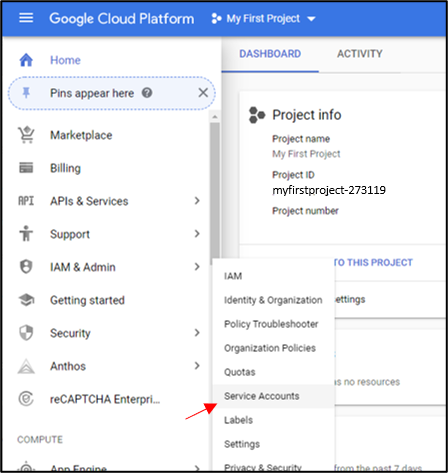
In the GCP Console Home page, go to your project, hover IAM & Admin, and then click Service Accounts.
![]()
At the top, click CREATE SERVICE ACCOUNT.
For the first step, enter an account name. We will use dsv-svc in this example. Click CREATE.
![]()

In the second step, click the drop-down arrow in the Select a role box, type service account key admin in the filter and select Service Account Key Admin. Then click Continue.
![]()

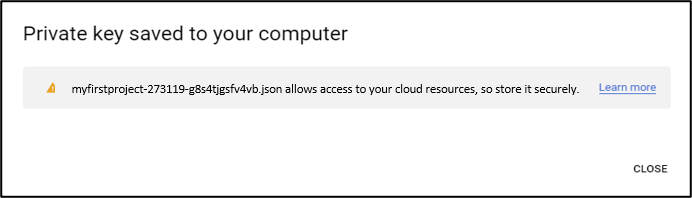
In the third step, click CREATE KEY and when the option to generate a file slides in from the right, select json and click CREATE. A file will be downloaded that will have all the information needed to setup the DSV authentication provider.
The Goolge API for IAM must be enabled. To do this in the Google Console, go to the relevant project and on the left navigation, hover APIs & Services then select Library.
![]()

In the search, type Identity and Access and in the results, select the Identity and Access Management (IAM) API. Click Enable.
![]()

DSV Authentication Provider Setup
Go back to the terminal (DevOps Secrets Vault CLI).
Use dsv config auth-provider search -e yaml to see all of your current authentication providers.
Initially, the only authentication provider is Thycotic One, similar to this:
created: "2019-11-11T20:29:20Z"
createdBy: users:thy-one:admin@company.com
id: xxxxxxxxxxxxxxxxxxxx
lastModified: "2020-05-18T03:58:15Z"
lastModifiedBy: users:thy-one:admin@company.com
name: thy-one
properties:
 baseUri: https://login.thycotic.com/
 clientId: xxxxxxxxxxxxxxxxxxxxxxxxxxxxxxxxxxxxx
 clientSecret: xxxxxxxxxxxxxxxxxxxxxxxxxxxxxxxxxxxxxxxxxxxxxxxxxxxxxxxxxxxx
type: thycoticone
version: "0"
Setup the DSV authentication provider. Create a json file named auth-gcp.txt with the following format, substituting the dsv-svc service account values in the key file you downloaded from the GCP console.
{
  "name": "gcloud",
  "type": "gcp",
  "properties": {
    "ProjectId": "{project-id}",
    "type": "service_account",
    "PrivateKeyId": "{private-key-id}",
    "PrivateKey": "-----BEGIN PRIVATE KEY-----{private-key}-----END PRIVATE KEY-----\n",
    "ClientEmail": "{clientemail}",
    "TokenURI": "https://oauth2.googleapis.com/token"
  }
}
In the DSV CLI, run dsv config auth-provider create --data @auth-gcp.txt to create the GCP authentication provider.
dsv config auth-provider <name> read -e yaml where the example name we will use here is gcloud
created: "2019-11-12T18:34:49Z"
createdBy: users:thy-one:admin@company.com
id: bq4ce17cj2bc72qun8vg
lastModified: "2020-05-18T03:58:15Z"
lastModifiedBy: users:thy-one:admin@company.com
name: gcloud
properties:
clientEmail: dsv-svc@myfirstproject-xxxxxx.iam.gserviceaccount.com
privateKey: |
-----BEGIN PRIVATE KEY-----
XXXXXXXXXXXXXXXXXXXXXXXXXXXXXXXXXXXXXXXXXXXXXXXXXXXXXXXXXXXXXXXX
XXXXXXXXXXXXXXXXXXXXXXXXXXXXXXXXXXXXXXXXXXXXXXXXXXXXXXXXXXXXXXXX
XXXXXXXXXXXXXXXXXXXXXXXXXXXXXXXXXXXXXXXXXXXXXXXXXXXXXXXXXXXXXXXX
XXXXXXXXXXXXXXXXXXXXXXXXXXXXXXXXXXXXXXXXXXXXXXXXXXXXXXXXXXXXXXXX
XXXXXXXXXXXXXXXXXXXXXXXXXXXXXXXXXXXXXXXXXXXXXXXXXXXXXXXXXXXXXXXX
XXXXXXXXXXXXXXXXXXXXXXXXXXXXXXXXXXXXXXXXXXXXXXXXXXXXXXXXXXXXXXXX
XXXXXXXXXXXXXXXXXXXXXXXXXXXXXXXXXXXXXXXXXXXXXXXXXXXXXXXXXXXXXXXX
XXXXXXXXXXXXXXXXXXXXXXXXXXXXXXXXXXXXXXXXXXXXXXXXXXXXXXXXXXXXXXXX
XXXXXXXXXXXXXXXXXXXXXXXXXXXXXXXXXXXXXXXXXXXXXXXXXXXXXXXXXXXXXXXX
XXXXXXXXXXXXXXXXXXXXXXXXXXXXXXXXXXXXXXXXXXXXXXXXXXXXXXXXXXXXXXXX
XXXXXXXXXXXXXXXXXXXXXXXXXXXXXXXXXXXXXXXXXXXXXXXXXXXXXXXXXXXXXXXX
XXXXXXXXXXXXXXXXXXXXXXXXXXXXXXXXXXXXXXXXXXXXXXXXXXXXXXXXXXXXXXXX
XXXXXXXXXXXXXXXXXXXXXXXXXXXXXXXXXXXXXXXXXXXXXXXXXXXXXXXXXXXXXXXX
XXXXXXXXXXXXXXXXXXXXXXXXXXXXXXXXXXXXXXXXXXXXXXXXXXXXXXXXXXXXXXXX
XXXXXXXXXXXXXXXXXXXXXXXXXXXXXXXXXXXXXXXXXXXXXXXXXXXXXXXXXXXXXXXX
XXXXXXXXXXXXXXXXXXXXXXXXXXXXXXXXXXXXXXXXXXXXXXXXXXXXXXXXXXXXXXXX
XXXXXXXXXXXXXXXXXXXXXXXXXXXXXXXXXXXXXXXXXXXXXXXXXXXXXXXXXXXXXXXX
XXXXXXXXXXXXXXXXXXXXXXXXXXXXXXXXXXXXXXXXXXXXXXXXXXXXXXXXXXXXXXXX
XXXXXXXXXXXXXXXXXXXXXXXXXXXXXXXXXXXXXXXXXXXXXXXXXXXXXXXXXXXXXXXX
XXXXXXXXXXXXXXXXXXXXXXXXXXXXXXXXXXXXXXXXXXXXXXXXXXXXXXXXXXXXXXXX
XXXXXXXXXXXXXXXXXXXXXXXXXXXXXXXXXXXXXXXXXXXXXXXXXXXXXXXXXXXXXXXX
XXXXXXXXXXXXXXXXXXXXXXXXXXXXXXXXXXXXXXXXXXXXXXXXXXXXXXXXXXXXXXXX
XXXXXXXXXXXXXXXXXXXXXXXXXXXXXXXXXXXXXXXXXXXXXXXXXXXXXXXXXXXXXXXX
XXXXXXXXXXXXXXXXXXXXXXXXXXXXXXXXXXXXXXXXXXXXXXXXXXXXXXXXXXXXXXXX
XXXXXXXXXXXXXXXXXXXXXXXXXXXXXXXXXXXXXXXXXXXXXXXXXXXXXXXXXXXXXXXX
XXXXXXXXXXXXXXXXXXXXXXXX=
-----END PRIVATE KEY-----
privateKeyId: 9xxxxxxxxxxxxxxxxxxxxxxxxxxxxxxxxxxxxxx3
projectId: myfirstproject-xxxxxx
tokenUri: https://oauth2.googleapis.com/token
type: service_account
type: gcp
DSV Service Account/User Mapping
Now the service account that is going to access DSV is required. For this example, we will name this account client-svc The setup in GCP is the same as above for the dsv-svc account except that when the role is assigned, it must be Service Account Token Creator so that this account can request tokens. Also, after generating the key, make sure to save the file to the local machine that will access DSV and note the location.
In the DSV CLI, create a User called gcp-test referring to the client-svc service account with gcloud as the authentication provider using dsv user create --username gcp-test --provider gcloud --external-id client-svc@myfirstproject-273119.iam.gserviceaccount.com.
{
  "cursor": "",
  "data": [
    {
      "created": "2020-04-04T17:56:33Z",
      "createdBy": "users:thy-one:admin@company.com",
      "externalId": "client-svc@myfirstproject-xxxxxx.iam.gserviceaccount.com",
      "id": "d6a8e1e5-5554-4fc8-a4ca-1c1a653f9095",
      "lastModified": "2020-04-04T17:56:33Z",
      "lastModifiedBy": "users:thy-one:admin@company.com",
      "provider": "gcloud",
      "userName": "gcp-test",
      "version": "0"
    }
  ],
  "length": 1,
  "limit": 25
}
Set an environmental variable named GOOGLE_APPLICATION_CREDENTIALS to the path of the key file for client-svc that was just downloaded.
In Linux or Mac, this might look like:
export GOOGLE_APPLICATION_CREDENTIALS="/home/user/Downloads/[FILE_NAME].json"
Windows Powershell
$env:GOOGLE_APPLICATION_CREDENTIALS="C:\Users\username\Downloads\[FILE_NAME].json"
Windows Command Line
set GOOGLE_APPLICATION_CREDENTIALS=C:\Users\username\Downloads\[FILE_NAME].json
After creating the User, modify the config to give that User access to the default administrator permission policy.
Adding a User to the admin policy is not security best practices. This is for example purposes only. Ideally, you would create a separate policy for this GCP service account with restricted access. For details on limiting access through policies, see the Policy section.
dsv config edit
Add gcloud:gcp-test as a User to the Default Admin Policy. Third party accounts must be prefixed with the provider name; in this case, the fully qualified username would be glcoud:gcp-test.
<snip>
- actions:
 - <.*>
 conditions: {}
 description: Default Admin Policy
 effect: allow
 id: xxxxxxxxxxxxxxxxxxxx
 meta: null
 resources:
 - <.*>
 subjects:
 - users:<gcloud:gcp-test|admin@company.com>
<snip>
Run dsv init filling out the desired values and selecting 6 GCP (federated) when prompted for the auth type.
Please enter auth type:
       (1) Password (local user)(default)
       (2) Client Credential
       (3) #{ThycoticOne}# (federated)
       (4) AWS IAM (federated)
       (5) Azure (federated)
       (6) GCP (federated)
       (7) OIDC (federated)
Run dsv auth to verify authentication. A token will be displayed.
Run dsv secret read <path to any secret> to verify secret access.
Google Compute Engine (GCE) Metadata Authentication
The idea behind GCE Metadata authentication is to enable a GCE instance to gain access to DevOps Secrets Vault.
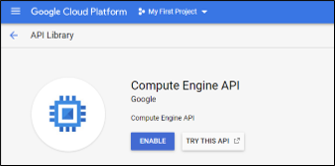
In this example we assume you have created a Linux Google Compute Instance and have the Google Compute Engine API enabled.
![]()
It is further assumed that the Compute Engine default service account is used. However, you can assign a different service account to the Compute instance if desired.
Using the GCE default service account is generally not best practices because it is defaulted to every GCE that is created, violating the idea of least privileges. This is for illustration purposes.
![]()

![]()
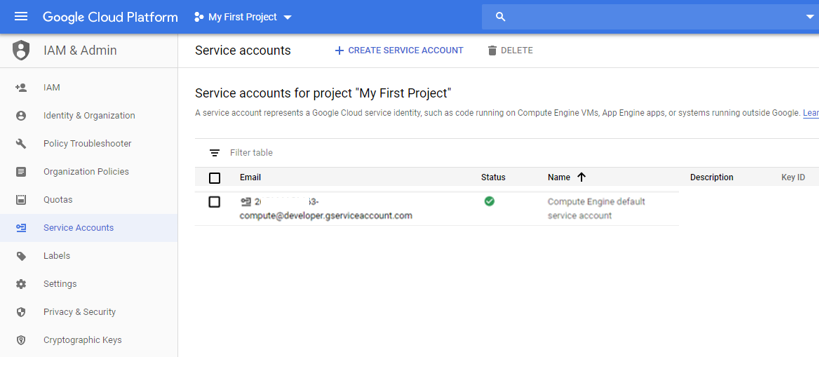
To find the Compute Engine default service account email, from the GCP Console Home, hover IAM and then click Service Accounts.
The name will say "Compute Engine default service account". Copy and store the email for later.
DSV GCE Authentication Provider setup
Using any computer with Admin DSV access, we now want to setup the DSV Authentication Provider.
Create a file named 'auth-gcp.txt' in the following format and substituting your ProjectID.
{
  "name": "gcloud-gce",
  "type": "gcp",
  "properties": {
    "ProjectId": "myfirstproject-273119"
  }
}
Run dsv config auth-provider create --data @auth-gcp.txt to implement the Authentication Provider.
To view the resulting addition to the config file, you would use:
dsv config auth-provider <name> read -e yaml where the example name we will use here is gcloud-gce.
- ID: bq71e5co19js72ppv140
name: gcloud-gce
properties:
projectId: myfirstproject-273119
type: gcp
tenantName: company
created: "2019-11-12T18:34:49Z"
createdBy: users:thy-one:admin@company.com
id: xxxxxxxxxxxxxxxxxxxx
lastModified: "2020-05-18T03:58:15Z"
lastModifiedBy: users:thy-one:admin@company.com
name: gcloud-gce
properties:
projectId: myfirstproject-xxxxxx
type: gcp
version: "0"
DSV GCE Metadata Service Account/DSV User Mapping
Run dsv user create --username gce-test --provider gcloud-gce --external-id {default compute service account email} using the default service account email we saved earlier.
{
  "created": "2020-04-09T12:59:44Z",
  "createdBy": "users:thy-one:admin@company.com",
  "externalId": "2XXXXXXXXXX3-compute@developer.gserviceaccount.com",
  "id": "19709b4e-2a13-4164-a930-81997b568036",
  "lastModified": "2020-04-09T12:59:44Z",
  "lastModifiedBy": "users:thy-one:admin@company.com",
  "provider": "gcloud-gce",
  "userName": "gce-test",
  "version": "0"
}
After creating the User, modify the config to give that User access to the default administrator permission policy.
Adding a user to the admin policy is not security best practices. This is for example purposes only. Ideally, you would create a separate policy for this GCP service account with restricted access. For details on limiting access through policies, see the Policy section.
dsv config edit
Add gcloud:gce-test as a user to the Default Admin Policy. Third-party accounts must be prefixed with the provider name; in this case, the fully qualified username would be glcoud-gce:gce-test.
Adding a user to the admin policy is not security best practices. This is for example purposes only. Ideally, you would create a separate policy for this AWS user with restricted access. For details on limiting access through policies, see the Policy section.
dsv config edit -e yaml
<snip>
- actions:
 - <.*>
 conditions: {}
 description: Default Admin Policy
 effect: allow
 id: xxxxxxxxxxxxxxxxxxxx
 meta: null
 resources:
 - <.*>
 subjects:
 - users:<gcloud-gce:gce-test|admin@company.com>
<snip>
GCE Authentication
SSH into the GCE and download the latest DSV CLI from this website DSV CLI.
For example, curl: https://dsv.secretsvaultcloud.com/downloads/cli/1.31.0/dsv-linux-x64 -o dsv
You may need to give yourself permissions to run the DSV binary, and it is also easier if you set the path.
Run dsv init filling out the desired values and selecting 6 GCP (federated) when prompted for the auth type.
Please enter auth type:
       (1) Password (local user)(default)
       (2) Client Credential
       (3) #{ThycoticOne}# (federated)
       (4) AWS IAM (federated)
       (5) Azure (federated)
       (6) GCP (federated)
       (7) OIDC (Federated)
Run dsv auth to verify authentication. A token will be displayed.
Run dsv secret read <path to any secret> to verify secret access.
Google Kubernetes Engine (GKE) Authentication
It follows that if you can have a GCE (aka a virtual server) authenticate to DSV, that there would be a similar way to do that with a Google Kubernetes Engine (GKE) node.
Here is an example where we deploy a simple app in GKE that is able to authenticate to DSV.
In the GCE example above, we used the Compute Engine default service account. Here we suggest you create a service account with at least the storage.objectViewer role for the project which will enable the ability to pull an image from GCP registry. In this example, we created a service account named dsv-gce.
DSV Authentication provider
Using any computer with Admin DSV access, setup the DSV Authentication Provider.
Create a file named 'auth-gcp.txt' in the following format and substituting your GCP <ProjectID>.
{
  "name": "gcloud-gce",
  "type": "gcp",
  "properties": {
    "ProjectId": "myfirstproject-273119"
  }
}
Run dsv config auth-provider create --data @auth-gcp.txt to implement the Authentication Provider.
DSV User mapped to the GKE service account
Run dsv user create --username gce-test --provider gcloud-gce --external-id {dsv-gce service account email} using the default service account email we saved earlier. You will get a response like this.
{
  "created": "2020-04-09T12:59:44Z",
  "createdBy": "users:thy-one:admin@company.com",
  "externalId": "dsv-gce@gcp-project-id.iam.gserviceaccount.com",
  "id": "19709b4e-2a13-4164-a930-81997b568036",
  "lastModified": "2020-04-09T12:59:44Z",
  "lastModifiedBy": "users:thy-one:admin@company.com",
  "provider": "gcloud-gce",
  "userName": "gce-test",
  "version": "0"
}
Back to GCP to setup a GKE cluster
From the GCP Home page, in the left menu, hover over Kubernetes Engine and select Clusters. Then Create Cluster. If this is the first one, then GCP will enable the GKE API for you.
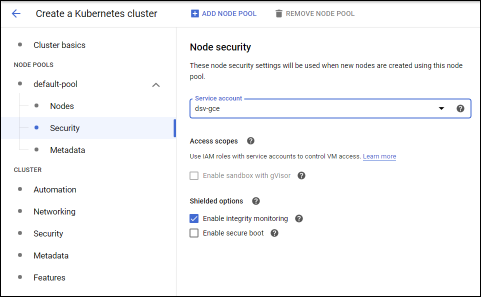
When the form comes up, the default values can be used with the exception of the service account. To change this, in the left navigation, select default-pool then Security where you will select the service account dsv-gce just mentioned.
Click Create. It takes a few minutes for the cluster to be built.
Hello-App
Now create and deploy this Go-based hello app in this cluster node.
We will use the built-in GCP Cloud shell to connect since it comes with Docker, Kubectl, and connectivity to GCP all setup. It even has a nice editor for the files we will create. To do this, go to the Kubernetes Engine then Clusters page. From the list, there is a Connect button that opens a modal pop-up. In the modal, select Run in Cloud Shell.

![]()
A terminal opens in the browser. Run the following steps.
mkdir hello-app
cd hello-app
cat >  main.go
Now you can copy the code below into the terminal, but substitute the tenant_url to your URL, which will look something like https://mycompany.secretsvaultcloud.com.
package main

import (
    "bytes"
    "encoding/json"
    "fmt"
    "io/ioutil"
    "log"
    "net/http"
    "os"
)

func main() {
    mux := http.NewServeMux()
    mux.HandleFunc("/", hello)

    port := os.Getenv("PORT")
    if port == "" {
        port = "8080"
    }

    log.Printf("Server listening on port %s", port)
    log.Fatal(http.ListenAndServe(":"+port, mux))
}

func hello(w http.ResponseWriter, r *http.Request) {
    log.Printf("Serving request: %s", r.URL.Path)

    fmt.Println("-----------computeMetadata-----------")

    client := &http.Client{}
    req, err := http.NewRequest("GET", "http://metadata.google.internal/computeMetadata/v1/project/project-id", nil)
    if err != nil{
        fmt.Fprintf(w, "Error creating Metadata Request: %s\n", err.Error())
        return
    }
    req.Header.Add("Metadata-Flavor", Google)
    resp, err := client.Do(req)
    if err != nil{
        fmt.Fprintf(w, "Error creating Metadata : %s\n", err.Error())
        return
    }

    body, err := ioutil.ReadAll(resp.Body)
    if err != nil{
        fmt.Fprintf(w, "Error parsing body computeMetadata: %s\n",  err.Error())
        return
    }
    fmt.Fprintf(w, "Response computeMetadata: %s\n", string(body))

    fmt.Println("-----------computeMetadata-service-accounts-----------")

    tenant_url := "{tenant url}"
    client2 := &http.Client{
    }
    req2, err := http.NewRequest("GET", "http://metadata.google.internal/computeMetadata/v1/instance/service-accounts/default/identity", nil)
    if err != nil{
        fmt.Fprintf(w, "Error creating service-accounts Metadata Request: %s\n", err.Error())
        return
    }
    req2.Header.Add("Metadata-Flavor", Google)
    q := req2.URL.Query()
    q.Add("audience", tenant_url)
    q.Add("format", "full")
    req2.URL.RawQuery = q.Encode()
    resp2, err := client2.Do(req2)
    if err != nil{
        fmt.Fprintf(w, "Error creating service-accounts Metadata : %s\n", err.Error())
        return
    }

    body2, err := ioutil.ReadAll(resp2.Body)
    if err != nil{
        fmt.Fprintf(w, "Error parsing body service-accounts computeMetadata: %s\n",  err.Error())
        return
    }
    fmt.Fprintf(w, "Response service-accounts computeMetadata: %s\n", string(body2))

    fmt.Println("-----------DSV-----------")

    reqBody, _ := json.Marshal(map[string]string{
        "grant_type" : "gcp",
        "jwt" : string(body2),
    })

    dsvResp, err := http.Post(tenant_url+"/v1/token","application/json", bytes.NewBuffer(reqBody))
    if err != nil || dsvResp == nil{
        if err!= nil {
            fmt.Fprintf(w, "Error creating dsv Request: %s\n", err.Error())
        }
        return
    }

    dsvBody, err := ioutil.ReadAll(dsvResp.Body)
    if err != nil{
        fmt.Fprintf(w, "Error parsing body dsv: %s\n",  err.Error())
    } else{
        fmt.Fprintf(w, "Response from DSV: %s\n", string(dsvBody))
    }
}
Use ctrl+c to escape out.
Now create the docker file.
cat > Dockerfile
Copy the commands below in.
FROM golang:1.13-alpine
ADD . /go/src/hello-app
RUN go install hello-app

FROM alpine:latest
COPY --from=0 /go/bin/hello-app .
ENV PORT 8080
CMD ["./hello-app"]
Use ctrl+c to escape out.
Run these commands to build and push the app to GKE. Substitute your project ID in.
docker build -t gcr.io/{PROJECT_ID}/hello-app:v1 .
docker push gcr.io/{PROJECT_ID}/hello-app:v1
The docker image is in GCP registry, so now create the Kubernetes deployment.
cat > k8.yml
Substitute your project id and paste the following.
apiVersion: apps/v1
kind: Deployment
metadata:
  name: my-app
  labels:
    app: my-app
spec:
  replicas: 1
  selector:
    matchLabels:
      app: my-app
  template:
    metadata:
      name: my-app
      labels:
        app: my-app
    spec:
      containers:
        - name: my-app
          image: gcr.io/{PROJECT_ID}/hello-app:v1
          volumeMounts:
            - name: certs
              mountPath: /etc/ssl/certs
      volumes:
        - name: certs
          hostPath:
            path: /etc/ssl/certs
Use ctrl+c to escape out.
And deploy:
kubectl apply -f k8.yml
Make sure the pod is in running status.
kubectl get pod
Now expose the app to the internet.
kubectl expose deployment my-app --type=LoadBalancer --port 80 --target-port 8080
kubectl get service
You should see:

It will take a few minutes for the <pending> to turn to an IP address.
Retry kubectl get service until you see IP address in EXTERNAL-IP.

Copy the EXTERNAL-IP for my-app and paste in your browser. You should a get DSV token.

At this point you are successfully logged into DSV from GKE. There are two tokens, the first one is the GKE metadata token. The second one is the DSV authentication token. If you parse the DSV token at the jwt.io website you should see the username gcloud-gce:gce-test to confirm.