Platform Dashboards
A dashboard is a customizable page that brings widgets and shortcuts from platform services together in a single view. Every dashboard you create appears in the Home section of the left navigation menu.
Dashboards are personal. You can't share a dashboard with other users.
Dashboard Overview
Widget Types
Widgets fall into two broad categories:
-
Analytical and reporting widgets: Display charts, metrics, and audit data. For example, a widget powered by Platform Audit can show audit event trends over time.
-
Operational widgets: Let you perform tasks directly from the dashboard. For example, you can navigate secret folders or view secret grids without leaving the dashboard.
Each platform service, such as Secret Server, Inventory, or ITDR (Identity Threat Detection and Response), supplies its own widgets. A widget is available to you only when two conditions are met. Your organization must subscribe to the service that provides it. Your roles must also give you access to the data or actions it shows. For example, the Secret Server report widget is available only if your role includes the permission to view Secret Server reports. As a result, two users can see different sets of widgets.
Layout Modes
Every dashboard uses one of two layout modes. You choose the layout mode when you create the dashboard, and you can't change it later.
| Layout mode | Best for | How content is arranged | How changes are saved |
|---|---|---|---|
| Auto – flexible width | Monitoring charts, metrics, or lists | Widgets in rows. Widgets expand to fill available space, and the layout adapts to smaller screens such as phones. | You make changes in Edit Mode, then save them. |
| Tile – fixed position | Shortcuts and operational widgets | Free-form grid, similar to a desktop. Items stay where you place them. | Changes save immediately. Tile Layout has no Edit Mode. |
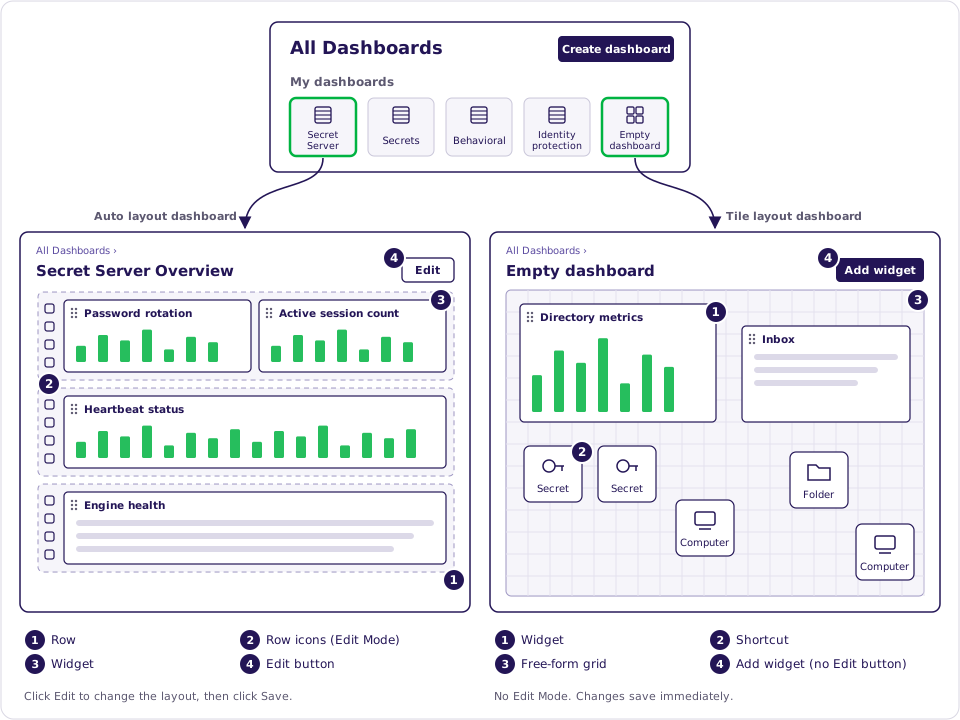
The following figure shows how the All Dashboards page, dashboards, rows, widgets, and shortcuts relate in each layout mode.
Dashboard Structure in Auto and Tile Layouts
Opening a Dashboard
To open a dashboard, use any of these methods:
-
In the left navigation menu, click Home, then click the dashboard name under Dashboards.
-
Select a dashboard from the list next to the current dashboard's title.
-
Click All Dashboards, then click a dashboard under My dashboards. The All Dashboards link appears under Dashboards in the Home menu and above each dashboard's title.
Using Full Screen Mode
Each dashboard has a full screen toggle in its header. Full screen mode hides the left navigation menu and the top bar so you can focus on the dashboard. To return to the standard view, click the toggle again.
Required Permissions
Two role permissions control access to dashboards. Administrators have both permissions by default. Standard users need both permissions granted explicitly.
-
View Dashboards: See and interact with dashboards.
-
Create Dashboards: Create new dashboards.
You can create dashboards only for yourself. A user with only View Dashboards can't create a dashboard, so most users need both permissions.
You assign these permissions through roles, like other platform permissions. For more information, see Platform Permissions.
Widgets don't all control data access the same way. Each service decides how its widgets apply permissions.
For example, a Secret Server report widget shows report results to any user with the role permission to view reports. It doesn't check folder or secret permissions, which matches how Secret Server reports work. As a result, report results can include information about secrets in folders that the user can't otherwise access.
Users who can create or edit Secret Server reports can write custom SQL and see almost any report data. Secret contents are encrypted, so a report never shows them.
Creating a Dashboard
You can start from a preconfigured dashboard or from an empty dashboard. You can customize any dashboard after you create it.
You can't change a dashboard's layout mode (Auto or Tile) after you create it. Choose the layout that fits how you plan to use the dashboard. See Layout Modes.
To create a dashboard:
-
In the left navigation menu, click Home.
-
Next to Dashboards, click the Create dashboard icon (a page with a plus sign). The Create dashboard dialog opens.
You can also click Create dashboard on the All Dashboards page.
-
Choose how to start:
-
To start from a preconfigured dashboard, select Use a preconfigured dashboard. Under Choose a dashboard to build from, click a dashboard. The panel on the right shows its description and the widgets it includes.
-
To start from scratch, select Start from an empty dashboard. Under Choose a layout to get started, click Auto – flexible width layout or Tile – fixed position layout.
-
-
Click Create. The new dashboard opens.
A dashboard you start from scratch is named Empty dashboard. To give it a meaningful name, see Renaming or Deleting a Dashboard.
Preconfigured Dashboards
The following preconfigured dashboards are available.
| Dashboard | Description | Widgets included |
|---|---|---|
| Secret Server Overview | Operational view of distributed engines, password changing, and heartbeat. | Password rotation, Active session count, Heartbeat status, Engine health |
| Secrets | Tools to view, access, and launch secrets. | Secret folder selector, Secret list, Heartbeat status |
| Identity protection | Track identity posture, privileged exposure, and risk across your connected sources. | Env. Posture Score, Accounts, Assets, Activities, Apps, Privileged Entities, Watched Collections, MFA Factor States, Unvaulted Privileged Accounts, Usage, Riskiest Accounts, Top Failing Checks |
| Behavioral Analytics | Behavioral analytics overview. | Accounts Risk by Severity, Riskiest Accounts, Latest Alerts, IP Map, Alerts Over Time, Most Active Users, Top User Agents, Most Active Secrets, Top Active IPs |
Renaming or Deleting a Dashboard
You can rename or delete your dashboards. You can't duplicate a dashboard.
To rename a dashboard:
-
Open the dashboard.
-
Click the ... icon next to the dashboard title.
-
Under Dashboard, click Rename. The Rename dashboard dialog opens.
-
In the Dashboard name field, enter the new name.
-
Click Update.
To delete a dashboard:
-
Open the dashboard.
-
Click the ... icon next to the dashboard title.
-
Under Dashboard, click Delete. The Remove dashboard dialog asks you to confirm.
-
Click Remove dashboard. The platform removes the dashboard and all of its contents.
Editing an Auto Layout Dashboard
Auto Layout dashboards organize widgets in rows. Each row has a column of icons on its left side. Changes you make in Edit Mode take effect only when you save them.
To edit an Auto Layout dashboard:
-
Open the dashboard.
-
In the dashboard header, click Edit. A drag handle (a six-dot icon) appears in the upper-left corner of each widget, and the row icons become active.
-
To change a row, use the icons on the left side of the row. Hover over an icon to see its name.
-
Add widget (a square with a plus sign): Adds a widget to the row.
-
Move up and Move down: Move the row. You can also click anywhere in the row and drag it up or down.
-
Increase row height and Decrease row height: Change the row's height.
-
Add row below: Adds an empty row.
-
Remove row: Removes the row.
-
-
To add a widget, click the add widget icon on a row. In the Add widget dialog, click a widget. If prompted, enter a Title, choose a Width, and click Add.
-
To move a widget, drag it by its drag handle. You can also use the move options in the widget's context menu instead of dragging.
-
Click Save.
To discard your changes, click Cancel next to Save. If you leave the page with unsaved changes, the Discard changes dialog appears. Click Discard changes to leave without saving, or Cancel to stay on the page.
Using the Shortcuts Widget
On an Auto Layout dashboard, shortcuts appear in a Shortcuts widget instead of as separate tiles. The widget lists each shortcut and has a Search shortcuts box.
To add a shortcut, pin the item to the dashboard, or add it from the widget. For pinning, see Pinning Items to a Dashboard.
To add a shortcut from the widget:
-
In the Shortcuts widget, click Add. The Add item to dashboard dialog opens.
-
To find items, enter a name in the search box, or filter by Type: All, Computer, Folder, Page, or Secret.
-
Select one or more items.
-
Click Add.
To open a shortcut's item, click the rocket icon next to the shortcut. The item opens in the same tab.
Arranging a Tile Layout Dashboard
Tile Layout dashboards work like a desktop. You place widgets and shortcuts to platform items, such as secrets, computers, and other content, anywhere on the grid.
To add a widget or shortcut:
-
Open the dashboard.
-
In the dashboard header, click Add widget. The Add item to dashboard dialog opens.
-
Choose what to add:
-
A widget: Click the widget name.
-
A shortcut: Click Shortcut to an existing item, then choose the item, such as a secret.
-
A dashboard folder: Click Add Folder, then enter a name for the folder. Use dashboard folders to group items on the dashboard.
-
You can also add a shortcut by pinning an item to the dashboard. See Pinning Items to a Dashboard.
Dashboard folders are separate from Secret Server folders, even if they have the same name. A dashboard folder groups items on the dashboard and doesn't contain secrets.
To work with items on a Tile Layout dashboard:
-
Move an item: Drag it to any position on the grid.
-
Resize a widget: Drag any border of the widget. You can also click the ... icon in the widget header, then click Basic settings. In the Update widget dialog, enter Width and Height values, then click Update.
-
View item details: Click a shortcut once to open a side panel with the item's details and options. For a secret shortcut, the options are View details, Update shortcut, Remove from dashboard, Change folder, and Launch.
-
Run the primary action: Double-click a shortcut to run the item's primary action, if it has one. For example, double-clicking a secret shortcut opens the Launch Secret dialog. If the secret has more than one launcher, choose the one to use.
-
Remove a shortcut: Click the shortcut once, then click Remove from dashboard in the side panel.
-
Move a shortcut into a dashboard folder: Click the shortcut once, then click Change folder in the side panel and choose the destination.
-
Open a dashboard folder: Click the folder. Its contents open on their own grid, and the breadcrumb shows the folder name. To return, click the dashboard name in the breadcrumb.
Tile Layout dashboards have no Edit Mode. Position and size changes save immediately.
Tile Layout doesn't provide keyboard alternatives for moving items. To arrange content without a mouse, use an Auto Layout dashboard.
Pinning Items to a Dashboard
You can pin a page, such as Inventory > Computers, to one or more dashboards. Pinning adds a shortcut to the page.
To pin an item to a dashboard:
-
Open the page you want to pin.
-
Click the ... icon next to the page title, then click Pin to dashboard. The Pin to dashboard dialog opens.
-
Choose where to pin the item:
-
To pin it to existing dashboards, select one or more dashboards.
-
To pin it to a new dashboard, click Pin to new dashboard and enter a name. The new dashboard uses Auto Layout.
-
-
Click Save.
Where the pinned item appears depends on the dashboard's layout mode:
-
Tile Layout: The item appears as a shortcut on the grid.
-
Auto Layout: The item appears in the Shortcuts widget. If the dashboard doesn't have one, the platform adds it. See Using the Shortcuts Widget.
Filtering Dashboards and Configuring Widgets
Most widgets are context-aware. A context-aware widget responds to filter settings shared across the dashboard.
Filtering by Folder
If a dashboard contains a folder selector widget, changing the selected folder updates other widgets that use a folder. Examples include secret lists, secret grids, and folder-scoped reports. The Secrets preconfigured dashboard includes both a Secret folder selector and a Secret list.
Filtering by Date
If any widget on the dashboard supports date filtering, a filter bar appears at the top of the dashboard. Changing the date range in the filter bar updates every context-aware widget at once.
Using the Widget Menu
To open a widget's menu, click the ... icon in the widget header. The menu includes these options:
-
Basic settings: Change the widget's title and size.
-
Remove this widget: Remove the widget from the dashboard.
-
Refresh: Reload the widget's data.
Widgets with advanced settings show an extra option in the menu. For example, a Secret Server report widget has advanced settings.
Some widgets also show their own settings in the widget body. For example, a Secret Server report widget asks you to choose a Report category and a Report, then click Apply.
Setting Your Login Home Page
Your login home page is the page that opens automatically when you sign in. Any page you can mark as a favorite can be your login home page, including a dashboard.
To set a page as your login home page:
-
Open the page, such as a dashboard or Inventory > Computers.
-
Click the ... icon next to the page title.
-
Click Set as login home.
You can also choose your login home page from your user profile, where the setting is called Landing page. The list includes only pages you've marked as favorites.
To choose your landing page from your user profile:
-
Click your user icon at the top right, then click Account details.
-
Click the Preferences tab.
-
Under Interface, select a page in the Landing page list.
For more about your user profile, see Landing page.
Troubleshooting
Issue: You can't see any dashboards
Cause: Viewing dashboards requires the View Dashboards permission.
Solution:
-
Check your roles on the Roles tab of your user profile. See Managing Your User Profile.
-
Ask your administrator to grant the View Dashboards permission.
-
Click Home and confirm that your dashboards appear under Dashboards.
Issue: You can't create a dashboard
Cause: Creating dashboards requires the Create Dashboards permission.
Solution:
-
Check your roles on the Roles tab of your user profile.
-
Ask your administrator to grant the Create Dashboards permission.
-
Follow the steps in Creating a Dashboard to confirm that you can create one.
Issue: A widget you expect isn't available
Cause: A widget appears only if your organization subscribes to the service that provides it, and your roles give you access to what it shows.
Solution:
-
Identify the service the widget comes from, such as Secret Server or ITDR.
-
Ask your administrator to confirm that your organization subscribes to that service.
-
If it does, ask your administrator for role permissions that give you access to the service's data.
-
Open the Add widget dialog again and confirm that the widget appears.
Issue: A widget doesn't change when you change the folder or date range
Cause: The widget doesn't use a folder or date, so the dashboard filters don't apply to it.
Solution:
-
Check whether the widget shows folder-based or date-based data, such as a secret list or audit trends over time.
-
If it doesn't, the dashboard filters don't affect it, and no change is needed.


