How to Configure Integrated Windows Authentication
Privileged Access Service lets you accept an Integrated Windows authentication (IWA) connection as sufficient authentication for users with Active Directory accounts when they log in to the Delinea portals. Privileged Access Service uses Kerberos SSO for authentication. With IWA enabled, the browser uses the current user's Active Directory information to prove its knowledge of the password through a cryptographic exchange with the in-process web server built into the connector. IWA is not available to Privileged Access Service account users.
Starting with Chrome version 142, a new security feature prompts users for permission when a site attempts to connect to local networks using Integrated Windows Authentication (IWA). To log in using IWA with Delinea products, the user must click "Allow" when prompted. This change affects all Chromium-based browsers, including Edge and Brave. For more information, see New permission prompt for Local Network Access on the Chrome for Developers blog.
You can create a Windows Group Policy Object (GPO) to grant local network access to your Delinea websites and avoid this prompt. For more information, see LocalNetworkAccessAllowedForUrls in the Microsoft documentation.
To stop these permission prompts, the user can click "Block," but the user will not be able to log in.
If you have multiple connectors enabled for IWA, Privileged Access Service prioritizes connection with the connectors in the following order:
-
Connectors from the same IP address as the user’s client machine
-
Randomly chooses a connector if more than one is from the same IP address as the user’s client machine. Multiple machines inside your network may appear as the same IP externally.
-
Chooses the best subnet match
-
Randomly chooses a connector if none of the above are available
To use IWA, users must be inside the external corporate IP range and specify their tenant URL in the portal URL in the following form:
- Admin Portal: https://<companyName>.centrify.com/manage?customerID=ABC1234
Prerequisites
Before you start configuring IWA with Privileged Access Service, make sure you have done the following:
-
Relevant browsers are configured for IWA. See [How to Configure Browsers for How to Configure Browsers for Silent Authentication.
-
Specify an external corporate IP range using Admin Portal. How to Set Corporate IP Ranges. Corporate IP range for IWA is for the external network only.
-
Your company has at least 1 Delinea connector with web server enabled and that connector must be joined to Active Directory in the forest to which users are authenticating. See Enabling IWA Service on the Connector.
-
Decide if you want to use the Delinea tenant CA (recommended because the CA automatically installs to the Delinea connector and minimizes configurationsteps during roll-out), third-party CA (such as Symantec, GoDaddy, and so forth), or your internal CA.
Enabling IWA Service on the Connector
Integrated Windows authentication (IWA) is enabled by default when you install the connector. However, you may want to make configuration changes (for example, defining your corporate IP range) and ensure that browsers used by your users are configured properly for IWA. See How to Configure Browsers for Silent Authentication.
You must restart the Delinea Connector after importing the certificate.
To configure IWA and import the certificate:
-
Log in to Admin Portal.
-
Click Settings > Network > Delinea Connectors.
-
Select the relevant connector or add a new one.
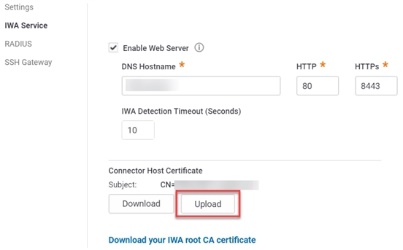
You can modify the following settings:
| Setting or property | Change to do the following |
|---|---|
| Enable web server | The default value is Enabled. This setting supports Integrated Windows Authentication and Office clients. If you disable the web server, you cannot change the DNS Hostname, HTTP Port Number and HTTPS Port number values. |
| DNS Hostname | The default is the connector’s host computer’s name. You can enter a DNS short name here or the fully qualified domain name in the IE local intranet zone. |
| IWA Detection Timeout | The length of time Integrated Windows Authentication (IWA) will wait for response from the connector. The default is 10 seconds. |
| HTTP Port Number | The default port is 80. Port 80 is the standard port. If you change the port number to a non-standard number (for example, 111), Firefox and Chrome may require additional configuration because these browsers block some non-standard ports. Do not change the port number unless you know the implications. |
| HTTPS Port Number | The default port is 8443. Port 8443 is the standard port. If you change the port number to a non-standard number, Firefox and Chrome may require additional configuration because these browsers block some non-standard ports. Do not change the port number unless you know about the implications. |
| Connector Host Certificate | The host certificate used by the Delinea Connector must be issued by a trusted issuer. You can trust the tenant specific CA we have created for you by default, or provide your own. Click Upload to upload a certificate into the Privileged Access Service. See [Configuring SSL for certificate requirement information]. Click Download to download your connector host certificate. Click Download your IWA root CA certificate to save a copy of the certificate from the IWA root CA. |
-
Click Save.
-
Click Corporate IP Range.
-
Click Add to enter a your corporate IP range.
IWA will not work for users whose computers are outside of the defined corporate IP range.
-
Click OK.
-
Reboot your Delinea Connector if you have uploaded a certificate.
Importing a Certificate
If you are using internal or third-party CAs (certificate authorities), you need to import those certificates into Privileged Access Service. You can import wildcard certificates.
For details about generating a certificate for the connector system, see Creating a connector machine certificate from an internal Microsoft CA
To import a certificate into Privileged Access Service:
-
In the Admin Portal, go to Settings > Network > Delinea Connectors.
-
Select the relevant connector.
-
Click IWA Service on the Delinea Connector Configuration page.
-
Confirm that the Enable Web Server check box is enabled.
-
Click the Upload button to import an internal or third-party certificate.
You can upload the same certificate to all Delinea Connectors in the same domain. If you do this, make sure you upload the same certificate to all IWA configured connectors.
-
Navigate to your CA and upload it.
-
Click Save.
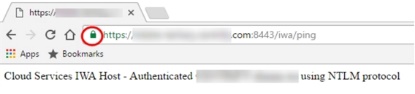
Verifying IWA Over HTTPS
You can test the validity of the Delinea Connector host certificate by doing the following:
-
Open a web browser from an endpoint machine
-
Navigate to the following address: https://<yourconnectorhostname>:<httpsport>/iwa/ping.
Replace <YourConnectorHostname> and <httpsport> with the corresponding values. For example: https://2008WindowsServer:8443/iwa/ping
-
Look for the green certificate in the browser.
Enabling IWA in the Authentication Policy
You can configure Privileged Access Service to bypass already configured authentication rules and default authentication profiles when IWA is configured. This option is configured by default.
To enable IWA in the authentication policy:
-
Log in to Admin Portal.
-
Click Access > Policies and select the relevant policy set.
-
Click Login Policies > Delinea Services.
-
Click the Enable authentication policy controls drop-down and select Yes.
-
Select a default authentication profile (in the Default Profiledropdown) for Privileged Access Service to use if IWA is not available and other authentication conditions are not met.
See Creating Authentication Profiles for more information on authentication profiles.
-
Enable the Allow IWA connections option (enabled by default) in the “Other Settings” area.
-
Click Save.
Using IWA with Identity Cookie
This is an optional configuration. When you enable Integrated Windows Authentication (IWA), Privileged Access Service can write a cookie in the current browser after a successful IWA-based log in. Privileged Access Service checks the browser for this cookie when the user logs in to the Admin Portal. As long as the cookie is there, the user is not prompted for multi-factor authentication.
To use IWA with identity cookie:
-
Open the relevant Login Policy (Login Policies > Delinea Services).
-
Enable the Set identity cookie for IWA connections option in the “Other Settings” area.
This option tells Privileged Access Service to write a cookie in the current browser after a successful IWA-based log in.
-
Click Save.
Using IWA to Authenticate Application Access
This is an optional configuration. You can configure Privileged Access Service to use IWA to override all application specific authentication requirements. For example, you can configure the Box application to require two authentication challenges if users are accessing the application from inside the network. However, you can tell Privileged Access Service to ignore those authentication requirements if IWA is available.
To allow IWA for applications that require authentication:
-
Open the relevant Login Policy (Login Policies > Delinea Services).
-
Enable the IWA connections satisfy all MFA mechanisms option.
-
This option tells the Privileged Access Service to allow IWA to override all application specific authentication requirements.
-
Click Save.
Disabling IWA
IWA is not required for manual authentication using Privileged Access Service. If you cannot use IWA on the corporate network, you can disable it.
To disable Integrated Windows authentication:
-
Log in to Admin Portal
-
Click Settings > Network > Delinea Connectors.
-
Select the relevant connector.
-
Unselect the Enable Web Server option.
-
Click OK.