Getting Started
This section includes information on how to use Delinea software to access applications with privileges on a Windows computer that has the Agent for Windows installed.
Verify That You Can Log On
The Agent for Windows can be centrally deployed by a system administrator or deployed locally directly on a computer. If an administrator has installed a Agent on a computer you use, the next step is to verify that you can log on successfully and locate the Delinea applet on your computer. The Agent does not change how you log on your computer. However, you must be assigned at least one role that allows you to log on locally, remotely, or both.
When you are prompted for a user name and password, type your domain or local credentials as you normally would. If your administrator has enabled multi-factor authentication for log in, you will be asked to perform one or more authentication challenges, such as responding to a text message or email message, answering a security question, or answering an automated phone call. If you provide valid credentials and have been assigned a role with permission to log on, you should see your default desktop as it normally displays with the addition of a Delinea applet that is added to the system tray notification area. By left-clicking on the Delinea applet, you can view your current desktop and assigned roles.
As part of the deployment, your computer may or may not have been joined to a zone. If the administrator has not specified a zone for your computer to join as part of the deployment process, you can specify a zone using the Privilege Elevation Service on your local computer. Contact your system administrator to find out which zone you should join.
You can check whether the agent is installed and running, and whether you are connected to a zone using the Services Control Panel or the Privilege Elevation Service. For example, click Start > All Programs > Server Suite 2021.1 > Agent Configuration > Privilege Elevation Service to view the control panel.
If the agent is installed but not connected to a zone, you should contact your system administrator to determine the zone to use. You should note, however, that setting or changing the zone assignment requires local administrative privileges. If the agent is not installed on the local computer, you should contact your administrator to find out if you are responsible for deploying the Agent for Windows on your computer.
If the zone information for the agent is configured, but the agent status is not Connected, your current rights, roles, and role assignment privileges should still be available, in most cases, from the local authorization cache. If you are unable to perform administrative tasks that you normally can perform, contact your system administrator to determine whether the authorization cache needs to be refreshed.
If you cannot log on, see What to do if you cannot log on.
What to Do if the Delinea Icon is Not Displayed
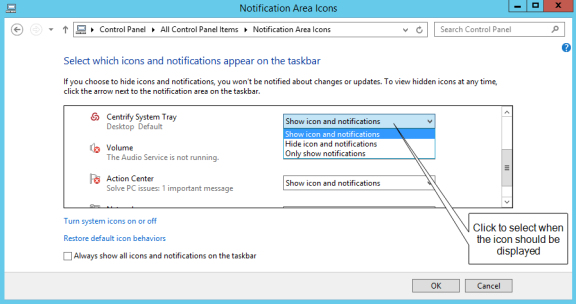
By default, the Windows system tray notification area is the located to the right of the task bar on the bottom of your screen. You can customize this area to display icons for different applications.
If the Delinea icon is not displayed by default, you can click the up arrow in the notification area to add it.
To display the Delinea icon if it is not displayed by default:
-
Click the up arrow in the notification area.
For example:

-
Click Customize to change the icons displayed.
-
Scroll to the System Tray icon, then select Show icon and notifications to display the Delinea icon at all times.
For example:
-
Click OK.
What to Do if You Cannot Log On
There are several reasons why an attempt to log on can fail. If you are denied access to a computer:
-
Verify that the computer you trying to log on to allows the type of access
you are attempting. For example, most users cannot log on locally on
computers that are Active Directory domain controllers. Similarly, a
computer’s properties must be configured to allow remote access for you to
be able to connect remotely. These settings are Windows policies and
properties and are not related to the Agent for Windows.
-
Check whether you are attempting to log on using a local account or a domain
account. The administrator can assign a role that allows you to log on to
your local account, your domain account, or both. It is possible that only
one of those accounts has been assigned a role with access to the computer.
For example, your administrator may have your account configured so you can
log on using your local account credentials but not with your domain
credentials.
-
Verify that the computer where you are trying to log on has access to an
Active Directory domain controller. If an Active Directory domain controller
is not available or the local computer is not a member of an Active
Directory domain, you might be prevented from logging on because the agent
cannot verify you have authority to access the computer.
-
Determine whether you are attempting to log on to a remote computer with an
appropriate role. The administrator can assign a role that allows you to log
on locally, log on remotely, or both. It is possible that only one of those
rights has been configured for the role you have been assigned. For example,
your administrator may have configured the role you are assigned to allow
you to log on to your local computer but not allow remote connections.
After the Agent for Windows has been installed, you must have a role assigned to your account that gives you log on privileges. If an attempt to log on fails, contact your Active Directory administrator or helpdesk to determine the roles you have been assigned, the type of access your roles grant, and any limitations associated with your role assignment. For example, roles can have time constraints with specific periods of availability. If you attempt to log on, but the role is not available, you will be denied access.
For more information about the steps you can take, see Troubleshooting.
Checking Your Rights and Role Assignments
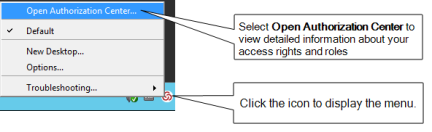
The roles you are assigned control your access rights and the accounts you can use to log on. You can look up detailed information about your rights and role assignments by right-clicking the Delinea icon, then selecting Open Authorization Center. For example:
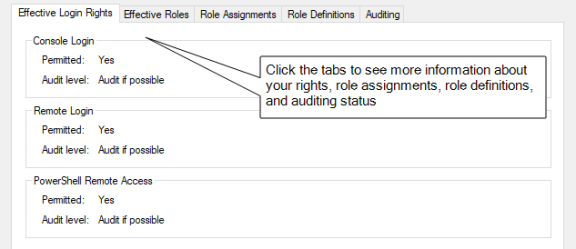
You can then click the tabs to see information about your current role and any other roles you have been assigned. For example, from Authorization Center, click the following tabs to see more detailed information about how the roles you have been assigned are configured:
-
Click Effective Login Rights to see information about your local,
remote, and PowerShell login rights and whether auditing is requested,
required, or not applicable.
-
Click Effective Roles to see information about the roles you have been
assigned and the current status of each role. For any roles, you can
right-click a role, then select Role Properties to view additional details.
For example, if any of your roles are Inactive, you can right-click to see
the time constraints defined for the role. You can also view the specific
type of rights granted by each role.
-
Click Role Assignments to see detailed information about your role
assignments, including where the assignment was made, whether the role is a
local or network role, and the start and end times that are in effect for
the role. You can right-click a role assignment, then select Assignment
Properties or Role Properties to view additional details.
-
Click Role Definitions to see detailed information about the login
rights and audit requirements that have been defined for the roles you have
been assigned. You can right-click a role definition, then select Properties
to view additional details.
-
Click Auditing to see information about the auditing status for each
desktop started in a session.
You can only view information about your own access rights and role assignments in the Authorization Center. Click Close when you are finished viewing authorization information.
After you review information about your access rights and role assignments using Authorization Center, you should have a basic understanding of the roles you have been assigned, any restrictions on when they are available, and what the roles allow you to do. Your role assignments control where you can log on, the type of account you use to log on, the specific access rights you have on local or network computers. As discussed in Roles grant different types of access rights, there are three categories of access rights for Windows computers:
- Desktop
- Application
- Network access
Depending on the details of how roles are defined in your organization and the specific roles you have been assigned, you might have some or all of the access rights described in the next sections.
Working with Desktop Access Rights
When you first log on, the default desktop is your only desktop. Depending on whether you logged on using a local user account or an Active Directory domain user account, you have the default privileges associated with that account. If you have been assigned a role with a desktop access right, the Agent enables you to run individual applications using a selected role from your default desktop or create one or more new desktops to run multiple applications using the administrative privileges associated with your roles.
If you have one or more roles with desktop rights, you can create, select, and switch between desktops on computers that have a traditional Windows desktop.
Running an Individual Application Using a Role
If you have a role assignment with a desktop access right, you don’t have to create a new desktop to run a local application using your administrative privileges. You can select any local application directly from your default desktop, then select a role you have been assigned without creating a new desktop or switching from one desktop to another. This is often the best solution if you only run one application using your administrative privileges or rarely need to invoke those privileges.
To run a local application using a selected role:
-
Navigate to and select the application you want to run.
-
Right-click the executable or shortcut for the application.
If you want to open the application from the Start menu, press the Shift key when you right-click.
-
Select Run with Privilege.
Selecting Run with Privilege is similar to selecting standard Windows “Run as” or “Run as administrator” menu items, but does not require you to provide a password for an administrative or shared service account. Instead, you always use your own password to authenticate your identity.
-
If the Select Role dialog box opens, select a role from the list of available roles, then click OK.
If there is only one role assigned to you that allows you to run the application, the application will automatically run using that role, and the dialog box does not open. If you would like to access the Select Role dialog box, press the Shift key when you select Run with Privilege.
-
Type the password for your login account if you are prompted for it, then click OK.
If your administrator has enabled privilege elevation justification, a justification dialog box appears.
-
Enter the following information to justify why you need to run the application with privilege:
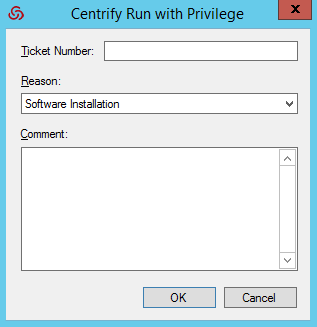
- Ticket number: If your administrator has instructed you to enter a
ticket number, do so here. (This field can be used with ticketing
systems such as ServiceNow and so forth.) - Reason: Select the reason category that best fits your situation.
Your choices are:
- Software Installation
- Remote System Administration
- Local System Administration
- Windows Feature Management
- System Networking Change
- Maintenance (Shutdown, Reboot, Power Off)
- PowerShell or Other CLI
- Operation (Services, Zone Operations, etc.)
- Other
- Comment: Enter any comments about your need to run with privilege.
- Ticket number: If your administrator has instructed you to enter a
-
If your administrator has enabled multi-factor authentication, complete the additional authentication challenges after entering your password.
After you select a role, you have the rights associated with that role. The application opens with the privileges associated with a specific user account or with the members of a particular administrative group and an audit trail event is recorded in the Windows Application event log. When you close the application, you resume working with your normal account privileges and group membership.
Creating a New Desktop
Desktop access rights enable you to create a separate desktop working environment for each role the administrator has assigned to you. You might have multiple role assignments with different desktop access rights so that you can run applications with elevated privileges. For example, you might be assigned two separate roles—one for running applications as a member of the domain administrators group and another for running applications as a member of the local administrators group.
If you have been assigned roles that have desktop access rights, you can create a desktop for each role.
To create a new desktop:
-
Click the Delinea icon in the notification area.
-
Select New Desktop.
If you have not been assigned to any role that has a desktop access right, a message is displayed to inform you that you are not a member of any role that permits opening a new desktop.
If you have been assigned to any roles that have desktop access rights, you can continue to the next step.
-
Select a role from the list of your available roles, then click OK.
For example, if you are assigned multiple roles that include desktop access rights, you can select from these role assignments to control which account privileges are in effect for the new desktop.
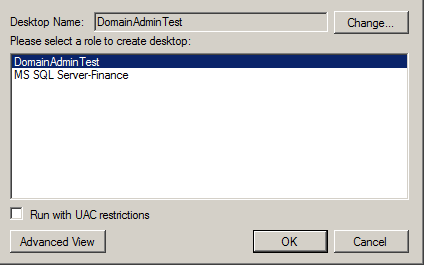
Note that the roles listed might allow you to run as your own account locally, but grant access to remote servers. To see more information about the context associated with your roles, click Advanced View.
When you select a role, you also have the option to run the desktop with User Account Control (UAC) restrictions enforced. Selecting this option gives you filtered privileges, prompting you to confirm actions before continuing with operations that require elevated privileges. You can leave this option unselected to use a desktop with full privileges and without being prompted to confirm your actions. You should note, however, that when you run a desktop without enforcing UAC restrictions, no warnings are displayed, even if you have configured User Account Control Settings on the local computer.
-
Type the password for your login account, if you are prompted for it, then click OK.
-
If your administrator has enabled privilege elevation justification, a dialog box appears. Enter the following information to justify why you need to run the application with privilege:
- Ticket number: If your administrator has instructed you to enter a
ticket number, do so here. (This field can be used with ticketing
systems such as ServiceNow and so forth.) - Reason: Select the reason category that best fits your situation.
Your choices are:
- Software Installation
- Remote System Administration
- Local System Administration
- Windows Feature Management
- System Networking Change
- Maintenance (Shutdown, Reboot, Power Off)
- PowerShell or Other CLI
- Operation (Services, Zone Operations, etc.)
- Other
- Comment: Enter any comments about your need to create a new desktop.
- Ticket number: If your administrator has instructed you to enter a
-
If your administrator has enabled multi-factor authentication, complete the additional authentication challenges after entering your password.
-
After you select a role and click OK, the new desktop becomes your working environment. You can view the local and network roles you are using for the new desktop by left-clicking on the Delinea icon in the system Notification Area on the taskbar.
If the role is only applicable on a remote computer, the local role is displayed as Self. If the role does not have network access rights, the network role is displayed as Self.
To see complete information about the desktop, application, and network access rights for each of your roles, open the Authorization Center as described in Checking your rights and role assignments.
Setting a Desktop Name
By default, new desktops uses the name of the role you select as the desktop name. You can click Change if you want to change the name of desktop. For example, you might want to add your name, a computer name, or other information to the information displayed when you left-click the Delinea icon in your system Notification Area to help identify the context when switching from one desktop to another.
After you click Change, select Use the following desktop name, type the name you want displayed for the desktop, then click OK.
Switching from one desktop to another
To switch desktops, click the Delinea icon and select the desktop you want. You can also set up hot keys to switch between desktops using a keystroke combination.
Setting hot keys for switching between desktops
Hot keys are keystroke combinations that enable you to switch between desktops without clicking the Delinea icon or accessing the applet menu. By selecting hot key combinations, you can move from one desktop to another more quickly when you have more than one desktop open at a time.
To set up hot keys for switching between desktops:
-
Click the Delinea icon.
-
Select Options.
-
Click the Hotkey tab.
-
Select the Enable hotkey option, then select a key or key combination from the list of Modifiers and whether to use a number, function key, or letter from the list of Specifiers.
For example, if you want to switch from one desktop to another using the Alt and a number, Alt+1 and Alt+2, select Alt from the list of Modifiers and Number from the list of Specifiers.
-
Click OK.
Using a desktop with network access rights
When you open a desktop and select a role, you get all of the access rights associated with that role. Depending on how the role is configured, those access rights may be limited to running applications with locally elevated privileges or include access to remote servers on the network. The Delinea icon in the system Notification Area always displays the current Local and Network roles you are using. However, it is up to the administrator to decide whether network access rights should be included in roles that grant desktop access rights.
If roles granting network access rights are defined separately from roles that include desktop access rights, you might have to select your local and network roles separately. In some cases, you might also need to select more than one network role to work with multiple remote computers. To handle these more complex situations, you can use the Advanced View to select the appropriate combination of local and network roles.
To view and select your local and network roles for a desktop:
-
Open a new desktop.
-
In the Select Role dialog box, click Advanced View.
If there are any network roles listed, those roles grant network access rights for specific remote computers. For example, if you are assigned separate roles with network access rights to two separate SQL Server instances, you might see the roles with network access rights listed separately from your roles with local desktop access rights.
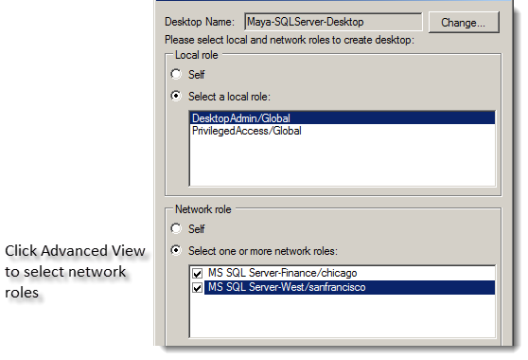
In this example, the Desktop Admin role is a local role that has desktop access rights but does not include any network access rights. By selecting both MS SQL Server-Finance and MS SQL Server West network roles, you can create a single local desktop that has remote network access to both SQL Server instances. Alternatively, you could create separate desktops for accessing each SQL Server instance. You can left-click on the Delinea icon in the system Notification Area to view the roles you have selected so that you know whether you have network access rights for one SQL Server instance or both.
-
For the local role, select a role that grants desktop access rights or application access rights on the local computer.
-
Type the password for your login account, if you are prompted for it, then click OK.
If your administrator has enabled multi-factor authentication, complete the additional authentication challenges after entering your password.
Closing a desktop
In some cases, you might have multiple desktops open at the same time to allow you to switch between several different roles quickly. If you have more than one desktop open at a time, you can selectively close the desktops you are no longer using.
To close a desktop:
- Switch to the desktop you want to close.
- Click the Delinea icon.
- Select Close Desktop.
The agent removes that desktop from your list and returns you to the default desktop. You cannot close your default desktop.
Running a specific application with privileges
With desktop access rights, you can run any application using one of the roles assigned to you. Application access rights are assigned on an application-by-application basis.
If you have a role assignment with application access rights, you can run one or more specific applications using the administrative privileges defined for your role. The administrator defines the specific application rights that you have in each role you are assigned. If you have a role assignment with application access rights, the administrator specifies the location of the application executable, the arguments you can use when running the application, and the account used when you run application. You can only select a role to run a local application for which you have application rights.
Selecting Run with Privilege is similar to selecting standard Windows “Run as” or “Run as administrator” menu items, but does not require you to provide a password for an administrative or shared service account. Instead, you always use your own password to authenticate your identity.
For information about running an application as an alternate user, see Run with privilege as an alternate user.
To run a local application using a selected role:
-
Navigate to and select the application you want to run.
-
Right-click the executable or shortcut for the application and select Run with Privilege.
(If you want to open the application from the Start menu, press the Shift key when you right-click.)
If you have not been assigned to any role that has application access rights for the application you are trying to open, a message displays to inform you that you are not a member of any role associated with the selected application.
The Run with Privilege dialog box displays. (If it doesn't display, it's because you're assigned to just one role, so there's no need to select a role.)
If you pressed the Shift key when you right-clicked the application in Step 2, the Run with Privilege dialog box displays even if you're assigned to just no roles or just one role for access to that application.
-
Select the desired role.
-
If the application requires network access rights for a remote server, click Advanced View to see if you have a role with network access rights available.
-
If you'd prefer to use your environment variables instead of the variables that are associated with the selected role, select Use current environment variables instead of "Run As" user's.
-
Click OK to continue.
-
Enter the password for your login account, if you are prompted for it, then click OK.
If your administrator has enabled privilege elevation justification, a dialog box appears.
-
Enter the following information to justify why you need to run the application with privilege:
- Ticket number: If your administrator has instructed you to enter a
ticket number, do so here. (This field can be used with ticketing
systems such as ServiceNow and so forth.) - Reason: Select the reason category that best fits your situation.
Your choices are:
- Software Installation
- Remote System Administration
- Local System Administration
- Windows Feature Management
- System Networking Change
- Maintenance (Shutdown, Reboot, Power Off)
- PowerShell or Other CLI
- Operation (Services, Zone Operations, etc.)
- Other
- Comment: Enter any comments about your need to run with privilege.
- Ticket number: If your administrator has instructed you to enter a
-
If your administrator has enabled multi-factor authentication, complete the additional authentication challenge.
-
Click OK.
After you've successfully authenticated, the application opens and an audit trail event is recorded in the Windows Application event log. You can use the application with the privileges granted to the specific user account or administrative group defined for your role. You have the privileges associated with the role or roles you selected until you exit the application. When you close the application, you resume working with your normal account privileges and group membership.
Using the RunAsRole Command Line
As an alternative to selecting Run with Privilege from the right-click menu for an application, you can use the runasrole command-line program. The RunAsRole program enables you to run a specified Windows application in a Command Prompt windows using a specified access role. You can use command line options to control whether the role is used as a local role, a network role, or both, and whether to use the current environment or the environment variables associated with the “Run As” user account. The runasrole command line program is equivalent to selecting the Run with Privilege menu option when right-clicking an application shortcut or executable.
The syntax for the runasrole command is:
runasrole /role:role[/zone] [options] application [argument]
runasrole /localrole:role[/zone] [options] application [argument]
runasrole /networkrole:role[/zone] [options] application [argument]
You must specify the role to use in the rolename/zonename format. You must also specify an appropriate path to the application you want to access, including any required or optional arguments.
You can use the following command line arguments with the runasrole command:
| Use this option | To do this |
|---|---|
| /role | Use the role name you specify as both a local role and a network role. You can specify this option to run an application locally and access a remote server using the same role, if applicable. You should only use this option if the role you are assigned and want to use has both local and network access rights defined. |
| /localrole | Use the role name you specify as a local role. |
| /networkrole | Use the role name you specify as a network role. |
| /env | Use the current environment variables instead of the environment variables associated with the "Run As" user account. |
| /netdrives | Use mapped network drives when running an application with the selected role. By default, you cannot use mapped network drives that are associated with you logged-on user account when running applications using a role with elevated privileges. If you want to use a mapped network drive when accessing an application using a selected role, include the /netdrives option in the command line. |
| /removetimestamp | Remove the grace period on Windows authentication and MFA for the current user session. |
| /wait | Prevents the runasrole program from exiting immediately after opening the specified application. If you specify this option, the runasrole program starts the specified application and waits until the application session ends before exiting. When the application session ends, the runasrole program exits and returns the same result code as the application. If you specify this option and the application is a command line utility, the runasrole program redirects the application's input and output to the command line console. You should note that some applications use a Microsoft API that does not support redirection of standard input and output. For applications that don’t support redirection, the /wait option has no effect and is ignored. |
| /h | Displays the command help. |
If your administrator has enabled privilege elevation justification, a dialog box appears. Enter the following information to justify why you need to run the application with privilege:
|
|
|---|
-
Ticket number: If your administrator has instructed you to enter a
ticket number, do so here. (This field can be used with ticketing systems
such as ServiceNow and so forth.)
-
Reason: Select the reason category that best fits your situation. Your
choices are:
- Software Installation
- Remote System Administration
- Local System Administration
- Windows Feature Management
- System Networking Change
- Maintenance (Shutdown, Reboot, Power Off)
- PowerShell or Other CLI
- Operation (Services, Zone Operations, etc.)
- Other
- Comment: Enter any comments about your need to run as role.
Examples of Using RunAsRole
To use the same role to open the Computer Management application locally and access a remote server in zone1, you might run a command similar to the following:
runasrole /role:role1/zone1 mmc.exe c:\windows\system32\compmgmt.msc
To use the role named SQLdba from the finance zone as a local role to open the Services application, you might run a command similar to the following:
runasrole /localrole:SQLdba/finance mmc.exe c:\windows\system32\services.msc
To use role1 from zone1 as a local role to open the Computer Management application and use network access rights from role2 in zone2, you might run a command similar to the following:
runasrole /localrole:role1/zone1 /networkrole:role2/zone2 mmc.exe compmgmt.msc
To open the Services application using the role named SQLdba from the finance zone and have the runasrole program remain open until you close the Services application, you might run a command similar to the following:
runasrole /wait /role:SQLdba/finance mmc.exe c:\windows\system32\services.msc
Running an application from a shortcut
In most cases, you can use the runasrole program to run specified Windows applications using the application shortcut. However, there are many different types of application shortcuts and the RunAsRole program does not support all of them. You can use the RunAsRole program to execute applications with the following recognized shortcut target extensions:
.bat
.cmd
.cpl
.exe
.msc
.msi
.msp
.ps1
.vbs
.wsf
How to determine whether RunAsRole supports an application shortcut
You can determine whether you can use the RunAsRole program to execute an application from the application shortcut by checking the file extension for the target application in the application’s shortcut properties dialog box.
To check the file extension for a target application shortcut
-
Select an application shortcut.
-
Right-click the shortcut, then click Properties to display the file properties.
-
Click the Shortcut tab and check the target field.
If the target file extension displayed is a supported file extension, you can use RunAsRole to execute the application from the application shortcut.You should note that a shortcut target field might include both the filename for the application executable and one or more arguments. As long as the application executable has a supported file extension, you can useRunAsRole to execute the application with the specified arguments from the shortcut. For example, if the shortcut target isC:\Windows\System32\control.exe printers, the application executableC:\Windows\System32\control.exe is a supported file extension with printers supplied as an argument. Therefore, you would be able use RunAsRole to run the application from its shortcut.
Run with Privilege As an Alternate User
If your administrator has enabled the group policy for this feature and assigned you to a role with rights for a specific application, you can run the application with elevated privileges of an alternate user.
For example, if your user account doesn't have privileges to install an application on the computer but your administrator does, you can stay logged in and run the application with privilege and your administrator can enter her credentials so that you can install the application.
To run a local application as an alternate user:
-
Navigate to and select the application you want to run.
-
Right-click the executable or shortcut for the application and select Run with Privilege.
(If you want to open the application from the Start menu, press the Shift key when you right-click.)
If you have not been assigned to any role that has application access rights for the application you are trying to open, a message displays to inform you that you are not a member of any role associated with the selected application.
The Run with Privilege dialog box displays. (If it doesn't display, it's because you're assigned to just one role, so there's no need to select a role.)
If you pressed the Shift key when you right-clicked the application in Step 2, the Run with Privilege dialog box displays even if you're assigned to no roles or just one role for access to that application.
-
To specify the alternate user, click Change User and specify the alternate user account.
-
When prompted, enter the alternate user's login credentials to authenticate as that user.
The dialog box now lists the alternate user and the roles assigned to that account.
-
Select the desired role.
-
If your administrator has configured the system to re-authenticate, enter the alternate user's credentials again and click OK.
-
If your administrator has enabled multi-factor authentication, complete the additional authentication challenge.
-
If you'd prefer to use your environment variables instead of the variables that are associated with the alternate user, select Use current environment variables instead of "Run As" user's.
For example, this option is useful if you're installing a program that's dependent on one that you've installed and is set in your path variable
-
Click OK.
After you've successfully authenticated with the alternate user's credentials, the application opens and an audit trail event is recorded in the Windows Application event log. You can use the application with the privileges granted to the specific user account. You have the privileges associated with the specified user account until you exit the application.
Running An Application with an Alternate Account
If your administrator has configured the ability to run an application with an alternate account, you can run applications with an alternate, privileged account without having to log in to PAS and check out the password for that alternate account.
Alternate accounts are typically a privileged or administrator account in Active Directory that's associated with an owner account. You can log in to the alternate account using your main account.
For example, system administrators typically have several accounts, a user account for general log-ins and an administrative account to access specific systems and services.
To run an application with an alternate account:
-
Right-click the desired application and choose Run with Alternate Account.
-
If you have multiple alternate accounts, you can then choose which account to use.
The application runs under your alternate account.
Selecting Roles with Network Access Rights
As discussed in Using a desktop with network access rights network access rights can be included in roles with other rights or defined separately. Therefore, it is not always possible to see where your rights apply or the scope of your role assignment.
If you are assigned multiple roles, you should work with the administrator to identify which roles grant local and network access rights and the computers where the roles apply. You can see detailed information about the rights associated with each role you are assigned and the zones where different roles are defined using the Authorization Center. You have less visibility, however, of which computers are in scope for your network access rights.
Selecting Roles That Are Not Applicable on a Local Computer
In some cases, you might have roles that are visible on your local computer in the list of roles you have been assigned that are not applicable on the local computer. You can select the role, but the privileges associated with the role are only granted when you access computers over the network where the assignment applies.
For example, an administrator might create an Exchange Admin role that contains a network access right, and assign you to that role in a zone that only contains Exchange servers or assign you to that role explicitly on the computers that host Exchange.
When you log on to your laptop, the Exchange Admin role is included in your list of available roles even though the assignment is out of scope for the laptop. You can select the Exchange Admin role and continue working on the laptop without elevated privileges.You know that the Exchange server requires maintenance and you are planning to get to it later in the day.
When you are ready to do maintenance on the Exchange server, you connect to the server over the network. At that point, the elevated privileges associated with the Exchange Admin role are applied. The Exchange server you are accessing from your laptop is in scope for where you have been assigned the Exchange Admin role. You complete the maintenance required on the Exchange server with your elevated privileges, then resume working on your laptop where the Exchange Admin role does not apply.
Role-based Auditing of Session Activity
The Agent for Windows can be installed with or without auditing features. Depending on whether auditing features are activated on your computer and whether your role requires auditing or not, your session activity might be captured and stored in a database. You can check whether session-level auditing is requested or required for the roles you are assigned using Authorization Center. You are only notified that your session activity might be audited if the administrator has enabled notification. If you select a role that requires auditing but auditing features are not available on computer you attempt to use, you will be denied access to that computer until auditing is available.
If session-level auditing is activated, everything you do on your computer is captured, including all of your keystrokes and the screens displayed on the desktops you use. At a minimum, any time you use a role that elevates your privileges on a computer, an audit trail event is recorded in the Windows Application event log.
Setting up the Offline MFA Profile (Multi-Factor Authentication)
If you are required to use multi-factor authentication, you may be prompted to set up an offline MFA profile so that you can access your computer in the event that the authentication server cannot be reached.
If you have already set up your offline MFA profile and want to reconfigure (override) it, you will be prompted for multi-factor authentication. That profile is set in the MFA Login Policy.
If your administrator has enabled offline multi-factor authentication, you will see a notification message each time you log on which will prompt you to set up your offline MFA profile. Depending on the configuration settings, you may not be able to access your machine in the event that you are unable to connect to the authentication server if you do not set up the offline MFA profile.
To set up an offline MFA profile:
-
Right click the notification icon in the system notification area, and select Setup Offline MFA Profile.
-
Click Next to begin the Offline Authentication Wizard.
-
Select one of the following methods to create an authenticator account profile on your mobile device:
-
Scan barcode
If you select this option, a QR code is displayed for you to scan using your mobile authenticator application. You can use either the Delinea application or a third-party authenticator application.
-
Manual entry
If you select this option, you must manually enter the displayed account profile information into your authenticator application.
-
Program YubiKey
If you select this option, you can use a YubiKey as the second form of authentication. You'll then need to select which slot on the YubiKey to use, and whether or not to use Yubikey's touch-to-sign feature.
-
-
Enter the passcode that is generated after you have created your authenticator profile. Click Next.
-
Click Finish to exit the Wizard.
After you have set up your offline MFA profile, you will be prompted to enter the mobile passcode generated by your authentication application as the second form of authentication when you attempt to log on to your machine if it cannot connect to the authentication server.
Authentication Grace Periods
When you have authenticated with a Delinea software component either with Windows authentication or MFA, you have a short period of time where you won't need to re-authenticate for the same type of item.
Understand that there are 3 types of grace periods for authentication:
- Lock Screen MFA grace period
- User Privilege Elevation for MFA grace period
- User Privilege Elevation for Windows Authentication grace period
Your administrator enables and configures these grace periods by way of a group policy, and each grace period type has its own policy. By default, these grace periods are not in effect.
For the lock screen MFA grace period, when you lock the screen within the grace period (either you lock the screen yourself or if your screen saver does it for you), you can unlock the login session without an MFA challenge.
If the group policy "Continue with MFA Challenges after failed windows authentication in Logon Screen" is enabled, then the lock screen MFA grace period is disabled automatically.
For the user privilege elevation grace period (MFA or Windows authentication) , the grace period is triggered when you either run an application with privilege, switch to a privileged desktop, or create a new privileged desktop. During the grace period, you aren't requested to re-authenticate by way of MFA or Windows authentication, respectively.
For both the user privilege elevation grace periods (MFA and Windows authentication), you can clear the grace period manually. To clear the grace period, right-click the Delinea icon in the system tray and select Clear Grace Period > MFA or Clear Grace Period > Windows Authentication. The Clear Grace Period option is only enabled if you're within the user privilege elevation grace period.