Provisioning New User and Group Profiles After Migration
After you have completed the basic migration for a set of existing users and groups, you can continue with the Delinea deployment by configuring the environment for automated provisioning of new users and groups. At this stage, you have already built the foundation for the automated addition and removal of users and groups. The next steps involve defining the business rules for creating new user and group profiles. The goal of this section is to help you identify and integrate a provisioning process for new UNIX users and groups.
Integrating with Existing Provisioning Processes
The Zone Provisioning Agent and the provisioning groups you created in Add provisioning groups to the parent zone are intended to integrate the provisioning of UNIX users and groups with your existing account fulfillment process. Those groups enable you to leverage existing processes because most organizations have well-defined and standardized procedures for provisioning new Active Directory users based on Active Directory group membership.
If possible, you would like to use the same or a similar process for provisioning UNIX users and groups. If you can integrate the provisioning of UNIX users and groups with your existing process, the people in your organization can use tools they are familiar with and won't have to learn an entirely new process.
However, defining the business rules for adding new user and group profiles to zones requires some planning. In particular, you need to make decisions about Active Directory group membership, primary group definitions for users in zones, and how profile attributes are defined.
Defining the Business Rules for New Groups in the Parent Zone
You have already started the process of integrating the provisioning for UNIX users and groups when you added imported accounts to the Active Directory provisioning groups in Adding existing users and groups to Provisioning Groups. The next step is to define the business rules for creating new UNIX group profiles in the top-level parent zone.
The business rules you define only affect new UNIX user and group profiles. The imported legacy data remains unchanged, and the Zone Provisioning Agent will not modify any attributes on the existing user and group profiles.
Configure the Business Rules for Automated Provisioning of Group Profiles
You configure the business rules for automated provisioning of group profiles on a zone-by-zone basis. When you use hierarchical zones, you typically want to configure the business rules for the parent zone so that the profile can be inherited in all child zones. Remember that the profile, by itself, does not provide any access to the computers in the child zones, and that you can override any inherited attributes in any zone or on individual computers.
To Configure the Business Rules For Groups in the Parent Zone
-
Start Access Manager.
-
In the console tree, expand the Zones node.
-
Select the top-level parent zone, right-click, then click Properties.
-
Click the Provisioning tab.
If you are defining business rules for a parent hierarchical zone and want to establish a “source zone” for profile attributes, click Advanced. You can then select the Source zone for any or all user and group profile attributes. If you select Source zone for any attribute on the Advanced Provisioning page, you can click Browse to search for and select the zone to use as the source zone. In most cases, selecting a source zone is not necessary if you using hierarchical zones, but this option can be useful if you are migrating from classic to hierarchical zones.
-
Click Enable auto-provisioning for group profiles.
-
Click the Find icon to search for and select the “groups” zone provisioning group as the Source Group.
If you followed the recommended naming convention, search for and select parentZoneName_Zone_Groups. For example, if the zone name is arcadeGlobal, select arcadeGlobal_Zone_Groups.
-
Select a method for assigning a new GID to new UNIX group profiles:
- Generate from group SID generates new GIDs that are guaranteed to be unique in the forest based on the Active Directory security identifier (SID) of the group. Selecting this option ensures groups defined in the parent zone have a unique GID across all zones in the Active Directory forest.
- RFC 2307 attribute uses the gidNumber attribute from the RFC 2307 schema to define GID values for the Active Directory groups that you add to the parent zone. This option requires you to add the RFC 2307 attribute to Active Directory group principals.
- Use auto-incremented GID selects the next available GID in the parent zone. In most cases, you should avoid using this option because it does not guarantee unique GIDs.
- Generate using Apple scheme generates group GIDs based on the Apple algorithm for generating numeric identifiers from the Active Directory group’s objectGuid. This option is only supported for hierarchical zones.
-
Select a method for assigning a new group name to new UNIX group profiles:
-
SamAccountName attribute generates the group name for UNIX group profile based on the sAMAccountName value.
-
CN attribute uses the common name attribute to define group names for the Active Directory groups you add to the zone. You should only select this option if you verify the common name does not contain spaces or special characters. Otherwise, you should not use this option.
-
RFC 2307 attribute uses the cn attribute from the RFC 2307 schema to define group names for the Active Directory groups you add to the zone.
-
Zone default value uses the Group name setting from the Group Defaults tab to define group names for the Active Directory groups you add to the zone. In most cases, the default is a variable that uses the sAMAccountName attribute.
By default, all UNIX group names are lowercase and invalid characters are replaced with underscores.
-
-
Click OK to save your changes.
Add Security Groups to the Parent Zone
The most common way to provision UNIX users is to use a private group identifier as the primary group. With this approach, every user has a unique primary GID that is the same as the UID.
Although not required, another common approach to provisioning UNIX users involves adding a small number of key security groups to the parent zone. For example, if you have a commonly-used group such as All US Employees to which you normally add valid Active Directory users as members, you could add that security group to the parent zone to assign all UNIX users the same primary GID in the parent zone. This approach makes provisioning UNIX users easier because you have already defined Active Directory users as members of that group. If you want to use an Active Directory group to set the primary GID for provisioned users, keep in mind that the size of the group membership can affect the performance of the Zone Provisioning Agent and how long it take to complete provisioning.
If you choose to have the user’s primary group defined by Active Directory group membership, the Active Directory group must be in the same Active Directory forest as the users being provisioned. If the Active Directory group is located in another forest, provisioning fails.
If you want to use this approach:
-
Add the security group to the provisioning group for the parent zone (for example, parentZoneName_Zone_Groups).
-
Open the Properties for the parent zone, click the Provisioning tab, and define the business rules for the UNIX group profile provisioning associated with the security group.
At the next update interval, the Zone Provisioning Agent adds a profile for the group to the zone. You can also run the zoneupdate command to add the profile without waiting until the next update interval. For example:
zoneupdate zoneName
-
Click the User Defaults tab for the parent zone, select the ellipsis <...> option for the Primary Group and select the GID for the group profile that the Zone Provisioning Agent added to the zone.
Defining The Business Rules For New Users In The Parent Zone
In addition to the business rules for group profiles, you configure similar rules for new UNIX user profiles. When you use hierarchical zones, you typically want to configure these business rules for the parent zone so that the profile can be inherited in all child zones. Remember that the profile, by itself, does not provide any access to the computers in the child zones, and that you can override any inherited attributes in any zone or on individual computers.
The business rules you define only affect new UNIX user and group profiles. The imported legacy data remains unchanged, and the Zone Provisioning Agent will not modify any attributes on the existing user and group profiles.
To Configure The Business Rules For User Profiles In The Parent Zone
-
Start Access Manager.
-
In the console tree, expand the Zones node.
-
Select the top-level parent zone, right-click, then click Properties.
-
Click the Provisioning tab.
If you are defining business rules for a parent hierarchical zone and want to establish a “source zone” for profile attributes, click Advanced. You can then select the Source zone for any or all user and group profile attributes. If you select Source zone for any attribute on the Advanced Provisioning page, you can click Browse to search for and select the zone to use as the source zone. In most cases, selecting a source zone is not necessary if you using hierarchical zones, but this option can be useful if you are migrating from classic to hierarchical zones.
-
Click Enable auto-provisioning for user profiles.
-
Click the Find icon to search for and select the “users” zone provisioning group as the Source Group.
If you followed the recommended naming convention, search for and select parentZoneName_Zone_Users. For example, if the parent zone name is arcadeGlobal, select arcadeGlobal_Zone_Users.
This is the same group to which you added the Active Directory users associated with imported user profiles as described in Add existing users to the provisioning group for the parent zone.
-
Select a method for assigning a new UID to new UNIX user profiles:
- Generate from user SID generates new UIDs that are guaranteed to be unique in the forest based on the Active Directory security identifier (SID) of the user. Selecting this option ensures users defined in the parent zone have a unique UID across all zones in the Active Directory forest.
- RFC 2307 attribute uses the uidNumber attribute from the RFC 2307 schema to define UID values for the Active Directory users that you add to the zone. This option requires you to add the RFC 2307 attribute to Active Directory user principals. Otherwise, you should not use this option.
- Use auto-incremented UID uses the next available UID in the parent zone. In most cases, you should avoid using this option because it can create UID conflicts with users in other zones.
- Use custom ID enables you to use the employeeId, employeeNumber, or uidNumber attribute as the UID for new users. You should only select the employeeId or employeeNumber attribute if your organization already populates the employeeId or employeeNumber attribute with a unique value for each user account.
- Generate using Apple scheme generates user UIDs based on the Apple algorithm for generating numeric identifiers from the Active Directory user’s objectGuid. This option is only supported for hierarchical zones.
-
Select a method for assigning a new UNIX user login name to new UNIX user profiles:
- SamAccountName attribute generates the user login name for new UNIX users based on the sAMAccountName attribute.
- CN attribute uses common name attribute for user names. You should only select this option if you verify the common name does not contain spaces or special characters. Otherwise, you should not use this option.
- RFC 2307 attribute uses the uid attribute from the RFC 2307 schema to define user names for the Active Directory users that you add to the zone. This option requires you to add the RFC 2307 attribute to Active Directory user principals. Otherwise, you should not use this option.
- Zone default value uses the setting from the User Defaults tab for the zone. In most cases, the default is a variable that uses the sAMAccountName attribute.
-
Select a method for assigning a new shell and home directory to new UNIX user profiles.
-
RFC 2307 attribute uses the loginShell attribute for the shell and the unixHomeDirectory attribute for home directory from RFC 2307 schema for the default shell and home directory
-
Zone default value uses the values you define on the User Defaults tab, which can include runtime variables for the shell and home directory.
Runtime variables are populated with platform-specific values when a user tries to log on to a UNIX computer. For example, if a user logs on to a Linux computer with a profile that uses the runtime variable for the home directory, the home directory is
/home/username. If the user logs on to a Solaris computer, the runtime variable becomes /export/home/username.
-
-
Select a method for assigning a primary group to new UNIX user profiles.
-
RFC 2307 attribute uses the gidNumber attribute from the RFC 2307 schema for primary group values. This option requires you to add the RFC 2307 attribute to Active Directory user principals. Otherwise, you should not use this option.
-
Zone default value uses the values you define on the User Defaults tab. This setting enables you to use a specific group profile as the primary group for all UNIX users. If you don’t change the default value for the primary group on the User Defaults tab, the default primary group is a private group.
-
Private group uses the user’s UID as the primary GID.
-
Active Directory group membership uses the Active Directory group with the highest priority as the primary UNIX group. With this option, the Zone Provisioning Agent checks which groups a user belongs to and a prioritized list of groups you have defined. If you select this option, click the Configure icon to search for and select the Active Directory groups to include in the prioritized list. This option allows different users to have different primary GIDs in the same zone.
-
Generate using Apple scheme generates the user’s primary group identifier (GID) based on the Apple algorithm for generating numeric identifiers from the Active Directory objectGuid for the user’s primary group. Note that the user's primary group must configured for the zone. If the primary group is not configured for the zone, an error will be logged in the Windows Event Log when the user is provisioned. This option is only supported for hierarchical zones.
-
Generate from group SID generates new primary GIDs based on the user’s Active Directory primary group using the Delinea algorithm for generating GIDs.
If you select the Active Directory group membership option and a user isn’t a member of any of the groups in the list of prioritized groups, the Zone Provisioning Agent will not create a UNIX user profile for the user, because it won’t be able to determine the primary group. As noted in Add security groups to the parent zone, the most common approach is to have all users assigned the same primary GID in a zone.
-
-
Click OK to save your changes.
By default, the GECOS field in new UNIX user profiles is populated using the displayName attribute for the user.
How Hierarchical Zones Affect Provisioning
Because hierarchical zones enable profile attributes to be inherited, defining the business rules for new users and groups in the parent zone enables the Zone Provisioning Agent to generate consistent profiles for all child zones.
When you define a UNIX profile for a group or a user in a parent zone, the attributes are automatically inherited by all child zones. For groups, inheritance makes the group GID and group name available in all child zones. For users, inheritance gives every user defined in the parent zone the potential to log on to every UNIX computer. You then use role assignments to control which computers users can actually access, and, once you begin defining custom roles, what they can do on those computers.
By default, all of the attributes in each new profile are inherited from the parent zone. You can then override any of the attributes as needed in each of the child zones or on individual computers on a case-by-case basis. This flexibility enables you to establish a consistent UID and GID namespace across all zones based on unique SID and sAMAccountName values, while granting exceptions to the specific cases where you need them.
For individual computers, UNIX user and group profiles are inherited from the zone the computer has joined. Typically, this is a child zone or the child of a child zone. You can manually override any attribute or set of attributes for individual computers. Any attributes you do not override are inherited from the zone and the business rules you defined for the Zone Provisioning Agent.
Adding New Users to a Provisioning Group and a Role Group
For new Active Directory users to be effective users of a zone, they must be added to the parent zone’s “users” provisioning group and to a role group. You can add users to these groups manually using Active Directory Users and Computers or you can update your existing provisioning process for modifying the membership of Active Directory groups to add users to the appropriate groups. The key points to understand are:
- Users are added to a provisioning group so that the Zone Provisioning Agent creates a UNIX profile for them. A user must have a complete UNIX profile to be a valid user on UNIX computers. Delinea recommends creating the profile in the parent zone, but you can create the profile in any zone or on individual computers.
- Users are added to a role group so that they have a valid role assignment that allows them to log on or perform specific tasks. Initially, you only have two possible role assignments, listed or UNIX Login, but you are likely to create more.
Add The User to a Provisioning Group
Using Active Directory Users and Computers, scripts, or internal procedures, the basic workflow for a new user would be similar to this:
-
A new Active Directory user requests access to UNIX computers.
-
You add the user principal name to an Active Directory group principal. If you are adding the user to the parent zone, you add the user to the “users” provisioning group parentZoneName_Zone_Users.
If you wanted to create the profile in a child zone instead of the parent zone, you would add the Active Directory user to the childZoneName_Zone_Users. If you use some other naming convention for the provisioning group, you would search for and select that group.
-
The Zone Provisioning Agent monitors this group and at the next interval (or ondemand) creates a UNIX profile for the user in the zone, based on the business rules you defined.
If you remove a user from the Active Directory provisioning group, the Zone Provisioning Agent removes the UNIX user profile from the zone.
-
You notify the user that a new UNIX profile has been created with information about the login name and initial Active Directory password to use.
Add the User to a Role Group
Users must also have a role assignment for the zone where you want to grant access. A role assignment is required before the UNIX user profile is usable.
Using Active Directory Users and Computers, scripts, or internal procedures, the basic work flow for a new user would be similar to this:
-
A new Active Directory user requests access to UNIX computers.
-
You add the user principal name to the appropriate Active Directory group principal. If you want to allow the user to log on to computers in a child zone, you add the user to the Login role group childZoneName_Role_Login.
If the user should be recognized but not allowed to log on, you would add the Active Directory user to the childZoneName_Role_Listed. After you have created custom roles, you would search for and select groups based on the specific rights a user needs.
-
Run the Zone Provisioning Agent update command in preview mode to verify your changes. For example:
zoneupdate /p zoneName
-
Check the results of the zoneupdate preview, then run the command without the preview option to execute the business rules for provisioning. For example:
zoneupdate zoneName
Adding a New Unix Group Profile to All Zones
If you want to make a new UNIX group available to all zones, you should first create a new Active Directory group. In most cases, groups are not shared across multiple zones because of the potential for privilege escalation based on group membership. However, the steps for creating a UNIX profile that spans all zones or only the computers in a specific zone are similar.
Using Active Directory Users and Computers, scripts, or your existing provisioning process, the basic workflow for a new group would be similar to this:
-
Create a new Active Directory group for access to UNIX computers in the UNIX Groups organizational unit (ou=UNIX Groups, ou=UNIX).
For example, if you are creating a new Active Directory group for the denali project team in the parent zone arcadeGlobal, use Active Directory Users and Computers to create a new group named arcadeGlobal_denali.
-
(Optional) Add users to the group if you know who to add.
For example, if you are creating the group for a new project and you have a list of authorized users for that project, you can click the Members tab to add those Active Directory users to the new group. If those Active Directory users have a valid UNIX profile and role assignment in the zone, their secondary group membership is updated with the new group.
-
Add the new Active Directory group to the appropriate zone provisioning group. If you are adding the group to the parent zone, you add the user to the “groups” provisioning group parentZoneName_Zone_Groups.
If you wanted to create the profile in a child zone instead of the parent zone, you would add the Active Directory group to the childZoneName_Zone_Groups. If you use some other naming convention for the provisioning group, you would search for and select that group.
-
Run the Zone Provisioning Agent update command in preview mode to verify your changes. For example:
zoneupdate /p zoneName
-
Check the results of the zoneupdate preview, then run the command without the preview option to execute the business rules for provisioning. For example:
zoneupdate zoneName
-
The Zone Provisioning Agent creates a UNIX profile for the group in the zone based on the business rules you defined.
If you remove an Active Directory group from the Active Directory provisioning group, the Zone Provisioning Agent removes the UNIX group profile from the zone.
Using the Zoneupdate Program for Controlled Automation
You can use the zoneupdate.exe program with command line options to provision profiles in controlled way, allowing you to verify that profiles and access rights are defined correctly for subsets of users or groups without affecting the production environment.
At a minimum, you must specify the zone name or canonical name for the zone to use the zoneupdate.exe program. The command line options are similar to the options available on the Provisioning tab when you display a zone’s properties.
For example, to use the provisioning properties defined for a zone, you only need to specify the zone name at the command line:
zoneupdate default
If you use the canonical name for the zone, you specify the full path to the zone:
zoneupdate "centrify.com/program data/Centrify/zones/default"
You can override the default provisioning properties for a zone by specifying one or more of the following command line options.
Options are not case-sensitive. If you specify an option more than once, only the last value is used.
| Use this option | To specify |
|---|---|
| /z:ZoneName or /SourceZone:ZoneName | The name of a source zone. If you do not specify a zone name and there’s not a source zone defined in the zone’s provisioning properties, you cannot use the zoneupdate command to copy user or group attributes from one zone to another. A source zone is required for classic zones. It is optional for parent hierarchical zones, but can be useful if you are migrating from classic to hierarchical zones. |
| /d:DomainName or /Domain:DomainName | The name of the domain to process. If you do not specify a domain name, the zoneupdate program processes the Active Directory domain to which the computer is joined. |
| /dc:DCName or /DomainController:DCName | The name of the target domain controller to connect. No option - This will use the default domain controller of target domain. |
| /uu:Option or /UserUid:Option | The method to use to set the user’s numeric identifier (UID) value. You can specify any one of the following values: Auto to generate UIDs based on the Active Directory domain name and the RID of a user object. This setting is equivalent to selecting Generate from user SID in the Provisioning tab. AppleScheme to generate UIDs based on the Apple algorithm for generating numeric identifiers from the Active Directory user object's objectGuid. This setting is equivalent to selecting Generate using Apple scheme in the Provisioning tab. RFC2307 to use the uidNumber attribute in the Active Directory RFC2307 schema for the user’s UID value. ZoneDefault to use the UID defined on the User Defaults tab for the zone. If there’s no default value, the Next UID value for the zone is used. SourceZone to copy the UID from the same user in a specified source zone. EmployeeId to copy the UID from the employeeId attribute of the user object. EmployeeNumber to copy the UID from the employeeNumber attribute of the user object. uidNumber to copy the UID from the uidNumber attribute of the user object. If you don’t use one of these values, you can set the UID to not have any value. For example: /uu:empty If you use this setting, users will have an incomplete profile in the zone. |
| /un:Option or /UserName:Option | The method to use to set the user’s name. You can specify any one of the following values: sAMAccountName to use the Active Directory user’s sAMAccountName attribute as the UNIX user name. CN to use the user's common name (CN) attribute as the UNIX user name. RFC2307 to use the uid attribute in the Active Directory RFC2307 schema as the UNIX user name. ZoneDefault to use the user name defined on the User Defaults tab for the zone. If there’s no default value zone, the sAMAccountName is used. SourceZone to copy the user name from the same user in a specified source zone. If you don’t use one of these values, you can set the user name to an explicit value. For example: /un:hunter |
| /us:Option or /UserShell:Option | The method to use to specify the user’s default login shell. You can specify any one of the following values: RFC2307 to use the loginShell attribute in the Active Directory RFC2307 schema as the default shell. ZoneDefault to use the shell specified on the User Defaults tab for the zone. SourceZone to copy the shell defined for the user in a specified source zone. If you don’t use one of these values, you can set the login shell using an explicit value. For example: /us:/bin/bash |
| /uh:Option or /UserHomeDirectory:Option | The method to use to specify the user’s default home directory. You can specify any one of the following values: RFC2307 to use the unixHomeDirectory attribute in the Active Directory RFC2307 schema for a user as the default home directory. ZoneDefault to use the home directory specified on the User Defaults tab for the zone. SourceZone to copy the home directory defined for the user in a specified source zone. If you don’t use one of these values, you can set the home directory to an explicit value. For example: /uh:/home/hunter |
| /ug:Option or /UserPrimaryGroup:Option | The method to use to specify the user’s primary group identifier. You can specify any one of the following values: AppleScheme to generate the user’s primary group identifier (GID) based on the Apple algorithm for generating numeric identifiers from the Active Directory objectGuid for the user’s primary group. Note that the user's primary group must configured for the zone. If the primary group is not configured for the zone, an error will be logged in the Windows Event Log when the user is provisioned. This setting is equivalent to selecting Generate using Apple scheme in the Provisioning tab. PrimaryGroupSID to generate the user’s primary group identifier (GID) based on the Delinea algorithm for generating numeric identifiers from the Active Directory security identifier of the user’s primary group. PrivateGroup to set the user's primary GID value to be the same as the user‘s UID value. RFC2307 to use the gidNumber attribute f in the Active Directory RFC2307 schema as the primary group identifier or a user. ZoneDefault to use the primary group specified on the User Defaults tab in the zone. If there’s no default value, zoneupdate.exe will stop provisioning the user. SourceZone to copy the primary group defined for the user in a specified source zone. example: /ug:empty If you use this setting, users will have an incomplete profile in the zone. GroupMembership to set the user's primary GID based on the user’s Active Directory group membership. If a user is a member of the Active Directory groups ops-mgrs and ops-labs and one of those groups has a UNIX profile in the zone but not the other, the group with the UNIX profile in the zone will be used as the primary GID for the user. If both group have a UNIX profile in the zone, the one with higher priority will be used. You can set the priority for selecting the primary group to use in the Access Manager console. If the priority is the same, zoneupdate.exe will stop provisioning the user. If you don’t use one of these values, you can set the primary GID to not have any value. |
| /uc:Option or /UserGecos:Option | The method to use to specify the user’s GECOS field. You can specify any one of the following values: RFC2307 to use the gecos attribute in the Active Directory RFC2307 schema for a user. ZoneDefault to use the value defined for the GECOS field on the User Defaults tab for the zone. If you don’t use one of these values, you can set the primary GID value to an explicit value. For example: /uc:Thompson, Hunter S. |
| /gg:Option or /GroupGid:Option | The method to use to set the group numeric identifier (GID) value. You can specify any one of the following values: Auto to generate the GID based on the Active Directory domain name and the RID of a group object. This setting is equivalent to selecting Generate from group SID in the Provisioning tab. AppleScheme to generate GIDs based on the Apple algorithm for generating numeric identifiers from the Active Directory group object's objectGuid. This setting is equivalent to selecting Generate using Apple scheme in the Provisioning tab. RFC2307 to use the gidNumber attribute in the Active Directory RFC2307 schema for the group GID value. ZoneDefault to use the GID defined on the Group Defaults tab for the zone. If there’s no default value, the Next GID value for the zone is used. SourceZone to use the GID defined for the group in a specified source zone. If you don’t use one of these values, you can set the GID to not have any value. For example: /gg:empty If you use this setting, groups will have an incomplete profile in the zone. |
| /gn:Option or /GroupName:Option | The method to use to set the group name. You can specify any one of the following values: samAccountName to use the Active Directory group samAccountName attribute as the UNIX group name. CN to use the group's common name (CN) attribute as the UNIX group name. RFC2307 to use the cn attribute in the Active Directory RFC2307 schema as the UNIX group name. ZoneDefault to use the group name defined on the Group Defaults tab for the zone. If there’s no default value, the sAMAccountName is used. SourceZone to copy the group name from the group in a specified source zone. If you don’t use one of these values, you can set the group name to an explicit value. For example: /gn:apps-lab |
| /u:ADGroupName or /UserSource:ADGroupName | An Active Directory group to use to populate a Delinea zone with users. Use the sAMAccountName and, optionally, the domain name to identify the group. For example, to use the Active Directory engineers group in the currently connected domain to populate users in the default zone: zoneupdate /u:engineers default To use the Active Directory engineers group in a specific domain, you can use the /d:DomainName option or group_name@domain_name. For example to use the Active Directory engineers group in the testdomain.org domain to populate users in the default zone: zoneupdate /u:engineers@testdomain.org default |
| /g:ADGroupName or /GroupSource:ADGroupName | An Active Directory group to use to populate a Delinea zone with groups. Use the sAMAccountName and, optionally, the domain name to identify the group. For example, to use the Active Directory employees group in the currently connected domain to populate groups in the default zone: zoneupdate /g:employees default |
| /v or /Verbose | Display detailed information about the provisioning of users and groups. When you use this option, the output format is: Group: groupname:gid User: uid:username:shell:home:primarygid |
| /p or /Preview | Preview the users or groups to be provisioned or removed. In preview mode, the zoneupdate.exe program does not create or remove any UNIX profiles. |
| /el or /EventLog: Level | Enable logging to the Event log. You can use the Event Viewer to check the log results. For the log level, you can specify any one of the following values: None - don't write any provisioning activities to the Event log. This is the default setting. Normal - Write only the name of the provisioned users and groups to the Event log. Verbose - Write the UNIX profiles for the provisioned users and groups to the Vent log. |
| /l or /Log:Level | Enable logging and set the level of detail recorded in the log file. For the log level, you can specify any one of the following values: Error to log only error messages. Warning to log warnings and error messages. Information to log informational messages, warnings, and errors. Verbose to log all messages, including details about the user and group profiles created or removed. Logging is off by default. If you enable logging, the default file location for the log file is: C:\Users\user_name\AppData\Roaming\Centrify\Zone Provisioning Agent\Log You can change the default log file path by modifying the following registry key: HKEY_LOCAL_MACHINE\Software\Centrify ZPA\LogLevel |
Using Any Active Directory Attribute in a Profile
In addition to the provisioning properties you can set for a zone using Access Manager, you can manually configure the Zone Provisioning Agent to use any attribute in Active Directory to define a value for any field in automatically-provisioned UNIX user or group profiles. For example, if your organization uses a custom attribute, such as org_global_id, for all users, you can manually configure the Zone Provisioning Agent to use that attribute for the numeric user identifier (UID) in automatically-generated user profiles.
To manually specify an Active Directory attribute to use in a UNIX profile:
-
Open Microsoft ADSI Edit.
-
Select a target zone, right-click, then click Properties.
-
Select the description attribute, then click Edit.
-
Type a profile provisioning attribute and specify the Active Directory attribute to use for the profile.
The valid provisioning attributes are:
provisioning_custom_uid_attribute
provisioning_custom_gid_attribute
provisioning_custom_primary_group_attribute
provisioning_custom_user_unixname_attribute
provisioning_custom_group_unixname_attribute
provisioning_custom_home_directory_attribute
provisioning_custom_shell_attributeThe format for the entry is:
provisioning_custom_uid_attribute:attribute_name
Replace attribute_name with the Active Directory attribute you want to use. For example:
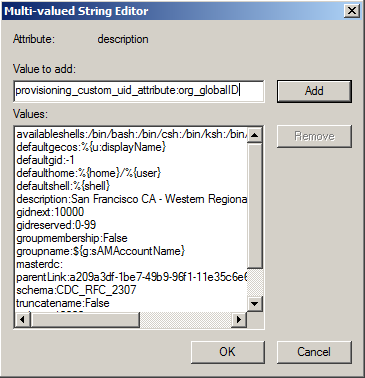
-
Click Add, then click OK.
-
Run the Zone Provisioning Agent update command in preview mode to verify your settings. For example:
zoneupdate /p zoneName
-
Check the results of the zoneupdate preview, then run the command without the preview option to execute the business rules for provisioning. For example:
zoneupdate zoneName
If the Active Directory attribute type is different from the target profile value, the Zone Provisioning Agent attempts to convert the data type. If the data conversion fails, the Zone Provisioning Agent reports an error and stops the provisioning process.
Provisioning Users When Across Trusted Domains
The Zone Provisioning Agent includes two utilities in its Tools folder to assist you in provisioning users when there are trust relationships between domains. These two utilities are CopyGroup and CopyGroupNested. These utilities enable you to mirror group membership or a group hierarchy from a trusted domain and forest in a target domain and forest.
To use these command line utilities, you must have an account that can log on to the trusted source domain and the target domain. The account should also have read permission on the source domain and permission to update the target domain.
For example, assume you have configured the AJAX domain to have a one-way trust with the ACME domain and you have your Active Directory users and groups defined in the ACME domain. If you want to allow the users and groups in the ACME domain to log on to computers that are joined to the AJAX domain, you can log on to the AJAX domain controller with an account that has administrative privileges in both the AJAX and ACME domains, then run the CopyGroup utility to mirror the group membership from a group in the ACME source domain as zone users in the AJAX target domain.
For more information about the command line arguments and options for these utilities, see the usage message displayed for each utility.
Monitoring Provisioning Events
The Zone Provisioning Agent writes events to the Windows event log. You can use tools that monitor the event log to notify you of specific provisioning events. The following table lists the event identifiers and messages the Zone Provisioning Agent records.
| Event | Severity | Event description and sample message |
|---|---|---|
| 1 | Information | Summarizes the result after a provisioning run. Delinea zones updated. Domain controller: domain_controller_name Container: container_name Start time: start_time End time: end_time Successful: successful_message Failure: failure_message |
| 2 | Error | Indicates that provisioning failed for a specific domain because the domain was not found. Domain domain_name not found. |
| 3 | Error | Indicates that provisioning failed because the domain controller was not accessible. Domain server domain_controller_name is down. |
| 4 | Error | Indicates that provisioning failed because the domain was not operational. Domain domain_name is not operational. |
| 5 | Error | Indicates that provisioning failed without a specific cause. Failed to update zones in domain domain_name on domain controller domain_controller_name. |
| 6 | Error | Indicates that provisioning failed because there was a problem with the agent connecting to the Active Directory. Failed to update zones in domain domain_name on domain controller domain_controller_name. Error on Active Directory service. |
| 7 | Error | Indicates that provisioning failed because there was an unexpected error when updating the zones in a specific domain. Unexpected error when updating the zones in domain domain_name on domain controller domain_controller. Details: detail_message. |
| 8 | Information | Provides verbose user provisioning information, including details about the provisioned user profile. User provisioned to a Delinea zone. User: user Zone: zone UID: uid Name: name Shell: shell Home directory: home_directory Primary group: primary_group Gecos: gecos |
| 9 | Information | Provides basic user provisioning information. User provisioned to a Delinea zone. User: user Zone: zone |
| 10 | Information | Provides verbose user de-provisioning information, including details about the user profile removed. User removed from a Delinea zone. User: user Zone: zone UID: uid Name: name Shell: shell Home directory: home_directory Primary group: primary_group Gecos: gecos |
| 11 | Information | Provides basic user de-provisioning information. User removed from a Delinea zone. User: user Zone: zone |
| 12 | Information | Provides verbose group provisioning information, including details about the provisioned group profile. Group provisioned to a Delinea zone. Group: group Zone: zone GID: gid Name: name |
| 13 | Information | Provides basic group provisioning information. Group provisioned to a Delinea zone. Group: group Zone: zone |
| 14 | Information | Provides verbose group de-provisioning information, including details about the group profile removed. Group removed from a Delinea zone. Group: group Zone: zone GID: gid Name: name |
| 15 | Information | Provides basic group de-provisioning information. Group removed from a Delinea zone. Group: group Zone: zone |
| 16 | Warning | Indicates that the Zone Provisioning Agent received a warning message during the provisioning process. Warning occurred when provisioning a Delinea zone. Zone: zone Details: detail_message |
| 17 | Error | Indicates that provisioning failed because there was a problem with the permissions on the account used to run the Zone Provisioning Agent. Insufficient permission to setup the log file. Please contact your local administrator. Details: detail_message |
| 18 | Error | Indicates that provisioning failed because there was a problem with creating the log file in the log file location. Failed to create the log file. Please contact your local administrator. Details: detail_message |
| 19 | Information | Indicates that provisioning is paused to allow another provisioning cycle to complete. Zone Provisioning Agent failed to start another provisioning cycle at current_time because the previous provisioning cycle is not yet complete. The provisioning request is pending until Zone Provisioning Agent finishes the previous provisioning cycle. |
| 20 | Error | Indicates that provisioning failed because the computer was not found in the domain being provisioned. This computer is not joined to a domain or the domain is not available. |
| 21 | Error | Indicates that provisioning failed because there was a problem loading domain information. Failed to load domain information. No zone will be provisioned. Error: error_message |
| 22 | Error | Indicates that provisioning failed because there was a problem with the functional operation of the domain. Functional error occurred with domain domain_name. |
| 23 | Error | Indicates that provisioning failed because authentication failed for the account used to run the Zone Provisioning Agent. Domain domain_name authentication failed. |
| 24 | Error | Indicates that provisioning failed because the authentication system failed. Domain domain_name authentication (system) failed. |
| 25 | Error | Indicates that provisioning failed because there was an unexpected error when loading a specific domain. Unexpected error occurred when loading domain domain_name. |
| 26 | Error | Indicates that provisioning failed because the Active Directory forest was not found. Forest forest_name not found. |
| 27 | Error | Indicates that provisioning failed because the root domain controller was not accessible. Forest server server_name is down. |
| 28 | Error | Indicates that provisioning failed because the forest was not operational. Forest forest_name is not operational. |
| 29 | Error | Indicates that provisioning failed because there was a problem with the functional operation of the forest. Functional error occurred with forest forest_name. |
| 30 | Error | Indicates that provisioning failed because authentication failed at the forest level for the account used to run the Zone Provisioning Agent. Forest forest_name authentication failed. |
| 31 | Error | Indicates that provisioning failed because the authentication system failed at the forest level. Forest forest_name authentication (system) failed. |
| 32 | Error | Indicates that provisioning failed because there was an unexpected error at the forest level. Unexpected error occurred when loading forest forest_name. |
| 33 | Error | Indicates that provisioning failed because there was an error during the provisioning process. Error occurred when provisioning a Delinea zone. Zone: zone Details: detail_message |
| 34 | Warning | Indicates that provisioning might be incomplete because the account used to run the Zone Provisioning Agent does not have permission update zone in a specified domain. Insufficient permission to update the zones in domain domain. |
Adding New Profiles Manually
Provisioning groups enable automated provisioning of UNIX profiles for users and groups with the Zone Provisioning Agent. Server Suite does not require you to use provisioning groups and business rules to create new users and groups. You can also manually create UNIX users and groups in any zone using the Access Manager console, ADedit, or custom scripts. Adding profiles manually to a zone provides you with control over the definition of individual UNIX profiles on a zone-by-zone basis.