Importing and Managing NIS Maps
This section describes how to import, create and manage NIS maps and map entries using the Access Manager console.
You can also use ADSI Edit, ADEdit, custom scripts or other tools to add, modify and remove NIS maps and map entries. To import NIS maps, however, you must use the Access Manager console.
Importing and Creating User and Group Profiles
If you want to make user and group information available to NIS clients, whether for agentless authentication or in response to other lookup requests, you must first make sure the appropriate users and groups have zone profiles and role assignments defined in the zone. The zone information is used for automatic generation of the maps passwd.byname, passwd.byuid, group.byname, and group.bygid. If you disable a user profile in the zone, the user’s information cannot be retrieved or published in response to NIS client requests, or used to authenticate the user’s identity.
You can import existing user and group information directly from existing NIS servers and domains or from properly formatted text files, such as local /etc/passwd and /etc/group files, using the Import from UNIX wizard, or you can create new profiles for Active Directory users using the Access Manager console.
Once the appropriate user and group profiles have been added to the zone you are using as a NIS domain, the information is available to NIS clients unless you explicitly restrict the publication of this information.
For information about restricting the maps published, see Customizing the NIS maps to publish. For information about importing or creating user and group profiles in a zone, see the Administrator’s Guide for Linux and UNIX.
Publishing Network or Custom Information
In addition to user and group information, adnisd can publish network information or make custom information available to NIS clients. For example, you can import information from standard NIS maps such as automount, netgroup, and automaster, if these maps exist in your environment. Importing network information or creating custom maps, however, requires you to have the NIS Extensions.
NIS Extensions are installed by default when you run the setup program. If you did not select this option, rerun the setup program and select NIS Extensions from the list of Access Manager Administration components.
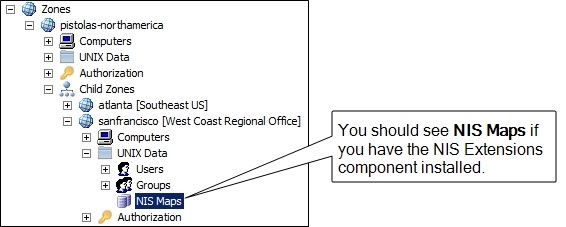
If you have the NIS Extensions installed, you should see the NIS Maps node under each zone. For example, if you are using hierarchical zones, you can see NIS Maps under the UNIX Data node for the parent or child zone you select:
Importing Network NIS Maps
To use Access Manager to import a standard network NIS map into Active Directory:
-
Open Access Manager.
-
In the console tree, navigate to the specific zone into which you want to import NIS maps.
-
Expand the console tree to display NIS Maps.
-
Select NIS Maps, right-click, then click Import Maps.
-
Select whether you want to connect to the NIS server and domain or import the information from a text file, then click Next.
- If you are importing maps directly from an existing NIS server, type the name of the NIS domain and NIS server. Using this option requires network connectivity to the NIS server from the Window computer you are using.
- If you are importing a map from a text file, click Browse to navigate to the map file you want to import. If you cannot connect directly to the NIS server, you should export the NIS database to a file; then import the information using this option.
-
Select the NIS maps to import if you are importing directly from an existing NIS server, or type a map name and define the file format if importing from a file, then click Next. The Import Maps wizard does not validate the information to be imported. If the map has invalid entries, they are imported as-is.
If you importing from a text file:
-
Type a Map name that describes the type of map being imported. In most cases, you should use the base name that identifies the configuration file used to generate the NIS database. For example, use hosts to identify the map generated from the /etc/hosts file.
-
Type the Field separator character used to separate fields in the map file.
-
Type the column number that defines the start of the Key field.
-
Specify any additional options as appropriate for the file you are importing. For example, select Comments are included in the file after and type the character used to designate comments if the file includes comments.
For Access Manager to correctly interpret the map file, you need to provide accurate information about the file format, such as the type of separator used between fields.
Because the Delinea NIS server does not include comments in response to service requests, you must save the map to a text file and import from that file to retrieve comments contained in NIS maps.
-
-
When the import is complete, click Finish.
-
After importing NIS maps, restart the adnisd service.
Creating New NIS Maps in Active Directory
If you cannot import network information from existing NIS maps, you can create new maps by adding the appropriate information directly to Active Directory using Access Manager. Once you add the information to Active Directory, adnisd can use the information to automatically generate a local cache of the map data and make the information in those generated maps available to NIS clients.
If you are creating NIS maps manually, keep in mind that the Network Information Service can return a maximum of 1024 characters of data in response to a query from any NIS map, so make sure all NIS map entries have less than 1024 characters of data.
To create a new network NIS map in Active Directory
-
Open Access Manager.
-
Navigate to the specific zone for which you want to create maps.
-
Expand the console tree to display NIS Maps.
-
Select NIS Maps, right-click, then click New and select the type of map you want to create.
For most map types, you can only use the recognized map name for the new map. Recognized map names enable you to use derived maps to retrieve information using different keys. If you are creating a new Automaster map, you must choose either auto_master or auto.master as the map name to retrieve the names of the automount maps.
If you select the Generic Map option, you can create a custom NIS map for any key/value pairs that you want to make available to NIS clients. For more information, see Creating generic custom maps.
-
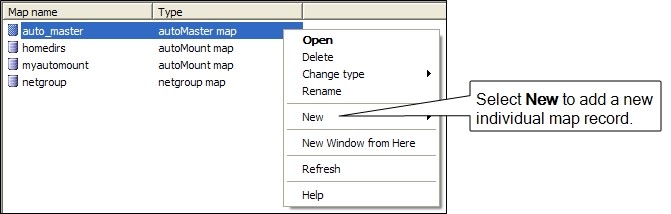
Select the new empty map, right-click, then click New > Map Entry or New > netgroup to add a new individual map record.
The file format and the specific fields used in individual map records depend on the type of map you are working with.
-
Type the appropriate information for the fields listed, then click OK to save a record in the new map.
For more information about the fields required in any NIS map, see the man page for the type of map you are creating. For example, see the man page for
netgroupto see detailed information about required and optional fields and the format ofnetgroupmaps.You can use Active Directory groups in
netgrouprecords. Using Active Directory groups innetgrouprecords enables dynamic changes to user and computer pairings based on their Active Directory group membership. If you have existing processes for adding and removing users and computers in Active Directory groups, you can leverage those processes innetgrouprecords.
Creating Maps for Common Network Services
Delinea uses explicitly-defined NIS maps to generate derived maps automatically. Once a recognized base map is imported or created manually in Active Directory, the agent generates and stores its derived maps so that information can be retrieved searching on different keys.
In most cases, you can import recognized base maps directly from an existing NIS server and domain or from generated text files (for example, files created using the niscat command). Alternatively, you can create the base maps manually using the corresponding map type in Access Manager.
The following table describes the recognized base maps and their derived maps.
aliases
The aliases map is the abbreviated name for the mail.aliases map. The derived maps are mail.aliases and mail.byaddr. In most cases, the NIS map is created from the /etc/aliases or /etc/mail/aliases file. A typical line looks like this:
alias: address1 [address2 addressn...] # comment
For example:
 acme: amy.adams@acme.com bill.byrnes@acme.com
 widgetco: aaron@widgetco.com,...,zuza@widgetco.com
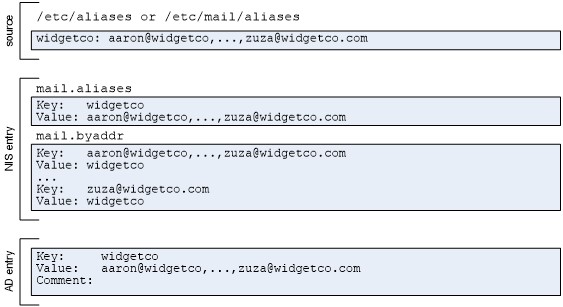
For the mail.alias map, the entries are defined like this:
- Key is the alias name:
acme - Value is the list of addresses for the alias:
amy.adams@acme.combill.byrnes@acme.com
For the mail.byaddr map, the entries are defined like this:
- Key is an address:
amy.adams@acme.com - Value is the corresponding alias:
acme
If you create an aliases map in Active Directory, you must include the key as part of the value. For example:
- Key:
acme - Value:
acme: someone@acme.com - Comment:
someone@acme.com is the address
audit_user
In most cases, the audit_user map is created from the /etc/security/audit_user file. A typical line looks like this:
user_name:always_audit_flags:never_audit_flags
For example:
 root:lo:no
 wily:lo,am:io,cl
 kris:lo,ex,+fc,-fr,-fa:io,cl
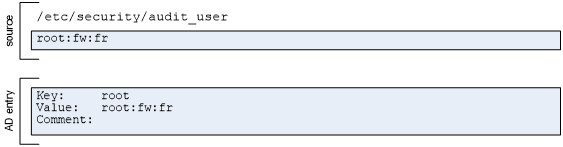
For the audit_user map, entries are defined like this:
- Key is the user name:
root - Value takes the following format: user_name:always_audit_flags:never_audit_flags
If you create an audit_user map in Active Directory, you must include the key as part of the value. For example:
- Key:
root - Value:
root:lo:no
This map is only applicable for Solaris.
auth_attr
In most cases, the auth_attr map is created from the /etc/security/auth_attr file. A typical line looks like this:
name:res1:res2:short_description:long_description:attr
For example:
 solaris.::All Solaris Authorization::help=SolarisAuth.html
 solaris.user.manage:::Manage Users::help=ManageUsers.html
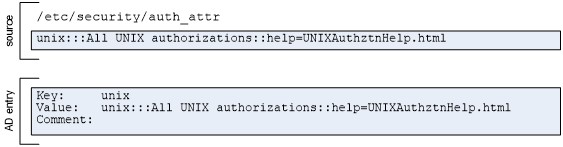
If you create an auth_attr map in Active Directory, you must include the key as part of the value. For example:
- Key:
solaris. - Value:
solaris.:::AllSolarisAuthorizations::attribute - Comment:
This map provides authorization attributes for Solaris.
This map is only applicable for Solaris.
bootparams
In most cases, the bootparams map is created from the /etc/bootparams file. A typical line looks like this:
client_name key=value:[key=value:...]
For example:
 client root=sr04:/export/client/root domain=nyc.test
 engr1 root=smoketest:/export/engr1/root rootopts=:vers=2
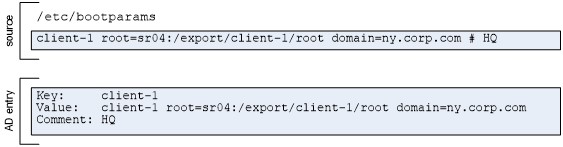
If you create a bootparams map in Active Directory, the value must consist of key and value pairs. For example:
- Key:
client - Value:
root=sr04:/export/client/root domain=nyc.test - Comment:
The value consists of key=value pairs separated by colons (:).
This map is only applicable for Solaris.
ethers
The ethers map is the abbreviated name for the ethers.by name map. The derived maps are ethers.byname and ethers.byaddr. In most cases, the NIS map is created from the file /etc/ethers file. A typical line looks like this:
ethernet_address host_name
For example:
 52:ef:75:72:4e:c8 rhel9
 31:ee:c5:72:4e:18 finance
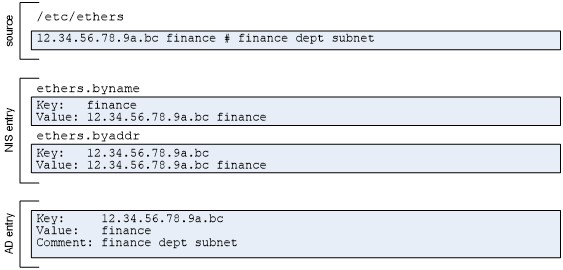
For the ethers.byname map, entries are defined like this:
- Key is the host name:
rhel9 - Value is the ethernet address for the host name:
52:ef:75:72:4e:c8
For the ethers.byaddr map, entries are defined like this:
- Key is an address:
52:ef:75:72:4e:c8 - Value is the host name:
rhel9
If you create an ethers map in Active Directory, you must include the key as part of the value. For example:
- Key:
rhel9 - Value:
52:ef:75:72:4e:c8 rhel9 - Comment:
The host name for 52:ef:75:72:4e:c8 is rhel9
exec_attr
In most cases, the exec_attr map is created from the /etc/security/exec_attr file. A typical line looks like this:
name:policy:type:res1:res2:id:attr
For example:
 Application Server Management:susuer:cmd:::/usr/bin/admin:
 DBA:unix-dba:cmd:::/usr/db/bin/dbadmin:
 dbuser:unix-dbuser:cmd:RO::/usr/sbin/db/opensql
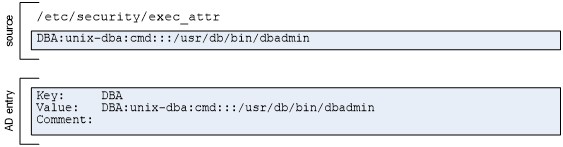
If you create an exec_attr map in Active Directory, you must include the key as part of the value. For example:
- Key:
Application Server Management - Value: execution profile name and properties followed by attributes defined as key and value pairs for the profile:
Application Server Management:suser:cmd::: \/usr/appserver/bin/admin:
This map is only applicable for Solaris.
hosts
The hosts map is the the abbreviated name for the hosts.byname map. The derived maps are hosts.byname and hosts.byaddr. In most cases, the NIS map is created from the /etc/hosts file. A typical line looks like this:
host_ip_address host_name [alias,...] # comment
For example:
 127.0.0.1 localhost.localdomain localhost
 192.168.22.1 arcade.cendura.net arcade arc1 # clustername
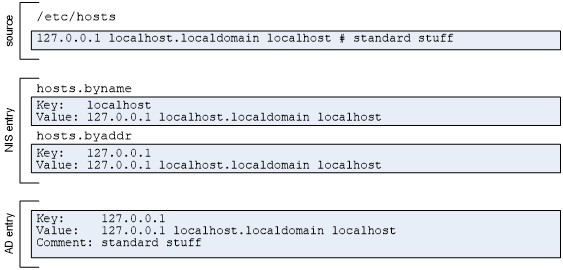
For the hosts.byname map, entries are defined like this:
- Key is the host name:
localhost - Value is the IP address and any aliases defined for the host:
127.0.0.1 localhost.localdomain localhost
For the hosts.byaddr map, entries are defined like this:
- Key is an address:
127.0.0.1 - Value is the IP address and any aliases defined for the host:
127.0.0.1 localhost.localdomain localhost
If you create a hosts map in Active Directory, you must include the key as part of the value. For example:
- Key:
127.0.0.1 -
Value: IP address and any aliases defined for the host:
127.0.0.1 localhost.localdomain localhost - Comment:
The value includes both the host name and IP
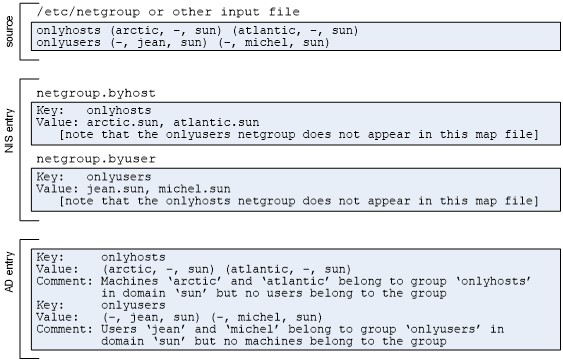
netgroup
The netgroup map defines a hierarchy of netgroupgroups and members. The netgroupmap controls access by user name, host name, or NIS domain name. The derived maps are netgnetgroup.byhostroup.byhost and netgroup.byuser. In most cases, the NIS map is created from the /etc/netgroup file. A typical line looks like this:
netgroup_name (host,user,NIS_domain)[,netgroup]...
The keys in a netgroupmap are the names of each netgroup. The values in a netgroupmap are one or more space-separated elements. An element can be:
- a set of three comma-separated components.
- a
netgroupname.
When specifying an element as a set of three components, you can omit any component to allow any value for that component or specify the special character dash (-) to eliminate a component as a valid value.
The netgroup.byhost map uses the host name as the key and the value is the list of all netgroups that contain the key host somewhere in the hierarchy.
The netgroup.byuser map uses the user name as the key and the value is the list of all netgroups that contain the key user somewhere in the hierarchy.
If you create a netgroupmap in Active Directory, you must not include the key as part of the value. To illustrate, the following example has entries for two netgroups—onlyhosts and onlyusers—and how the groups become key and value entries in the derived NIS maps.
netmasks
In most cases, the netmasks map is created from the /etc/inet/netmasks or /etc/netmasks file. A typical line looks like this:
IP_addressnetmask # comment
For example
 192.168.4.0 255.255.252.0
 192.168.4.1 255.255.255.0
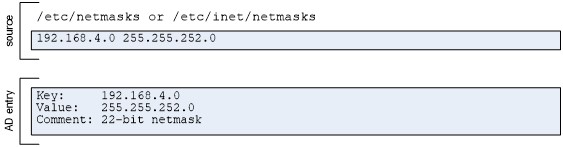
If you create a netmasks map in Active Directory, you must not include the key as part of the value. For example:
- Key:
192.168.4.0 - Value:
255.255.252.0 - Comment:
This is a 22-bit netmask.
This map is only applicable for Solaris.
networks
The networks map is the the abbreviated name for the networks.byaddr map. The derived maps are networks.byname and networks.byaddr. In most cases, the networks map is created from the /etc/networks file. A typical line looks like this:
network_name network_address [alias1,...] # comment
For example:
 arpa 10 arpanet
 intra_1 123.45.67.89 intranet # headquarters
 sf_site 171.22.0.0 sf1 # san francisco satellite
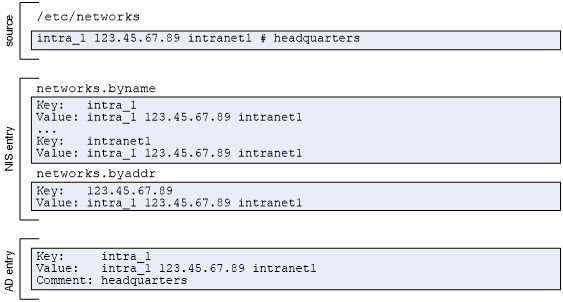
For the networks.bynamemap, entries are defined like this:
- Key is the network name:
intranet - Value is the network address and any aliases defined for the network:
intranet 171.22.0.0 intra
For the networks.byaddr map, entries are defined like this:
- Key is the network address:
171.22.0.0 - Value is the network name and any aliases defined for the network:
intranet 171.22.0.0 intra
If you create a networks map in Active Directory, you must include the key as part of the value. For example:
- Key:
intranet - Value:
intranet 171.22.0.0 intra - Comment:
The value includes the network name and address
printers
In most cases, the printers map is created from the /etc/printers.conf file. A typical line looks like this:
destination_name key=value[,key=value,...] # comment
For example:
 buildx:paddr=buildx.acme.com,105004,1,sys,lp,buildxspl,1:
 printer3:bsdaddr=server,ps_printer # in copy room
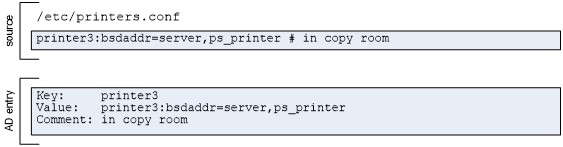
If you create a printers map in Active Directory, you must include the key as part of the value. For example:
- Key:
printer3 -
Value: printer name followed by key and value pairs for the printer properties:
printer3:bsdaddr=server,ps_printer - Comment:
in copy room
This map is only applicable for Solaris.
prof_attr
In most cases, the prof_attr map is created from the /etc/security/prof_attr file. A typical line looks like this:
profile_name:res1:re2,description:attr
For example:
 all:::Execute any command as the user:help=AllRights.html
 guest:RO::Allow read-only:audit-flags=all:project=web
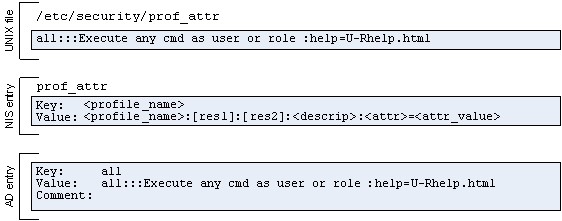
If you create a prof_attr map in Active Directory, you must include the key as part of the value. For example:
- Key:
all -
Value: profile name and properties followed by attributes defined as key and value pairs for the profile:
all:::Execute any cmd as user or role:help=All.html
This map is only applicable for Solaris.
project
In most cases, the project map is created from the/etc/project file. A typical line looks like this:
project_name:projectid:comment:user_list:group_list:attr
For example:
 DB-backup:14709:Back up DB:dba,root:!*:project.max-tasks=5
 web:101:Web services deployment:root:as-team: \\ task.maxlwps=(privileged,101,signal=SIGTERM)
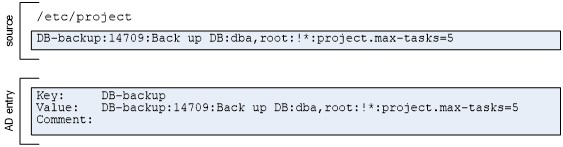
If you create a project map in Active Directory, you must include the key as part of the value. For example:
- Key:
DB-backup -
Value: project name and properties followed by attributes defined as key and value pairs:
DB-backup:14709:Back up DB:dba,root:!*: \\ project.maxtasks=5
This map is only applicable for Solaris.
protocols
The protocols map is the the abbreviated name for the protocols.bynumber map. The derived maps are protocols.byname and protocols.bynumber. In most cases, the protocols map is created from the /etc/protocols file. A typical line looks like this:
protocol number alias # comment
For example:
ip 0 IP # internet protocol, pseudo protocol number
udp 17 UDP # user datagram protocol
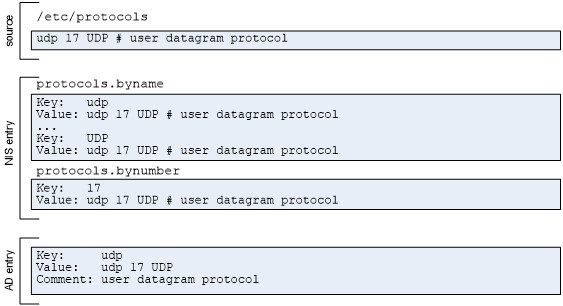
For the protocols.byname map, entries are defined like this:
- Key is the protocol name:
udp - Value is the protocol name, number, and any aliases defined for the protocol:
udp 17 UDP
For the protocols.bynumber map, entries are defined like this:
- Key is the protocol number:
17 - Value is the protocol name, number, and any aliases defined for the protocol:
udp 17 UDP
If you create a protocols map in Active Directory, you must include the key as part of the value. For example:
- Key:
udp - Value:
udp 17 UDP - Comment:
user datagram protocol
rpc
The rpc map is the the abbreviated name for the rpc.bynumber map. The derived maps are rpc.byname and rpc.bynumber. In most cases, the rpc map is created from the /etc/rpc file. A typical line looks like this:
rpc_name port_number alias1 alias2 ... # comment
For example:
 portmapper 100000 portmap sunrpc
 rpcbind 100001
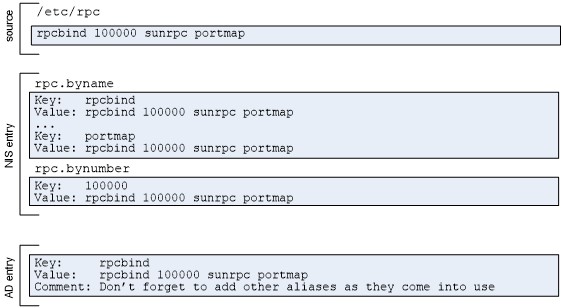
For the rpc.byname map, entries are defined like this:
- Key is the rpc name or alias, so there would be separate entries for:
portmapper,portmap,sunrpc, andrpcbind. - Value for each of the
portmapper,portmap, andsunrpckey entries would be the same:portmapper 100000 portmap sunrpc
For the protocols.bynumber map, entries are defined like this:
- Key is the rpc number:
100000 - Value is the rpc name, number, and aliases:
portmapper 100000 portmap sunrpc
If you create a rpc map in Active Directory, you must include the key as part of the value. For example:
- Key:
portmapper - Value:
portmapper 100000 portmap sunrpc - Comment:
portmap and sunrpc are aliases for portmapper
services
The services map is the the abbreviated name for the services.byname map. The derived maps are services.byname and services.byservicename. In most cases, the services map is created from the /etc/services file. A typical line looks like this:
service port/protocol alias1 alias2 ... # comment
For example:
uucp 540/tcp uucopy # this entry is for uucp
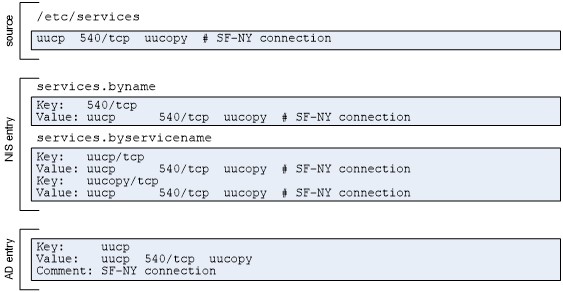
For the services.byname map, entries are defined like this:
- Key is the service name or alias, so there would be separate entries for: uucp and uucopy.
- Value for each of the uucp and sunrpc key entries would be the same: uucp 540/tcp uucopy
For the service.byservicename map, entries are defined like this:
- Key is the port number and protocol:
540/tcp - Value contains the same set of fields:
uucp 540/tcp uucopy
If you create a services map in Active Directory, you must include the key as part of the value. For example:
- Key:
uucp - Value:
uucp 540/tcp uucopy - Comment:
uucopy is an alias for uucp
user_attr
In most cases, the user_attr map is created from the /etc/user_attr file. A typical line looks like this:
user:qualifier:res1:res2.attr
For example:
 root::::auths=solaris.*,solaris.grant; \\
 profiles=Web Console Management,All; \\ lock_after_retries=no; min_label=admin_low; \\ clearance=admin_high
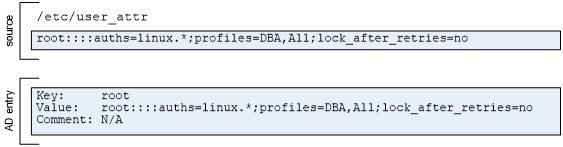
If you create a user_attr map in Active Directory, you must include the key as part of the value. For example:
-
Key:
root -
Value: user name and properties followed by attributes defined as key and value pairs for the profile:
all::::auths=solaris.*;profiles=DBA,all;lock_after_retries=no
This map is only applicable for Solaris.
Creating Generic Custom Maps
You can create generic maps to publish any type of custom information that you want to make available to NIS clients. Generic custom maps consist of a simple key/value format and optional comments. You can also use generic maps to manually create standar
To add a custom map to Active Directory:
- Open Access Manager.
- In the console tree, select Zones, and open the specific zone you want to work with.
- In the console tree, select NIS Maps and right-click; then click New and select Generic Map.
- Type a name for the new map; then click OK.
- In the details pane, select the new map, right-click; then click New > Map entry.
-
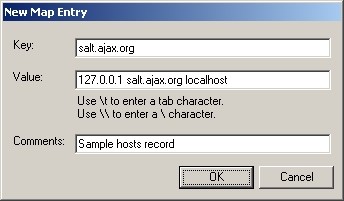
Type the appropriate information for the map record you are adding; then click OK. For example:
-
Type the Key to use in a client request for looking up the corresponding value.
-
Type the Value associated with the key.
-
Type any optional Comments for the key/value pair.
For example:
-
Changing the Map Type
When you import or create NIS maps, the map type determines the fields defined. For example, a Generic map type consists of three fields: the Key field (required) the Value field (required), and the Comment field. If you don’t select the correct map type, the Delinea Network Information Service will not be able to interpret the records in the map correctly or respond to client requests with the proper information.
To change the map type of an existing NIS map:
-
Open Access Manager.
-
In the console tree, select Zones, and open the specific zone you want to work with.
-
In the console tree, open NIS Maps; then the select the map name you want to change. For example, if you have created a map named nethosts, select the nethosts map.
-
Right-click; then click Change Type and select the correct map type. For example, if the records in nethosts map should consist of a Key, a Value, and an optional Comment, select Generic Map as the map type.
If records have already been defined for the map using the incorrect map type, in most cases, you will need to modify the fields after changing the map type.
Maintaining Map Records in Active Directory
Once NIS maps are stored in Active Directory, you must maintain the records in Active Directory to ensure changes are reflected in the local map cache that the Delinea Network Information Service uses to respond to NIS client queries. You can use Access Manager to manually add, edit, or delete individual map records for any map. The specific fields available in each record, and which fields are required and which are optional, depend on the type of map you are editing. For example, the fields in an auto.master map entry are different from the fields in a netgroupmap entry. For information about the fields in different types of maps, see Creating new NIS maps in Active Directory.
Modifying Map Records in Active Directory
Specific users and groups can be given the right to add, modify, and delete NIS map entries using the Zone Delegation Wizard. For information about the rights required, see the Planning and Deployment Guide.
To edit individual map records:
-
Open Access Manager.
-
In the console tree, select Zones, and open the specific zone you want to work with.
-
In the console tree, open NIS Maps, the select the map you want to modify. For example, select the
auto.master map. -
Select an individual map record and right-click.
-
Click Properties to modify the fields for the selected record or click Delete to remove the record from the map.
If deleting a map record, click Yes to confirm the operation.
Deleting a map stored in Active Directory
Specific users and groups can be given the right to delete NIS maps using the Zone Delegation Wizard. For information about the rights required, see the Planning and Deployment Guide.
To remove a NIS map from Active Directory:
- Open Access Manager.
- In the console tree, select Zones, and open the specific zone you want to work with.
- In the console tree, open NIS Maps, the select the map you want to remove.
- Right-click; then click Delete to remove the map from Active Directory.