Securing an Installation
For production deployments, you can take the following steps to secure the installation:
- Use the Installation group policy to specify which installation agents and collectors are part of. By enabling the Installation group policy you can prevent local administrators from configuring a computer to be part of an unauthorized installation.
- Configure a trusted group of collectors to prevent a hacker from creating a rogue collector to collect data from agents.
- Configure a trusted group of agents to prevent a hacker from performing a Denial of Service attack on the collector and database by flooding a collector with bogus audit data.
- Encrypt all data sent from the collector to the database.
Before you can follow these steps to secure an installation, you must have access to an Active Directory user account with permission to create Active Directory security groups, enable group policies, and edit Group Policy Objects.
To secure an installation using Windows group policy:
- Open the Group Policy Management console.
- Expand the forest and domains to select the Default Domain Policy object.
- Right-click, then click Edit to open Group Policy Management Editor.
- Expand Computer Configuration > Policies > Delinea Audit Settings, then select Common Settings.
- Double-click the Installation policy in the right pane.
- On the Policy tab, select Enabled.
- Click Browse to select the installation you want to secure, then click OK.
- Click OK to close the Installation properties.
Securing an Audit Store with Trusted Collectors and Agents
By default, audit stores are configured to trust all audited computers and collectors in the installation. Trusting all computers by default makes it easier to deploy and test auditing in an evaluation or demonstration environment. For a production environment, however, you should secure the audit store by explicitly defining the computers the audit store can trust.
You can define two lists of trusted computers:
- Audited computers that can be trusted.
- Collector computers that can be trusted.
To secure an audit store:
-
Open the Audit Manager console.
-
Expand the installation and Audit Stores nodes.
-
Select the audit store you want to secure, right-click, then select Properties.
-
Click the Advanced tab.
-
Select Define trusted Collector list, then click Add.
-
Select a domain, click OK, then search for and select the collectors to trust and click OK to add the selected computers to the list.
Only the collectors you add to the trusted list are allowed to connect to the audit store database. All other collectors are considered untrusted and cannot write to the audit store database.
-
Select Define trusted Audited System list, then click Add.
-
Select a domain, click OK, then search for and select the audited computers to trust and click OK to add the selected computers to the list.
Only the audited computers you add to the trusted list are allowed to connect to the trusted collectors. All other computers are considered untrusted and cannot send audit data to trusted collectors.
-
Click OK to close the audit store properties dialog box.
The following example illustrates the configuration of trusted collectors and trusted audited computers.
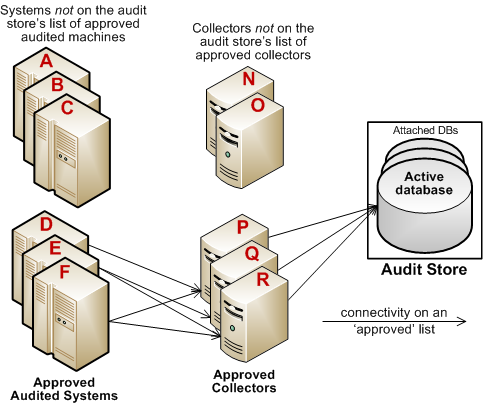
In this example, the audit store trusts the computers represented by P, Q, and R. Those are the only computers that have been identified as trusted collectors in the audit store Properties. list. The audit store has been configured to trust the audited computers represented by D, E, and F. As a result of this configuration:
- Audited computers D, E, and F only send audit data to the trusted collectors P, Q, and R.
- Trusted collectors P, Q, and R only accept audit data from the trusted audited computers D, E, and F.
- The audit store database only accepts data for its trusted collectors P, Q, and R, and therefore only stores audit data that originated on the trusted audited computers D, E, and F.
Disabling a Trusted List
After you have added trusted collectors and audited computers to these lists, you can disable either one or both lists at any time to remove the security restrictions. For example, if you decide to allow auditing data from all audited computers, you can open the audit store properties, click the Advanced tab, and deselect the Define trusted Audited System list option. You don’t have to remove any computers from the list. The audit store continues to only accept data from trusted collectors.
Using Security Groups to Define Trusted Computers
You can use Active Directory security groups to manage trusted computer accounts. For example, if you create a group for trusted audited computers and a group for trusted collectors, you can use those groups to define the list of trusted collectors and audited computers for the audit store. Any time you add a new computer to one of those groups, thereafter, it is automatically trusted, without requiring any update to the audit store properties.