Installing the Audit Collectors
After you have created a new installation, with an audit management database and at least one audit store and audit store database, you must add the collectors that will receive audit records from the agents and forward those records to the audit store. For redundancy and scalability, you should have at least two collectors. For more information about planning how many collectors to use and the recommended hardware and network configuration for the collector computers, see Deciding where to install collectors and audit stores.
Setting the Required Permission
Before you configure a collector, you should check whether your user account has sufficient permissions to add new collector accounts to the audit store database. If you are a database administrator or logged on with an account that has system administrator privileges, you should be able to configure the collector without modifying your account permissions. If you have administrative rights on the computer that hosts Audit Manager but are not a database administrator, you can set the appropriate permission before continuing.
To set the permission required to add accounts to the audit store database:
-
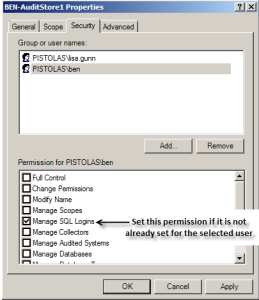
Open Audit Manager.
-
Expand the installation, then expand Audit Stores.
-
Select the audit store that the collector will connect to, right-click, then click Properties.
-
Click the Security tab.
-
Click Add to search for and select the user who will configure the collector.
-
Select the Manage SQL Logins right, then click OK.
Installing the Collector Service using the Setup Program
If your user account has sufficient permissions to add new collector accounts to the audit store database, you can install a collector by running the setup program on the computer on which you want to install the collector. When you are prompted to select components, select Audit Collector and deselect all of the other components, then click Next. Follow the instructions in the wizard to select the location for installing files and to confirm your selections, then click Finish to complete the installation.
The collector installer is in the \DirectAudit\Collector folder in your installation media.
Configuring the Audit Collector Service
By default, when you click Finish, the setup program opens the Collector Configuration Wizard. Alternatively, you can launch the configuration wizard at any time by clicking Configure in the Collector Control Panel.
To configure the collector service:
-
On the first screen of the Collector Configuration Wizard, select the DirectAuditinstallation to assign this collector to.
If the computer is also enrolled in the Delinea Cloud Platform and you have already enabled auditing in the Admin Portal, you can choose which kind of audit installation to assign the collector to:
-
Automatic: This option configures the collector to receive audit data from systems that are enrolled in the Delinea Cloud Platform and systems that are joined to Active Directory.
You use the Admin Portal to configure which installation is used by these systems. The systems have either the Delinea Client for Linux or Delinea Client for Windows and the audit packages installed so that auditing is enabled. These systems do not have to be joined to Active Directory.
-
Manual: This option configures the collector to receive audit data from systems that are joined to Active Directory and have either the Delinea Agent for *NIX or Delinea Agent for Windows installed and the system is enabled for auditing. For this option, select the audit installation.
Computers that are not enrolled in the Delinea Cloud Platform have a single list of audit installations to pick from.
Click Next to continue.
The configuration wizard verifies that the specified installation has an audit store that services the site that the collector is in and that the collector and its audit store database are compatible.
-
-
Enter the port number(s) that the collector will use to communicate with the audited systems.
-
The default port is 5063 for systems that have either the Delinea Agent for *NIX or Delinea Agent for Windows installed.
-
If the computer is also enrolled in the Delinea Cloud Platform, the default port is 5064 for systems that have either the Delinea Client for Linux or Delinea Client for Windows installed.
-
If you set the installation to Manual in the previous step, Delinea Client System port is greyed out.
For either port, if you specify a different port and have the default Windows firewall turned on, the wizard checks whether the port is open. If the port isn't open, the wizard offers to open it for you.
If you are using another vendor’s firewall, open the port with the tools provided by that vendor. If there’s an upstream firewall—such as a dedicated firewall appliance—between the collector and the computers to be audited, contact the appropriate personnel to open the port on that firewall.
Click Next to continue.
-
-
If the computer where you’re configuring a collector belongs to multiple audit stores in the auditing installation, choose which audit store this collector will connect to, then click Next.
For example, two audit stores can have an overlapping scope if one audit store scope is configured for Active Directory sites and another one is set by subnets.
-
Select whether you want to use Windows authentication or SQL Server authentication when the collector authenticates to the audit store database, then click Next.
In most cases, you should choose Windows authentication to add the computer account to the audit store database as a trusted, incoming user.
If Microsoft SQL Server is in a different forest or in an untrusted forest, you should use SQL Server Management Studio to set up one or more SQL Server login accounts for the collector. After you create the SQL Server login account for the collector to use, you can select SQL Server authentication, then type the SQL Server login name and password in the wizard.
-
Type the maximum number of connections for the Microsoft SQL Server connection pool, then click Next.
-
Review the settings for the collector, then click Next.
-
Click Finish to close the wizard and start the collector service.
Configuring a Collector Silently by Editing the Registry
You can also configure a collector by changing the following registry key information.
Registry Key and Path
Computer\HKEY_LOCAL_MACHINE\SOFTWARE\Centrify\DirectAudit\Collector
Registry Value
InstallationId
DA installation instance ID
Port
The port number. The default value is 5063.
MaxPoolSize
The max size of pool. The default value is 1000.
UseSqlAuthentication
The collector can use either Windows authentication or SQL Server authentication to authenticate with the Audit Store database.
0: Windows authentication
1: SQL authentication. If you specify SQL authentication, you need to specify some additional key values - see below.
UseDatabase
The default is 1.
PreferredAuditStore
Specify the name of the audit store.
PreferSiteOverSubnet
The value is 0 or 1. By default, it is 0.
IsRegistered
0: The collector is not configured yet.
1: The collector has been configured.
Additional Key for SQL Authentication
If you specify SQL authentication, you also need to create two registry values under the following registry key :
\HKEY_LOCAL_MACHINE\SOFTWARE\Centrify\DirectAudit\Collector\SqlAuthentication
Registry Value
SqlLoginName
SqlPassword
This password has to be encrypted using the DPAPI function CryptProtectData.