Preparing Authentication Profiles
With Server Suite, you can require multi-factor authentication for two distinct situations:
- As part of the login process so that users who are attempting to log in to Delinea-managed computers must provide multiple forms of authentication before they are granted access.
- As part of a re-authentication process so that users who are attempting to use Application, Network, and Desktop rights on Windows machines, or command rights with elevated privileges or in a restricted shell on UNIX machines, must provide a password and another form of authentication before they can execute the selected command.
To configure the types of authentication challenges allowed in each situation, you can prepare one or more authentication profiles in the Admin Portal. If you have already configured authentication profiles for other purposes, you can reuse those profiles for multi-factor authentication or add new profiles specifically for the computers you manage using Server Suite. You can prepare one profile to use for both login access and for the use elevated privileges or you can prepare separate profiles for each situation.
Create an Authentication Profile
The first step in preparing authentication profiles is to create the profile.
To create an authentication profile:
-
Open a browser and log on to Privileged Access Service using your customer-specific URL.
-
Navigate to Settings > Authentication.
Three default authentication profiles are available out-of-the-box:
- Default New Device Login Profile: Uses Password for the first challenge and Mobile Authenticator, Text message (SMS) confirmation code, Email confirmation code, or OATH OTP Client for the second challenge with a 12 hours pass-through duration.
- Default Other Login Profile: Uses Password for the first challenge and no secondary challenge with a 12 hours pass-through duration.
- Default Password Reset Profile: Gives the option for users to use Mobile Authenticator, Text message (SMS) confirmation code, Email confirmation code, or OATH OTP Client for the first challenge with a 12 hours pass-through duration.
-
Select an existing Authentication Profile or click Add Profile.
The fields needed to add new profile.
-
Type the authentication profile name.
-
Select the types of authentication to present for the first challenge.
The second authentication is not needed. Challenge two is a third mechanism.
-
Click OK.
-
The pass-through option does not apply to Windows, Linux, or UNIX MFA logins unless you specify otherwise in the policy settings.
Select the authentication mechanism(s) you require and want to make available to users. Some authentication mechanisms require additional configurations before users can authenticate using those mechanisms. See Authentication mechanisms for information about each authentication mechanism.
For example, you can require that the first challenge be the user’s account password. Then for the second challenge, users can choose between an email confirmation code, security question, or text message confirmation code.
If you have multiple challenges, Privileged Access Service waits until users enter all challenges before giving the authentication response (pass or fail). For example, if users enter the wrong password for the first challenge, we will not send the authentication failure message until after users respond to the second challenge.
If users fail their first challenge and the second challenge is SMS, email, or phone call, the default configuration is that Privileged Access Service will not send the SMS/email or trigger the phone call. Contact support to change this configuration.
Assign Login Authentication Profiles
The next step is to assign login authentication profiles to policies. In this task, you set up a policy so that if specified conditions are met, the affected users proceed according to a specified authentication profile. If those conditions aren't met, you can specify a default authentication profile or block access entirely.
For example, you could set a policy that says that during work hours of Monday to Friday, 8:00 am to 5:00pm, users log in using an authentication profile that requires a password and a security question. For users logging in outside of those days or times, users will have to login with a password, security question, and an email confirmation code.
As a reminder, you use authentication profiles to define the necessary authentication methods to use. You define authentication rules to specify where to enforce those authentication profiles inside of a policy set.
To assign a login authentication profile to a policy set:
-
In the Admin Portal, go to Access > Policies and either click Add Policy Set to create a new policy or click an existing policy to edit.
-
Create or edit the policy set and assign it to the desired users or resources.
For details, see "Creating policy sets and policy assignments" in the Privileged Access Service help.
-
In the Policy Settings area, navigate to Authentication > Delinea Server Suite Agents > and click one of the following settings:
Policy Setting Description Linux, UNIX and Windows Servers For Linux and UNIX Servers or Workstations where the Server Suite Agent for *NIX is installed and enabled. For Windows Servers where the Server Suite Agent for Windows is installed and enabled Windows Workstations For Delinea-managed workstations where the Server Suite Agent for Windows is installed and enabled. The operating system variant determines if it's a workstation. Privilege Elevation For systems where either the Server Suite Agent for *NIX or Serer Suite Agent for Windows is installed and enabled. For any of the above policy settings, the role assignment associated with this policy must include computer objects or groups in Active Directory and also the "Computer Login and Privilege Elevation" administrative rights.
-
Select Yes in the Enable authentication policy controls drop-down.
The Authentication Rules section displays. You use this section to define which authentication profiles apply under which conditions.
-
(Optional) If you want to specify conditions for which different authentication rules apply, click Add Rule. Otherwise, proceed to step
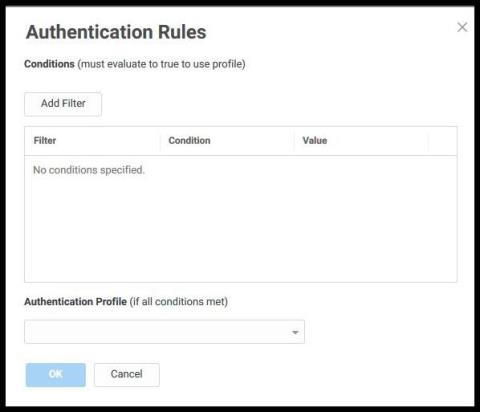
The Authentication Rules window displays.
-
Click Add Filter, and then click the same drop-down to spicy which kind of condition.
For example, you can create a rule that requires a specific authentication method when users access Privileged Access Service from an IP address that is outside of your corporate IP range. Supported filters are:
Filter Description IP Address The authentication factor applies as follows: For Privileged Access Service on-premise, the authentication factor is the connector's IP address when you log in. When using HTTP proxy, the authentication factor is the HTTP Proxy server’s IP address when you log in. For Privileged Access Service, the authentication factor is the tenant connectors’ public IP address when you log in. When using HTTP proxy, the authentication factor is the HTTP proxy server’s public IP address when you log in. This option requires that you have configured the IP address range under Settings > Network > CorporateIPRange. Note: For Windows machines that can access the Internet, the authentication factor is the machine's IP address when you log in. Identity Cookie The authentication factor is the cookie that is embedded in the current browser by the directory service after the user has successfully logged in. Day of Week The authentication factor is the specific days of the week (Sunday through Saturday) when the user logs in. Date The authentication factor is a date before or after which the user logs in that triggers the specified authentication requirement. Date Range The authentication factor is a specific date range. Time Range The authentication factor is a specific time range in hours and minutes. Risk Level Risk Level: The authentication factor is the risk level of the user logging on to Admin Portal. For example, a user attempting to log in to Privileged Access Service from an unfamiliar location can be prompted to enter a password and text message (SMS) confirmation code because the external firewall condition correlates with a medium risk level. This Risk Level filter, requires additional licenses. If you do not see this filter, contact Delinea support. The supported risk level are: Non Detected — No abnormal activities are detected. Low — Some aspects of the requested identity activity are abnormal. Remediation action or simple warning notification can be raised depending on the policy setup. Medium — Many aspects of the requested identity activity are abnormal. Remediation action or simple warning notification can be raised depending on the policy setup. High — Strong indicators that the requested identity activity is anomaly and the user's identity has been compromised. Immediate remediation action, such as MFA, should be enforced. Unknown — Not enough user behavior activities (frequency of system use by the user and length of time user has been in the system) have been collected. For the Day/Date/Time related conditions, you can choose between the user’s local time and Universal Time Coordinated (UTC) time. -
Click the Add button associated with the filter and condition.
-
Select the authentication profile you want applied if all filters/conditions are met in the Authentication Profile drop-down.
The authentication profile defines which authentication methods to use. If you have not created the necessary authentication profile, select the Add New Profile option in the list (it's at the bottom of the list).
-
Click OK to close the Authentication Rules dialog box.
-
If desired, continue adding authentication rules. You can drag the rules to change the order of priority. The highest priority rule is at the top of the list.
-
Select a default profile to be applied if a user does not match any of the configured conditions in the Default Profile (used if no conditions matched) drop-down.
If you have no authentication rules configured and you select Not Allowed in the Default Profile dropdown, users will not be able to log in to the service.
-
If this policy setting is for Linux, UNIX, and Windows Servers, you have the option to configure how the pass-through duration applies. The pass-through duration is how long before the user needs to re-authenticate, and you define the pass-through duration in the authentication profile (for example, the default is 30 minutes). Select one of the following options:
- Never (default): Always prompt for MFA and ignore the pass-through setting.
- If Same Source and Target: Apply the pass-through duration if the user is logging in from the same system and where they're logging in to is the same system as compared to the initial login.
- If Same Source: Apply the pass-through duration if the user is logging in from the same system as compared to the initial login.
- If Same Target: Apply the pass-through duration if the user is logging in to is the same system as compared to the initial login.
-
If desired, you can add multiple policy settings to the same policy set.
-
Click Save.
Assigning Privilege Elevation (Re-authentication) Profile
Finally, you must assign privilege elevation profiles.
-
For Elevated Privileges Profile, click Privilege Elevation Policies>Privilege Elevation, select Yes for Enable authentication policy controls, and Add Rule> Add Filter, click Authentication Profiles and display the list of existing profiles and select a profile to use or click Add New Profile.
You can use the same profile for server access, and to re-authenticate for roles and rights that require multi-factor authentication. However, if you want to specify different authentication challenges from which a user can select when executing UNIX commands or accessing Windows applications, select Add New Profile.
As with the Login Authentication Profile, you can select multiple types of authentication to present for the first and second challenges. However, only the authentication challenges that are applicable for a user can be presented when the user attempts to access privileged Windows rights or execute UNIX commands with elevated privileges (dzdo) or in a restricted shell (dzsh).
-
Click Save.