Installing and Removing the Agent and Leaving a Domain
This section shows other methods of installing the agent besides the standard method using the package installer (DMG file); see Installing the Delinea DirectControl Agent for Mac. It also shows how to remove the agent and how to join and leave a domain.
The following topics are covered:
Installing Using the install.sh Script
Installing Silently on a Remote Computer
Uninstall from the Delinea System Preferences Pane
Leaving an Active Directory Domain
Installing Using the install.sh Script
This section explains how to install using the install.sh script. This method is recommended for experienced UNIX administrators who are familiar with UNIX command-line installations. Otherwise, you should install by using the graphical user interface, which is described in Installing the Delinea DirectControl Agent for Mac.
To install using the install.sh command-line program:
Before launching the installer, be certain that Apple Directory Utility is closed. If it is open while running the installer, it causes the Delinea Directory Access plug-in to show the incorrect status, that is, it shows that the plug-in is disabled when in fact it is enabled.
-
Log on with a valid user account.
You are not required to log on as the
rootuser on, but you must know the password for the Administrator account to complete the installation. -
Mount the CD-ROM device using the appropriate command for the local computer’s operating environment, if it is not automatically mounted.
-
Change to the appropriate directory on the CD or on the network where the DirectControl agent package is located. For example, change to the
Agent_Macdirectory. -
Run the
install.shscript to start the installation of the Delinea software on the local computer’s operating environment. For example:sudo ./install.shBefore beginning the installation, the
install.shscript runs theADCheckutility, which performs a set of operating system, network, and Active Directory checks to verify that the Mac computer meets the system requirements necessary to install the Delinea DirectControl Agent for Mac and join an Active Directory domain. -
Review the results of the checks performed. If the target computer, DNS environment, and Active Directory configuration pass all checks with no warnings or errors, you should be able to perform a successful installation and join. If you receive errors or warnings, correct them before proceeding with the installation.
-
Follow the prompts displayed to select the services you want to install and the tasks you want to perform. For example, you can choose whether you want to join a domain or restart the local computer automatically at the conclusion of the installation.
When installation is complete, see Understanding the Directory Structure below for a description of the directories and files installed for Delinea.
Installing Silently on a Remote Computer
You can install the agent silently on a remote Mac computer in either of these ways:
-
By using sudo commands from the command line. If you use this method, no user interaction on the target Mac computer is required. See the section below, Installing Remotely on a Mac Computer Using sudo Commands.
-
By using Apple Remote Desktop. This method requires that you have Apple Remote Desktop 3 for remote software distribution. See the section below, Installing Remotely on a Mac Computer Using Apple Remote Desktop.
If you use this method to install version 5.1.0 of the agent, the Delinea Join Assistant launches on the target Mac computer after the installation completes, and a user must interact with the Delinea Join Assistant to complete the join process. This limitation exists only in version 5.1.0 of the agent. Earlier versions of the agent (that is, 5.0.x and lower) and later versions (5.1.1 and above) do not have this limitation, and can be installed using Apple Remote Desktop without any user interaction on the target Mac computer.
Installing Remotely on a Mac Computer Using Sudo Commands
Perform the following steps to use sudo commands to install the agent remotely on a target Mac computer without requiring any user interaction on the target Mac computer.
To install the agent remotely using sudo commands:
-
Ensure that you have administrator account credentials on the target Mac computer, and that SSH is installed on the target Mac computer.
-
On the computer where the Delinea packages were downloaded (that is, the source computer), use an appropriate file transfer method to push the
CentrifyDC-x.x.x.pkgfile to the target Mac computer.For example, perform these steps to transfer files from a PC source computer to the target Mac computer:
- On the source computer, ensure that file sharing is enabled, and that the folder containing the Delinea packages is a shared folder.
- On the target Mac computer:
- Open a new window in the Finder.
- In the sidebar under Shared, click All.
- Select the source computer.
- Click Connect As, type the user name and password for the source computer, and click Connect.
- The folder that you shared on the source computer appears in the Finder on the target Mac computer. Locate the
CentrifyDC-x.x.x.pkgfile on the source computer and drag it to the location of your choice on the target Mac computer.
-
On the source computer, use a program such as Putty to connect remotely to the target Mac computer through SSH. Log in to the target Mac computer using an account that has local administration privileges, such as the Local Admin account.
-
On the target Mac computer, navigate to the directory where the
.pkgfile was transferred and execute the following command:sudo /usr/sbin/installer –pkg CentrifyDC-x.x.x.pkg –target /When you execute this command, the agent is installed silently on the target Mac computer.
- If an agent was already installed on the target Mac computer and this was an update of the existing agent, the target Mac computer was already joined to the domain, and you do not need to perform any additional steps.
- If this was the first installation of the agent on the target Mac computer, you must enable licensed features and join the target Mac computer to a domain as described in Step 5 and Step 6.
-
Execute the following command on the target Mac computer to enable licensed features:
sudo adlicense -l -
When you join the target Mac computer to a domain, you can choose to join the auto zone or a specified hierarchical zone.
-
Execute the following command on the target Mac computer to join the target Mac computer to a domain and the Auto Zone:
sudo /usr/local/sbin/adjoin --user Domain_Admin --container "domain.com/Path/To/OU" --name computer_name --workstation domain_name.com -
Alternatively, execute the following command on the target Mac computer to join the target Mac computer to a domain and a specified hierarchical zone:
sudo /usr/local/sbin/adjoin --user Domain_Admin --container "domain.com/Path/To/OU" --name computer_name --zone zone_namedomain_name.com
-
Installing Remotely on a Mac Computer Using Apple Remote Desktop
Perform the following steps to install the agent remotely on a target Mac computer without requiring any user interaction on the target Mac computer.
If you use this method to install version 5.1.0 of the agent, the Delinea Join Assistant launches on the target Mac computer after the installation completes, and a user must interact with the Delinea Join Assistant to complete the join process. For all other versions of the agent, no user interaction on the target Mac computer is required.
To remotely install the DirectControl agent and join a computer to the domain using Apple Remote Desktop 3:
-
Verify that you have an Apple Remote Desktop 3 Admin station and one or more Apple Remote Desktop 3 Clients.
-
Verify that all of the Apple Remote Desktop 3 Client computers where you want to install the DirectControl agent are set to Allow Remote Desktop using the Service pane in the Sharing system preference. For example:
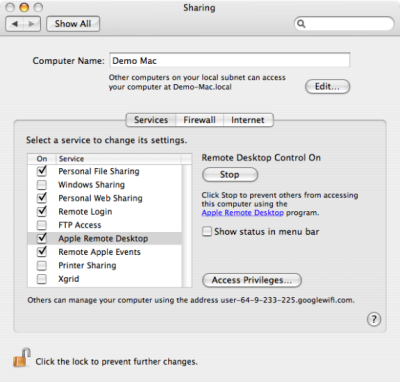
-
Copy the DirectControl agent package, for example
centrifydc-release-macversion-i386.dmg, to the Apple Remote Desktop 3 Admin computer and verify that you can access the disk image. -
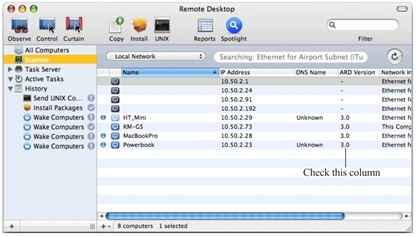
Open Remote Desktop on the Admin Computer, then click Scanner and verify that the Mac computers on which you plan to install Delinea are listed and that ARD Version column displays 3.0 (or later). For example:
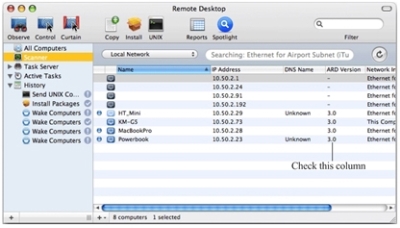
-
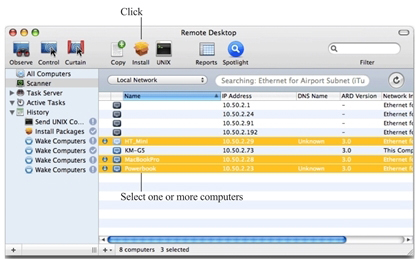
Select one or more computers from the list, then click Install. For example:
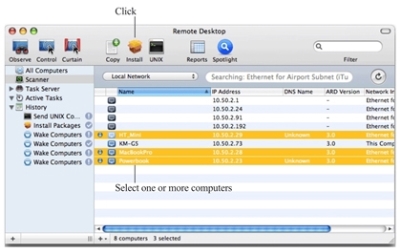
-
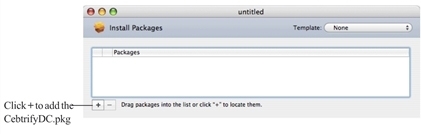
In the Install Packages window, click + to locate the
CentrifyDC.pkgin the DirectControl agent disk image. For example:
-
In the DirectControl agent disk image, select the
CentrifyDC.pkgfile and click Open to add it to the Install Packages list. For example: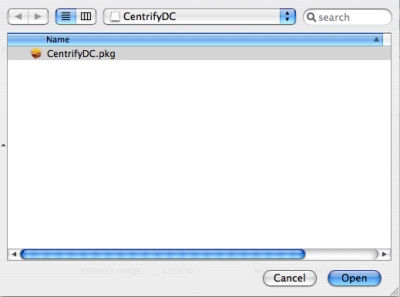
-
In the Install Packages window, click Install to install the listed packages, for example:


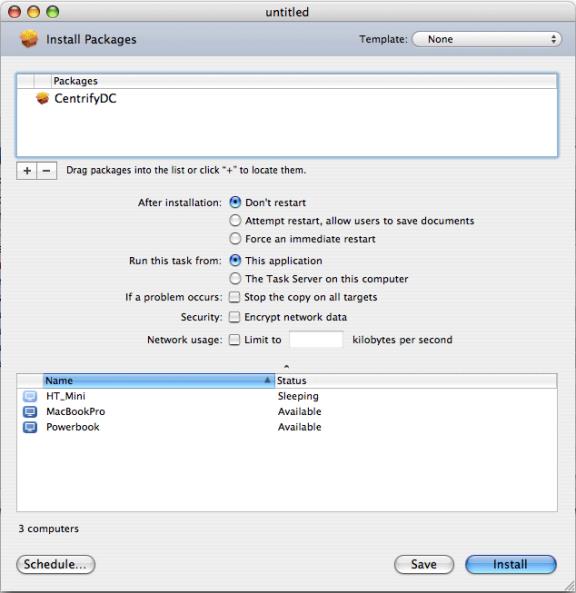
In most cases, you can use the default settings to install the Delinea DirectControl Agent for Mac. If you want to schedule the installation for another time rather than completing the installation now, click Schedule. For more information about the Apple Remote Desktop installation parameters, see Chapter 8 “Administering Client Computers,” in the Apple Remote Desktop Manual.
If you click Install the Remote Desktop displays a progress bar and task status for each of the computers selected for the installation.
Understanding the Directory Structure
When you complete the installation, the local computer will be updated with the following directories and files:
| This directory | |
|---|---|
| /etc/centrifydc | The Delinea DirectControl Agent for Mac configuration file and the Kerberos configuration file. |
| /usr/local/share/centrifydc | Kerberos-related files and service library files used by the Delinea DirectControl Agent for Mac to enable group policy and authentication and authorization services. |
| /usr/local/sbin /usr/bin | Command line programs to perform Active Directory tasks, such as join the domain and change a user password. |
| /var/centrifydc | No files until you join the domain. After you join the domain, several files are created in this directory to record information about the Active Directory domain the computer is joined to, the Active Directory site the computer is part of, and other details. |
| /System/Library/Frameworks/ DirectoryService.framework/ Resources/Plugins | The Delinea Directory Service Plugin, CentrifyDC.dsplug, that enables you to join or leave the domain using the graphical user interface. |
Uninstall from the Delinea System Preferences Pane
The Delinea System Preferences pane is created when you install the Delinea DirectControl Agent for Mac. You can use this pane to uninstall the Delinea DirectControl Agent for Mac. Uninstalling the agent from the Delinea System Preferences pane also leaves the AD domain.
To uninstall the Delinea DirectControl Agent for Mac from the Delinea System Preferences pane
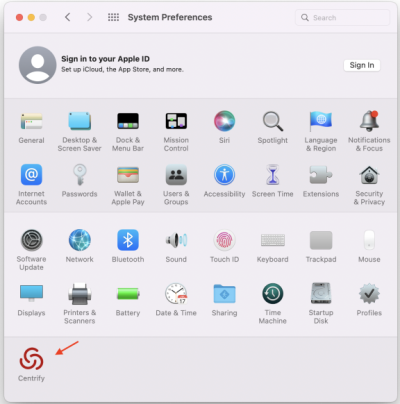
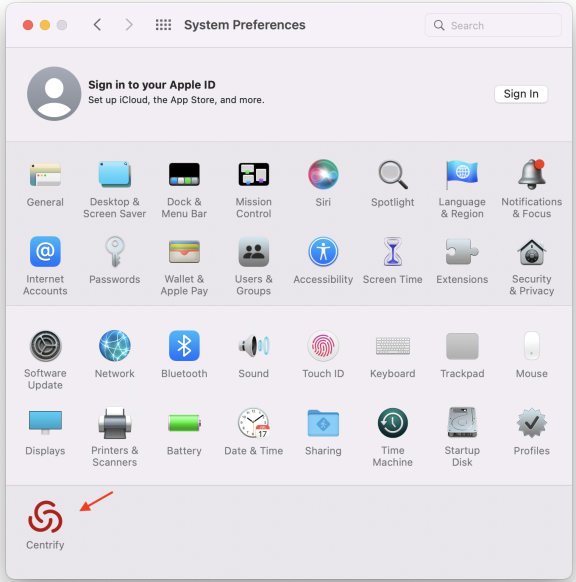
-
Open System Preferences, then click Delinea.
-
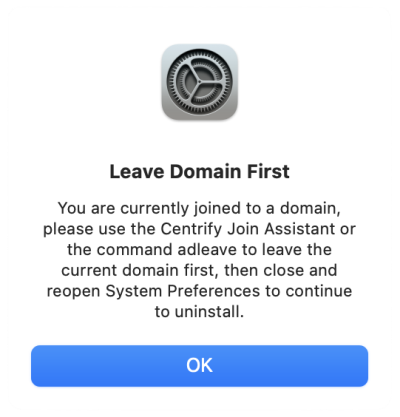
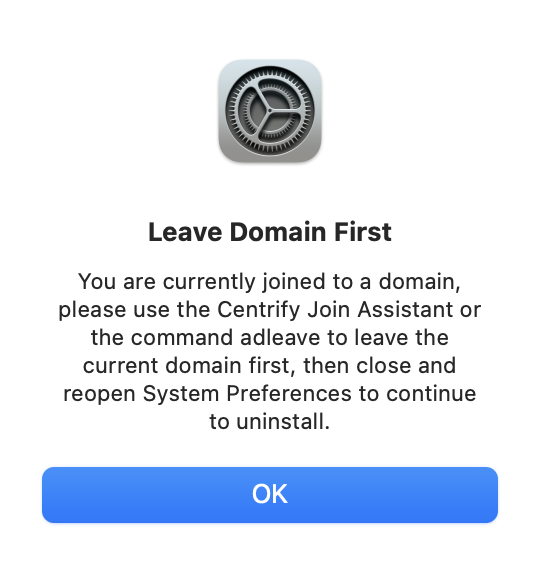
Click Uninstall, then click OK at the confirmation prompt.
If you are currently joined to a domain, it will prompt the Leave Domain First dialog. For more information, see Leaving an Active Directory Domain below.
-
Enter administrator credentials and click OK.
The uninstall process starts.
-
Click OK to quit when you see the window indicating that the Delinea DirectControl Agent for Mac was uninstalled.
Run the uninstall.sh Script
The uninstall.sh script is installed by default in the /usr/local/share/centrifydc/bin directory on each Delinea-managed system.
To remove the Delinea DirectControl Agent for Mac by running the uninstall.sh script
-
Open a Terminal window on the computer where the DirectControl agent is installed. For example, select Applications > Utilities > Terminal.
-
Switch to the root user or a user with superuser permissions. For example:
su -Password:
root_password -
Run the
uninstall.shscript. For example:/bin/sh /usr/local/share/centrifydc/bin/uninstall.shThe
uninstall.shscript will detect whether the Delinea DirectControl Agent for Mac is currently installed on the local computer and whether the computer is currently joined to a domain. If the computer is not currently joined to a domain, the script will begin removing Delinea files from the local computer.
Leaving an Active Directory Domain
To start the Delinea program for joining or leaving a domain:
-
Click Applications > Utilities > Delinea, then double-click Delinea Join Assistant to open it.
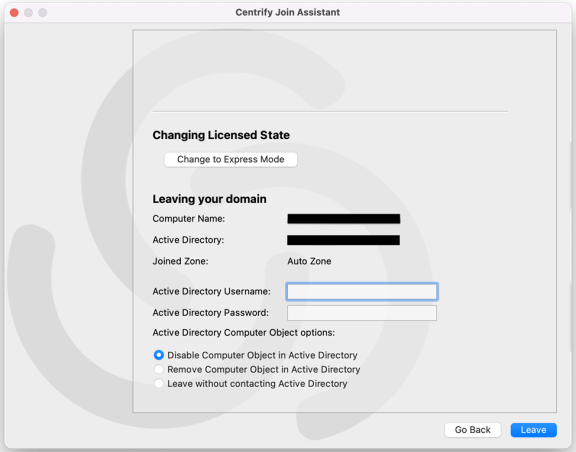
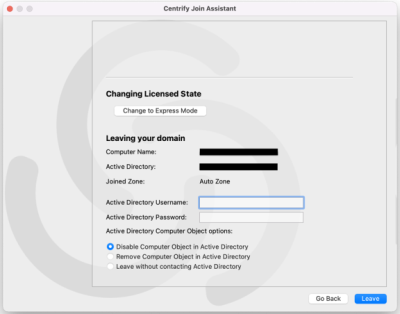
Click Continue on the Welcome page and the join assistant displays information about the domain to which the computer is connected:
-
Select whether to disable the computer object in Active Directory, remove the computer object from Active Directory, or leave without contacting Active Directory.
- Disable: Disables the computer object in Active Directory.
- Remove: Removes the computer object from Active Directory.
- Leave without contacting Active Directory: This option forces the local computer's settings to their pre-join conditions without contacting Active Directory. The Computer Object will not be removed or disabled in Active Directory.
Use this option if the Active Directory computer account has been modified or deleted so that the host computer can no longer work with it.
-
Click Leave to leave the domain.