Hardening RDS Hosts for Session Connector
Overview
Delinea Secret Server offers a variety of session launching methods, including the use of Microsoft Remote Desktop Services (RDS) in conjunction with Secret Server Session Connector. This setup allows users to initiate privileged sessions via an RDS host without needing additional installations on client devices. All that's required is a Remote Desktop Protocol (RDP) client capable of opening RDP files furnished by Secret Server. Given the integral role of RDS hosts in this configuration, it is essential to harden them.
Prerequisites
Complete and validate the installation, setup, and functionality of Secret Server Session Connector before proceeding with the hardening process. If the RDS host is already in production, ensure a full backup of the RDS host and its configurations are available.
The Issue
RDS hosts offer access to a published application. Even though users will connect with unique, non-privileged, and randomly generated credentials on the RDS host, they can still interact extensively with the OS. For example, using the <CTR>-<ALT>-<END> command in the published application accesses the task manager on the RDS host, letting the user initiate additional programs and view the host's local file system. This could potentially allow the user to start additional unauthorized applications.
The Solution
Limit user access, reduce the attack surface, and ensure secure session handling through a combination of OS-level settings, GPOs, and application configurations.
Operating System Hardening
- Patching: Regularly update the OS to patch known vulnerabilities.
- Unnecessary Services: Disable services and applications that are not required for the server's role.
- Antivirus/Antimalware: Install and regularly update antivirus software.
- Limit User Access: Only grant least-privilege access rights.
Network Hardening
- Firewalls: Ensure a firewall is in place to filter unwanted inbound and outbound traffic. Only allow the necessary ports (for example, 3389 for RDP).
- Virtual Private Network (VPN): Avoid directly exposing the RDS server to the internet. Employ a VPN to facilitate secure remote connectivity.
- Strategic Network Segmentation: Position the RDS server within a distinct VLAN, ensuring optimal traffic isolation and mitigating risks associated with broader network vulnerabilities.
- Intrusion Detection: Deploy an Intrusion Detection System (IDS) to continuously oversee and promptly address any unusual or potentially harmful network behavior.
Local User Hardening via PowerShell Script
For these local user adjustments, you can use the provided PowerShell script. The following settings are deployed into the default user profile via the PowerShell script:
- Hide Local Drives: Prevent users from viewing the RDS host's local drives.
- Lock CTRL-ALT-DEL Screen: Restrict users from locking the system, altering passwords, or launching the task manager.
- Remove Shutdown Button: Although standard users lack the permission to shut down the RDS host, it is best to hide the shutdown buttons to avoid confusion.
- Disable Screensaver and Lock Screen: Users do not know the password for the randomly generated user. Configure the system to prevent screensaver activation or session lockouts.
- Lock Internet Explorer Settings: Even if Internet Explorer is not in active use, configure its settings to enhance security.
PowerShell Script
Overview
The script performs the following actions:
-
Sets the execution policy to RemoteSigned.
-
Creates a backup of the default user's
ntuser.datfile. -
Loads the default user profile registry hive for editing.
-
Hides local drives of the RDS Server.
-
Disables local drive viewing.
-
Adjusts <CTRL>-<ALT>-<DEL> options.
-
Disables Task Manager, Change Password, and Lock.
-
Disables Internet Explorer context menu.
-
Disables Screensaver and Lock Screen.
-
Disables Developer mode on Internet Explorer.
-
Removes shutdown buttons.
-
Blocks access to Control Panel and PC Settings.
-
Disables Windows Store.
-
Checks and verifies the changes made to the registry settings.
-
Unloads the default user profile registry hive after edit.
Download
Access the script via the box below.
Deployment
To ensure smooth execution of this PowerShell script:
-
Run the script before applying hardening group policies to the RDS host.
-
Right click and select Run as administrator.
By default, the script will only hides C and D drives. If you wish to hide additional drives, please change the prospective registry values in the following sections prior to running the script:
# Hide Drive Setting
Current value is 12 (C + D)
# No View Drive Setting
Current value is 12 (C + D)
The script is designed to provide visual feedback on the status of each setting:
-
Green: Denotes settings that are correctly configured and aligned with security and operational standards.
-
Red: Denotes settings that are not found within the system registry.
-
Yellow: Denotes settings that are present but have a value mismatch, meaning the current configuration does not align with the expected standard.
-
Copy
<#
.SYNOPSIS
This script is designed to harden the default user profile on a system.
.DESCRIPTION
This script performs the following actions:
- Sets the execution policy to RemoteSigned
- Creates a backup of the default user's ntuser.dat file.
- Loads the default user profile registry hive for editing.
- Hides local drives of the RDS Server.
- Disables viewing of local drives.
- Adjusts CTRL-ALT-DEL options.
- Disables Task Manager, Change Password, and Lock.
- Disables Internet Explorer context menu.
- Disables Screensaver and Lock Screen.
- Disables Developer mode on Internet Explorer.
- Removes Shutdown Buttons.
- Blocks access to Control Panel and PC Settings.
- Disables Windows Store.
- Checks and verifies the changes made to the registry settings.
- Unloads the default user profile registry hive after editing.
- Reverts the execution policy back to its original state.
Note: This script needs to be run as an administrator.
#>
# User Confirmation
$confirmation = Read-Host "This script will make changes to system settings. Do you want to continue? (Y/N)"
if ($confirmation -ne 'Y') {
    Write-Host "Script execution cancelled by user."
    exit
}
# Check if the script is run as administrator
if (-not ([Security.Principal.WindowsPrincipal][Security.Principal.WindowsIdentity]::GetCurrent()).IsInRole([Security.Principal.WindowsBuiltInRole] "Administrator")) {
    Write-Host "Please run this script as an administrator." -ForegroundColor Red
    exit
}
# Store the current execution policy
$originalPolicy = Get-ExecutionPolicy
Write-Host "Storing the current execution policy: $originalPolicy"
# Set execution policy to RemoteSigned
Set-ExecutionPolicy RemoteSigned -Force
Write-Host "Execution policy set to RemoteSigned"
# Create a backup of ntuser.dat to the current directory with a timestamp
$backupFileName = ".\ntuser.dat-backup-$(Get-Date -Format 'yyyy_MM_dd_HH_mm_ss')"
Copy-Item -Path 'C:\users\default\ntuser.dat' -Destination $backupFileName
Write-Host "Backup of ntuser.dat created: $backupFileName"
# Load the default user profile registry hive
$defaultProfileRegistry = 'C:\users\default\NTUSER.DAT'
$registryHive = 'HKEY_USERS\RDSProfile'
$null = reg load $registryHive $defaultProfileRegistry
Write-Host "Default user profile registry hive loaded."
$key = "Registry::$registryHive"
# Function to ensure a registry key exists
function Ensure-RegistryKey {
    param(
        [string]$Path
    )
    if (-not (Test-Path $Path)) {
        New-Item -Path $Path -Force | Out-Null
        Write-Host "Registry key created: $Path"
    }
}
# Function to check a registry key value
function Check-RegistrySetting {
    param (
        [string]$Path,
        [string]$Name,
        [string]$Type,
        $ExpectedValue
    )
    $value = Get-ItemPropertyValue -Path $Path -Name $Name -ErrorAction SilentlyContinue
    if ($null -eq $value) {
        Write-Host "Setting NOT FOUND: $Path\$Name" -ForegroundColor Red
        return
    }
    if ($Type -eq 'DWORD' -and $value -eq $ExpectedValue) {
        Write-Host "Setting OK: $Path\$Name = $value" -ForegroundColor Green
    }
    elseif ($Type -eq 'String' -and $value -eq $ExpectedValue) {
        Write-Host "Setting OK: $Path\$Name = $value" -ForegroundColor Green
    }
    else {
        Write-Host "Setting MISMATCH: $Path\$Name = $value (Expected: $ExpectedValue)" -ForegroundColor Yellow
    }
}
# Hide local drives (Calculate required value using:)
$hideDriveKey = "$key\Software\Microsoft\Windows\CurrentVersion\Policies\Explorer"
Ensure-RegistryKey -Path $hideDriveKey
New-ItemProperty -Path $hideDriveKey -Name 'NoDrives' -PropertyType DWORD -Value 12 -Force
# No view on local drives (Calculate required value using:)
$viewDriveKey = "$key\Software\Microsoft\Windows\CurrentVersion\Policies\Explorer"
Ensure-RegistryKey -Path $viewDriveKey
New-ItemProperty -Path $viewDriveKey -Name 'NoViewOnDrive' -PropertyType DWORD -Value 12 -Force
# Adjust CTRL-ALT-DEL options
$ctrlAltDelKey = "$key\Software\Microsoft\Windows\CurrentVersion\Policies\System"
Ensure-RegistryKey -Path $ctrlAltDelKey
New-ItemProperty -Path $ctrlAltDelKey -Name 'DisableChangePassword' -PropertyType DWORD -Value 1 -Force
New-ItemProperty -Path $ctrlAltDelKey -Name 'DisableLockWorkstation' -PropertyType DWORD -Value 1 -Force
New-ItemProperty -Path $ctrlAltDelKey -Name 'DisableTaskMgr' -PropertyType DWORD -Value 1 -Force
# Remove Shutdown Buttons
$shutdownKey = "$key\Software\Microsoft\Windows\CurrentVersion\Policies\Explorer"
Ensure-RegistryKey -Path $shutdownKey
New-ItemProperty -Path $shutdownKey -Name 'NoClose' -PropertyType DWORD -Value 1 -Force
# Disable Screensaver / Lockscreen
$screensaverKey = "$key\Software\Policies\Microsoft\Windows\Control Panel\Desktop"
Ensure-RegistryKey -Path $screensaverKey
New-ItemProperty -Path $screensaverKey -Name 'ScreenSaveActive' -PropertyType String -Value '0' -Force
New-ItemProperty -Path $screensaverKey -Name 'ScreenSaverIsSecure' -PropertyType String -Value '0' -Force
# Disable Internet Explorer Context Menu
$ieContextKey = "$key\Software\Policies\Microsoft\Internet Explorer\Restrictions"
Ensure-RegistryKey -Path $ieContextKey
New-ItemProperty -Path $ieContextKey -Name 'NoBrowserContextMenu' -PropertyType DWORD -Value 1 -Force
# Disable Internet Explorer Developer Tools
$ieDevToolsKey = "$key\Software\Policies\Microsoft\Internet Explorer\IEDevTools"
Ensure-RegistryKey -Path $ieDevToolsKey
New-ItemProperty -Path $ieDevToolsKey -Name 'Disabled' -PropertyType DWORD -Value 1 -Force
# Disable Internet Explorer First Run
$ieFirstRunKey = "$key\Software\Policies\Microsoft\Internet Explorer\Main"
Ensure-RegistryKey -Path $ieFirstRunKey
New-ItemProperty -Path $ieFirstRunKey -Name 'DisableFirstRunCustomize' -PropertyType DWORD -Value 2 -Force
# Disable Internet Explorer Settings Tabs
$iePanelKey = "$key\Software\Policies\Microsoft\Internet Explorer\Control Panel"
Ensure-RegistryKey -Path $iePanelKey
New-ItemProperty -Path $iePanelKey -Name 'SecurityTab' -PropertyType DWORD -Value 1 -Force
# Block access to Control Panel and PC Settings
$controlPanelKey = "$key\Software\Microsoft\Windows\CurrentVersion\Policies\Explorer"
Ensure-RegistryKey -Path $controlPanelKey
New-ItemProperty -Path $controlPanelKey -Name 'NoControlPanel' -PropertyType DWORD -Value 1 -Force
# Disable Windows Store
$storeKey = "$key\Software\Policies\Microsoft\WindowsStore"
Ensure-RegistryKey -Path $storeKey
New-ItemProperty -Path $storeKey -Name 'RemoveWindowsStore' -PropertyType DWORD -Value 1 -Force
# Check local drives are hidden
Check-RegistrySetting -Path "$key\Software\Microsoft\Windows\CurrentVersion\Policies\Explorer" -Name 'NoDrives' -Type DWORD -ExpectedValue 12
# Check viewing of local drives is disabled
Check-RegistrySetting -Path "$key\Software\Microsoft\Windows\CurrentVersion\Policies\Explorer" -Name 'NoViewOnDrive' -Type DWORD -ExpectedValue 12
# Check CTRL-ALT-DEL options
Check-RegistrySetting -Path "$key\Software\Microsoft\Windows\CurrentVersion\Policies\System" -Name 'DisableChangePassword' -Type DWORD -ExpectedValue 1
Check-RegistrySetting -Path "$key\Software\Microsoft\Windows\CurrentVersion\Policies\System" -Name 'DisableLockWorkstation' -Type DWORD -ExpectedValue 1
Check-RegistrySetting -Path "$key\Software\Microsoft\Windows\CurrentVersion\Policies\System" -Name 'DisableTaskMgr' -Type DWORD -ExpectedValue 1
# Check shutdown buttons are removed
Check-RegistrySetting -Path "$key\Software\Microsoft\Windows\CurrentVersion\Policies\Explorer" -Name 'NoClose' -Type DWORD -ExpectedValue 1
# Check screensaver and lock screen are disabled
Check-RegistrySetting -Path "$key\Software\Policies\Microsoft\Windows\Control Panel\Desktop" -Name 'ScreenSaveActive' -Type String -ExpectedValue '0'
Check-RegistrySetting -Path "$key\Software\Policies\Microsoft\Windows\Control Panel\Desktop" -Name 'ScreenSaverIsSecure' -Type String -ExpectedValue '0'
# Check Internet Explorer context menu is disabled
Check-RegistrySetting -Path "$key\Software\Policies\Microsoft\Internet Explorer\Restrictions" -Name 'NoBrowserContextMenu' -Type DWORD -ExpectedValue 1
# Check Developer mode on Internet Explorer is disabled
Check-RegistrySetting -Path "$key\Software\Policies\Microsoft\Internet Explorer\IEDevTools" -Name 'Disabled' -Type DWORD -ExpectedValue 1
# Check Control Panel and PC Settings access is blocked
Check-RegistrySetting -Path "$key\Software\Microsoft\Windows\CurrentVersion\Policies\Explorer" -Name 'NoControlPanel' -Type DWORD -ExpectedValue 1
# Check Windows Store is disabled
Check-RegistrySetting -Path "$key\Software\Policies\Microsoft\WindowsStore" -Name 'RemoveWindowsStore' -Type DWORD -ExpectedValue 1
# Unload the registry hive
$null = reg unload $registryHive
Write-Host "Registry hive unloaded."
# Restore the original execution policy
Set-ExecutionPolicy $originalPolicy -Force
Write-Host "Execution policy restored to $originalPolicy."
Write-Host "Script execution completed. Please review the settings above. For any discrepancies, consult the log file and consider manual verification." -ForegroundColor Green
Restoring from Backup
If the hardening script causes issues and you need to restore the NTUSER.DAT backup:
To restore the backup:
1. Boot into Safe Mode:
-
Restart the server and press F8 during startup (or use `
shutdown /r /o /f /t 00` from an elevated command prompt to access advanced startup options). -
Select Troubleshoot > Advanced Options > Startup Settings > Restart.
-
Press 4 or F4 to enable Safe Mode.
2. Locate the backup file:
The backup file is created in the same directory where you ran the script with a timestamped filename: `ntuser.dat-backup-YYYY_MM_DD_HH_mm_ss`
3. Restore the backup:
-
Open an elevated command prompt in Safe Mode.
-
Navigate to the directory containing the backup file.
-
Run the following commands:
cd C:\users\defaulttakeown /f ntuser.daticacls ntuser.dat /grant administrators:Fcopy /Y "path\to\ntuser.dat-backup-YYYY_MM_DD_HH_mm_ss" ntuser.datReplace path\to\ntuser.dat-backup-YYYY_MM_DD_HH_mm_ss with the actual path and filename of your backup.
4. Reboot normally:
-
Restart the server to exit Safe Mode: `
shutdown /r /t 0`
Alternative method using Recovery Environment:
If you cannot access Safe Mode, you can restore from Windows Recovery Environment (WinRE) by booting from Windows installation media and accessing the command prompt from the repair options.
Machine Hardening via Group Policy Objects (GPO)
The CIS (Center for Internet Security) Benchmark is an invaluable tool, offering a solid foundation for system configurations. Serving a wide range of entities from commercial sectors to government agencies, it provides detailed guidelines, ensuring robust system hardening. Similarly, the STIG (Security Technical Implementation Guide) framework is revered for its comprehensive approach, especially tailored to fortify systems entrusted with national security and classified data.
Integrating Our Custom Hardening GPO
Overview
Our custom hardening GPO can be easily integrated into your Active Directory environment. While the policy comes with a default configuration based on our insights and some industry best practices, you can modify it to better fit your organization's specific requirements.
Adding the Custom GPO to Your AD Environment
Download
Download the Hardening RDS Hosts for Session Connector .
Deploying the GPO File
-
Extract the contents of the zip file to your desired location
-
Open the Group Policy Management Console (GPMC).
-
Create a new GPO.
-
Right click the new GPO and select Import Settings. An Import Settings Wizard appears.
-
Click the Next > button to skip backing up the GPO.
-
Populate the Backup folder text box on the Backup location page with the location you unzipped the file to, and click the Next > button.
-
On the Source GPO page click the GPO you just added in the Backed up GPOs list, and click the Next > button.
-
On the Migrating References page, click to select the Copying them identically from the source selection button, and click the Next > button.
-
On the Completing the Import Settings Wizard page, click the Finish button.
Applying Custom GPOs to a Chrome Browser
This section describes how to configure Google Chrome ADM/ADMX templates to use custom GPOs:
-
Download the Google Chrome Enterprise Browser. This includes the ADM/ADMX templates and Google updater ADMX template update.
-
ADMX Deployment:
For a central store deployment, place the
.admxfiles here:\\<domain>\SYSVOL\<domain>\Policies\PolicyDefinitionsWithout a central store, place the
.admxfiles here:%systemroot%\PolicyDefinitions -
ADML Deployment:
For a central store deployment, place the
.admlfiles here (adjusting the language tag):\\<domain>\SYSVOL\<domain>\Policies\PolicyDefinitions\en-USWithout a central store, place the
.admlfiles here (adjusting the language tag):%systemroot%\PolicyDefinitions\en-US
As a best practice, always pilot any new GPO within a controlled setting prior to a full-scale deployment on your production systems.
STIG Compliance with Session Connector Functionality
Overview
While the Security Technical Implementation Guide (STIG) provides a robust framework for system security, some functional requirements, such as those of the session connector for RDP sessions, may necessitate deviations from STIG policies that might marginally lower your STIG compliance score.
The following policy configurations optimize session connector functionality on your RDS host. These recommendations offer a balance between operational necessities and security best practices. If you are employing the session connector for RDP, ensure that these policies are applied across your target systems as well.
User Rights Assignments
Configuration Path
Computer Configuration > Policies > Windows Settings > Security Settings > Local Policies > User Rights Assignments
Policies
Allow local login:
-
Users
-
Administrators
Allow login through terminal services:
-
Remote Desktop Users
-
Administrators
Deny login through terminal services:
-
Guests
-
<NETBIOS>\Domain Admins
-
<NETBIOS>\Enterprise Admins
Remote Desktop Session Host Security Configurations
Configuration Path
Computer Configuration > Administrative Templates > Windows Components > Remote Desktop Services > Remote Desktop Session Host > Security
Policies
Always prompt for password upon connection: disabled
Application Lockdown
- An application white listing strategy is instrumental in elevating the security posture of an organization.
- By permitting only approved applications to execute, the risk of malicious software execution and potential security breaches is significantly reduced.
- Consider tools such as Microsoft AppLocker for application control solutions.
Application Hardening via AppLocker
You can easily integrate our custom AppLocker GPOs into your Active Directory environment. While these policies come bundled with two different AppLocker configuration files based on our insights, you can choose the one that best aligns with your objectives and modify it as needed.
Session Connector Considerations
For the seamless operation of Session Connector launchers, the following executables must be explicitly allowed to run within your policies:
- rdpwin.exe
- rdpwin.bootstrapper.exe
- rdpwin.rdpclient.exe
- rdpwin.watchdog.exe
These executables are crucial for the proper functioning of session connector launchers as they perform various roles from launching the applications and managing RDP client sessions, to monitoring the health of the launcher. Ensuring these are allowed to run is vital for maintaining operational integrity and ensuring users can initiate and maintain their sessions without interruption.
AppLocker Policies
Both policies target the “Remote Desktop Users” group on the RDS host and will apply deny rules to prevent these users from accessing software. When launching an application, the Session Connector will grant logon rights by creating an ephemeral local user and adding this user to the “Remote Desktop Users” group.
During the installation of Remote Desktop Services (RDS), if you elected to associate the session collection with the default “Domain Users” group, the restrictions of these policies will apply to all domain users. RDS nests the “Domain Users” security group within the “Remote Desktop Users” group.
StrictAppLockerPolicy.xml
This policy restricts members of the “Remote Desktop Users” group from launching all applications, scripts, windows installers, files, and packaged apps, regardless of their path, unless explicitly defined in the exceptions.
Here is a list of the exceptions, which are primarily required for basic session connector functionality:
- conhost.exe: Handles console windows, providing the user interface for console applications.
- csrss.exe: Critical for system functionality, handling console windows, and the shutdown process.
- dllhost.exe: Hosts DLLs on behalf of other applications, potentially for COM components or other DLLs.
- dwm.exe: Manages graphical effects in the user interface.
- explorer.exe: The main shell of Windows, providing the desktop environment, taskbar, and Start menu.
- lsass.exe: Handles authentication and password policies, managing user login.
- osk.exe: Provides an on-screen keyboard for accessibility.
- rdpclip.exe, rdpinit.exe: Allows for clipboard sharing between the local machine and the RDP session.
- rdpinit.exe: Initializes an RDP session.
- rdpsa.exe, rdpsaproxy.exe: System executables that support the proper functionality of Remote Desktop Services.
- rdpshell.exe: Provides a shell or user interface for the RDP session.
- runonce.exe: Runs commands or scripts when a user logs on to the system for the first time after a restart.
- screenmagnifier.exe: Accessibility feature for screen magnification.
- sethc.exe: Related to Sticky Keys, a part of accessibility features.
- sihost.exe: Shows various user interface elements, such as system information on the secure desktop.
- smss.exe: Initializes the user session during Windows startup.
- svchost.exe: Hosts various Windows services.
- taskhostw.exe: A generic host process for running DLL-based services.
- tsthemes.exe: Related to RDP theme and appearance settings.
- userinit.exe: Initializes user settings and launches the user shell after log on.
- wermgr.exe: Involved in error reporting and solutions.
- winlogon.exe: Handles the login and logout procedures.
- rdpwin.exe, rdpwin.bootstrapper.exe, rdpwin.rdpclient.exe, rdpwin.watchdog.exe: Delinea files required for session connector functionality.
DefaultAppLockerPolicy.xml
This is a less restrictive policy and only restricts members of the “Remote Desktop Users” group from launching the following applications within the Windows directory:
- at.exe: Schedules commands at a specific time.
- bcdedit.exe: Manages Boot Configuration Data.
- bitsadmin.exe: Creates download or upload jobs, facilitating unauthorized data transfer or malware delivery.
- cacls.exe: Changes file and directory Windows NTFS permissions, which could modify system security settings.
- certreq.exe: Performs various certification authority (CA) certificate functions.
- certutil.exe: Manages CA certificates.
- cipher.exe: Alters the encryption of directories and files on NTFS partitions.
- cmd.exe: Allows arbitrary command execution.
- cmstp.exe: Installs or removes Connection Manager service profiles, which can be misused for arbitrary code execution.
- compmgmtlauncher.exe: Launches the Computer Management console.
- control.exe: Accesses Control Panel items.
- cscript.exe/wscript.exe: Executes VBScript or JScript.
- csvde.exe: Imports and exports Active Directory data in a comma-separated format.
- dcomcnfg.exe: Manages DCOM settings. Unauthorized modifications can lead to unauthorized remote control or data access.
- dism.exe: Services Windows images and could be misused to alter them.
- diskpart.exe: Manages disk partitions.
- dnscmd.exe: Manages DNS servers from the command line, which can be misused to change DNS configurations.
- driverquery.exe: Lists installed device drivers, which can be used for system reconnaissance.
- dsdbutil.exe: A command-line tool that can be used to manage Active Directory databases.
- dsquery.exe: Searches for objects in the directory from the command line.
- eventcreate.exe: Creates custom events in specified event logs.
- eventvwr.exe: Views system logs, which can be exploited for "bait and switch" attacks.
- expand.exe: Expands compressed files, which can be misused for bypassing software restriction policies.
- extrac32.exe: Extracts .cab files from the command line, similar to expand.exe.
- findstr.exe: Searches for strings in files, which can be used for data reconnaissance.
- finger.exe: Displays information about remote users on older systems.
- forfiles.exe: Executes commands on a set of files.
- fsutil.exe: Manages FAT and NTFS file systems, which could tamper with file systems.
- ftp.exe: FTP client.
- getmac.exe: Displays MAC addresses of network adapters.
- gpresult.exe: Displays group policy information for remote users.
- infdefaultinstall.exe: Installs driver packages.
- klist.exe: Manages Kerberos tickets, misuse of which can lead to unauthorized access.
- lodctr.exe: Updates performance counter-related registry values, which can be misused.
- makecab.exe: Creates .cab files, potentially misused for file obfuscation.
- mavinject.exe: Injects DLLs, which can be misused for privilege escalation.
- mmc.exe: Microsoft Management Console, which hosts various management snap-ins.
- msconfig.exe: Modifies system startup items.
- mshta.exe: Executes HTML applications, which can be misused for unauthorized script or payload execution.
- msiexec.exe: Installs software packages.
- msinfo32.exe: Retrieves detailed system information.
- net.exe: Manages users, groups, and more.
- netsh.exe: Modifies network configurations.
- nltest.exe: Provides network diagnostics, which can be used for reconnaissance.
- odbcad32.exe: Manages database connections.
- openfiles.exe: Displays files opened by remote users, which can be used for reconnaissance.
- pathping.exe: A network diagnostic tool, which is useful for reconnaissance.
- perfmon.exe: Monitors system performance.
- powershell.exe: PowerShell, a powerful scripting environment.
- printbrmui.exe: Manages printer migrations.
- query.exe: Provides information on user sessions, processes, and more, which is useful for reconnaissance.
- quser.exe: Displays information about logged-on users, which can be used for reconnaissance.
- rasdial.exe: Manages network connections, which can be misused to establish unauthorized connections.
- reg.exe: Edits the registry from the command line.
- regedit.exe, regedt32.exe: Modifies the Windows registry.
- robocopy.exe: A file copy tool, which can be misused to transfer data.
- schtasks.exe: Manages scheduled tasks.
- sc.exe: Manages services.
- secedit.exe: Configures and analyzes system security by comparing it to a template.
- shutdown.exe: Shuts down or restarts the system.
- sdbinst.exe: Installs custom database files, which can be misused for unauthorized binary execution.
- sysprep.exe: Prepares systems for cloning, which can remove security settings.
- takeown.exe: Regains file access by taking ownership, which can be misused to modify system files.
- taskmgr.exe: Manages processes and views performance stats.
- telnet.exe: Telnet client.
- tzutil.exe: Time zone utility, which can be misused in specific contexts.
- vssadmin.exe: Manages volume shadow copies.
- wevtutil.exe: Manages event logs, which can be misused to clear them.
- werfault.exe: Windows Error Reporting tool, which has been misused for malicious intent in some scenarios.
- whoami.exe: Displays information about the current user.
- winrs.exe: Runs commands on remote computers.
- wmic.exe: Windows Management Instrumentation command line, which can be used for reconnaissance or administration.
- wsmprovhost.exe: Hosts Windows Remote Management, which can be misused in specific contexts.
- wusa.exe: Installs Windows updates, which can be misused to install malicious updates.
- xwizard.exe: Extensible Wizard Framework, which has been used in UAC bypass techniques.
Integrating Our Custom AppLocker Policies
These steps enhance security by restricting the execution of potentially harmful or unauthorized applications.
Download
Access the GPO and AppLocker policies via the Hardening RDS Hosts for Session Connector
Deployment
-
Extract contents of the zip file to your desired location.
-
Follow “Guidelines for Machine Hardening via GPO” for instructions on how to import a GPO.
-
Edit the new GPO and import the desired AppLocker policy:
-
Navigate to the following path in the GPO editor: Computer Configuration > Policies > Windows Settings > Security Settings > Application Control Policies > AppLocker.
-
Right click and select Import Policy
-
Select the desired policy.
-
Click the Open button. An Import Policy dialog box appears.
-
Click the Yes button. An AppLocker dialog box appears.
-
Click the OK button. The dialog box disappears.
-
Ensure the new rules appear in the GPO editor.
-
AppLocker Diagnostic Procedures
Running in Audit Only Mode
If you experience issues with applications executing, we recommend switching AppLocker’s operational mode from “Enforce rules” to “Audit only.” This adjustment enables a comprehensive audit while ensuring uninterrupted application functionality. To switch the mode:
-
Navigate to the following path in the AppLocker GPO: Computer Configuration > Policies > Windows Settings > Security Settings > Application Control Policies > AppLocker.
-
Right click and select Properties
-
Set the Executable rules dropdown list to Audit only.
Using AppLocker Audit Logs
Procedure
The AppLocker audit logs provide invaluable insights and are instrumental for troubleshooting:
-
Access Event Viewer: Press Windows Key + R, type
eventvwr.msc, and press <Enter>. -
Navigate to AppLocker Logs: Go to Applications and Services Logs > Microsoft > Windows > AppLocker.
-
Select Log Files: Click on the log categories such as EXE and DLL to view events.
-
Filter Audit Events: Use Filter Current Log on the right panel, and specify event levels or IDs to isolate audit results.
-
Analyze Event Details: Select events and review the General and Details tabs for information on the audited application and actions taken.
-
Adjust Policies: Analyze to pinpoint issues, and modify AppLocker policies as needed for resolution.
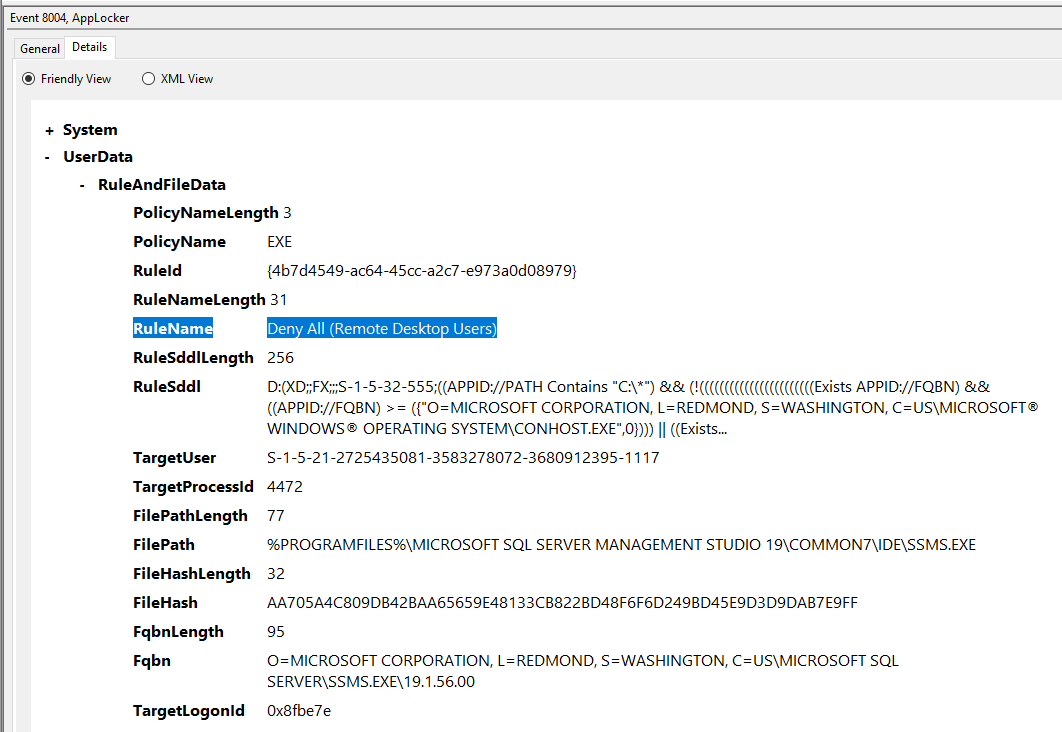
Example
SSMS.EXE will not run:
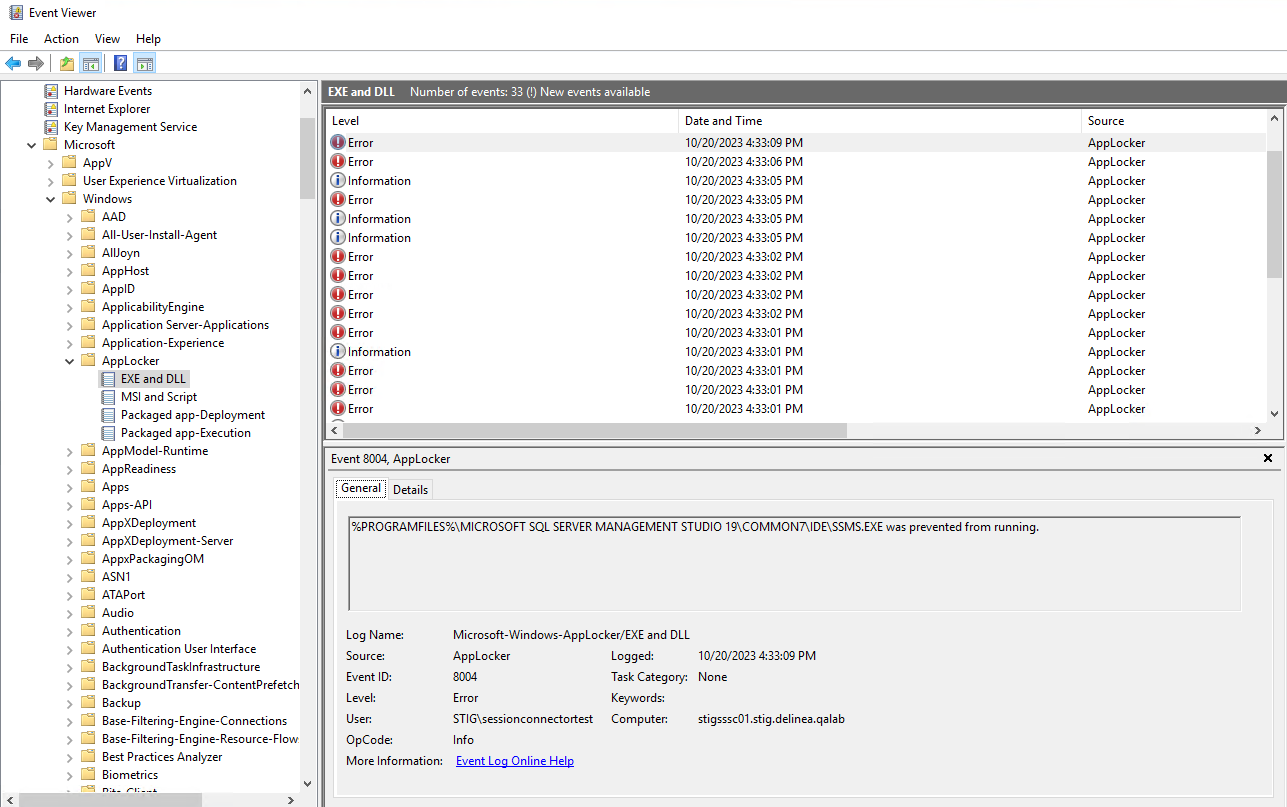
Click the details tab to display additional information regarding the rule preventing the application from launching:
Additional Suggestions
Monitoring and Logging
We recommend:
- Employing proactive system and application log analysis to detect irregularities and potential threats.
- Setting up automated alerts for critical events, notably patterns like successive failed login attempts, to ensure timely interventions.
Continuous Maintenance and Oversight
We recommend:
- Remaining informed and promptly acting on any updates or advisories from Delinea.
- Routinely assessing and refining security configurations to ensure they align with evolving best practices and organizational needs.