Azure Managed HSM Services
Task 1: Setting up the Encryption Key and an Application Registration
-
Go to Azure, Entra ID.
-
Click App Registrations on the left.
-
Select New registration.
-
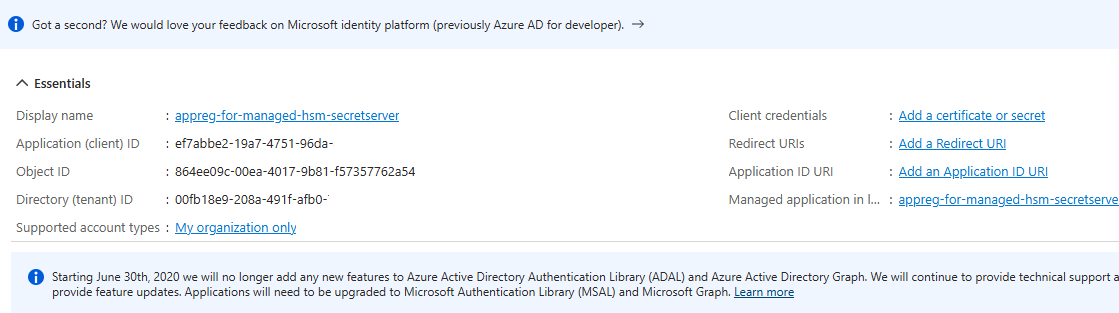
Name the registration and click Create:
-
Copy the Directory (tenant) ID and the Application (Client) ID for later.
-
Click Add a certificate or secret, located next to the client credentials.
-
Select New Client Secret.
-
Add a description and an expiration.
It is incredibly important to then set up procedures to ensure that a new client secret will be created and updated in Secret Server later before this expiration period is reached, to prevent loss of access to your Secret Server instance. -
Select Add to save your changes.
-
Copy the Value. You will not get an opportunity to copy this data again.
-
Read through and plan via the Azure Managed HSM documentation.
-
Create your Azure Key Vault Managed HSM and Activate it.
-
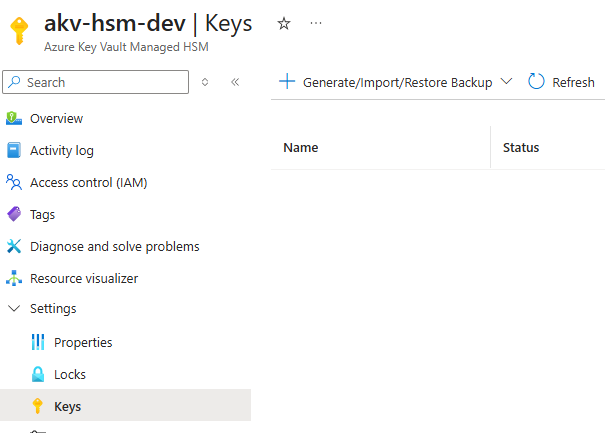
Utilizing a user that has Azure permissions (Local RBAC or IAM, depending on your configuration), Search for Keys.
-
Click Generate/Import/Restore Backup, and then choose Generate:
-
Name your key.
-
Choose key type oct-HSM (formerly named AES-HSM in older versions of the Azure Portal), and key size 256. No other key type or size will work.
-
Ensure the operations include wrap key and unwrap key, and create the key.
-
Copy the key identifier URL field and key name.
-
Under Settings, go to Local RBAC.
It is possible to use IAM security. Please read and adjust your Azure permissions as necessary if you use IAM. -
Click Add.
-
For Role, use Managed HSM Crypto User.
-
For Scope, use single key.
-
For key name, use the key name of the key you created earlier.
-
For security principle, select App Registration and secret, and select the app registration you created earlier.
You will not see the new entry directly on the Local RBAC page. It will display when navigating to the key and clicking Role Assignments:

Task 2: Adding the Encryption Key and Application Registration Details in Secret Server
-
Log into SSC.
-
Search for Key Management. The Key Management page appears.
-
Click the Edit button. The page becomes editable.
-
From the Key Management Type dropdown list, select Azure Managed HSM.
-
Type in your Azure Managed HSM Tenant ID value.
-
Type in your Azure Managed HSM Principal ID (this is the Application/Client ID) value.
-
Type in your Azure Managed HSM Principal Secret (the secret value of the client secret).
-
Type in the Azure Managed HSM Key URL that you saved earlier.
-
Select the checkbox that states Maintenance Mode will be enabled and a Secret Key Rotation will be triggered.
-
Click the Save button.
Task 3: Secret Key Rotation
Once you save your changes, your new settings are validated and a secret key rotation is triggered. You can now view the progress of the rotation:
-
Search for Secret Key Rotation.
-
Click the Rotate Secret Keys button to perform the operation.
Best Practices for Azure Managed HSM Configuration
Azure’s Key Vault Managed HSM Service is a highly available, single-tenant cloud service for creating, managing, and using encryption keys with FIPS 140-3 Level 3 validated HSMs. While Managed HSM is supported under Azure Key Vault branding, non-Managed HSM Key Vault tiers (Standard or Premium) are not supported.
For more details on security, pricing, and SLA, see What is Azure Key Vault Managed HSM?.
Guidelines and Best Practices
-
Region Alignment: The Managed HSM service must be located in the same region as your cloud subscription. Contact Delinea Support if you are unsure which region applies.
-
Key Type: Only AES 256 symmetric keys are supported. RSA keys — including RSA 2048 and RSA 4096, which are required by on-premises HSM integrations — are not supported for Azure Managed HSM. Attempting to use an RSA key will result in an error. No other key type or size will work.
-
Responsibility for Key Management: You are fully responsible for managing your keys, availability, and security settings. Misconfiguration or an Azure outage unrelated to Secret Server can block access if the encryption key becomes unavailable.
-
Follow Azure best practices for Soft-delete, purge protection, security domain backup, full backups, and replication.
-
-
Key Rotation:
-
Managed HSM supports automatic key rotation via CLI. We recommend NOT configuring this, as it can disable the previous key after an expiry time.
-
To rotate keys safely:
-
Use the UI to create a new key version.
-
Switch Secret Server to the new version.
-
Wait at least one day to confirm successful rotation and that secrets are readable.
-
Then consider setting an expiration date or disabling the previous version.
-
-
-
App Registration Secret: Ensure the client secret used by Secret Server to access the key does not expire. Update it before expiration to avoid service disruption.
Customer-Managed Encryption Keys – Critical Considerations
Managing your own encryption key or using a third-party provider (e.g., AWS KMS or Azure Managed HSM) carries serious risk if not handled correctly:
-
Secret Server requires continuous access to the third-party key for the website and secrets to remain accessible.
-
If the third-party key is deleted, Secret Server becomes permanently unable to decrypt any data—all access to secrets is lost.
-
If credentials used by Secret Server to access the key are blocked or disabled, the website becomes inaccessible until credentials are restored.
-
Important: If you delete your external encryption key or the credentials become invalid, you will not be able to access existing secrets. Delinea cannot recover them.