Azure Key Vault Integration
In this topic:
Introduction
The Azure Key Vault (AKV) Integration simplifies management and governance of NHI's and secrets from the CSP's native vaults. With AKV you can centrally manage and update secrets to one or more Azure Key Vaults, and rotate passwords or values more frequently. With fine grained roles and permissions, audit and logging, the AKV integration provides increased governance, visibility, and awareness of secrets managed in Azure Key Vault without affecting development velocity or processes.
With Azure Key Vault Connector, you can:
- Link external vaults to Secret Server.
- Identify and categorize non-human identities into folders.
- Manage and sync secrets from external vaults to a central Delinea vault.
- Control access by applying fine-grained permissions.
- Regularly rotate secrets to maintain a strong security posture.
- Use Secret Server to keep external vaults in sync.
What is Azure Key Vault?
Azure Key Vault (AKV) is a secure cloud service provided by Microsoft Azure for storing and managing sensitive information such as secrets, encryption keys, and certificates. It offers two service tiers: Standard, which uses software encryption, and Premium, which includes Hardware Security Module (HSM) protection. The Delinea AKV connector is a connection to AKV with GUI elements on the Secret Server side.
Key features of AKV include:
- Access Control: Uses Azure role-based access control (RBAC) for the management plane and either RBAC or key vault access policies for the data plane.
- Auditing and Monitoring: Provides logging capabilities for all key vault operations.
- Certificate Management: Enables easy provisioning, management, and deployment of TLS/SSL certificates.
- Encryption: All secrets are encrypted at rest using a hierarchy of encryption keys protected by FIPS 140-2 compliant modules.
- Key Management: Facilitates the creation and control of encryption keys used to protect data.
- Secrets Management: Securely stores and controls access to tokens, passwords, API keys, and other sensitive data.
AKV helps solve various security challenges in cloud environments, supporting the "use least privilege access" principle of the zero trust security strategy. It centralizes the storage of application secrets, reducing the chances of accidental leaks.
To use AKV, it must be associated with a resource group within the same application/environment combination. Access to AKV is controlled through two interfaces: the management plane for managing the vault itself, and the data plane for working with the stored data. To learn more access About Azure Key Vault.
Connecting with AKV—The App Registration Process
The following two-part procedure makes AKVs available in Secret Server.
Creating a Secret in the Azure Portal
-
Go to your Azure portal.
-
From the Azure services section, select App Registrations. The aforementioned page loads.
-
Click on the app you want to use from the list.
-
Within the Azure Portal, access Manage > Certificates and Secrets.
-
Create a new client secret.
You must copy the Value at the time of client secret creation as Azure will not allow you to go back and copy the value later. If you do not copy the value at this time, you have to create a new client secret.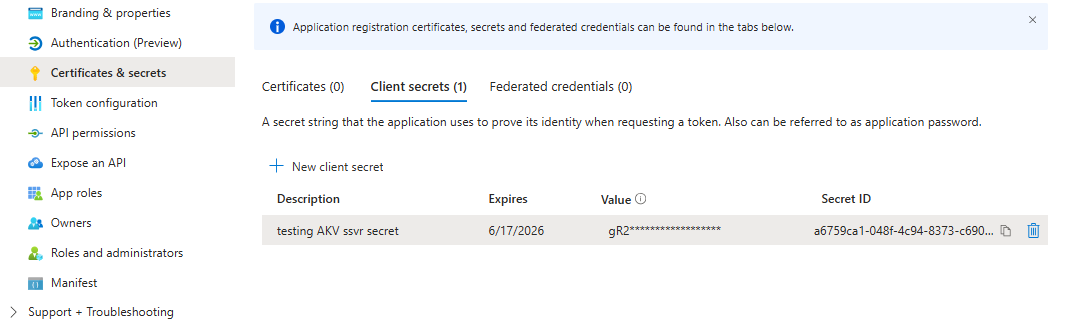
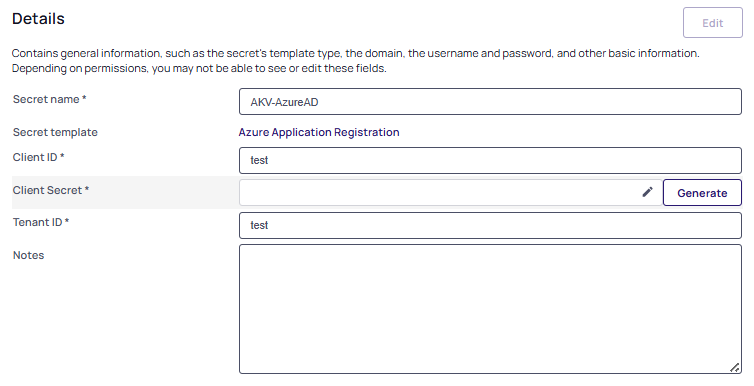
Creating the Azure App Secret in Secret Server
-
Access Secret Server.
-
Create a new secret using the Azure Application Registration template.
-
Fill in the following fields:
-
Secret name: give the secret an appropriate name.
-
Client ID: Type in the Client ID of the Azure AD Application.
-
Client Secret: Type in the Client Secret (Value) for the Azure AD Application.
Paste the value you copied from the Azure Portal into the Client Secret field of the secret in Secret Server:
-
Tenant ID: Type in the Tenant ID of the Azure AD Application.
-
Optionally, fill in the Notes field.
-
Optionally, change the Site field to one you need, otherwise leave as Default.
-
-
Select Create Secret to save your changes.
Firewall and Network Requirements
Secret Server communicates with Azure Key Vault over HTTPS (port 443). The current AKV integration does not route traffic through Distributed Engines.
For Secret Server Cloud, requests to Key Vault are initiated from the Delinea cloud service and routed using Azure internal networking. Because of this:
-
Delinea cannot provide a list of specific public IP addresses to allow-list in an Azure Key Vault firewall.
-
The integration does not traverse the public internet using a fixed Delinea egress IP.
-
If the Azure Key Vault firewall is enabled, coordinate with Azure support to allow internal Azure traffic or determine the internal IP ranges and/or Web Application Firewall (WAF) IPs needed for connectivity.
Secret Server On Premises
For on-premises installations, requests to Azure Key Vault originate from the Secret Server web server(s), not from the Delinea cloud service. Traffic traverses the public internet.
Requirements:
-
Outbound HTTPS (port 443) from the web server to <vault-name>.vault.azure.net
-
DNS resolution of *.vault.azure.net from the web server
-
If Azure Key Vault firewall is enabled, add the public IP address(es) of your Secret Server web server(s) to the Key Vault's allowed IP list
-
If using a proxy for outbound traffic, ensure the proxy allows connections to *.vault.azure.net on port 443
Creating an External Vault Link
- Access Secret Server.
- From the left navigation panel, select Secrets > External Secrets. The External Secrets page appears.
- Click the Create dropdown button and select Create External Vault Link. The Create External Vault Link page appears.
- For Type, select Azure Key Vault.
-
For Credential secret, select the No secret selected link and choose the secret you created previously in Secret Server during the app registration process. This is the secret that has proper access to query and write to AKV and will be used for all connections.
Required Permissions
The App Registration / Service Principal used by the credential secret requires the following minimum Azure Key Vault data plane permissions for secret management operations:
-
Get
-
List
-
Set
Azure Key Vault supports two permission models for the data plane: Vault access policies and Azure role-based access control (RBAC). Each vault is configured to use one of these models. Follow the procedure that matches your vault’s configuration.
Option A: Vault Access Policies
If the Key Vault uses the vault access policy permission model:
-
Go to https://portal.azure.com.
-
Navigate to the Key Vault that Secret Server will manage.
-
In the Key Vault menu on the left, click Access policies.
-
Select + Add Access Policy.
-
In the permissions list, under Secret permissions, select the checkboxes for:
-
Get
-
List
-
Set
Other permissions can be skipped unless required for your environment.
-
-
Click Select principal, then search for the App Registration / Service Principal that Secret Server uses.
-
Select it and click Select.
-
Click Add, then click Save on the main Access policies page. The Key Vault access policy now grants the Secret Server credential secret the necessary Get, List, and Set rights.
Option B: Azure Role-Based Access Control (RBAC)
If the Key Vault uses the Azure RBAC permission model, the Access policies blade is not available. Instead, assign an appropriate role to the App Registration / Service Principal:
-
Go to https://portal.azure.com.
-
Navigate to the Key Vault that Secret Server will manage.
-
In the Key Vault menu on the left, click Access control (IAM).
-
Click + Add and select Add role assignment.
-
On the Role tab, search for and select Key Vault Secrets Officer. This built-in role grants Get, List, Set, and other secret management permissions.
-
On the Members tab, click + Select members, then search for the App Registration / Service Principal that Secret Server uses.
-
Select it and click Select.
-
Click Review + assign to save the role assignment.
Completing the External Vault Link
After granting the required permissions, return to Secret Server and continue setting up the external vault link:
-
For Input type:
- If you choose Automatic List:
- You are automatically presented all available vaults for your Azure subscriptions. Once the Azure key vault account connects, a green Connected indicator appears at the top of the page.
- Click to select the checkboxes for the desired vaults.
- If you choose Manual Entry:
- Type the name of the Azure key vault you want to connect to, in the External Name text box. This name MUST exactly match the vault name in the external system to correctly link them.
- The Display name will automatically match the External Name of the vault, unless you manually change it.
- If you choose Automatic List:
- Select Save.
- You are prompted to synchronize the external vault. This step performs a pull on the vault and then a push on each active and linked external secret. This pulls all the secrets from the linked AKV into the Secret Server UI.
-
Synchronize the vault. The external vault summary page will show these results:
-
Name of the vault.
-
State: enabled or disabled.
-
Last pull status.
-
Number of external secrets
-
Credential secret used
-
- Select the External Secrets tab to view the list of external secrets.
- Change the Status to All states to view the list of external secrets. All external secrets are initially disabled. This means no secrets are synchronized from Secret Server to the AKVs.
Managing External Secrets
- Log into Secret Server.
-
Navigate to Secrets > External Secrets. The External Secret grid appears.
After you have linked at least one external vault, you will see a list of external secrets here.
-
In the grid you can:
- Search for a specific secret.
- View all secrets, enabled or disabled.
- View only "enabled" or "disabled" secrets.
- View or manage permissions.
- View audit events.
- View the log.
-
Select a secret in the grid. Now, you can perform a few more actions:
-
Set remote value: Sets a new value on the external secret in AKV.
-
View remote value: View the current value on the external secret in AKV.
-
Push: To propagate the changes made through edits to the secret(s).
-
Edit: Modify the secret and set properties.
-
Enable or disable synchronization for the secret.
-
Select a secret to link to. That secret serves as the master secret in Secret Server.
You can link one or more external secrets to a single master secret. You can sync the same secret/vault from a single master secret to secrets in multiple key vaults. -
Perform Remote Password Changing (RPC) on the master, which propagates to all the enabled linked external secrets.
-
Transform, which allows you to select the fields you want updated on the external secret(s).
Transforms are defined in the secret template for the master secret. For example,
Password (password)links the password field from the master secret and updates all linked enabled external secrets with the value of password field.You can also define a string format and insert field values from the linked secret using
$secret.slug.notation. For example,Password: $secret.slug.passwordsets the external secret value aspassword 1234pass, where1234passis the actual password from the master secret. Transform allows you to copy and paste the slug name or simply click on the + sign to add it in the box below.
-
Bulk Operations with the External Secret Grid
The external secret grid provides a central location in Secret Server to manage external secrets. When selecting external secrets in the grid, you can select to push or edit these items all at once, which is a bulk operation. This is useful for linking multiple external secrets from one or more vaults to a single master secret.
Performing a bulk operation on multiple external secrets:
-
Select all or a few secrets from the grid.
-
Push and Edit are now available actions for these secrets.
-
Push allows for changes from the master secret or secrets in Secret Server to affect the linked secrets in AKV.
-
Edit allows you to perform additional bulk actions such as:
-
Toggle the Synchronization enabled/disabled state.
-
Select Apply to all or Cancel.
The heading shows the number of secrets that will be affected by this bulk action.
-
-
Simultaneously Creating Master and External Secrets in AKV
How to create a new master secret along with an external secret at the same time in AKV:
- Access Secret Server.
- Create a secret using any template. For this example, use the Azure AD Account secret template.
- Fill in the secret name, domain, username and password fields and select Create Secret. The secret loads automatically on the screen.
- Select External Secrets from the left-hand menu.
- Click Create, then select Create external secret from the drop-down.
-
Type in the name of the External secret.
-
Choose the External vault where you want to create this secret from the drop-down.
-
Choose whether to enable Synchronization or not by selecting the checkbox.
-
For Linked Secret, click on No secret selected and choose the secret you just created.
-
If you want to sync any fields with the external secret, add those to the Transform section.
-
From the Merge secret field drop-down choose Password (password) to sync passwords from the master secret to the linked secret in AKV.
- Select Save to keep your changes.