RPC for Snowflake in Secret Server
RPC for Snowflake in Secret Server applies to Snowflake accounts, including both admin and non-admin user accounts. Secret Server supports two authentication methods for Snowflake:
-
Password authentication — for Snowflake SQL database user accounts that authenticate with a username and password.
-
Key pair authentication — for Snowflake service accounts that authenticate using RSA key pairs in PKCS#8 format. Secret Server generates, stores, and rotates the key pair and updates the public key in Snowflake automatically.
Prerequisites
Make sure you have:
-
Two active Snowflake accounts. One of these accounts must be a privileged admin account which will be used for password changing.
-
A Secret Server user who can create two Snowflake secrets.
-
Optionally, admin credentials for Secret Server (the Limited_User_Admin role) must be assigned to the admin account.
-
-
The RPC feature enabled in Secret Server.
-
Permission to create and configure secrets.
-
Heartbeat monitoring and remote password-changing features enabled in Secret Server.
-
A site with a distributed engine that has access to the internet.
Key Pair Authentication Prerequisites
Make sure you have:
-
A Snowflake account with key pair authentication enabled. See Snowflake Key-Pair Authentication for details.
-
A privileged Snowflake account with the SECURITYADMIN role (or equivalent) that can execute
ALTER USER ... SET RSA_PUBLIC_KEYfor the target user. -
A Secret Server user who can create secrets using the Snowflake Key Pair Auth template.
-
The RPC feature enabled in Secret Server.
-
Heartbeat monitoring and remote password-changing features enabled in Secret Server.
-
A site with a distributed engine that has outbound HTTPS access to
<account>.snowflakecomputing.com.
Role Usage Scenarios
-
The user can define a custom role for managing multiple users and their passwords. Essentially, this role would function like a group while still being a role.
Example: A user can create a user-defined role named
Custom_Role.User1, User2, User3, User4, andUser5are users, owned byCustom_Role.User1has been assigned toCustom_Role, allowing this user to manage the passwords of the other users who also belong toCustom_Roleas well. -
Two roles can be created, each managing their own set of users.
Example: Two roles are created:
AccountAdminandLimited_User_Admin, each have multiple separate user accounts assigned to them. One of these accounts isAccountUser1, which has both roles assigned to it. This allowsAccountUser1to rotate the passwords of users belonging to both roles.AccountUser1needs to use the following commands:-
USE ROLE AccountAdminbefore doing password rotation for any of the users assigned to that role. -
USE ROLE Limited_User_Adminbefore doing password rotation for users assigned to this second role, respectively.
-
Configuration
-
Log into Secret Server.
-
Navigate to All Secrets and click the Create secret button, the Create new secret popup appears.
-
Search for the Snowflake account template and select it. The popup refreshes automatically to reflect the fields you must fill in.
-
Complete the following fields:
-
Secret name: give the secret an appropriate name.
-
AccountId: you will find this as a part of your Snowflake URL (starts with lsb followed by several numbers).
-
Username: the username used to sign into the Snowflake account.
-
Password: the password used to sign into the Snowflake account.
-
Site: set a site with a distributed engine that can access Snowflake services.
-
Leave Auto Change Enabled unchecked and click Create secret. The newly created secret loads automatically for viewing.
-
-
The Heartbeat operation runs automatically to check if the entered credentials are valid. If the credentials are valid the status will change from Pending to Success.
If the credentials are not valid the status will change from Pending to Failed.
The distributed engine checks for RPC every 300 seconds. If the heartbeat state remains in Pending for longer than 300 seconds, confirm that the site has an operational distributed engine by accessing Settings > Sites and engines.To verify the status of the heartbeat processes, Search for Heartbeat Log.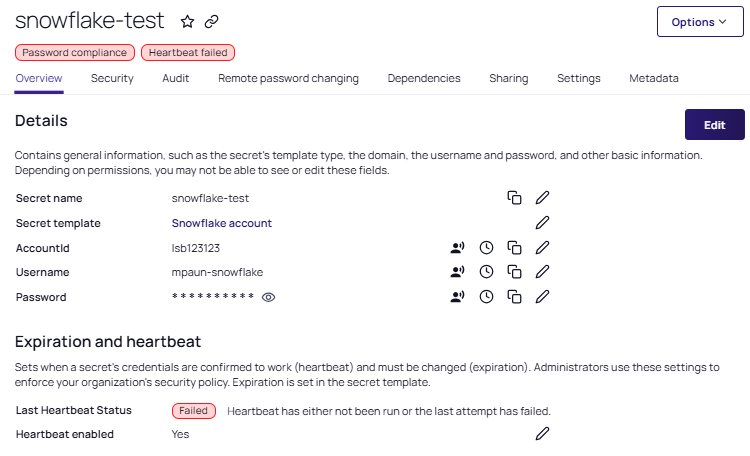
-
Navigate to the Remote password changing tab and select Edit for the RPC/Autochange section.
-
For Change password using, select the Privileged account credentials option.
-
If you chose the option above, the Change password using option appears, and you must select a secret by clicking on the No secret selected link.
-
A popup will appear where you can search for the secret you want to associate.
-
Select a Snowflake user with the Limited_User_Admin role used to process the password change.
-
Click Save.
-
-
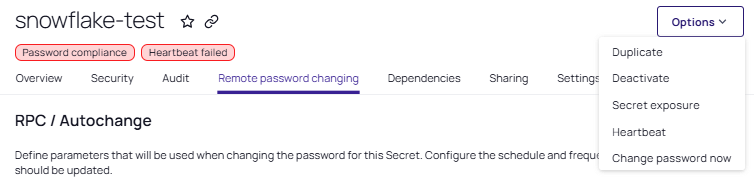
(Optional) Access the Change password now option button from the top right corner if you want to change the secret password. Alternatively, it can be found under the Options dropdown list:
Key Pair Authentication Configuration
Creating the Key Pair Auth Secret
-
Log into Secret Server.
-
Navigate to All Secrets and click Create secret.
-
Search for the Snowflake Key Pair Auth template and select it.
-
Complete the following fields:
-
Secret name: Give the secret an appropriate name.
-
Account URL: The account URL of your Snowflake instance (for example,
https://<account>.snowflakecomputing.com). -
Username: The username of the Snowflake service account.
-
Generate New Key: Select this checkbox to have Secret Server generate a new PKCS#8 RSA key pair. When selected, the Private Key and Public Key fields are auto-populated on secret creation.
-
Private Key: The private key in PKCS#8 PEM format. Auto-populated if Generate New Key is selected. You can also paste an existing PKCS#8 private key (
BEGIN PRIVATE KEYfor unencrypted,BEGIN ENCRYPTED PRIVATE KEYfor passphrase-encrypted). -
Public Key: The RSA public key in Base64 text format (no PEM headers). Auto-populated if Generate New Key is selected. This is the value registered in Snowflake via
ALTER USER ... SET RSA_PUBLIC_KEY. -
Private Key Passphrase: (Optional) A passphrase to encrypt the private key. If provided, the generated key uses
BEGIN ENCRYPTED PRIVATE KEYformat. Click Generate to auto-generate a passphrase. -
Site: Set a site with a distributed engine that has outbound HTTPS access to Snowflake.
-
-
Leave Auto Change Enabled unchecked and click Create secret.
-
The newly created secret loads automatically. The Heartbeat operation runs automatically to verify the key pair can authenticate to Snowflake.
-
If the credentials are valid, the status changes from Pending to Success.
-
If the credentials are not valid, the status changes from Pending to Failed.
The distributed engine checks for RPC every 300 seconds. If the heartbeat state remains in Pending for longer than 300 seconds, confirm that the site has an operational distributed engine by accessing Settings > Sites and engines. -
Configuring Remote Password Changing for Key Pair Auth
-
On the secret, navigate to the Remote password changing tab.
-
Click Edit for the RPC/Autochange section.
-
For Change password using, select Privileged account credentials.
-
Click the No secret selected link and select a Snowflake secret with the SECURITYADMIN role. This privileged account executes the
ALTER USER ... SET RSA_PUBLIC_KEYcommand to register the new public key in Snowflake during rotation. -
Click Save.
The Credentials on secret option is not available for the Snowflake Key Pair Auth password changer because this template has no password field. The option is disabled (grayed out) by design. -
(Optional) Click Change password now to trigger an immediate key rotation. This generates a new key pair, connects to Snowflake using the privileged account, and updates the public key via
ALTER USER ... SET RSA_PUBLIC_KEY. On success, the secret fields update to the new key pair.
Key Rotation Behavior
When a key rotation is triggered (manually or on schedule):
-
Secret Server generates a new PKCS#8 RSA key pair.
-
The privileged account connects to Snowflake and executes
ALTER USER ... SET RSA_PUBLIC_KEYwith the new public key. -
On success, the secret's Private Key and Public Key fields update to the new values.
-
On failure, the Post Fail Change rollback ensures the old key remains valid and the secret fields are unchanged.