Setting Minimum Permissions for AD RPC Service Accounts
Overview
Secret Server requires proper Active Directory permissions to perform Remote Password Changing (RPC). The privileged Delinea Secret Server RPC service account used for RPC of an Active Directory (AD) account secret, must have granular Active Directory permissions applied to it.
You will be using two Active Directory tools to make these modifications to the RPC account:
- ADSI Edit
- Active Directory Users and Computers.
Setting ADSI Permissions
-
Open ADSI Edit (found on Domain Controllers as part of the Active Directory Administration Tools).
-
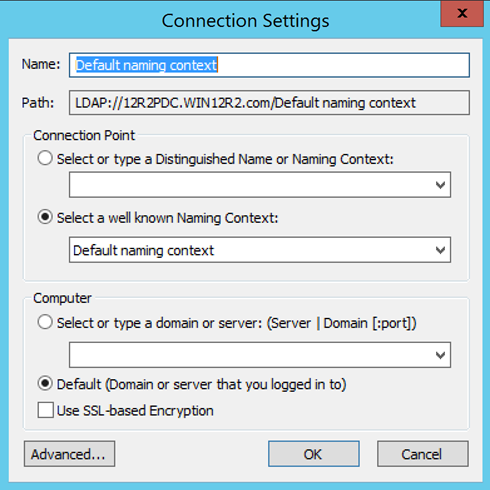
From the Action drop down menu select Connect to…. The "Connection Settings" window appears:
-
Make any necessary adjustments.
-
Click the OK button to connect to the domain you are logged into. The ADSI Edit window appears.
-
Click on the Default naming context node (the root of the domain).
-
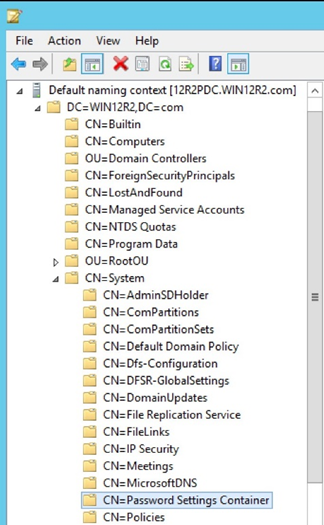
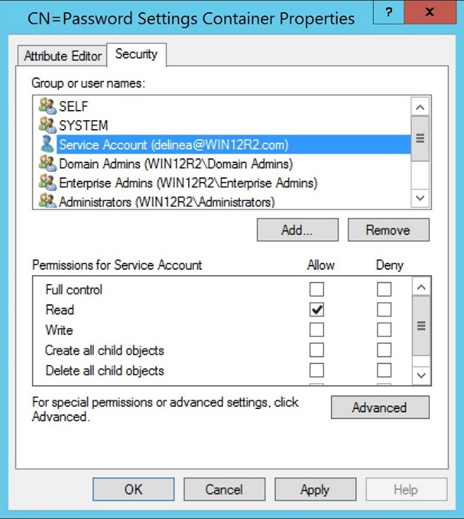
Expand the domain name root and scroll down until you reach CN=System > CN=Password Settings Container as noted in the image below:
-
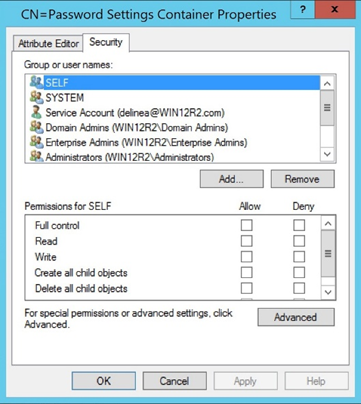
Right-click CN=Password Settings Container and select Properties. A properties dialog box appears:
-
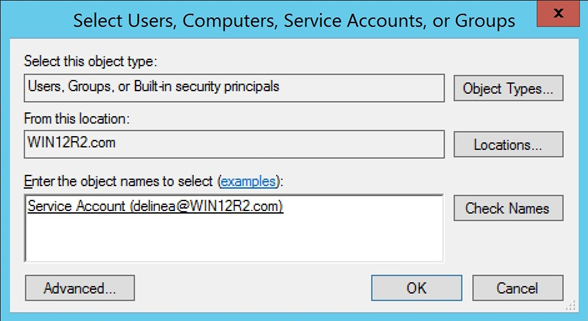
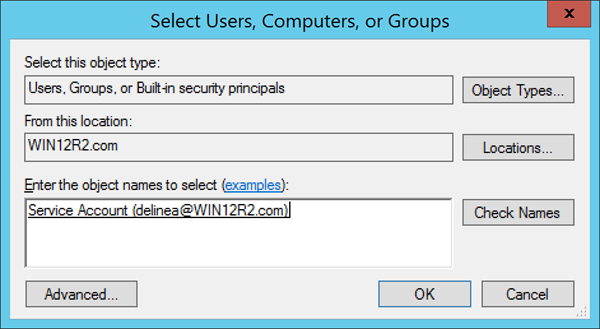
Click the Add… button. The "Select Users, Computers, Service Accounts, or Groups" dialog box appears:
-
Type the information for the Delinea Secret Server RPC account.
-
Select OK. The previous dialog box reappears with the "delinea" service account appearing in the "Group or user names" list.
-
Click on the new account, its permissions appear:
-
Select the Read checkbox in the Allow column.
-
Click OK to save your changes.
Setting Active Directory Delegate Control Permissions
-
Open the Active Directory Users and Computers administrative console.
-
Right-click the Organizational Unit (OU) or the top-level domain you want to configure.
-
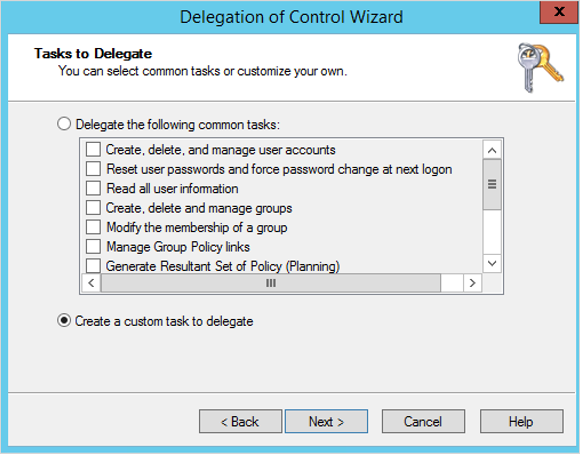
Select Delegate Control… as noted in the image below. The Delegation of Control Wizard appears.
-
Click the Next button. The Users or Groups dialog appears.
-
Click the Add… button in the Users or Groups section.
-
Click the Add… button. The "Select Users, Computers, Service Accounts, or Groups" dialog box appears:
-
Type the information for the Delinea Secret Server RPC account.
-
Click the OK button. The Wizard reappears.
-
Click the Next button. The Tasks to Delegate page of the wizard appears:
-
Select the Create a custom task to delegate radio button.
-
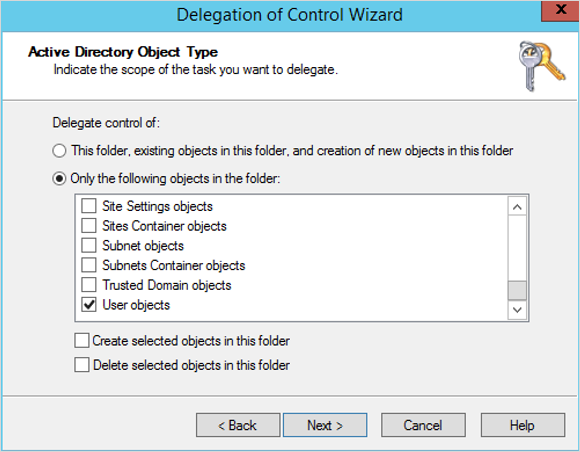
Click the Next button. The Active Directory Object Type page of the wizard appears:
-
Click to select the Only the following objects in the folder selection button.
-
Scroll to bottom of the list.
-
Select the User objects checkbox.
-
Click Next. The Delegate Control Permissions page of the wizard appears:
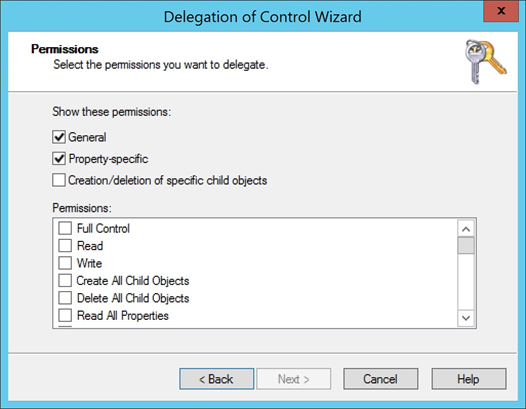
-
Click to select the General and Property-specifics check boxes.
-
In the Permissions list, ensure none of the check boxes are selected.
-
Locate and click to select the following check boxes in the Permissions list:
- Change Password
- Reset Password
- Read lockoutTime
- Write lockoutTime
- Read pwdLastSet
- Write pwdLastSet
- Read UserAccountControl
- Write UserAccountControl
-
Click the Next button.
-
Click the Finish button.
Setting Delegate Control Permissions for Protected Group Accounts
Configure delegation control in the domain controller for protected group accounts:
-
At a command prompt on the domain controller, type the following command to grant the domain account permission to unlock the account:
dc=cpsanddc=comin the following commands should be changed to your domain name.Copydsacls "dc=cps,dc=com" /G "<yourDomainName>\<yourAccountName>:RP;msDS-User-Account-Control-Computed;user" /I:S
dsacls "dc=cps,dc=com" /G "<yourDomainName>\yourAccountName>:RPWP;lockoutTime;user" /I:S
dsacls "CN=AdminSDHolder, CN=System, DC=cps, DC=com" /G "<yourDomainName>\<yourAccountName>:RPWP;lockoutTime" -
At a command prompt on the domain controller, type the following command to grant the domain account permission to reset the password:
dc=cpsanddc=comin the following commands should be changed to your domain name.Copydsacls "dc=cps,dc=com" /G "<yourDomainName>\<yourAccountName>:CA;Reset Password;user" /I:S
dsacls "CN=AdminSDHolder, CN=System, DC=cps, DC=com" /G "<yourDomainName>\<yourAccountName>:CA;Reset Password"
To initiate the SDProp process immediately, complete the following steps:
-
Click Run, and type
ldp.exein the domain controller desktop Start menu. -
Select Connection > Connect... from the LDP window.
-
In the Connect window, make sure 389 is listed in the Port field, and then click OK.
-
Select Connection > Bind... from the LDP window.
-
Select Bind as currently logged on user and click OK.
-
Select Browse > Modify from the LDP window.
-
Configure the following fields in the Modify window:
-
DN: empty
-
Attribute:
RunProtectAdminGroupsTask -
Values: 1
-
Operation: click Add and then click Enter.
-
-
Click Run.
If you have a large environment, it may take some time for SDProp to update the protected admin group permissions.
Configuring Delegation Control for Administrative Accounts
If you use a regular domain account (not part of the Domain Admins group) for the administrative account, you need to configure the domain account delegation in the domain controller.
Configuring Delegation Control for the Administrative Account
To configure delegation control in the domain controller for the administrative account, do the following:
-
In the domain controller of the domain, select Administrative Tools > Active Directory Users and Computers.
-
Right-click the domain with the accounts that will be managed. Select Delegate Control, then click Next at the Welcome window.
-
In Users and Groups, click Add and enter the name of the user you want to configure with the administrative account (with unlock and password reset permissions) and click OK.
-
In Task to Delegate, select Create a custom task to delegate and click Next.
-
In Active Directory Object Type, select Only the following objects in the folder, as well as User objects, then click Next.
-
In Permissions, select the following:
-
General and Reset password to delegate password reset rights.
-
Property-specific, Read msDS-User-Account-Control-Computed, Read lockout Time, and Write lockout Time to delegate account unlock rights.
-
-
Click Next and then Finish.
The domain account with delegated permissions can now be configured as the domain administrative account for the account unlock and automatic account maintenance features.