VMware ESX/ESXi Account Discovery and RPC Configuration
Prerequisites
Before configuring ESXi discovery, ensure:
-
Account permissions: The scanning account on each ESXi host must have the
Host.Local.ManageUserGroupsprivilege. This is the only privilege required for discovery. If you also plan to use remote password changing, the same privilege covers password rotation. See Account Permissions for Discovery for details. -
Network access: The Secret Server machine (or Distributed Engine) must be able to reach each ESXi host over HTTPS (port 443). The connection uses the VIM API endpoint at
/sdk/vim.wsdl. -
PowerCLI: VMware PowerCLI 6.5.1 or higher must be installed (see below).
Download Locations
-
Run the following PowerShell command:
Install-Module -Name VMware.PowerCLI -Force -
If the server does not have internet access, download supported versions of PowerCLI from VMware using the following link: VMware PowerCLI
Overview
The ESX/ESXi (API) password changer verifies (using heartbeat) and changes VMware ESX/ESXi passwords via the vSphere API. Password changing and discovery requires PowerCLI 6.5.1 or higher.
Either PowerCLI 6.5.1 or higher must be installed on the servers running discovery or your local Secret Server machine or machines running the Distributed Engine. Earlier versions of the password changer are now deprecated.
If you get an error about not being able to load file or assembly
VMware.Binding.Wcf.dll or
VMware.Binding.WsTrust.dll, copy the file from:
C:\Program Files\WindowsPowerShell\Modules\VMware.VimAutomation.Common\X.X.X.X\net45 (where X.X.X.X is the installed version number), to:
C:\Program Files\WindowsPowerShell\Modules\VMware.Vim\X.X.X.X\net45 (where X.X.X.X is the installed version number).
If the files are blocked after copying, right-click each file, select Properties, and select Unblock.
Alternatively, run the setup script referenced in the Setting Up and Troubleshooting section, which handles both copying and unblocking automatically.
net45 folders. For versions 13.1.0 and greater use the net472 folders instead.Details
Secret Server searches the machine's Windows PATH environment variable for the VMware SDK, therefore installing the correct version of it is all that is needed. On the machine you install VMware PowerCLI, update the Windows PATH environment variable to include the folder where the file VMware.Vim.dll is located.
C:\Program Files\WindowsPowerShell\Modules\VMware.Vim\[version]\net45. The PowerCLI installation path must be in the system PATH variable.To edit your PATH:
-
Add
C:\Program Files\WindowsPowerShell\Modules\VMware.Vim\[version]\net45to the PATH using the system panel (sysdm.cpl). -
From the System Properties dialog, select Advanced tab
-
Click Environment Variables…
-
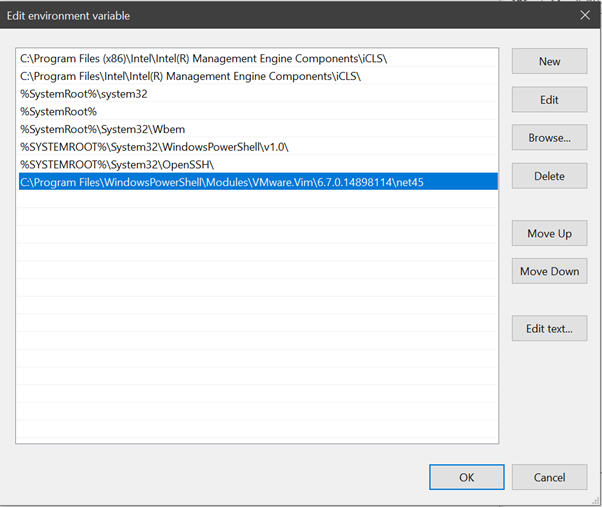
Under the System Variables section, highlight Path then Edit. The Edit Environment Variable dialog box appears:
-
Click New.
-
Type
C:\Program Files\WindowsPowerShell\Modules\VMware.Vim\[version]\net45, similar to the example above. -
Click OK when done.
net45 folders. For versions 13.1.0 and greater use the net472 folders instead.Setting Up and Troubleshooting VMware ESXi with Secret Server
Delinea provides a PowerShell script that automates the following tasks on a Secret Server Distributed Engine:
-
Installing PowerCLI and copying required DLL files.
-
Updating the system PATH variable.
-
Testing a VMware ESXi heartbeat connection.
-
Testing a VMware host account Discovery scan.
Download the script and review the README from the DelineaXPM GitHub repository. Run the script as an administrator.
VMware.Binding.Wcf.dll and VMware.Binding.WsTrust.dll files, which resolves a common issue when importing PowerCLI modules.ESXi Discovery Configuration
Each ESXi host must have a local account that Secret Server can use for Discovery. If no such account exists, the virtualization team will need to provision one and provide the credentials to the Secret Server administrators. The Secret Server admin team will then create secrets for each host using these credentials.
Creating a Folder for Discovery Accounts
-
Create a dedicated folder in Secret Server to store all ESXi Discovery account Secrets.
Example Folder: VMware / ESXi – Discovery Accounts
-
If you maintain a spreadsheet of ESXi hosts, you may use the Import Secrets (CSV) feature to bulk-create secrets.
This is helpful when the initial account name and password are identical across hosts. -
After importing, you can begin managing the accounts to ensure each secret eventually has its own unique password.
Creating a Secret Search Filter
A Secret Search Filter allows Discovery to dynamically locate the correct local admin secret based on the machine being scanned. The filter uses a defined naming pattern and folder location to match the scanned system to the appropriate credential.
To create a Secret Search Filter:
-
Search for and navigate to Secret Search Filter in Secret Server.
The Secret Search Filters tab opens on the Scanner Definition page.
-
Select Create Secret Search Filter. The New Secret Search Filter page loads.
-
Fill in the following fields:
-
Secret name pattern: Find secrets whose secret name matches the pattern you've set in this field. For Example:
$MACHINE\Administrator, $DOMAIN - Network Admin -
State: Select the Enabled checkbox.
-
Folder: Click the link No Folder Selected and choose the folder you created previously.
-
Secret template: Select the VMware ESX/ESXi account template from the dropdown list.
-
Optionally select these checkboxes:
-
Include subfolders
-
Expect single
-
Allow partial match
-
-
Select Save to keep your changes.
Each vaulted ESXi account secret must use the same ESXi template selected here. The Secret Search Filter cannot match secrets that use a different template. -
To configure a Secret Search Filter:
-
Navigate to Discovery.
-
Select the Configuration tab.
-
From the Discovery Configuration Options dropdown, select Extensible Discovery.
-
In the upper-right corner, select Scanner Settings.
-
Edit the Machine Scanner.
-
Select Add Secret Search Filter and choose the filter you created.
Remove any existing static Secret Credentials. Only the Secret Search Filter should be configured.
Import ESXi Accounts into Secret Server
Import the ESXi host credentials into Secret Server using the Import Secrets feature:
-
Search for and navigate to Import Secrets.
-
For the Import type, select CSV
-
For Secret template, choose the Unix Account (SSH) template from the dropdown list.
-
In the CSV text field, paste the list of ESXi hosts using the following naming format:
FQDN\usernameorIP\usernameThe secret name must match how Discovery identifies the host. Use the FQDN if the ESXi hosts have DNS entries with PTR records (recommended), or use the IP address if DNS is not configured for the hosts. -
Ensure that each imported secret is stored in the folder created for ESXi Discovery accounts (e.g., VMware / ESXi – Discovery Accounts).
Secret Name Format:
<FullyQualifiedDomainName>\<username>or<IPAddress>\<username>Example (FQDN):
NUS-ESX-A01-B01.nus.domain.com\svc_ssesxiExample (IP):
10.0.1.50\svc_ssesxi
Troubleshooting and Issues
-
The error "The VMware VIM API is not installed or is the wrong version" indicates that PowerCLI needs to be installed.
-
We recommend not using an outdated SDK with an updated version of VMware.
-
Secret Server's VMware password changer rejects self-signed SSL certificates. Make sure your VMware servers have valid SSL certificates (see below for settings).
-
The error "Exception: The remote certificate is invalid according to the validation procedure" indicates that vCenter server root certificates needs to be installed. For more information, see Download and install vCenter Server root certificates to avoid web browser certificate warnings.
-
For Secret Server installed editions, you may need to restart the Secret Server website after installing PowerCLI. Do this by recycling the Secret Server application pool or performing an IIS reset.
-
For distributed engines, the distributed engine service may need to be restarted after PowerCLI is installed.
ESXi Certificate Settings
X509RevocationMode.NoCheck option to the ESXi.CertificateChainPolicyOptions setting.Delinea added a configuration option for Secret Server to allow ESXi TLS connections to ignore self-signed certificates, allow certificates from specific issuers (even if issuer is not in trusted certificate lists), or completely skip certificate validation when using ESXi password changer, heartbeat, or discovery.
New advanced configuration settings include:
-
ESXi: Enable TLS Debugging and Connection Tracking: Identical to TLS Audit option, but specifically for ESXi. If set to true and Secret Server (or DE) auditing is set to DEBUG, detailed debug messages about the certificate chain will be written to the log file.
-
ESXi: Certificate Chain Policy Options: Identical to TLS Audit option, but specifically for ESXi. Allows setting X509 options to be applied to certificate validation. This is a comma-delimited list of options. See TLS Auditing or the Details section for more information.
-
ESXi: Allow Certificates Issued By: Semi-colon delimited list of issuer names (in format shown on certificate---such as "O=Issuer Name"). Ignores partial chain errors due to certificate being issued by any issuer in this list when that issuer is not in the trusted root or intermediate CAs lists on the server.
-
ESXi: Client Certificate Thumbprints: Identical to TLS Audit option, but specifically for ESXi. If ESXi host requires the client to present a valid certificate, this is a semi-colon delimited list of client certificates on the server to try to present.
-
ESXi: Ignore All Certificate Errors: If true, certificate validation will not be performed. All certificate errors will be ignored.
-
ESXi: Allow Default Host Certificates: Sets all the TLS configuration options necessary to not fail due to a default ESXi host certificate and its issuer not being in the trusted certificates lists. This is a combination of setting the issuer to ignore and not performing a revocation check. Setting this to false should be the first change to make when attempting to resolve heartbeat, RPC, or discovery issues to ESXi hosts when using PowerCLI versions later than 5.5.
-
ESXi: Ignore Self-Signed Certs: If true, ignores any self-signed certs (subject = issuer) from ESXi hosts during heartbeat, RPC, and discovery.