Discovering SSH Public Keys
Secret Server can scan for SSH public keys on Unix machines. You can add this ability in the scanner settings section of Unix Account Discovery.
Task 1: Viewing Discovery Scanners for the Unix Discovery Source
-
Access Discovery from the side menu and select Sources.
-
Select the Unix discovery source that you created in the previous section. The Discovery Source tab for it appears.
-
Select the Scanners tab. The discovery source Scanners page appears:

Task 2: Adding the SSH Public Key Scanner
-
In the discovery source Scanners page, click Add Scanner. The Add Scanner popup appears:

-
Select the SSH Public Key Scanner.
-
Select the newly added SSH Public Key Scanner. The details open in a panel on the right side of the screen.
-
Click Edit Scanner. Various sections in the details panel are now editable.
-
Click the Add Secret link and choose one or more secrets that have Unix sudo or su permissions for the host range selected in the discovery source.
These permissions are necessary to navigate each user's home directory on a machine in search of SSH public key entries in the user's
<user home directory>/.ssh/authorized_keysfile. -
Click Save.
Task 3: Importing SSH Public Keys
From the Discovery Network View, Secret Server can import SSH public keys and potentially take over an account. The import process creates a new secret for the SSH public key in one of two ways:
- Including a provided matching SSH private key and passphrase.
- Taking over the key by creating a new key and saving the private key file and passphrase with the secret. This can be easily managed by Secret Server.
Prerequisites
Before proceeding with importing an SSH Public Key based account, ensure that an SSH key pair has been generated and that the public key is available for import.
If you do not already have an SSH key for your account user, follow these steps:
-
Generate one using the following command:
ssh-keygen -t rsa -b 4096 -C "your-email@example.com"This creates a public key (
id_rsa.pub) and a private key (id_rsa) in the~/.ssh/ directory(Linux/macOS) orC:\Users\YourUser\.ssh\(Windows).The public key (id_rsa.pub) is the file that will be imported. -
If you already have an SSH key pair, verify that the public key exists by running:
cat ~/.ssh/id_rsa.pubIf no output appears, an SSH key may not have been created or may be stored under a different filename.
-
Before importing, verify whether the public key must be linked to an account in the system:
-
If an account must have a public key before import, manually add the key:
ssh-copy-id username@remote-server -
If the import process automatically associates the key, ensure the system can discover existing public keys.
-
If accessing a remote server, ensure the key is added to the
~/.ssh/authorized_keysfile on that server.
Once the public key is available, proceed with the steps outlined in To Import an SSH Public Key.
-
To Import an SSH Public Key
-
Access Discovery > Network View. The Discovery Network View page appears listing all discovered and managed items.
-
Set the Item type option to Computer accounts.
-
Select the account with your associated key from the list. The Computer account detail panel opens to the right.
-
Click the Actions dropdown list and choose Import. The import Accounts popup appears:

-
Click the Site dropdown list to select a site.
-
Click the Secret Template dropdown list to select a template. Usually only one is available.
-
Click the Folder link to select a folder. This is where will the new secrets will be created.
-
Type a name in the Secret Name text box. (It auto fills with
$MACHINE\$USERNAME). -
Click the Password button. The Password screen in the popup appears.
-
Select one of the three options:
-
I know the current password and do not want to change it
-
Assign a new specific password to all accounts
-
Generate a random password for each account
-
-
Click the Import Password button, the following will happen based on your choice:
-
If you chose "I know the current password and do not want to change it" you will be prompted to provide the current password. before being able to click Password Changing.
-
If you choose "Assign a new specific password to all accounts" you will be prompted to type in a new password, choose the password type, and choose the Initial Takeover Secrets from the available link:

-
If you chose "Generate a random password for each account" you will be prompted to choose the password type and the Initial Takeover Secrets from the available link.
-
-
For the two choices that require selecting Initial Takeover Secrets from the available link, choose a secret:

-
Click the Password Changing button, the Password Changing section appears:

-
Click the Add Secret link to choose a Unix sudo or su secret for future key rotations.
-
Click the OK button to complete the dialog and import the selected secrets.
-
The Bulk Progress popup will appear as the process runs. If successful, you will see "Task complete: DiscoveryImport".
-
Click Close when done. The new secret will now appear in the folder you designated previously.
Task 4: Creating an Import Rule
Discovery rules automatically create secrets and send emails when local accounts or public keys match the rule.
To create a rule to import discovered SSH public keys:
-
Access Discovery > Network View. The Discovery Network View page appears.
-
Click the Create Rule button. The Create Rule wizard appears:

-
Select the Rule Type: Accounts or Dependencies.
-
Fill in the following fields if you chose Accounts:
-
Computer Name Contains
-
Account Name Contains
-
Operating System Contains
Make sure the Manage Accounts checkbox is selected. Selecting to manage accounts indicates that secrets will be created and the service and accounts will be managed by the vault.
-
-
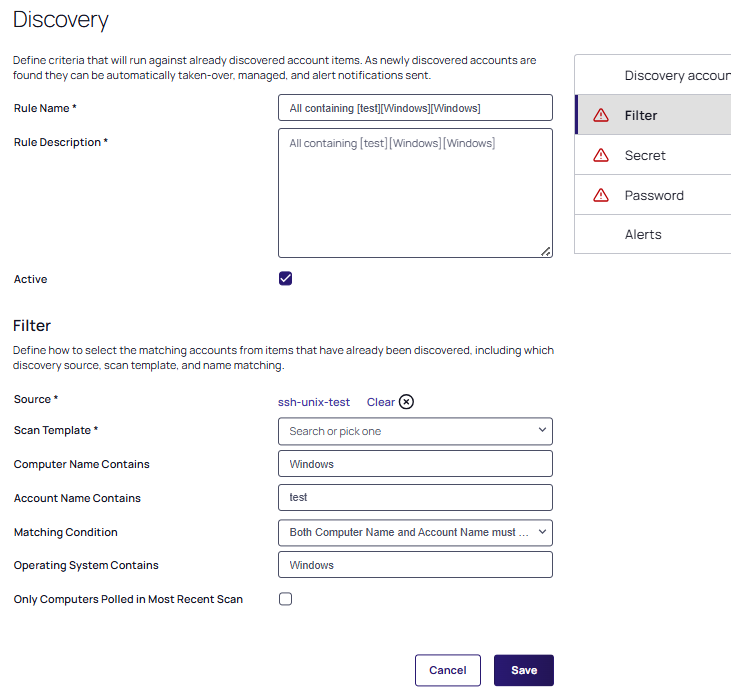
Click Create Rule to save your changes. The Discovery Account Rule page appears:

-
The Rule Name field contains the values of the three fields you completed in step 4. The Rule Description contains a duplicate of the rule name values. You can change both manually.
-
Make sure the Active checkbox is selected.
-
Under the Filter section, click on the Source link that displays as None Selected. The Pick OU popup appears.
-
Select the Unix source you created in step 1 from the list and the Filter section will automatically display fields like the following:
-
Most of the fields are completed automatically. Choose the Scan Template from the dropdown list, in this case SSH public key:

-
You can alter the Marching Condition and select or deselect the Only Computers Polled in Most Recent Scan checkbox.
-
Add in the Public Key for your account user (previously created or associated in the prerequisites).
-
In the Secret section under Filter define where, how, and what type of new secret will be created:
-
Select the Create Secrets checkbox.
-
From the Secret Template dropdown list, choose one of the two options: Unix Account (SSH Key Rotation - No Password) or Unix Account (Privileged Account SSH Key Rotation - No Password).
-
-
Click the Folder link to select a folder in which the secret will be created.
-
Type a name in the Secret Name text box (It auto fills
$MACHINE\$USERNAME Key). -
Click the New Secret Permissions dropdown list to choose how permissions are propagated for the new secret, either copied or inherited from the folder.
-
Click the Site dropdown list to select a site. The Password section appears.
-
In the Password section, select one of the following options:
-
I have the matching private key - This choice causes the following to appear:
-
Current Private Key field: copy and paste the account's current private key in this field.
-
Current Passphrase: copy and paste the account's current passphrase in this field.
-
Password Changing Privileged Account: click the link to select a secret.
When passwords for the secret added here are changed in the future, this privileged account will be used.
-
-
I want to change the public SSH key on the Account - This choice causes the following to appear:
-
Take-over threshhold: this field displays 1000 by default and can be changed to another value.
If the number of accounts that will be taken over exceeds the max threshold, the import is canceled and the subscribed users below are notified by email. -
Initial Takeover Secrets: this button allows you to add multiple secrets to modify.
This privileged account will only be used on the initial takeover of the account.
-
Password Changing Privileged Account: this button allows you to add multiple secrets to modify.
When passwords for these secrets are changed in the future, this privileged account will be used.
-
-
-
In the Alerts section, you have the option of selecting to send an email alert for newly discovered accounts.
Example:

-
Click Save when all your settings are complete.
-
Return to the Discovery Network View page.
-
Click View Rules and select the Account or the Dependency tab depending on your rule type, to see a list of rules including the one you just created.
Troubleshooting SSH Key Import Issues
If the import fails, consider the following:
-
Public key not found: Ensure the key exists in
~/.ssh/and is readable. -
Authentication failures: Check that the public key is correctly associated with the target account.
-
Debugging SSH authentication: Increase logging verbosity with by using the
ssh -vvv username@remote-servercommand. -
Scanning for public keys: If the system supports key discovery, verify that the process is correctly configured.