Using the Secret Server SDK for DevOps
Overview
The Secret Server Software Development Kit for DevOps tool, was created for securing and streamlining DevOps processes in regard to Secret Server. The SDK for DevOps tool allows you to efficiently engage Secret Server via a Command Line Interface (CLI) without compromising security. It allows for secure retrieval of credentials from, as well as tracking access to a secure vault.
The SDK uses the REST API Reference Download. The SDK is a .NET library (available via a NuGet package), which you can use in a custom application. The SDK .NET library exposes a limited subset of the REST API.
There is also a .NET Core CLI SDK Client that uses the SDK .NET library. The SDK Client was created to allow customers to write automation scripts to access secrets without having to write code to directly access the REST API.
The .NET SDK library and the .NET Core CLI client both:
- Automatically store the credentials and remote server used to acquire an OAUTH token and stores them in a file. For Windows, the file is encrypted file. For Linux, the file needs to be secured by the customer. The token is then used to make subsequent API calls. OAUTH tokens have an expiration time, which is configurable in the UI on the configuration page via the Session Timeout for Webservices value..
- Get the contents of a secret.
- Provide client-side caching (SDK client caching).
Secret Server has user and application accounts. Both types of accounts can access Secret Server via the REST API. Application accounts are not counted for licensing purposes. Application accounts can only access Secret Server via the REST API. Both account types never expire.
Secret Server provides security for automated clients. SDK rules manage permissions. Client IDs are created when SecretServerClient.Configure() or tss init is called. The client ID is used to reference SDK client instances.
How it Works
The SDK is a console application written in .NET Core that wires up its own credentials based on the machine it is installed on. Those credentials, called DevOps Users, do not have any rights in Secret Server but can be assigned to other Secret Server users or application user accounts, mimicking permissions to access secrets.
This removes the widespread DevOps issues with hard coding credentials into scripts and configuration files. Instead, the target system is registered via IP address which is whitelisted, providing REST authentication without entering user credentials. You can use the SDK to retrieve a REST user token for our REST API, or you can use the SDK to perform direct queries on Secret Server.
The SDK establishes secure access points so that PowerShell users can employ the Secret Server API directly from the CLI, without wasting time entering privileged account passwords.
Configuration Overview
Secret Server exposes a REST API interface that is used by the SDK client. When the SDK sends a REST request, Secret Server determines where the request came from (via IP address) and what permissions it should be granted (via a rule set in Secret Server). Once the client is initialized with Secret Server and the rule name, this configuration is stored on the client machine. For Windows, the configuration is encrypted automatically. For Linux, the configuration file needs to be secured by the customer, ready for subsequent calls.
Out of the box, the SDK offers:
- Token retrieval
- Secret retrieval
- Secret field retrieval
The SDK requires setup in two areas: Secret Server configuration and SDK installation on the DevOps system.
Required Roles and Permissions
- Administer Configuration: Allows a user to enable SDK functionality in Secret Server, that is, to enable webservices and the SDK itself.
- Administer Create Users: Allows a user to access the Settings > All settings > Tools and integrations > SDK client page in Secret Server.
- Administer scripts: This permission is required to be able to create an SDK Client Onboarding rule. It allows a user to view and edit PowerShell, SQL, and SSH scripts on the Scripts Administration page.
- Administer Users: Allows a user to operate the SDK to retrieve account credentials on client machines. Alternatively, you can be the owner of the application account used by the SDK.
- View Launcher Password: Allows a user to unmask the password on the view screen of secrets with a launcher. Typically, this includes Web Passwords accounts, Active Directory accounts, Local Windows accounts, and Linux accounts.
Setup Procedure
Task 1: Configuring Secret Server
Configure Secret Server for communication with the SDK
-
Search for SDK Client, the SDK Client Management page opens.
-
Under the Configuration tab, click Edit, and check to select Enable SDK Configuration. When done, click Save.
-
Search for Application.
-
On the Application page click Edit and select the Enable Webservices check box.
-
Leave the default settings for webservices and click Save.
Select or Setup Application Accounts
Select or setup any application accounts that you want for use by SDK clients. Make sure these application accounts have appropriate permissions to access any secrets or execute any operations the client host needs to perform.
To create a new application account with the needed permissions:
-
Search for Users, the User Management page appears.
-
Click the Create user button. The Add User popup appears.
-
Fill in the following fields:
-
Username: the account name.
-
Display name: the searchable name for the account of your choice, can be the same as the username.
-
Domain: leave as is with the default Local value.
-
New Password and Confirm Password: a password of your choice.
-
Email: type in an email (optional).
-
Select the Application Account checkbox.
-
Multifactor authentication: leave as is with the default <None> value.
-
Make sure the Enabled checkbox is selected.
-
-
Click Add User.
-
Create a new role:
-
Search for Roles.
-
Click Create Role. The Create Role popup appears.
-
Type in a Name and make sure the Enabled checkbox is selected.
-
Click Create Role. The page for the new role appears.
-
Assign the View Secret permission to this role:
-
Select the Permissions tab and click Edit.
-
Change the Scope selection to All, and search for the View Secret permission with the search box.
-
Select it and click Save.
-
-
-
Assign the role you just created to the application user created above:
-
Access the role you just created, it has no users assigned.
-
Under the Assignment tab click Edit, the Scope option appears. Change its value to All.
-
Search for the user you previously created, toggle the Domain option as needed to show all users.
-
Add the user by selecting the checkbox by its name and clicking Save.
-
- Assign the View Launcher Password role permission to the application user previously created if this account requires access to secrets with launchers associated to them. Use the same steps for assigning this permission as described for View Secret in the previous steps.
Set up an SDK client rule
-
Search for SDK client. This will lead you to the SDK Client Management page.
-
Under the Client Onboarding tab, click Create rule. The New Rule page appears.
-
Type in a relevant name in the Name field without any spaces. For example:
ProductionWebApp. -
Optionally, leave the Allowed IP Ranges (CIDR) field blank, or type in an IPV4 address, or use CIDR notation.
Secret Server will only allow clients to use this rule if they connect from a valid IP address. If not provided, Secret Server will not enforce IP address restrictions on this rule. We strongly recommend using this feature.
There is a 250-character limit, so you can only add a few dozen IP addresses unless you use CIDR notation.IPv6 addresses are not supported. -
For the User drop-down list leave the default All value selected.
-
In the search box next to the dropdown, look for the application user you just created and select it.
Clients are granted the same permissions as this account within Secret Server. If not provided, an account will be automatically created for clients, but will have no default permissions. You must use an application account (the one you created) for the rule. Application accounts are restricted from logging into the system through the normal user interface and do not count towards your license quota. -
Select the Require Onboarding Key checkbox.
Clients must provide a generated additional key string when authenticating. If not provided, Secret Server allows any client to use the rule if its IP address is within the specified range. We strongly recommend using this feature.
-
When done, click Save.
The page for the new rule you just created will load automatically.
-
Return to the SDK Client Management page, and under the Client Onboarding tab click on the rule that you have just created, the rule details will expand to the right of the screen.
-
Select Show Key, then copy and save the generated onboarding key value, e.g.
U9Ue9PsMYknfoskQvd/0BYMTaTTx2vtWbB/tHI3exDE=, for future use.
Task 2: Installing the SDK Client
-
Access Downloads for the Secret Server SDK for DevOps and choose the right kit for your platform. We recommend always using the latest version available.
-
Extract/unzip the SDK zip file you downloaded.
-
Optionally, to get the SDK NuGet packages, see our documentation on GitHub.
-
-
For Linux systems, you must make the tss program executable by running
chmod u+x tss. -
On Linux systems, you must install libunwind:
- On Red Hat or Centos, run
sudo yum install libunwind libicu - On Ubuntu, run
sudo apt-get install libunwind-dev
- On Red Hat or Centos, run
-
For Windows, open a console window by clicking the Start menu and searching for cmd.
-
Inside the Command Prompt type
cd [location of the downloaded zip file]/[location of extraction folder].E.g.
cd downloads/secretserver-sdk-1.5.9-win-x64 -
To confirm the SDK client tool is installed and working, run help:
- On Windows, run
tss --help - On non-Windows systems, run
./tss --help
- On Windows, run
Task 3: Connecting to Secret Server
Before the client can retrieve data from Secret Server, it must be initialized to connect to the Secret Server instance. This is a one-time operation on the client machine.
SDK connections are Windows-user-specific (DPAPI encryption).
On Windows, the credentials.config file created by tss init is encrypted using the Windows Data Protection API (DPAPI), which binds the encryption to the Windows user account that ran tss init. This means:
A different Windows user cannot decrypt or use the same credentials.config file, even with Administrator privileges.
If a second Windows user runs tss init or tss token in the same folder, they will overwrite the existing credentials.config, invalidating the first user's registration. The first user will receive the error secret-server credentials not present. Run tss init to initialize the connection. and must re-run tss init to restore their connection.
Sharing a single SDK folder between multiple Windows users on the same host is not supported.
To initialize your connection:
-
Click the Start menu and search for cmd.
-
Inside the Command Prompt type
cd [location of the downloaded zip file]\[location of extraction folder].E.g.
cd downloads\secretserver-sdk-1.5.9-win-x64 -
Run
tss -ito use interactive mode: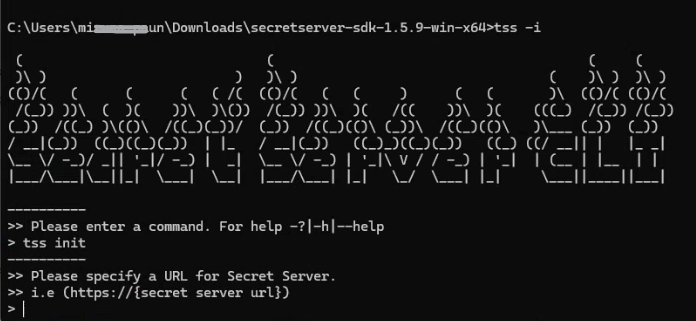
-
Type
initand press enter. -
When prompted for the URL, copy and paste the URL of your Secret Server instance, and press enter.
E.g. https://[secret server url].
-
You are then prompted to specify the rule you created previously in the SDK Client Management page. Type in the rule name and press enter. E.g
ProductionWebApp. -
You are now asked if you wish to specify an onboarding key. Enter yes.
-
The prompt to specify the key appears. The key was copied after you created the rule. E.g.:
CNrQwRBscnq4qAZ6v3EIAcE27vQuLlz6KSpfRJHryyA=. You need to paste it in the Command Prompt window and press enter: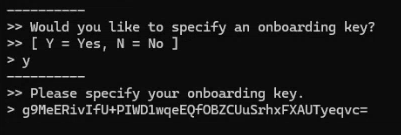
-
The "Your SDK Client account registration is complete" message appears. Keep this window open, do not exit.
-
Return to your Secret Server instance and to the SDK Client Management page.
-
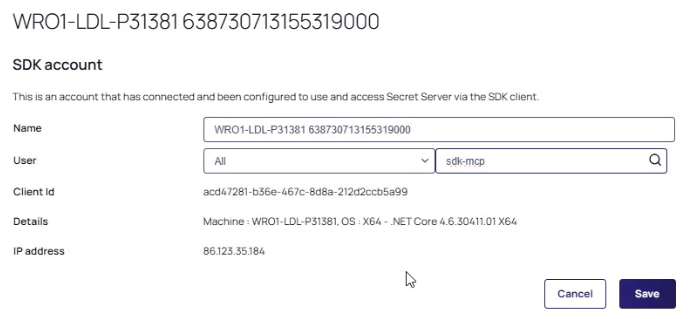
In the Accounts tab, click on the account that now appears after performing SDK initialization. The side menu appears with information about the account.
-
Click View details.
-
Inside the SDK account page, click Edit.
-
Search for the application account/user you previously created in Task 1, e.g:
-
Add the application account username in the box for the User search field, it will return a list of users. Pick the one you need and click Save.
If this is not done the SDK Client will return this error:invalid_client. -
Return to the Command Prompt window you kept open. You will now enter the command to view your secret ID
tss secret -s [secret id]: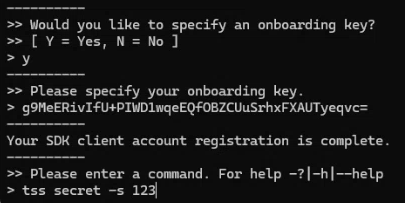
-
The prompt to specify a field appears, enter no.
-
The Secret will successfully display in the tss application.
Secret Server verifies the client’s credentials and IP address restriction (if specified). Once validated, the client and server establish a connection allowing the client to retrieve data from Secret Server.
To perform this operation outside of interactive mode, run tss init --url [url] -r [rule] -k [key] using the parameters you recorded earlier for your instance.
Example of operation and parameters to run for connection initialization:
tss init --url https://myserver/SecretServer/ -r ProductionWebApp -k CNrQwRBscnq4qAZ6v3EIAcE27vQuLlz6KSpfRJHryyA=
Usage Examples
- Retrieving a secret by ID (returns a JSON structure describing the entire secret record):
tss secret -s 4 - Retrieving all secret field values for a secret by ID:
tss secret -s 4 -ad - Retrieving only the value of a particular secret field by secret ID:
tss secret -s 4 -f password - Writing a secret field value to a file:
tss secret -s 4 -f password -o passwordfile.txt - Retrieving an access token for use in other REST API requests:
tss token -
Retrieving a secret by ID when that Secret requires a comment:
tss secret -s 4 -c comment
The SDK client includes an interactive mode (tss -i) that allows you to input multiple commands into a series of prompts. To exit interactive mode, run the exit command.
SDK Client Management
To view and manage a list of connected SDK clients from within Secret Server:
-
Search for SDK client. The SDK Client Management page appears.
-
In the Accounts tab a list of connected SDK clients appears for all users if available. You can remove or rename them. You can also filter clients by User.
-
Select the Client Onboarding tab to create and manage client onboarding rules.
-
Select the Configuration tab to disable or enable all SDK client activity.
-
Select the Audit tab to see date and time-stamped SDK client activity concerning onboarding rules and client secrets.
-
To remove the Secret Server connection from a client machine, run the
tss removecommand. This deletes the connection, and the client can no longer retrieve Secret Server data without being re-initialized.
SDK Client Caching
Overview
To increase performance and reliability, you can configure the SDK client to cache values retrieved from Secret Server on the client machine. Cached values are stored on disk. For Windows, the cached values are encrypted automatically. For Linux, the cached values need to be secured by the customer. You can configure client caching in one of four ways:
- Never (0): With this default setting, the client never caches Secret Server data. All data requests result in a query directly against the Secret Server instance. If the instance is unavailable, the requests fail.
- Server Then Cache (1): With this setting, the client first attempts to retrieve the value from the server. If the server is unavailable, it checks to see if the same value has been previously fetched within a given period, and if so, it will return the cached value. Use this setting to guard against losing connection to Secret Server.
- Cache Then Server (2): With this setting, the client first checks to see if the same value has been previously fetched within a given period. If so, it returns the value without consulting the server. If not, it fetches, caches, and returns the value from the server. Use this setting for increased performance by reducing requests sent to Secret Server.
- Cache Then Server Fallback on Expired Cache (3): This strategy operates similarly to "Cache Then Server," but if the server is unavailable and an expired value exists in the cache, the client returns that value as a last resort. Use this strategy for increased performance and reliability.
All these cache strategies have a configurable age, in minutes, after which the value is considered expired and not used (except in Cache Then Server Fallback mode). Cache settings are set using the client application, see the examples below for more details.
Examples
- Turn off caching:
tss cache --strategy 0 - Turn on the Cache Then Server setting with a cache age of five minutes:
tss cache --strategy 2 --age 5 - Immediately clear all cached values:
tss cache --bust - Show the current cache settings:
tss cache --current