Enabling Common Criteria Security Hardening
For release dates, end-of-support timelines, and upgrade guidance, see the Secret Server Product Lifecycle page.
You can view the latest version of the Secret Server documentation here.
Secret Server releases 10.4 and later provide security features enabling users to achieve Common Criteria certification. Due to the stringency of the standards and the need for customized user configuration, not all of these features are automatically set by the installer application. Instead, an administrator must configure some settings, and this documentation provides the information to perform those configurations to comply with the Common Criteria evaluated configuration.
This documentation is closely associated with the Security Hardening Report in Secret Server (Click Reports > Security Hardening). Follow the checklists in Secret Server to adjust parameters to achieve Common Criteria certification.
Security Hardening Checklist
After installing Secret Server, navigate to the Reports > Security Hardening tab, and follow the checklist to ensure your environment is as secure as possible: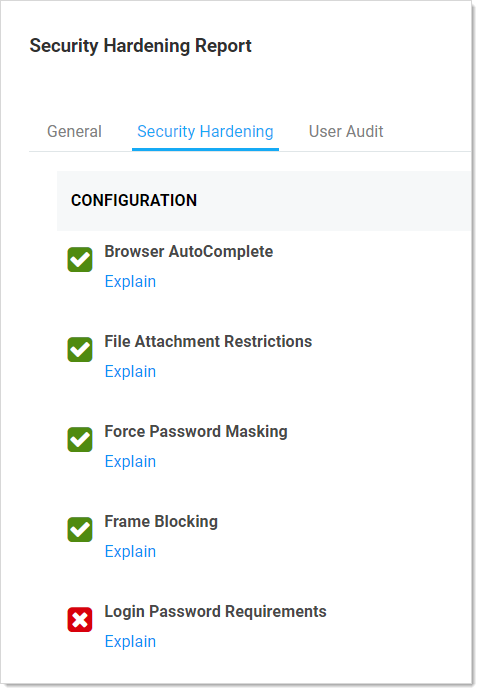
Evaluated Configuration
The Target of Evaluation (TOE) is DelineaSecret Server Government Edition v10.1, a software application used in the enterprise settings to define and maintain user credentials within a large organization. The evaluated configuration consists of the software application running on Windows Server 2016 (or later) with Microsoft .NET Framework 4.6.2 (or later) and Microsoft SQL Server 2016 (or later) database, installed locally.
DelineaSecret Server – Government Edition can manage any IT asset compatible with the following types of credentials:
-
Windows Accounts
-
Active Directory accounts
-
Unix accounts (SSH)
These credential types define a broad range of compatible ESM products. Generally, Linux 2.6.32 or later, Windows Server 2008 R2 or later, Windows 7 Enterprise or later would be compatible.
Assumptions and Operational Environment
There are specific conditions that are assumed to exist in the TOE's Operational Environment. The following table lists assumptions about the Operational Environment as specified by the Protection Profile:
| Assumption Name | Assumption Definition |
|---|---|
| A.CRYPTO | The TOE will use cryptographic primitives provided by the Operational Environment to perform cryptographic services. |
| A.ENROLLMENT | There will be a defined enrollment process that confirms user identity before the assignment of credentials. |
| A.ELECTRONIC SUPPORT MEASURES (ESM) | The TOE will be able to establish connectivity to other ESM products in order to share security data. |
| A.FEDERATE | Third-party entities that exchange attribute data with the TOE are assumed to be trusted. |
| A.MANAGE | There will be one or more competent individuals assigned to install, configure, and operate the TOE. |
| A.SYSTIME | The TOE will receive reliable time data from the Operational Environment. |
The following table identifies the organizational security policies applicable to the TOE as specified by the Protection Profile:
| Policy Name | Policy Definition |
|---|---|
| P.BANNER | The TOE shall display an initial banner describing restrictions of use, legal agreements, or any other appropriate information to which users consent by accessing the TOE. |
Table: Organizational Security Policies
Configuring TLS
To achieve Common Criteria certification on Secret Server, you must enable Transport Security Layer (TLS).
Manually Disabling TLS Version 1.0
TLS 1.0 is no longer considered secure, so it is important to disable this version of the protocol on Secret Server. To do this, follow the instructions in Manually Disabling TLS v1.0.
TLS Diffie-Hellman Hardening Overview
For information on configuring your servers with stronger Ephemeral Diffie-Hellman hardening, see the TLS Diffie-Hellman Hardening Overview.
Restricting Server Cipher Suites for TLS
Allowed Suites
Common Criteria certification requires restricting the cipher suites configured on your server to only:
- TLS_DHE_RSA_WITH_AES_128_CBC_SHA
- TLS_DHE_RSA_WITH_AES_256_CBC_SHA
- TLS_RSA_WITH_AES_128_CBC_SHA
- TLS_RSA_WITH_AES_128_CBC_SHA256
- TLS_RSA_WITH_AES_256_CBC_SHA
- TLS_RSA_WITH_AES_256_CBC_SHA256
Restricting them can cause communication issues with other servers if they are not able to communicate using any of the above ciphers. In that case, you need to modify those servers to include these cipher suites to securely communicate according to Common Criteria guidelines.
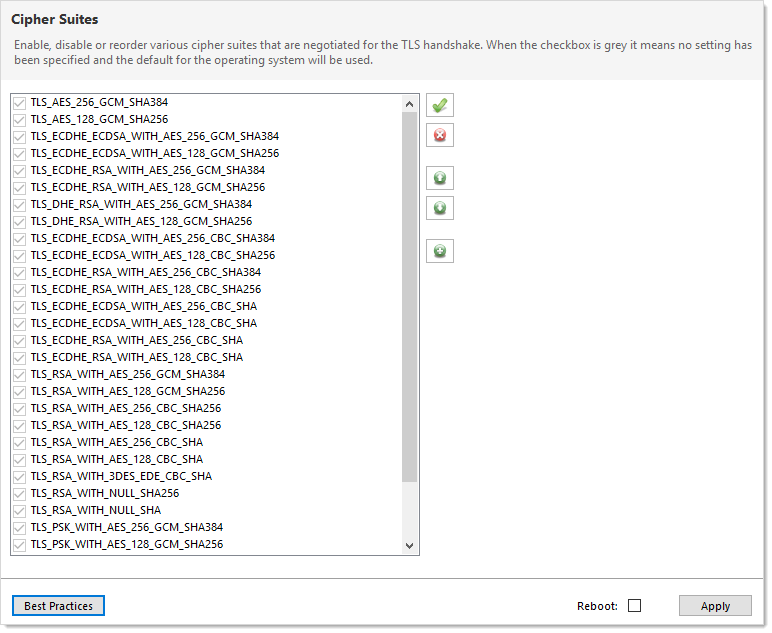
Changing Cipher Suites with the IIS Crypto Tool
One way to change the cipher suites on a computer is to use the free IIS Crypto tool:
-
Download the GUI version of the NARTAC IISCrypto tool.
-
Run the tool:

-
Click Cipher Suites button on the left. The Cipher Suites window appears:
-
Click the
 Uncheck All button to uncheck all cipher suites
 -
Find and click to select the suites in the list above.
-
Click the Apply button.
Configuring TLS with IIS
Common Criteria certification requires using HTTPS/SSL for all connections to the Secret Server Web page. To do this, follow the instructions in TLS Configuration with IIS.
Enabling TLS Auditing
To have Secret Server audit TLS connections and connection failures, follow the instructions in Configuring Auditing for TLS Connections.
Configuring TLS with Active Directory
To ensure that TLS is configured with Active Directory Follow the instructions in Configuring TLS with Active Directory.
Configuring TLS with Syslog
To configure TLS with Syslog, follow the steps in Configuring Syslog/CEF External Audit Server.
Additional Common Criteria Configurations
Configuring X.509v3 Certificates
For instructions on installing and configuring certificates on the Secret Server Web servers, see Configuring X.509v3 Certificates.
Enabling DPAPI
The Windows Data Protection API (DPAPI) is a pair of functions that allow access to operating-system-level data protection services to protect the master encryption key file, encryption.config.
To enable DPAPI, follow the instructions in the Verify DPAPI Setting Is Enabled section.
Enabling FIPS Mode
To configure your server and Secret Server to use the Federal Information Processing Standard (FIPS), follow the instructions in the Verify FIPS Mode Is Enabled.
Ensuring Zero Information Disclosure
To comply with Common Criteria requirements, you must configure Secret Server to not display any unnecessary information. This applies to unhandled errors as well as the application version number.
Configuring Custom Error Messages
To hide detailed error messages and display a custom message when an unhandled error occurs:
- Open
https://<your_secret_server_url>/ConfigurationAdvanced.aspxin your browser. - Scroll to the bottom of the page and click the Edit button.
- Type the message you want displayed to users in the Zero Information Disclosure Message text box.
- Click the Save button.
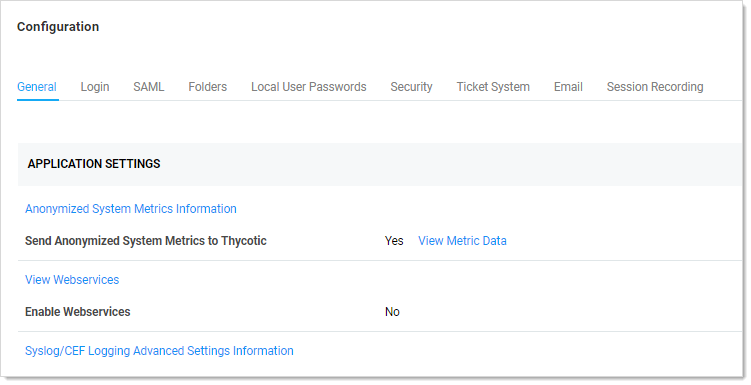
Hiding the Application Version Number
To hide the application version number in the application header and footer:
-
Go to Admin > Configuration > Security.
-
Click the Edit button. The Configuration page appears:
-
Click the Security tab.
-
In the Web Services section of the page, click to select the Hide Secret Server Version Numbers check box.
-
Click the Save button.
Configuring the Login Banner
For Common Criteria compliance, when a user first logs in, the login banner must reveal the user policy agreement and force that user to agree to the policy before logging into Secret Server. To configure the Login Banner according to Common Criteria guidelines, follow the instructions in Configuring the Login Banner.
Configuring Account Lockout
To access Secret Server, users must login with local or domain credentials. To comply with Common Criteria, Secret Server must use "account lockouts" to prevent repeated unsuccessful login attempts. Configurable by an Secret Server admin, an account becomes inaccessible after a defined number of unsuccessful authentication attempts until an admin unlocks the user's account.
To configure settings for account lockouts:
- Navigate to Admin > Configuration.
- Click the Login tab.
- Click the Edit button.
- Adjust the number in the Maximum Login Failures text box. The default is five attempts.
To Unlock a user's account:
- Navigate to Admin > Users > Select the User.
- Click the Edit button.
- Click to deselect the Locked Out check box.
- Click the Save button.
Disabling "Remember Me" Logins
A browser's "remember me" login function stores the user's login name and password so the user does not need to enter it again on that browser, which is both convenient and insecure. To disable "Allow Remember Me" during logins, follow the instructions in How to Disable Allow Remember Me during Logins.
Configuring SQL Server
To meet Common Criteria requirements, Microsoft SQL Server must be installed on the local machine—the same as the Secret Server Web server. During the install process for MS SQL, ensure that you use Windows authentication mode.
If you have an installed instance of Secret Server that does not meet this requirement, you can migrate the remote database to the server hosting Secret Server. If MS SQL Server is not installed and configured on the Secret Server, you must install it. The server must be configured with enough RAM, storage space, and processors to support running MS SQL Server and the Web site simultaneously. After copying the database, you can go to Admin > Database to point Secret Server to the new database location.
Running the IIS Application Pool with a Service Account
To use Windows authentication to access the SQL database, you should create a service account. To run the Secret Server IIS Application Pool with a service account:
-
Open a command prompt window, change the directory to your .NET framework installation directory (usually
C:\Windows\Microsoft.NET\Framework…) using thecdcommand. -
Type
.\aspnet_regiis -ga <user_name>and press <Enter>. The username is from the MS SQL Server user account. -
Give your service account "modify" access to
C:\Windows\TEMP. -
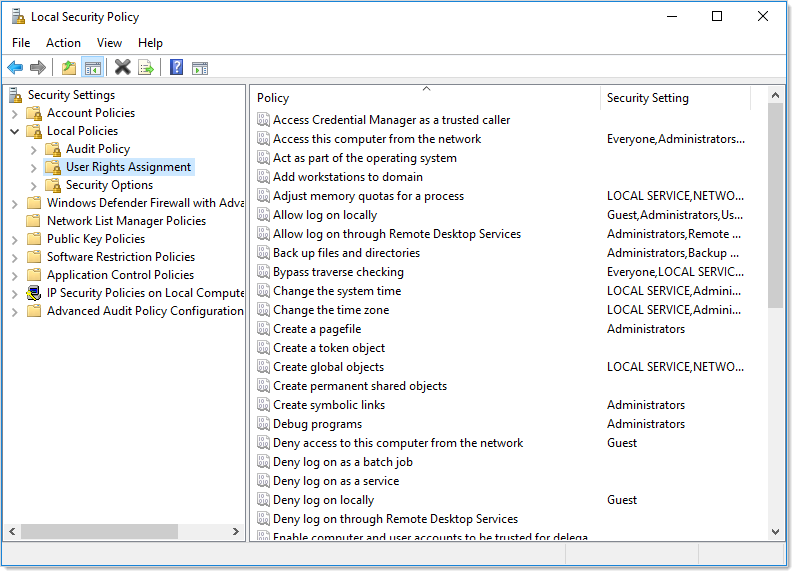
Open the Local Security Policy App from your start menu.
-
Grant batch logon permissions to your service account:
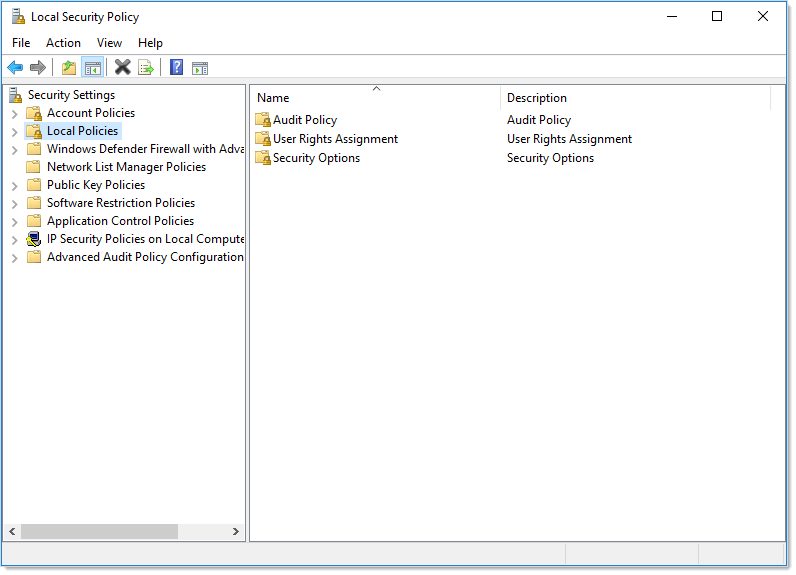
- Open the Local Security Policy Console (search for and open
secpol.msc): -
Expand the Local Policies folder (not shown).
-
Click to select the User Rights Assignment folder.
-
Right-click Log on as a batch job in the right panel and select Properties.
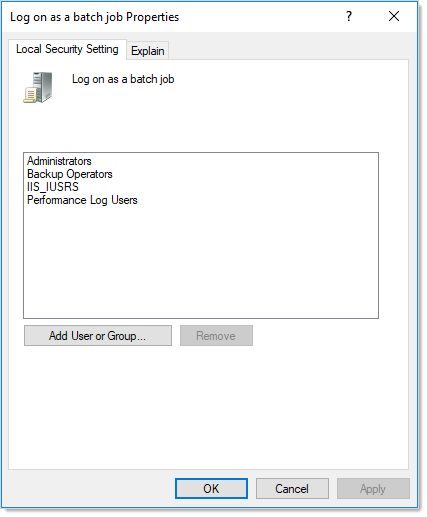
-
Click the Add User or Group button.
-
Add your service account.
-
Click the OK button.
- Open the Local Security Policy Console (search for and open
- Grant "Impersonate a client after authentication" permission to the service account under User Rights Assignment the same way "Log on as a batch job" was assigned above.
-
If you now get a "Service Unavailable" error after applying "Log on as a batch job" permissions:
- Update your group policy settings (Start > Run > Cmd and type
gpupdate /force) and restart the Windows Process Activation service.
- Update your group policy settings (Start > Run > Cmd and type
Assigning Common Criteria Roles and Permissions
See the "Common Criterial Roles and Permissions" section of the Common Criteria Hardening Guide.
Managing User Passwords
See "Managing User Passwords."
Configuring Secret Templates
To enable only the secret templates that are certified Common Criteria compliant and to set Common Criteria-compliant password policies on those templates, see "Configuring Secret Templates" and "Configuring Password Policy for Secret Templates."
Setting Authentication Strength for Non-Password Credentials
See "Authentication Strength for Non-Password Credentials."
Configuring Remote Password Changing for SSH Key Rotation
See "Configuring Remote Password Changing for SSH Key Rotation."
Configuring External Auditing
Connecting to an External Audit Server
To connect to an external syslog/CEF audit server, see "Security—Connecting to an External Audit Server" and "Configuring Syslog/CEF External Audit Server."
Configuring Local Windows Event Log Auditing
See "Configuring Local Windows Event Log Auditing."