Configuring Common Criteria
For release dates, end-of-support timelines, and upgrade guidance, see the Secret Server Product Lifecycle page.
You can view the latest version of the Secret Server documentation here.
Verify Settings in Government Edition
Verify DPAPI Setting is Enabled
The Delinea Government Edition Installer will automatically set encryption in Secret Server to use DPAPI. To verify that DPAPI is in use, navigate to Admin ZZ_BAR_ZZ Configuration ZZ_BAR_ZZ Security tab and ensure that DPAPI is enabled by scrolling to the bottom of the page and checking the existence of the Decrypt Key to not Use DPAPI button.
If DPAPI is not enabled in your Secret Server installation, this button will say “Encrypt Key to Use DPAPI.” To maintain compliance with Common Criteria standards do not decrypt the Secret Server key.
Verify FIPS Mode is Enabled
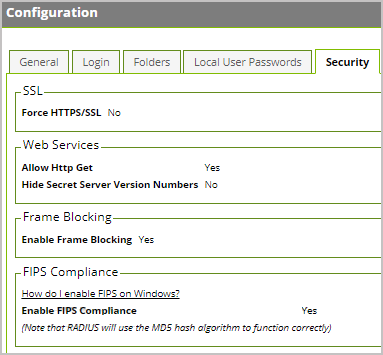
Common Criteria evaluations rely on FIPS 140 validations to provide assurance that cryptographic functionality is implemented properly. The Secret Server Government Edition Installer checks for FIPS encryption security standards on the Windows local server and enables FIPS mode by default in Secret Server. To check this setting, go to Admin ZZ_BAR_ZZ Configuration ZZ_BAR_ZZ Security tab and ensure that the Enable FIPS Compliance line is set to Yes.
Manually Enabling FIPS on Windows Local Server
The Secret Server Government Edition Installer ensures that FIPS Compliance is automatically enabled in Windows on your local server. To verify or do this manually:
-
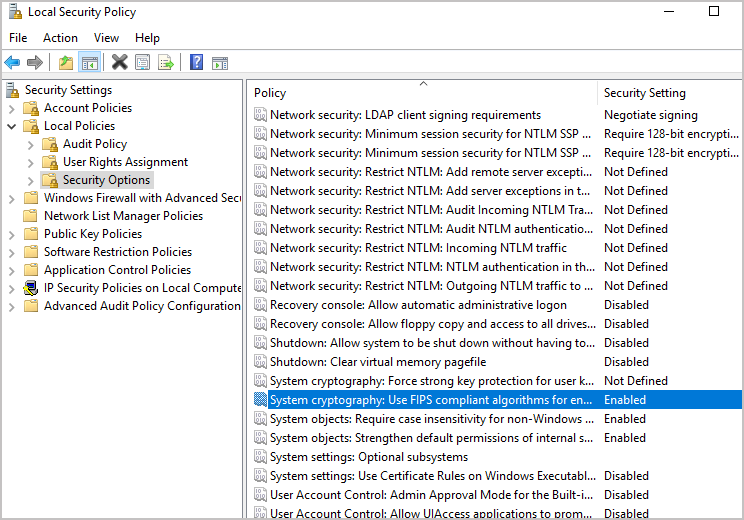
Go to Windows Local Security Policy editor (secpol.msc)
-
Navigate on your left pane to Security Settings ZZ_BAR_ZZ Local Policies ZZ_BAR_ZZ Security Options
-
Find and go to the property of System Cryptography: Use FIPS Compliant algorithms for encryption, hashing, and signing...
-
Choose Enable and click OK.
- Restart your Server with iisreset
The Microsoft .NET implementations of AES and SHA are not FIPS certified so Secret Server uses the Windows API versions for encryption functionality which *are* FIPS certified. More information on the FIPS certificate numbers for the Windows operating systems, including the algorithm implementations that we use can be found at:http://technet.microsoft.com/en-us/library/cc750357.aspx
Manually Disabling TLS v1.0
To disable the TLS 1.0 protocol so that IIS does not try to negotiate using the TLS 1.0 protocol, follow these steps:
-
Click Start, click Run, type regedt32 or type regedit, and then click OK.
-
In Registry Editor, locate the following registry key:
HKey_Local_Machine\System\CurrentControlSet\Control\SecurityProviders \SCHANNEL\Protocols\TLS 1.0\Server
If the subkeys “Server” or “Client” do not exist, create them under the TLS 1.0 key.
-
On the Edit menu for each subkey, click Add Value.
-
In the Data Type list for each subkey, click DWORD.
-
In the Value Name box for each subkey, type “Enabled,” and then click OK.
*Note If this value is present, double-click the value to edit its current value.
-
Type 00000000 in Binary Editor to set the value of the new key equal to "0".
-
Click OK. Restart the Windows Server.
More information can be found at https://support.microsoft.com/en-us/help/187498/how-to-disable-pct-1-0-ssl-2-0-ssl-3-0-or-tls-1-0-in-internet-informat
Microsoft Cryptographic Engine
Secret Server relies on Windows Server 2016 Standard Edition to provide protocol and cryptographic functionality. Windows Server 2016 Standard Edition implements a FIPS certified (CMVP #2937) Cryptographic Primitives Library.
More information on the FIPS 140 certificate numbers for the Windows operating systems, including the algorithm implementations that we use can be found at: http://technet.microsoft.com/en-us/library/cc750357.aspx
Configuring X.509v3 Certificates
In order to maintain compliance with Common Criteria standards, the following installed certificates must follow the standard X.509v3 digital certificate structure.
*Do not use self-signed certificates in production environments.
Installing Certificate in Trust Store
To best protect the users of your Secret Server website, use an SSL certificate from a trusted root authority and install it on your web server(s).
-
It is possible to use a self-signed certificate in demo or sandbox environments as long as all other machines used to access Secret Serverare also configured to trust the certificate. Otherwise, users will receivewarnings about it being invalid and unsafe to navigate to your Secret Server URL.
-
Local machines either need to Import your public certificate into the Trusted People certificate store if you used IIS to create it, or If you used OpenSSL and set up a custom Root CA to sign your web server certificate, the Root CA must be imported into the Trusted Root Certification Authorities store.
-
If a custom Intermediary CA is created, this must also be imported into the Intermediate Certification Authorities store.
If Secret Server will be communicating with any remote server using TLS, any Root CAs and Intermediate CAs in the trust chains of the certificates presented by those remote servers must be added to the Trusted Root Certification Authorities and Intermediate Certification Authorities stores respectively. This includes syslog and LDAPS servers.
Follow the steps below to install a certificate in the Trusted Root CA store:
-
On your local machine open mmc.exe, select File, then Add/Remove Snap-In…
-
Next choose Certificates and then Add. Select Computer Account, then Local Computer. Click Finish.
-
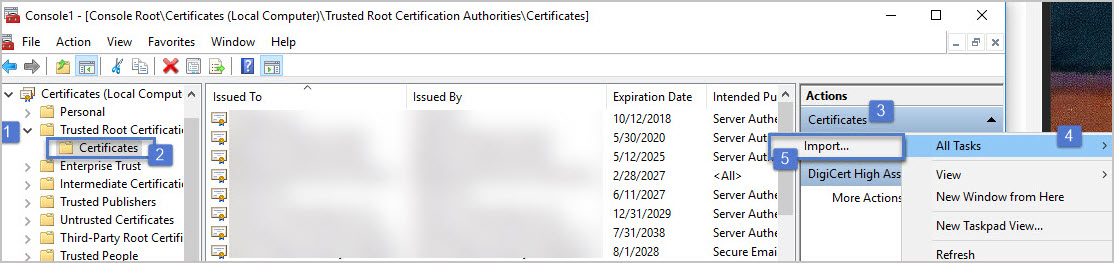
Open Certificates (Local Computer), then expand the Trusted Root Certification Authorities store/folder from the left pane and select Certificates, then in the right-side Actions pane select More Actions, All Tasks, and Import…
-
Click Next then select the certificate to import. This is usually a file with a file extension of .cer, .crt, .pem, or .pfx and click Next.
-
If prompted, enter the certificate’s password and click Next.
-
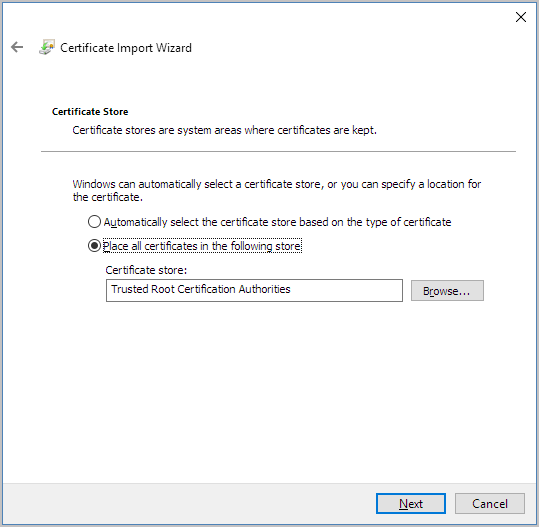
Leave the selected options at the Certificate Store step and click Next.
-
Click Finish to import the certificate
To import and Intermediate Certificate Authority follow the same steps for a Root Certificate Authority but select Intermediate Certification Authorities in step 3 instead of Trusted Root Certification Authorities. In step 6, the selected certificate store should also say Intermediate Certification Authorities.
Configuring Web Certificate
To install a web certificate for use by IIS:
-
Open IIS Manager by clicking Start, clicking Run, typing in “inetmgr”, and clicking OK.
-
Click on the server node (one of the root nodes) in the left panel, and double click on Server Certificates.
-
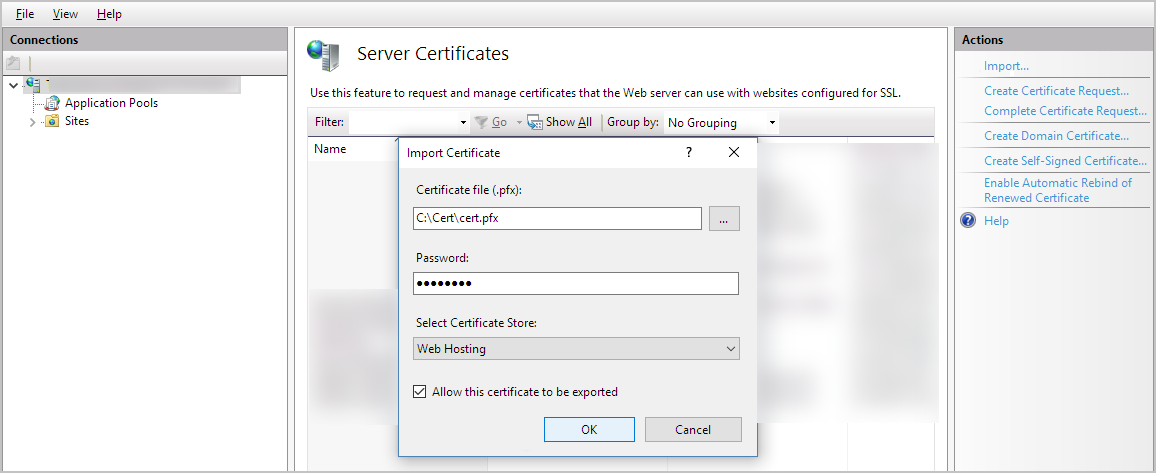
Click Import… in the right-hand Actions panel
-
Select the certificate to use, enter the password, select “Web Hosting” in Select Certificate Store, and click OK.
Alternatively, to create a self-signed certificate, click Create Self-Signed Certificate on the right panel and type in a Friendly Name.
Now that your certificate is installed, IIS must be configured to use it.
-
In IIS Manager, click on your website in the left panel, then click Bindings on the right panel.
-
If https is not already listed, click Add, select https, select the correct certificate, and click OK.
-
If https was already listed, select it, click Edit, and select the correct certificate.
Configuring Client Certificates
Client Certificates can be used for LDAPS connections and for Secure TCP Syslog connections if your LDAPS or Secure TCP Syslog server requires one to be used.
You will need to install a Client Certificate on your web server(s) in the Local Computer’s Web Hosting (used by newer versions of IIS) or Personal Stores:
-
On your local machine open mmc.exe, select File, then Add/Remove Snap-In…
-
Next choose Certificates and then Add. Select Computer Account, then Local Computer. Click Finish.
-
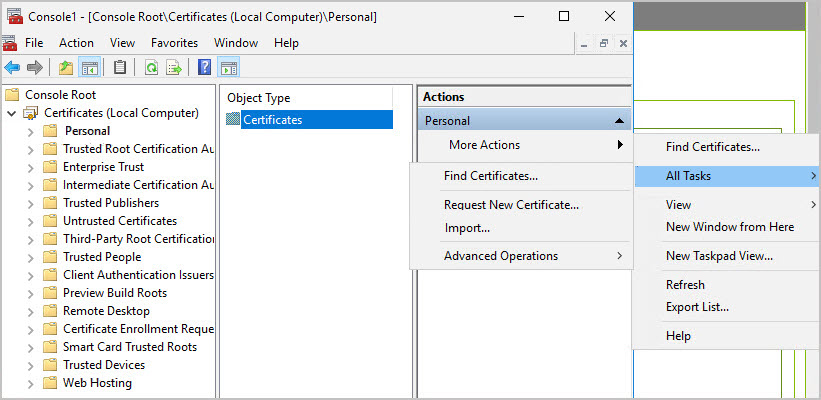
Open Certificates (Local Computer), then import your certificate by selecting the Personal or Web Hosting store/folder from the left pane, then All Tasks, and Import…
-
Follow the Import Wizard to complete the installation of the client certificate.If you are using an older version of IIS, or IIS is not installed on your machine, the Web Hosting store will not exist. In that case, import into the Personal store.
To enable Secret Server to send the client certificate to remote servers, you must first get the certificate thumbprint. This thumbprint will be added to Secret Server and used to identify which certificate to send when a client certificate is requested.
To get the certificate thumbprint:
-
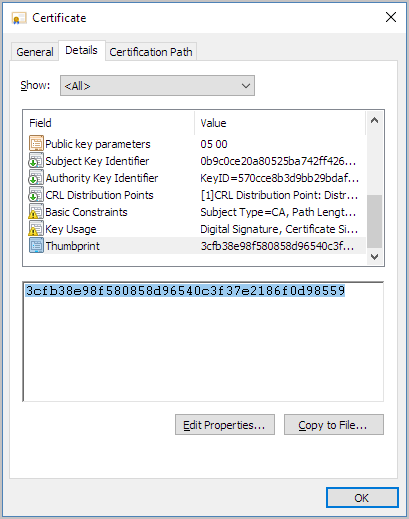
Right-click on the certificate file in Windows Explorer or the certificate listed in MMC and select Open.
-
Select the Details tab.
-
Scroll down in the list of fields until you find Thumbprint. Select it. The value will be displayed in the box below the field list.
-
Select the text in this box and copy it by pressing Ctrl+V.
Now that you have the thumbprint copied to the clipboard, you can add it to Secret Server:
-
In Secret Server, select ADMIN > Configuration.
-
Select the Security tab and click Edit.
-
Find the TLS Auditing section.
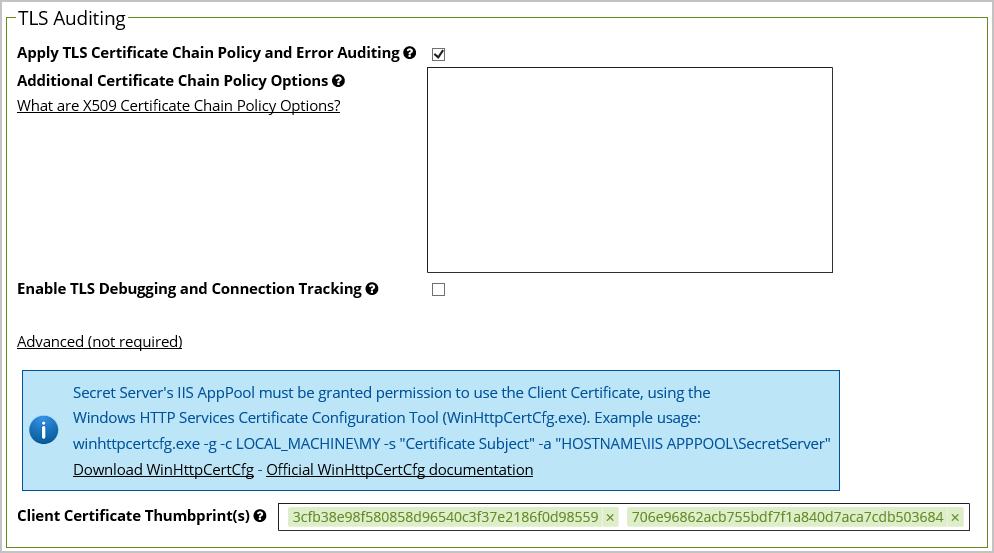
-
Check Apply TLS Certificate Chain Policy and Error Auditing.
-
Click Advanced (not required) to expand that section.
-
Paste the thumbprint in the Client Certificate Thumbprint(s) field. If you need to use more than one client certificate (for example, if you havemultiple Secret Server nodes with different client certificates), you can paste multiple thumbprints in this field.
-
Click Save when done.
Certificate Identifiers Overview
Certificates used for server authentication are verified by Secret Server using the verification provided by Microsoft Windows' Schannel. A certificate must contain a reference identifier that the client can use to verify that the server is presenting a matching certificate. This identifier can be contained in either the certificate Subject or Subject Alternative Name (SAN). In order for the Subject to be verified as valid for a given server, it must contain a CN entry that contains the Fully-Qualified Domain Name (FQDN) of the server. If a certificate needs to be valid for more than one reference identifier, the certificate can contain a SAN that contains multiple entries. These entries can include both DNS names and IP addresses. If a certificate contains a SAN, the CN in the subject is ignored and only the entries in the SAN are used to validate the certificate against the server.
Configuring Transport Layer Security (TLS)
Common Criteria users must configure TLS in Secret Server. To enable TLS, follow the steps in the below sections:
TLS Configuration with AD
To configure TLS with Active Directory, follow the steps in section 7.1.3 Configuring TLS with Active Directory.
TLS Configuration with Syslog
To configure TLS with Syslog, follow the steps in section 13.3 Configuring Auditing for TLS Connections.
TLS Configuration with IIS
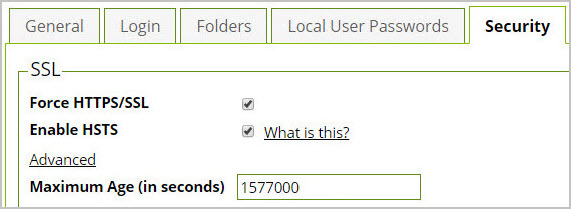
According to Common Criteria security standards, you must force Secret Server through HTTPS/SSL for all website connections, ensure you are using an https URL in your Secret Server browser, then navigate to Admin ZZ_BAR_ZZ Configuration ZZ_BAR_ZZ Security tab, click Edit and then check the Force HTTPS/SSL checkbox, followed by the Enable HSTS. We recommend adjusting the Maximum Age (in seconds) to a high number, the example below allows for approximately six months, but we recommend up to one year. Save changes.
For more information on HSTS, see Securing Traffic with HTTP Strict Transport Security