Disaster Recovery
For release dates, end-of-support timelines, and upgrade guidance, see the Secret Server Product Lifecycle page.
You can view the latest version of the Secret Server documentation here.
Overview
The Disaster Recovery (DR) feature is a tool for emergency access to critical systems in the event of an emergency, such as a network outage. DR generates updates at regular intervals from one Secret Server instance (the data source) to another, or many other, instances (the Replicas). A select set of folders and the secrets they contain will have any changes sent securely to the configured replicas so that, in the event the data source becomes inaccessible, the replicas can be quickly used for emergency access to vital systems
Setup
Secret Server Database Preparation
Overview
We provide several SQL scripts to help you identify any data duplication you may have that could cause issues with DR. We recommend that you run all of them.
They are:
- Secret Template Names: Searches for duplicates
- Secret Field Slug Names: Searches for duplicates
- Character Set Names: Searches for duplicates
- Password Requirements Names: Searches for duplicates
- Domain Names: Searches for duplicates of formal domain names (those in URLs)
- Domain Friendly Names: Searches for duplicates of human-readable domain name equivalents
- Folder Paths: Searches for duplicates of secret folders
- Group Names: Searches for duplicates of user group names
- Role Names: Searches for duplicates of user role names
Procedure
Copy and paste each query into a custom report and run it. Alternatively, database admins can run the scripts directly on the Secret Server On-Premises database. After running the queries, if you receive any results, that indicates duplicates to address before enabling the DR feature. Most issues can be resolved by simply renaming or removing the duplicate items.
SQL Scripts
Secret Template Names
-- Secret Template Names
SELECT
    SecretTypeName
FROM
    tbSecretType
GROUP BY
    SecretTypeName
HAVING
    COUNT(*) > 1
Secret Field Slug Names
-- Secret Field Slug Names
SELECT
    st.SecretTypeName,
    t.FieldSlugName
FROM
(
    SELECT
        sf.SecretTypeId,
        sf.FieldSlugName
    FROM
        tbSecretField AS sf
    JOIN
        tbSecretType AS st2
    ON
        st2.SecretTypeID = sf.SecretTypeID
    GROUP BY
        sf.FieldSlugName, sf.SecretTypeId
    HAVING
        COUNT(*) > 1
) AS t
JOIN
    tbSecretType AS st
ON
    st.SecretTypeID = t.SecretTypeID
Character Set Names
-- Character Set Names
SELECT
    cs.Name
FROM
    tbCharacterSet AS cs
GROUP BY
    cs.Name
HAVING
    COUNT(*) > 1
Password Requirement Names
-- Password Requirement Names
SELECT
    pr.Name
FROM
    tbPasswordRequirement AS pr
GROUP BY
    pr.Name
HAVING
    COUNT(*) > 1
Domain Names
-- Domain Names
SELECT
    Domain
FROM
    tbDomain
GROUP BY
    Domain
HAVING
    COUNT(*) > 1
Domain Friendly Names
-- Domain Friendly Names
SELECT
    FriendlyName
FROM
    tbDomain
GROUP BY
    FriendlyName
HAVING
    COUNT(*) > 1
Folder Paths
-- Folder Paths
SELECT
    FolderPath
FROM
    tbFolder
WHERE
    UserID IS NULL
GROUP BY
    FolderPath
HAVING
    COUNT(*) > 1
Group Names
-- Group Names
SELECT
    GroupName
FROM
    tbGroup
WHERE
    IsPersonal = 0
    AND IsPlatform = 0
    AND SystemGroup = 0
    AND DomainId IS NULL
GROUP BY
    GroupName, DomainId
HAVING
    COUNT(*) > 1
Role Names
-- Role Names
SELECT
    r.Name
FROM
    tbRole AS r
WHERE
    r.RoleType = 1
    AND r.IsSystem = 0
GROUP BY
    r.Name
HAVING
    COUNT(*) > 1
Role Assignment
Assign the "administer disaster recovery" role permission:
-
Click Administration in the main menu. The Secrets Administration page appears.
-
Click the Roles link in the Users, Roles, Access Management section. The Roles page appears.
-
Select or create the role you want to configure this feature with.
-
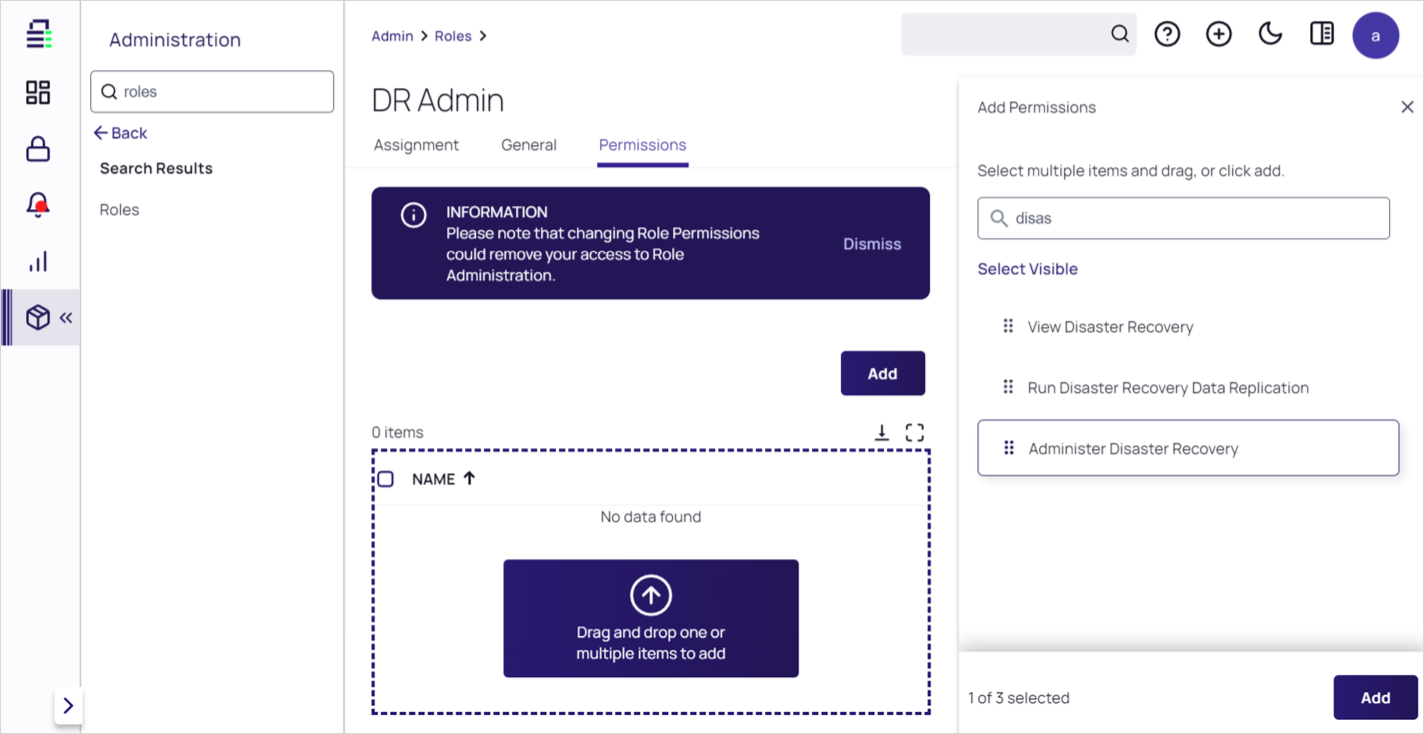
Click the Permissions tab.
-
Click the Add or Edit button.
-
If you do not see the role in the Add Permissions list, type
Administer Disaster Recoveryin the search box. -
Drag the Administer Disaster Recovery role from the Add Permissions list and drop it in the unlabeled permissions box. The role now has the permission.
Data Source DR configuration
Configure the data source DR configuration:
-
Click Administration in the main menu. The Secrets Administration page appears.
-
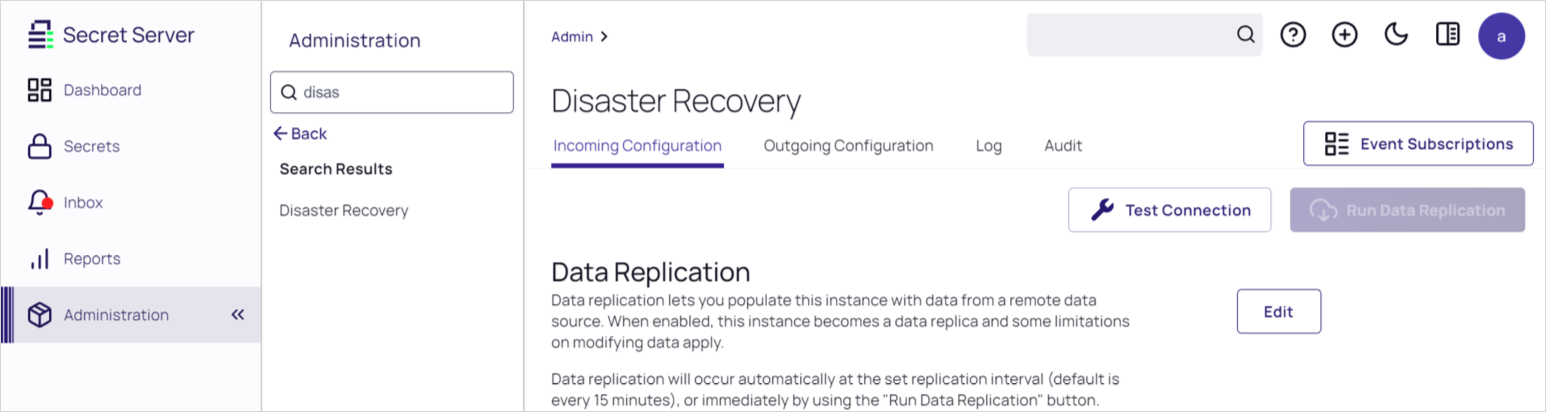
Search for and click Disaster Recovery. The Disaster Recovery page appears.
-
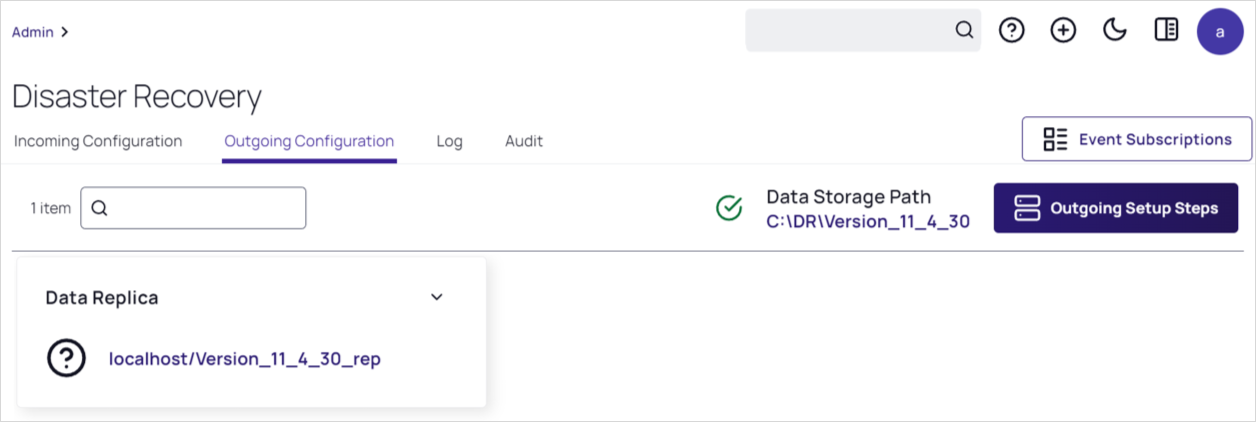
Click the Outgoing Configuration tab.
-
Click the Outgoing Setup Steps button. A popup appears.
-
Copy the URL from the Data Source URL and save it where you can easily access it.
-
Click the Copy Data Source Key button to copy the key to the clipboard. The popup disappears.
-
Copy the key and save it to the same location you used for the URL. It should look something like this:
https://mydomain.com/Playground BgIAAACkAABSU0ExABAAAAEAAQAPeEYJLZ3
u1F26EF+bBiRwokrGusSAICUpRXlIJFdm2/lo3Ad7dpTEl7j3rvG9+T+j8DKTsmi6Xfj
c/J0hkoX00b6LOq4feo6mvnf6Lp8agopN2XWjLy4KU7ICG2iAoL4wgIdpgWVCHdZUcHH
Vhe6RSkahRDOC4ctpRxb/KOI8Bbk6ftporjwZAfEfCVEOotnnm4Z8qjI0XKKbhLl2eTH
2lDTJk53dt8z7g/Aj4nz7aYUMJX1vDOKKARpd3GiVfu5fcb0hpIqw64pjOs8trqOVxuy
oyfSLwYPC9rtK4/JZ7Xodq93p9IIEJfSY7cup9kCHhFzU8d3RNgWj5pKKVLsPOVUreXV
6vceGmRA3OeKY/a8/I6aEAkmkWjJAP5bmMosYVbcRR2PxI0bxXGUSKbMdKdC2Akgm3PW
jWqezONsv0QFmJPYEGrLIxeJc2/9X+TUnx5ON/Cgeb2bHSf5CLXizjxlB67gzDZpH3q0
mmJzm0aSDmqIc20UxFYk2YZeEzICI5lnAVPiAbaCoKuhQdhaxxaD+wdMQDCCEooKiyhW
Yo3NFYY79k6scJh2+sn62xZNPdpxi0m6rP/F+mpELKMyElwJdFxVm+l14ksaKhIA6bDn
xRLJ/f/SMdxfmIcTqxLr/r9k6RAiJo8DiBoWMkjk4VUCFIL4rYpUIJb/aKmx9npg==
Replica DR Configuration
-
Click Administration in the main menu. The Secrets Administration page appears.
-
Search for and click Disaster Recovery. The Disaster Recovery page appears.
-
If necessary, click the Incoming Configuration tab.
-
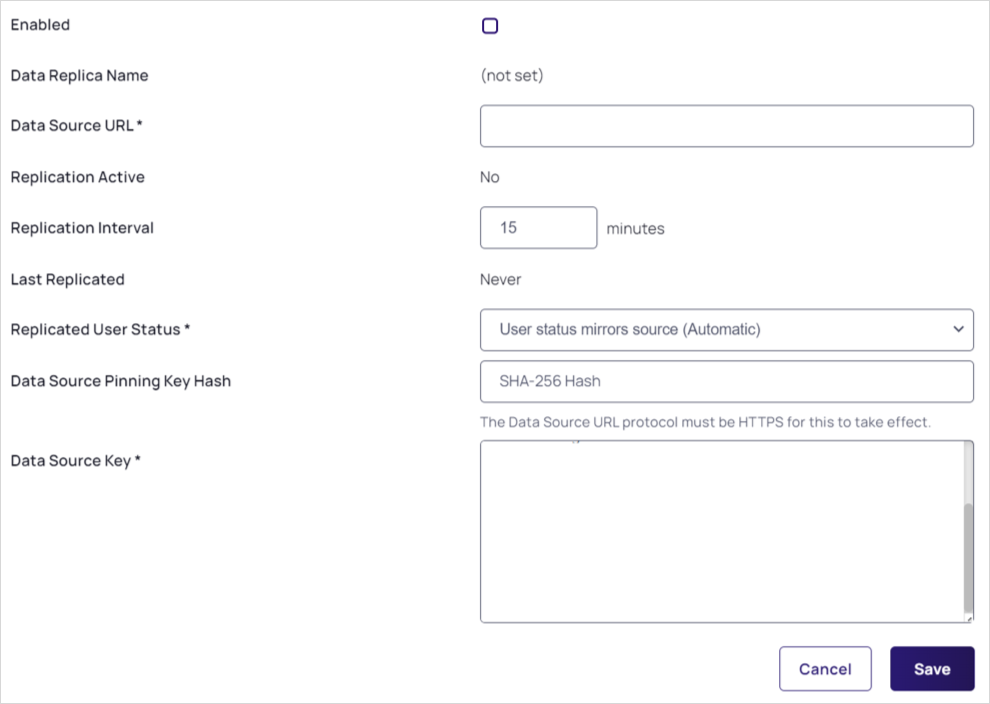
Click the Edit button. The page becomes editable.
-
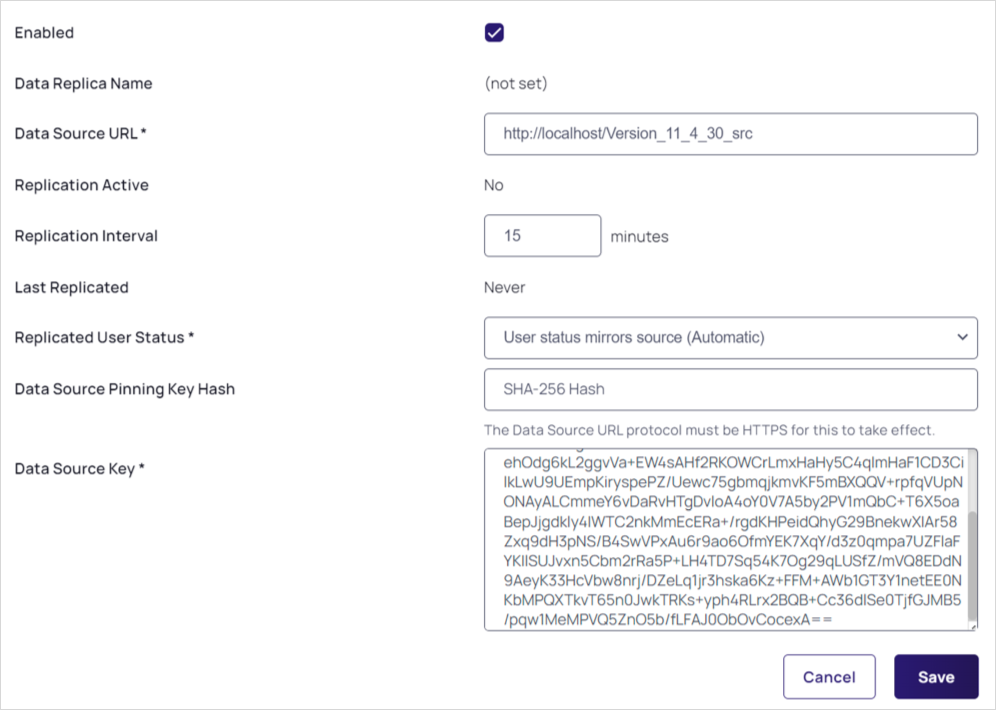
Click to select the Enabled checkbox.
-
Type or paste the data source URL you saved before.
-
Type or paste the data source key you saved before.
-
Click the Save button.
-
Refresh the Disaster Recovery page showing the Outgoing Configuration tab. A new block appears for the new replica connection:
-
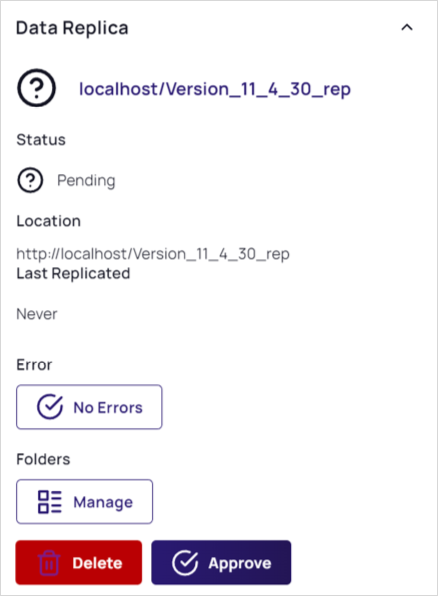
Click the v on the block to expand it.
-
Click the Approve button.
-
Returning to the Outgoing Configuration tab, click the Test Connection button to verify everything is configured correctly.
Finishing up
-
Once configuration is complete, return to and refresh the Outgoing Configuration tab.
-
We recommend expanding the block and clicking the Manage button for folders.
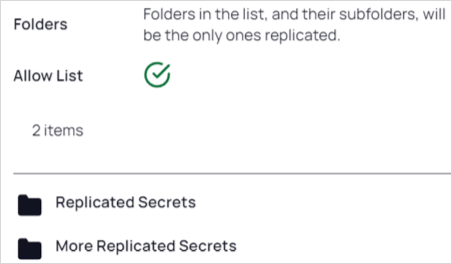
This enables you to select which folders, subfolders, and secrets get replicated. This reduces the scope of the replicated data, enabling faster replication and a smaller duplicated data footprint.
Replication
By design, the first time a replication from the data source to the replica occurs, all data is replicated. This is likely the slowest DR operates and can take up to 20 minutes to replicate a data source containing 100,000 secrets.
All subsequent replications are significantly smaller. Only information that has been changed since the previous replication is replicated again.
Replication Scope
The items that DR replicates:
- Character Sets: all Character Sets (add context) are replicated.
- Configuration: selected global configuration settings for application hardening and Active Directory are replicated.
- File Attachments: all File Attachments for replicated Secrets are replicated.
- Folders: Configure this on the data source (under Admin > See All > Disaster Recovery > Data Replicas > Select a Replica > Manage) to limit what folders are replicated. By default, all folders are replicated.
- Groups: All Groups are replicated.
- Launchers: All Launchers and associated mappings are replicated.
- Password Requirements: all Password Requirements are replicated.
- Permissions: all Permissions are replicated.
- Roles: All roles are replicated.
- Secret Templates: All secret templates are replicated.
- Secrets: All secrets within the replicated folders are also replicated.
- Users: all Users are replicated.
Replica Mode
When you configure a Secret Server instance as a replica, it is automatically placed in replica mode. While in replica mode, the following features are disabled
- ConnectWise synchronization
- Discovery
- DoubleLock
- Heartbeat
- Pipeline and bulk operations on secrets
- Remote password changing
- Secret import
- Secret policy changes to secrets
Replicated User Status
The "replicated user status" setting determines how the "enabled" status for users is handled during replication. The setting is used primarily when the source and replica user counts do not match—that is, new users are on the source that are not on the replica. Delinea strongly recommends both source and replica user counts match so all users and their access is replicated to the DR instance.
The possible settings are:
- User status mirrors source (automatic): This is the default setting. Any new users in the source are replicated as enabled.
- New users from source are disabled by default (manual): This setting is for admin special cases and must be manually set. New users are replicated as disabled.
Recommendations
We recommend placing a Secret Server replica into read-only mode. This further reduces the possibility of data changes to the instance.