Setting User-Based Group Policies
Centrify group policies allow administrators to extend the configuration management capabilities of Windows Group Policy Objects to managed Mac computers and to users who log on to Mac computers. This chapter describes the Mac group policies that can be applied to Mac users
The user-based group policies are defined in the Centrify Mac administrative template (centrify_mac_settings.xml) and accessed from User Configuration > Policies > Centrify Settings > Mac OS X Settings.
Group policies are only applied to users and computers in the GPO’s linked OU and any child OUs. If your users and computers are in different OUs (which is common), Delinea recommends using user Group Policy loopback processing to make sure user policies are applied to everyone who logs on to a Mac. This is a standard Microsoft Group Policy that applies to every user to the computer.
To implement user Group Policy loopback processing mode
-
In the Group Policy Management Editor, navigate to Computer Configuration > Administrative Templates > System > Group Policy > Configure user Group Policy loopback processing mode.
-
Enable the policy, set Mode: to Merge, then click OK.
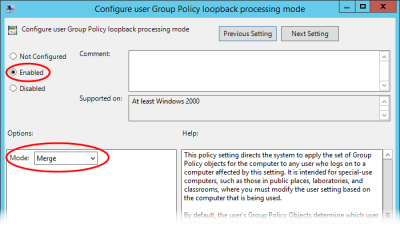
See https://technet.microsoft.com/en-us/library/cc978513.aspx for more information about loopback processing.
See Understanding Group Policies for Mac Users and Computers for general information about how to use group policies to manage Mac settings and for information on how to install the group policy administrative templates.
Setting User-Based Policies
This section describes user-based policies for Mac that you can set. The following table provides a summary of the group policies you can set for Mac users. These group policies are in the Centrify Mac administrative template (centrify_mac_settings.xml) and accessed from User Configuration > Policies > Centrify Settings > Mac OS X Settings.
| Use this policy | To do this |
|---|---|
| 802.1X Wireless Settings | Create user profiles for wireless authentication. This group policy corresponds to 802.1X Options in the Networks system preference. |
| Application Access Settings (deprecated) | Control the specific applications users are either permitted to use or prohibited from using. These group policies correspond to Applications preferences set in the Workgroup Manager. |
| Desktop Settings | Control the desktop and screen saver options for users on Mac computers. These group policies correspond to settings in the Desktop & Screen Saver system preference. |
| Dock Settings | Control the look and operation of the Dock displayed on the user’s desktop. These group policies correspond to Dock preferences set in the Workgroup Manager. |
| Finder Settings | Specify whether to use the standard Finder, or the Simple Finder, which restricts users to applications and folders in the Dock. |
| Folder Redirection | Redirect specified network home folders to the local computer to improve performance. |
| Import Settings | Specify plist files to import preferences from another computer. This group policy corresponds to the import plist functionality in Workgroup Manager. |
| Login Settings | Specify frequently used applications, folders, and server connections to open when a user logs in. This group policy corresponds to the login functionality in Workgroup Manager. |
| Media Access Settings | Control the specific media types users are either permitted to use or prohibited from using. These group policies correspond to Media Access preferences set in the Workgroup Manager. |
| Mobility Settings | Control the synchronization rules applied for users access services from mobile devices. These group policies correspond to Mobility preferences set in the Workgroup Manager. |
| Scripts (Login/Logout) | Specify login and logout scripts that run when Active Directory users log on or log out. |
| Security & Privacy Settings | Control the secure login options for users on Mac computers. These group policies correspond to settings in the Security system preference. |
| System Preference Settings | Control the specific system preferences displayed for users. These group policies correspond to System Preferences set in the Workgroup Manager. |
802.1X Wireless Settings
Path
User Configuration > Policies > Centrify Settings > Mac OS X Settings > 802.1X Wireless Settings
Description
Use the User Configuration > Policies > Centrify Settings > Mac OS X Settings > 802.1X settings to create profiles for wireless network authentication. The profiles you specify with these group policies are created in the Network system preferences pane.
Specify User Profiles (Deprecated)
Path
User Configuration > Policies > Centrify Settings > Mac OS X Settings > 802.1X Wireless Settings > Specify User Profiles (Deprecated)
Description
Enable this policy to specify 802.1X User Profiles for wireless network authentication.
When using a user profile, a user will be prompted for username and password to authenticate to a wireless network after login.
To add a user profile
- Enable the policy and click Add to enter the profile name and setting.
- Type a name for the profile.
-
Type the setting using the following format:
Network;Security Type;Authentication Method, where each field is separated by a semi-colon;.- Network is the wireless network name
- Security type is one of
802.1X WEP, WPAEnterprise, WPA2 Enterprise - Authentication method is one or more of the following, separated by commas:
TTLS, PEAP, TLS, EAP-FAST, LEAP, MD5
For example:
OFFICE1;WPA Enterprise;PEAP
OFFICE2;802.1X WEP;TTLS,PEAP
Set the Automatically turn on Airport option to automatically turn on AirPort device if this type of profile is specified. Otherwise, the status of the AirPort device will not change.
Once enabled, this policy takes effect dynamically at the next group policy refresh interval.
Application Access Settings (deprecated)
Path
User Configuration > Policies > Centrify Settings > Mac OS X Settings > Application Access Settings
Description
Use the User Configuration > Policies > Centrify Settings > Mac OS X Settings > Application Access Settings group policies to manage the applications Mac users are allowed to open or prevented from opening.
These group policies correspond to settings you can make using the Applications preference in the Workgroup Manager.
Permit/Prohibit Access to Application List: Applescript (Deprecated)
Path
User Configuration > Policies > Centrify Settings > Mac OS X Settings > Application Access Settings > Permit/prohibit access to application list: AppleScript
Description
Select the specific applications in the Finder’s Applications/AppleScript folder that users are permitted to use if you selected Users can only open these applications, or not allowed to use if you selected Users can open all applications except these.
This policy is only effective if the Permit/prohibit access to applications group policy is enabled. If the Permit/prohibit access to applications group policy is not configured or disabled, this group policy is ignored.
Once enabled, this group policy takes effect dynamically at the next group policy refresh interval.
Permit/Prohibit Access to Application List: Applications (Deprecated)
Path
User Configuration > Policies > Centrify Settings > Mac OS X Settings > Application Access Settings > Permit/prohibit access to application list: Applications
Description
Select the specific applications in the Finder’s Applications folder that users are permitted to use if you selected Users can only open these applications, or not allowed to use if you selected Users can open all applications except these.
This policy is only effective if the Permit/prohibit access to applications group policy is enabled. If the Permit/prohibit access to applications group policy is not configured or disabled, this group policy is ignored.
Once enabled, this group policy takes effect dynamically at the next group policy refresh interval.
Permit/Prohibit Access to Application List: Server (Deprecated)
Path
User Configuration > Policies > Centrify Settings > Mac OS X Settings > Application Access Settings > Permit/prohibit access to application list: Server
Description
Select the specific applications in the Finder’s Applications/Server folder that users are permitted to use if you selected Users can only open these applications, or not allowed to use if you selected Users can open all applications except these.
This policy is only effective if the Permit/prohibit access to applications group policy is enabled. If the Permit/prohibit access to applications group policy is not configured or disabled, this group policy is ignored. In addition, this policy is only applicable for Mac OS X Server computers.
Once enabled, this group policy takes effect dynamically at the next group policy refresh interval.
Permit/Prohibit Accesst to Application List: Utilities (Deprecated)
Path
User Configuration > Policies > Centrify Settings > Mac OS X Settings > Application Access Settings > Permit/prohibit access to application list: Utilities
Description
Select the specific applications in the Finder’s Applications/Utilities folder that users are permitted to use if you selected Users can only open these applications, or not allowed to use if you selected Users can open all applications except these.
This policy is only effective if the Permit/prohibit access to applications group policy is enabled. If the Permit/prohibit access to applications group policy is not configured or disabled, this group policy is ignored.
Once enabled, this group policy takes effect dynamically at the next group policy refresh interval.
Permit/Prohibit Access to Applications (Deprecated)
Path
User Configuration > Policies > Centrify Settings > Mac OS X Settings > Application Access Settings > Permit/prohibit access to applications
Description
Allow other policies to specify the applications that users are permitted to access or prohibited from accessing. You must enable this policy for any other application access group policies to take effect. Once enabled, only the applications explicitly specified in Application List policies are permitted or prohibited.
If you enable this policy, in Access mode, select one of the following:
-
Users can only open these applications to grant access only to the applications you select with the other application access policies.
If you select the option, User can also open all applications on local volumes, users can access any local applications. Restrictions only apply to applications on CDs, DVDs, or external disks. -
Users can open all applications except these to prevent access only to the applications you select with the other application access policies.
You can also set the following options in this group policy:
-
Select User can also open all applications on local volumes to allow access to applications on a computer’s local hard drive.
If selected, users can access any local applications in addition to the applications explicitly approved using the other application access policies. If you uncheck this option, users can only access applications on CDs, DVDs, or external disks that have been explicitly approved.
-
Select Allow approved applications to launch non-approved applications to allow approved applications to open applications that aren't explicitly approved.
For example, if users click a link in an email message, this option allows the email application to open a browser to display the Web page even if the browser is not listed as an approved application. To prevent approved applications from opening applications that aren’t explicitly approved, uncheck this option.
-
Select Allow UNIX tools to run to allow applications or the operating system to run tools, such as the QuickTime Image Converter, without explicitly listing them as approved applications.
These tools usually operate in the background, but can be run from the command line. If you want to prevent access to these tools, do not check this option.
Once enabled, this group policy takes effect dynamically at the next group policy refresh interval.
Permit/Prohibit Access to the User-Specific Applications (Deprecated)
Path
User Configuration > Policies > Centrify Settings > Mac OS X Settings > Application Access Settings > Permit/prohibit access to the user-specific applications
Description
Define a list of additional applications that users are permitted to run if you selected Users can only open these applications, or not allowed to use if you selected Users can open all applications except these. If enabled, you must specify the CFBundleIdentifier to identify the application; for example, for the Firefox browser, the CFBundleIdentifier is: org.mozilla.firefox. To find the CFBundleIdentifier complete the following steps:
-
In the Finder, locate the application to control.
-
Control-click or right-click the application, then select Show Package Contents.
-
If necessary, expand the Contents folder, then open
info.plistwith a text editor. -
Find the string:
CFBundleIdentifier .On the next line is the application’s
CFBundleIdentifier; for example:org.mozilla.firefox - Use
org.mozilla.firefoxto identify the Firefox browser.
To add an application to the list, select Enabled, then click Add and enter the CFBundleIdentifier and click OK.
You may also control access to system preference panes by using the CFBundleIdentifier. You can find the CFBundleIdentifier for system preference panes in /System/Library/PreferencePanes. You can specify any application object that has a CFBundleIdentifier in its info.plist file.
CFBundleIdentifier (when you right-click the application name, there is no Show Package Contents menu item). In this case, you cannot add the application to the list of permitted or prohibited applications.This policy is only effective if the Permit/prohibit access to applications group policy is enabled. If the Permit/prohibit access to applications group policy is not configured or disabled, this group policy is ignored.
Once enabled, this group policy takes effect when users log out and log back in.
Automount Settings
Path
User Configuration > Policies > Centrify Settings > Mac OS X Settings > Automount Settings
Description
Use the Automount Settings to automatically mount network shares and the user’s Windows home directory when a user logs in.
Automount Network Shares
Path
User Configuration > Policies > Centrify Settings > Mac OS X Settings > Automount Settings > Automount network shares
Description
Specify the network shares to automatically mount when a user logs in. The default network share mount location is User_Home/Network Share.
This policy supports SMB, AFP, and NFS shares.
To add a share
-
Enter a path to mount the share in the Mount to: field.
The path should start with
/or~. The default value is~/Network Shares. In this case, network share folders would be mounted under the directoryNetwork Sharesof user's home directory.
-
Click Enabled, then click Add and enter the share in one of the following formats:
-
keyword://server/sharewhere:
keywordis one ofsmb,nfs,afpserveris the name or IP address of the server and can include a user or user and password in the form:user:@serveroruser:password@server.sharecan include spaces and be followed by a subdirectory.
For example, the following are all valid share specifications:
smb://acme.com/MacUsers smb://acme.com/Mac Users smb://acme.com/MacUsers/Shared_resources smb://jsmith:pass1234@acme.com/MacUsers afp://acme.com/Users_server nfs://acme.com/MacUsers nfs://192.168.0.1/MacUsers -
(Optional) Select Create Dock icon to create a link to the network share in the user’s Dock.
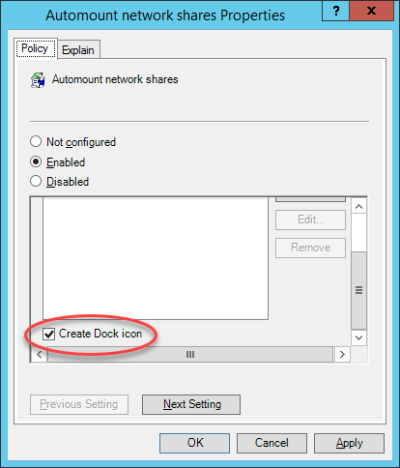
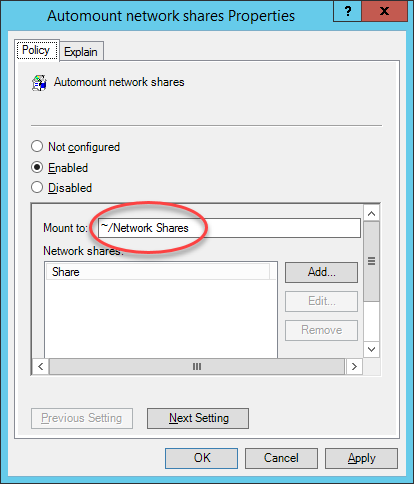

Once enabled, this policy takes effect when a user logs out and back in to a computer.
Automount User’s Windows Home
Path
User Configuration > Policies > Centrify Settings > Mac OS X Settings > Automount Settings > Automount user’s Windows home
Description
Automatically mount the user’s Windows home directory when the user logs in.
Specify the Windows home directory by using the Profile tab for a user in Active Directory Users and Computers (ADUC).
Once enabled, this policy takes effect when a user logs out and back in to a computer.
Create Alias Instead of Symbolic Link
Path
User Configuration > Policies > Centrify Settings > Mac OS X Settings > Automount Settings > Create alias instead of symbolic link
Description
This group policy is provided for compatibility with Delinea releases earlier than 2015. If you are using release 2015 or later, do not use this group policy.
In releases prior to 2015, the default mount point for network shares was /var/centrify/mnt/user. Starting with release 2015, the default mount point for network shares is User_Home/Network Share.
In Delinea releases prior to 2015, the “Automount network shares” group policy creates symbolic links to the specified shared network directories. However, certain versions of Microsoft Office are unable to save files to a shared folder by using the symbolic link (the link is greyed-out). The “Create alias instead of symbolic link” group policy corrects the problem by creating an alias instead of a symbolic link. In release 2015 or later, because of the new mount location, symbolic links are not required, and this group policy has no effect.
If you enable this group policy, the alias points to network shares that are automatically mounted when a user logs in.
Once enabled, this policy takes effect when a user logs out and back in to a computer.
Custom Settings
Path
User Configuration > Policies > Centrify Settings > Mac OS X Settings > Custom Settings
Description
Use the User Configuration > Policies > Centrify Settings > Mac OS X Settings > Custom Settings > Install MobileConfig Profiles group policy to install mobile configuration profiles. This policy installs a user profile. To install a device profile, use the same policy in Computer Configuration > Centrify Settings > Mac OS X Settings > Custom Settings.
Install MobileConfig Profiles
Path
User Configuration > Policies > Centrify Settings > Mac OS X Settings > Custom Settings > Install MobileConfig profiles
Description
Enable this group policy to install mobile configuration profiles on managed Mac computers.
Before enabling this policy, you must create a directory and copy mobile configuration files to SYSVOL on the domain controller. SYSVOL is a well-known shared directory on the domain computer that stores server copies of public files that must be shared throughout the domain.
Specifically, create the following directory on the domain controller: \\domainName\SYSVOL\domainName\mobileconfig
and copy one or more mobile configuration profile files to this directory. See Deploy Configuration Profiles to Multiple Computers for details on how to do this.
To specify mobile configuration files to install, enable the policy, then click Add. Enter the name of a mobile configuration file that you placed in SYSVOL on the domain controller. Include the .mobileconfig suffix with the name.
If you specify a file that is not in the SYSVOL mobileconfig directory, the profile will not be installed.
If you add new files to the existing list in the group policy, those profiles will be installed — existing profiles will not be touched. If you remove previously specified files, the profiles defined by these files will be uninstalled.
If you add two or more profile files that have the same payloadIdentifier, only one of them will be installed.
If you change the group policy to “Disabled” or “Not Configured”, all existing profiles that were installed previously by the group policy will now be uninstalled from the managed Mac computers.
Desktop Settings
Path
User Configuration > Policies > Centrify Settings > Mac OS X Settings > Desktop Settings
Description
Use the User Configuration > Policies > Centrify Settings > Mac OS X Settings > Desktop Settings group policy to manage the start time for the screen saver from the Desktop & Screen Saver ( ) system preference on Mac computers. This group policy corresponds to the Start screen saver option displayed on the Screen Saver pane. For example:

Set Computer Idle Time for Starting Screen Saver
Path
User Configuration > Policies > Centrify Settings > Mac OS X Settings > Desktop Settings > Set computer idle time for starting screen saver
Description
Select the length of time to wait before starting the screen saver. If you enable this group policy, you can specify the number of minutes to wait while a computer is not in use before starting the screen saver. For example, if you want the screen saver to start after a computer has been idle for 10 minutes, you can set Start screen saver to 10 minutes.
Disabling this policy does not disable the screen saver. To disable the screen saver, enable this policy and set the value to 0.
Although you may specify values greater than 60 minutes, and the screen saver works appropriately, the Macintosh Screen Saver dialog box shows values that are greater than 60 as Never.
Enabling this group policy is the same as selecting when to start the screen saver using the Start screen saver slider in the Desktop & Screen Saver system preference.
Once enabled, this group policy takes effect when users log out and log back in.
Dock Settings
Path
User Configuration > Policies > Centrify Settings > Mac OS X Settings > Dock Settings
Description
Use the User Configuration > Policies > Centrify Settings > Mac OS X Settings > Dock Settings group policies to manage the characteristics of the Dock for Mac users. These settings correspond to the Dock preferences you can manage using the Workgroup Manager. In the Workgroup Manager, the Dock Items pane controls the items placed in the Dock and whether the workgroup Dock is merged with the user’s Dock, and the Dock Display pane controls attributes such as the Dock size, magnification, position, and animation. For example:

Add Other Folders to the Dock
Path
User Configuration > Policies > Centrify Settings > Mac OS X Settings > Dock Settings > Add other folders to the Dock
Description
Add icons for the other commonly-used folders to the Dock. You can choose to add the following folder icons to the Dock:
- My Applications
- Documents
The My Applications folder contains aliases to all approved applications you have defined in the Application list. If you do not manage access to applications, all available applications are included in the My Applications folder. If you enable Simple Finder, you should display the My Applications folder.
The Documents folder is the Documents folder found in the user’s home folder. For example, the /Users/username/Documents folder for local user accounts.
Once enabled, this group policy takes effect when users log out and log back in.
Adjust the Dock’s Icon Size
Path
User Configuration > Policies > Centrify Settings > Mac OS X Settings > Dock Settings > Adjust the Dock’s icon size
Description
Set the approximate size of Dock icons in pixels. The valid settings for the Dock size range from 16 pixels (small) to 128 pixels (large). The default size is 80 pixels.
Once enabled, this group policy takes effect when users log out and log back in.
Adjust the Dock’s Magnified Icon Size
Path
User Configuration > Policies > Centrify Settings > Mac OS X Settings > Dock Settings > Adjust the Dock’s magnified icon size
Description
Set the level of magnification to use for items in the Dock. If you enable this group policy, icons in the Dock are magnified to display in a larger size as the pointer moves over them. The valid settings for Dock magnification range from 16 pixels for minimum magnification to 128 pixels for maximum magnification. The default size is 80 pixels.
If you do not configure or disable this group policy, icons in the Dock are not magnified when the pointer moves over them.
Once enabled, this group policy takes effect when users log out and log back in.
Adjust the Dock’s Position on Screen
Path
User Configuration > Policies > Centrify Settings > Mac OS X Settings > Dock Settings > Adjust the Dock’s position on screen
Description
Specify the location for displaying the Dock on the screen. If you enable this group policy, you can position the Dock on the left, bottom, or right of the screen. The default location for displaying the Dock is at the bottom of the screen.
Once enabled, this group policy takes effect when users log out and log back in.
Adjust The Effect Shown When Minimizing the Dock
Path
User Configuration > Policies > Centrify Settings > Mac OS X Settings > Dock Settings > Adjust the effect shown when minimizing the Dock
Description
Specify the effect to use when a window or application is minimized and placed in the Dock. The valid effects are:
- Genie
- Scale
- Suck
Once enabled, this group policy takes effect when users log out and log back in.
Animate Opening Applications
Path
User Configuration > Policies > Centrify Settings > Mac OS X Settings > Dock Settings > Animate opening applications
Description
Animate application icons so that the icon displayed in the Dock bounces when the user opens the application.
Once enabled, this group policy takes effect when users log out and log back in.
Automatically Hide and Show the Dock
Path
User Configuration > Policies > Centrify Settings > Mac OS X Settings > Dock Settings > Automatically hide and show the Dock
Description
Hide the Dock from view automatically. If you enable this policy, the Dock is hidden during normal operation. The Dock is then automatically displayed again if the pointer moves over the position on the screen where the Dock is located.
Once enabled, this group policy takes effect when users log out and log back in.
Lock the Dock
Path
User Configuration > Policies > Centrify Settings > Mac OS X Settings > Dock Settings > Lock the Dock
Description
Lock the applications displayed in the Dock. If you enable this policy, icons cannot be moved into or out of the Dock.
Once enabled, this group policy takes effect when users log out and log back in.
Place Applications in Dock
Path
User Configuration > Policies > Centrify Settings > Mac OS X Settings > Dock Settings > Place applications in Dock
Description
List the applications to include in the Dock. After you enable this policy, click Add to enter the path to the application you want included in the Dock. Then click OK. You can click Add again to add additional applications. For example, to add Firefox and Chess icons to the Dock, type the application paths:
/Applications/Firefox.app
Click OK. Then click Add and enter:
/Applications/Chess.app
The icons for the applications you specify are placed to the left or above the separator line in the Dock in the order you enter them, up to 10 items. if you add more than 10 the order may be random. If the path to an application is incorrect, a question mark (?) is displayed in the Dock in place of the application’s icon.
This group policy does not sort icons from the initial system list. To sort these items, such as the Mail application icon, you can add the item to the list.
Once enabled, this group policy takes effect when users log out and log back in.
Place Documents and Folders in Dock
Path
User Configuration > Policies > Centrify Settings > Mac OS X Settings > Dock Settings > Place documents and folders in Dock
Description
List the documents or folders to include in the Dock. After you enable this policy, click Add to enter the path to the folder or document you want to include in the Dock. Then click OK. You can specify additional folders or documents by clicking Add again. For example, to add the Users folder and the Copyright.txt document to the Dock, type the paths to each:
/Users
Click OK, then click Add and type:
/Documents/Copyright.txt
The icons for the items you specify are placed to the left or above the separator line in the Dock. Items are sorted in the order you enter them up to 10 items. If you specify more than 10 items the order may be random. If the path to an item is incorrect, a question mark (?) is displayed in the Dock.
smb://serverName. Network share paths are implemented as aliases, which work differently than folder and document paths. If you specify a network share, a question mark (?) is displayed in the Dock.Once enabled, this group policy takes effect when users log out and log back in.
Merge with User’s Dock
Path
User Configuration > Policies > Centrify Settings > Mac OS X Settings > Dock Settings > Merge with user’s Dock
Description
Merge the Workgroup Dock settings with the user’s Dock.
Once enabled, this group policy takes effect when users log out and log back in.
Finder Settings
Path
User Configuration > Policies > Centrify Settings > Mac OS X Settings > Finder Settings
Description
Use the User Configuration> Policies > Centrify Settings > Mac OS X Settings > Finder Settings group policies to configure Finder commands, preferences and views.
The Configure Finder Commands (Deprecated) policy, below, allows you to control which commands are available in the Apple menu and Finder menus for users.
The Configure Finder Preferences (Deprecated) policy, below, enables you to specify the type of Finder for the user environment. After enabling the policy, you can choose one of two types from the drop-down list:
- Normal Finder applies the standard Mac desktop. This is the default value, and is the environment that all users will have if the policy is not enabled.
- Simple Finder restricts users to applications that are in the Dock.
When Simple Finder is enabled, users cannot open applications, open, modify, or delete documents, or create folders in the Finder. They also cannot mount network drives. They can only use items that are in the Dock. Use the Dock Settings policies above to configure the Dock; for example, enable Place Applications in Dock and Place Documents and Folders in Dock to control the applications and folders that users can access.
The Configure Finder Preferences (Deprecated) policy, below, enables you to control the arrangement and appearance of items on the user’s desktop, in Finder windows, and in the top-level folder of the computer.
Configure Finder Commands (Deprecated)
Path
User Configuration > Policies > Centrify Settings > Mac OS X Settings > Finder Settings > Configure Finder commands (Deprecated)
Description
Specify the commands in Finder menus and the Apple menu that are available to users. Select commands from the following list:
-
Connect to Server
Select to allow users to connect to a remote server by choosing 'Connect to Server' in the Finder Go menu. Deselect to prevent users from accessing this command.
-
Go to iDisk
Select to allow users to connect to an iDisk by choosing 'Go to iDisk' in the Finder Go menu. Deselect to prevent users from accessing this command.
-
Eject
Select to allow users to eject discs (for example, CDs, DVDs, floppy disks, or FireWire drives). Deselect to prevent users from ejecting disks.
-
Burn Disc
Select to allow user on computers with relevant hardware to burn discs. Deselect to prevent users from burning disks.
-
Go to Folder
Select to allow users to open a specific folder by choosing the 'Go to Folder' command in the Finder Go menu. Deselect to prevent users from using the 'Go to Folder' command.
-
Restart
Select to allow users to restart the computer they're using, or deselect to prevent them from restarting the computer.
-
Shut Down
Select to allow users to shut down the computer they're using, or deselect to prevent them from shutting down the computer.
Once enabled, this group policy takes effect when users log out and back in.
Configure Finder Preferences (Deprecated)
Path
User Configuration > Policies > Centrify Settings > Mac OS X Settings > Finder Settings > Configure Finder preferences (Deprecated)
Description
Configure Finder preferences, including whether to use normal or Simple Finder, which items to show on the desktop, how a new window behaves, and whether to show filename extensions and the Empty Trash warning.
Select from the following options:
-
Finder type
Select the normal Finder or Simple Finder as the user environment. The normal Finder looks and acts like the standard Mac desktop. Simple Finder removes the ability to use a Finder window to access applications or modify files, limiting users' access to only what is in the Dock. In addition, users can't mount network volumes, create folders, or delete files.
-
Show these items on the Desktop
Choose whether users see icons for local hard disks, external disks, CDs (DVDs and iPods), and connected servers on the desktop.
If you hide them, icons for disks and servers still appear in the top-level folder when a user clicks the Computer icon in a Finder window's toolbar.
-
New Finder window shows
Select Home to show items in the user's home folder, or select Computer to show the top-level folder, which includes local disks and mounted volumes.
-
Always open folders in a new window
Select this option to display folder contents in a separate window when a user opens a folder.
-
Always open windows in column view
Select this option to display folders in column view, which maintains a consistent view across windows.
-
Show warning before emptying the Trash
Select this option to display the normal warning when a user empties the Trash, or deselect it if you don't want users to see this message.
-
Always show file extensions
Select this option to show filename extensions (such as
.txtor.jpg) that identify the file type; or deselect it to hide filename extensions.Once enabled, this group policy takes effect when users log out and back in.
-
Configure Finder views
Enable this group policy to control Finder views, for example the arrangement and appearance of items on a user's desktop, in Finder windows, and in the top-level folder of the computer.
The options in Desktop View allow you to adjust the size and arrangement of icons on the desktop.
Use Icon Size to adjust the icon size.
Use Icon Arrangement to specify how to arrange icons:
- To keep items aligned in rows and columns, select Snap to grid.
- To arrange items by criteria such as name or type (for example, all folders grouped together), select Keep arranged by.
Items in Finder windows are viewed in a list or as icons and you can control aspects of how these items look.
Default View settings control the overall appearance of all Finder windows. Computer View settings control the view for the top-level computer folder, showing hard disks and disk partitions, external hard drives, mounted volumes, and removable media (such as CDs or DVDs).
In Icon View, use Icon Size to adjust the size of icons.
Use Icon Arrangement to specify how to arrange icons:
- To keep items aligned in rows and columns, select Snap to grid.
- To arrange items by criteria such as name or type (for example, all folders grouped together), select Keep arranged by.
In List View, set the following:
- Select relative dates to show an item's creation or modification date relative to today, rather than as a fixed date; for example,
TodayorYesterday, instead of3/24/10. - Select Calculate folder sizes to calculate the total size of each folder shown in a Finder window, which can take a lot of time depending on the size of the folder.
In Icon Size, select Select small or big for the size of icons in list view.
Once enabled, this group policy takes effect when users log out and back in.
Folder Redirection
Path
User Configuration > Policies > Centrify Settings > Mac OS X Settings > Folder Redirection
Description
Use the User Configuration > Policies > Centrify Settings > Mac OS X Settings > Folder Redirection group policies to redirect specified folders from a network home directory to the local computer.
When you set up a network home directory, all home directory files are written to the network share. Some folders, such as /Library/Caches, get heavy I/O from Apple and third-party applications, which may cause performance issues. The folder redirection policies enable you to redirect specific folders, such as /Library/Caches, to the local computers, which can result in dramatic performance improvements.
Folder Redirection contains two folders with identical sets of four policies:
- Folder redirection actions at login time applies the specified policy when the user logs in. For example, at login delete a folder in the network home directory and create a symbolic link to it on the local computer.
- Folder redirection actions at logout time applies the specified policy when the user logs out. For example, at logout, delete the symbolic link on the local computer (created at login) and restore the original folder to the network home directory.
After enabling the policy, click Add, then enter the following:
-
Path The path to the folder on the network share. You do not need to specify the actual network share location — you can simply use the tilde (
~) for the user’s home directory; for example,~/Library/Cachesspecifies the/Library/Cachesdirectory in the user’s network home directory. -
Link The location to create or delete on the local computer. For example:
/tmp/Library/Caches -
If you wish, you can use the syntax %@ to specify the logged in user’s name. For example:
/tmp/%@/Library/Caches
If cain is the logged in user, the folder that is created is:
/tmp/cain/Library/CachesThe Folder Redirection policies are listed here and explained below:
- Delete path
- Delete symbolic link and restore
- Delete and create symbolic link
- Rename and create symbolic link
Delete path
Path
User Configuration > Policies > Centrify Settings > Mac OS X Settings > Folder Redirection > Folder Redirect Actions at Login/Logout Time > Delete path
Description
Deletes the specified directory from the network home directory. For example, to delete the /Library/Caches file from each user’s home directory, enter the following in the Path box:
~/Library/Caches
Typically, you enable this policy for the login time folder.
Once this group policy is enabled, it takes effect when users log in (enabled for login time folder) or log out (enabled for logout time folder).
Delete Symbolic Link and Restore
Path
User Configuration > Policies > Centrify Settings > Mac OS X Settings > Folder Redirection > Folder Redirect Actions at Login/Logout Time > Delete symbolic link and restore
Description
Deletes a previously defined symbolic link on the local computer and restores the specified directory to the network home directory. Typically, you use this policy with the Rename and create symbolic link policy. For example:
At login (using Rename and create symbolic link) you save ~/Library/Caches in the network home directory to a temporary folder and redirect it to a folder on the local computer, for example /tmp/user/Library/Caches. At logout, you can enable Delete symbolic link and restore to delete the symbolic link and restore the folder on the network home directory, by specifying the following:
- Path:
~/Library/Caches - Link:
/tmp/%@/Library/Caches
where: %@ specifies the logged in user’s name on the local computer.
Once this group policy is enabled, it takes effect when users log in (enabled for login time folder) or log out (enabled for logout time folder).
Delete and Create Symbolic Link
Path
User Configuration > Policies > Centrify Settings > Mac OS X Settings > Folder Redirection > Folder Redirect Actions at Login/Logout Time > Delete and create symbolic link
Description
Deletes the specified directory from the network home directory and creates a symbolic link to it on the local computer.
For example, to delete the user’s /Library/Caches policy from the network home directory and create a link to it on the local computer, specify the following after enabling the policy:
- Path:
~/Library/Caches - Link:
/tmp/%@/Library/Caches
where %@ specifies the logged in user’s name on the local computer. For example, if cain is the logged in user, the cache files are written to:
/tmp/cain/Library/Caches
Once this group policy is enabled, it takes effect when users log in (enabled for login time folder) or log out (enabled for logout time folder).
Rename And Create Symbolic Link
Path
User Configuration > Policies > Centrify Settings > Mac OS X Settings > Folder Redirection > Folder Redirect Actions at Login/Logout Time > Rename and create symbolic link
Description
Renames the specified directory in the network home directory to a temporary folder and creates a symbolic link to it on the local computer.
For example, to rename the user’s /Library/Caches policy on the network home directory and create a link to it on the local computer, specify the following after enabling the policy for the login time folder:
- Path:
~/Library/Caches - Link:
/tmp/%@/Library/Caches
where %@ specifies the logged in user’s name on the local computer. For example, if cain is the logged in user, the cache files are written to:
/tmp/cain/Library/Caches
To restore the original /Library/Caches directory, use the Delete symbolic link and restore policy (enabled for the logout time folder).
Once this group policy is enabled, it takes effect when users log in (enabled for login time folder) or log out (enabled for logout time folder).
Import Settings
Path
User Configuration > Policies > Centrify Settings > Mac OS X Settings > Import Settings
Description
Mac OS X uses plist files to store application and other preferences. Use the User Configuration > Policies > Centrify Settings > Mac OS X Settings > Import Settings group policies to import plist files to customize your preferences:
-
Import plist files. This group policy allows you to import preferences from another computer to computers in your Delinea-managed domain. To do so you:
- Copy the plist files you want to use to the system volume on the domain controller.
- Use the Import plist files group policy to import the plist files to computers in the domain.
This group policy automatically processes plist files to extract MCX settings when the files are imported.
- Import MCX setting plist files. This group policy is similar to the Import plist file group policy, except that it does not process any data from the inputted plist files. This group policy copies the exact content (that is, the “raw” content) from the plist file and imports it to the Active Directory user record.
When you import the plist files, Delinea copies them to the appropriate directories on the local computers to implement the preferences that they control.
You can gather and copy plist files from multiple computers and paste them to the sysvol directory on the domain controller, but a more structured approach is to set up a preferences ‘template’ computer, that is, a computer that is set up with your desired preferences. Then you can copy the appropriate plist files to sysvol on the domain controller. Finally, you can use either of the group policies described here to import the plist files to Delinea-managed computers in the domain.
Mac OS X stores plist files in the /Library/Preferences directory and in the /Users/userName/Library/Preferences directory.
The following section shows specifics of using these group policies.
Import plist Files
Path
User Configuration > Policies > Centrify Settings > Mac OS X Settings > Import Settings > Import plist files
Description
Specify the names of plist files to import from the system volume (SYSVOL) — similar to importing plist files in Mac Workgroup Manager. By default, the system volume folder is at: \\domain\SYSVOL\domain\plist.
Before enabling this policy, you should copy all the plist files to import to the system volume (sysvol) on the domain controller.
To add a file, select Enabled, click Add, then type a filename.
The path you type in plist file is relative to \\domain\SYSVOL\domain\plist. For example, if the domain name is ajax.org and you enter a plist file named com.apple.MCX.plist, the file that gets imported is:
\\ajax.org\sysvol\ajax.org\com.apple.MCX.plist
You can specify additional relative directories in the path, if needed.
Once this group policy is enabled, it takes effect when users log out and log back in.
Import MCX Setting plist Files
Path
User Configuration > Policies > Centrify Settings > Mac OS X Settings > Import Settings > Import MCX setting plist files
Description
Enable this group policy to import raw MCX settings plist files from SYSVOL. By default the folder is \\<domain>\SYSVOL\<domain>\mcxplist, similar to importing plist files in Mac Workgroup Manager.
The plist file path that you specify is relative to this path:
\\<domain>\SYSVOL\<domain>\mcxplist
For example, if you specify this path:
com.apple.MCX.plist
the following plist file is imported:
\\<domain>\SYSVOL\<domain>\mcxplist\com.apple.MCX.plist
This group policy is similar to "Import plist files". However, instead of extracting MCX settings from the plist file like "Import plist files" does, this policy imports the entire plist file without processing it.
An example plist file format is as follows:
<?xml version="1.0" encoding="UTF-8"?>

<!DOCTYPE plist PUBLIC "-//Apple//DTD PLIST 1.0//EN" "http://www.apple.com/DTDs/PropertyList-1.0.dtd">

<plist version="1.0">

<dict>

    <key>mcx_application_data</key>

    <dict>

        <key>TARGET</key>

        <dict>

            <key>Forced</key>

            <array>

              <dict>

                Settings

              </dict>

            </array>

        </dict>

    </dict>

</dict>

</plist>
In this example, TARGET is the targeted MCX settings (such as com.apple.dock or com.apple.finder)
The recommended way to obtain the plist file with the correct format is by using the dscl command, and reading the MCX settings attribute of the user object that has the same MCX settings configured. Then copy the exact MCX settings and paste them into a plist file.
For example:
dscl /CentrifyDC read /Users/XXXX MCXSettings
where XXXX is an Active Directory user with the desired MCX settings.
Login Settings
Path
User Configuration > Policies > Centrify Settings > Mac OS X Settings > Login Settings
Description
Use the User Configuration > Policies > Centrify Settings > Mac OS X Settings > Login Settings group policy to specify frequently used items, such as applications, folders, or server connections to automatically open when a user logs in.
After enabling this policy, you can do the following:
- Use the Add button to specify the path to applications to open.
- In the Network Home area, use the Add button to specify URLs for servers to connect to; use the check box to specify whether to automatically connect the logged in user to the specified servers.
- Use the other check boxes to control whether users have the ability to add or remove login items.
The following table shows specifics of using this group policy.
Enable Login Items
Path
User Configuration > Policies > Centrify Settings > Mac OS X Settings > Login Settings > Enable login items
Description
Specify the names of applications, folders, and server locations to open automatically when a user logs in. Select Enable, then do any or all of the following:
- Login items. To add an application to open automatically, click Add, then type the path to the application; for example:
/Applications/TextEdit.app
To initially hide the application, select Hide. The application will open, but its window and menu bar remain hidden until the user activates the application (for example, by clicking the application icon in the doc).
Click OK to save the item you entered. You can click Add as often as necessary to add multiple applications. You can also select an item in the window and click Edit to change it, or Remove to delete it.
- Network share. To add access to a network share, click Add, then type the URL in one of the following formats:
smb://server/share

smb://server/hidden$

smb://server/share/subdir

smb://user:password@server/share

smb://user:@server/share

afp://server/share

nfs://server/share

nfs://192.168.0.1/share
To automatically connect the user to the share with the user's login name and password, select Authenticate selected share point with user’s login name and password.
%20 instead of a space.If the network share can be authenticated using Kerberos, this option can be ignored. If the network share cannot be authenticated using Kerberos, and this option is unchecked, then the user will be prompted for a username and password.
If a username is specified in the URL for the network share, then checking this option will still mount the share as the login user, while deselecting this option will mount the share as the user specified in the URL. For example, if network share is smb://mount_user:password@server/share, checking the option will mount the share as login_user, while deselecting the option will mount the share as mount_user.
Click OK to save the item you entered. You can click Add as often as necessary to add multiple shares. You can also select an item in the window and click Edit to change it, or Remove to delete it.
-
Select User may add and remove additional items to allow users to add items to the list and remove items from the list.
Deselect this box to prevent users from adding items or removing the items that you have specified. Note that they can remove login items that they specified on their own.
-
Select User may press Shift to keep items from opening to allow user’s to stop items from opening by holding down the Shift key during login until the Finder appears on the desktop.
Deselect this option to prevent users from stopping applications from opening automatically.
Once enabled, this group policy takes effect when users log out and log back in.
Media Access Settings
Path
User Configuration > Policies > Centrify Settings > Mac OS X Settings > Media Access Settings
Description
Use the User Configuration > Policies > Centrify Settings > Mac OS X Settings > Media Access Settings group policies to manage the access to discs and other media for Mac users. These group policies enable you to control access to specific types of media, such as CDs or DVDs, but you cannot restrict access to specific discs or to specific items, such as music or movies, on a disc type users are permitted to access. These settings correspond to the Media Access preferences you can manage using the Workgroup Manager. For example:
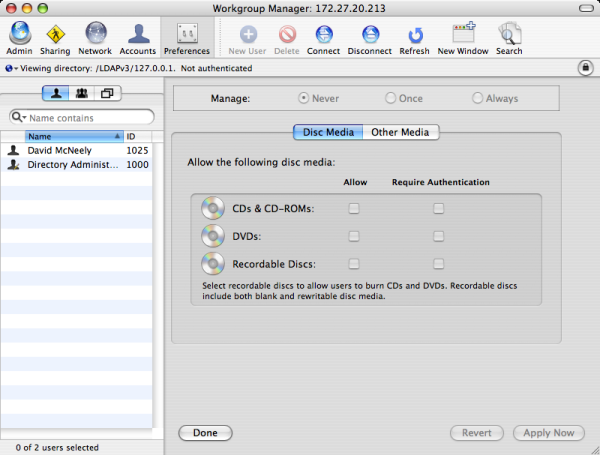
Permit/Prohibit Access: CDs and CD-ROMs
Path
User Configuration > Policies > Centrify Settings > Mac OS X Settings > Media Access Settings > Permit/prohibit access: CDs and CD-ROMs
Description
Control whether users can access data and applications on CDs and CD-ROMs. The valid options are:
- allow to allow access to CDs and CD-ROMs without authentication.
- allow, require authentication to require users to provide credentials for authentication before allowing them access to CDs and CD-ROMs.
- deny to prevent users from accessing any data or applications on CDs and CD-ROMs.
Once this group policy is enabled, it takes effect when users log out and log back in.
Permit/Prohibit Access: DVDs
Path
User Configuration > Policies > Centrify Settings > Mac OS X Settings > Media Access Settings > Permit/prohibit access: DVDs
Description
Control whether users can access data and applications on DVDs. The valid options are:
- allow to allow access to DVDs without authentication.
- allow, require authentication to require users to provide credentials for authentication before allowing them access to DVDs.
- deny to prevent users from accessing any data or applications on DVDs.
Once this group policy is enabled, it takes effect when users log out and log back in.
Permit/Prohibit Access: Recordable Discs
Path
User Configuration > Policies > Centrify Settings > Mac OS X Settings > Media Access Settings > Permit/prohibit access: Recordable Discs
Description
Control whether users can record or access data and applications on recordable discs. The valid options are:
- allow to allow access to recordable discs without authentication.
- allow, require authentication to require users to provide credentials for authentication before allowing them access to recordable discs.
- deny to prevent users from accessing any data or applications on recordable discs.
Allowing users access to recordable discs enables users to burn CDs and DVDs. Recordable discs can be blank or rewritable disc media.
Once this group policy is enabled, it takes effect when users log out and log back in.
Permit/Prohibit Access: Internal Discs
Path
User Configuration > Policies > Centrify Settings > Mac OS X Settings > Media Access Settings > Permit/prohibit access: Internal Discs
Description
Control whether users can access data and applications on internal discs. The valid options are:
- allow to allow read and write access to internal discs without authentication.
- allow, read-only to allow read-only access to the media.
- allow, require authentication to require users to provide credentials for authentication before allowing them access to the media.
- allow, require authentication, read-only to require users to provide credentials for authentication before allowing them access to internal discs, and grant read-only access to the media if authentication is successful.
- deny to prevent users from accessing any data or applications on internal discs.
Once this group policy is enabled, it takes effect when users log out and log back in.
Permit/Prohibit Access: External Discs
Path
User Configuration > Policies > Centrify Settings > Mac OS X Settings > Media Access Settings > Permit/prohibit access: External Discs
Description
Control whether users can access data and applications on external discs. External disks include floppy disks, FireWire drives, and all other external storage devices except CDs and DVDs. The valid options are:
- allow to allow read and write access to external discs without authentication.
- allow, read-only to allow read-only access to external discs.
- allow, require authentication to require users to provide credentials for authentication before allowing them access to external discs.
- allow, require authentication, read-only to require users to provide credentials for authentication before allowing them access to external discs, and grant read-only access to the media if authentication is successful.
- deny to prevent users from accessing any data or applications on external discs.
Once this group policy is enabled, it takes effect when users log out and log back in.
Eject All Removable Media at Logout
Path
User Configuration > Policies > Centrify Settings > Mac OS X Settings > Media Access Settings > Eject all removable media at logout
Description
Control whether removable media, such as CDs, DVDs, Zip disks, or FireWire drives, are automatically ejected when users log out. If you enable this group policy, CDs, DVDs, and other disk media are automatically ejected when users log out to ensure removable media is properly disconnected and put away when users end their sessions.
Once this group policy is enabled, it takes effect when users log out and log back in.
Mobility Settings
Use the Computer Configuration > Policies > Centrify Settings > Mac OS X Settings > Mobility Settings group policies to control if macOS creates a Mobile Account for the Active Directory user when logging in.
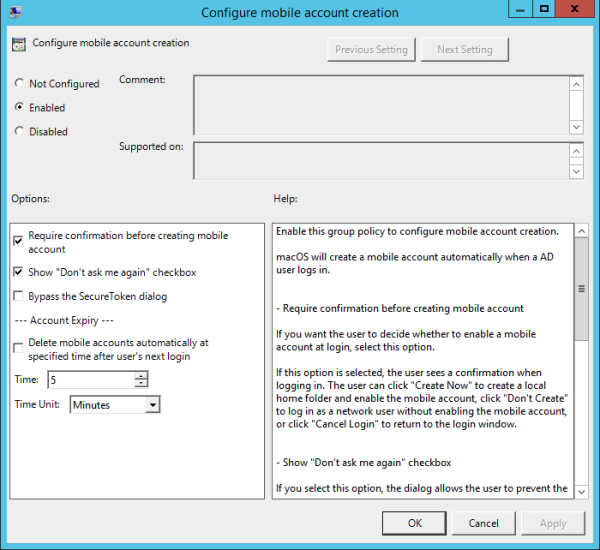
Configure Mobile Account Creation
Path
Computer Configuration > Policies > Centrify Settings > Mac OS X Settings > Mobility Settings > Configure mobile account creation
Description
Configure whether mobile accounts are created when users log in.
Check Require confirmation before creating mobile account to allow users to decide whether to enable a mobile account at login. Users see a confirmation dialog when logging in and can click one of the following:
- “Create Now” to create a local home folder and enable the mobile account.
- “Don't Create” to log in as a network user without enabling the mobile account.
- “Cancel Login” to return to the login window.
Select Show “Don't ask me again” checkbox to provide a check box that allows users to prevent display of the mobile account creation dialog on that computer in the future. Users who select “Don't ask me again” and click “Don't Create”, are not asked to create a mobile account on that computer (unless they hold down the Option key during login to redisplay the dialog).
Select Bypass the SecureToken dialog so that the system will bypass the secure token authorization dialog. The Active Directory user can continue to create a mobile account. However, if this volume is encrypted, the Active Directory mobile user may not be able to log in with this account when the computer starts. This dialog only affects APFS volumes.
Select Delete mobile accounts automatically at specified time after user's next login so that MacOS will delete the mobile account and its local home folder automatically after a period of inactivity.
Printing settings
Path
User Configuration > Policies > Centrify Settings > Mac OS X Settings > Printing Settings > Specify printer list (with model)
Description
Use the User Configuration > Policies > Centrify Settings > Mac OS X Settings > Printing Settings > Specify printer list (with model) group policy to specify a list of printers for a user.
The printers that are available to a user are a combination of those specified in this policy and those added through System Preferences on the local computer. Note that this policy allows an administrator to control whether the user can add or see printers on the local computer, or is only allowed to use the managed printers specified by this policy.
Specify a managed list of network printers that are available to a user on this computer. Printers specified by this policy use a generic PostScript driver.
To add a printer, click Add and enter the following information:
- Name: A name of your choosing for the printer.
-
DeviceURI: The device Uniform Resource Identifier, which specifies the device that is assigned to the printer (see Specifying the Device URI, below); for example:
socket://192.168.0.20:9100(which identifies the protocol, IP address, and port number)cdcsmb://dc1.acme.com/HPLaserJet2(which identifies a Windows printer added using the Delinea protocol and identified by hostname.)
- (Optional) Model: The printer driver for the printer model (see Specifying the Model (printer driver), below); for example:
HP Photosmart C6100 series. Fax
You can use the following options to control access to the printers on the local computer:
-
Allow user to modify the printer list: Check this option to allow local users to make changes in System Preferences to the printers that have been added by this policy, including deleting them.
Deselect this option to prevent local users from modifying the printers added by this policy.
-
Allow printers that connect directly to user’s computer: Check this option to allow users to add their own local printers.
Deselect this option to prevent users from adding local printers.
-
Require an administrator password: Check this option to require an administrator’s password when adding local printers.
-
Only show managed printers: Check this option to allow local users to use only the managed printers specified by this option.
Printers added locally, for example, through System Preferences, will not be visible.
Deselect this option to allow local users to use printers added locally, as well as the managed printers added by this policy.
Printers added through this group policy appear after the next group policy refresh interval.
Specifying the Device URI
When you add a printer through the Specify printer list group policy, or locally by using the Print & Scan, Add Printer advanced options, the printer is implemented through the Common UNIX Printing System (CUPS), which was developed by Apple for Mac OS X and other UNIX-like operating systems.
The CUPS system supports the following device Uniform Resource Identifier (URI) protocols that you can use to specify the printers to add.
AppSocket or Jetdirect Protocol
The AppSocket, or JetDirect, protocol normally prints over port 9100 and uses the socket URI scheme:
socket://ip-address-or-hostname
socket://ip-address-or-hostname:port-number
Internet Printing Protocol (IPP)
CUPS supports IPP natively. IPP printing normally happens over port 631 and uses the http and ipp URI schemes:
ipp://ip-address-or-hostname/resource

ipp://ip-address-or-hostname:port-number/resource

http://ip-address-or-hostname:port-number/resource
Line Printer Daemon Protocol (LPD)
LPD is the original network printing protocol and is supported by many network printers. LPD printing normally happens over port 515 and uses the lpd URI scheme:
lpd://ip-address-or-hostname/queue

lpd://username@ip-address-or-hostname/queue
Windows Printer via Delinea
When Mac users print on a Windows network printer, they must authenticate separately. Specifying a Windows printer via Delinea allows users to access the printer without providing credentials as they have already been authenticated through Active Directory.
Delinea printing normally happens over port 445 and uses the cdcsmb URI scheme
cdcsmb://server_fqdn/printersharename
Windows
Windows printing normally happens over port 445 and uses the smb URI scheme:
cdcsmb), if you want to use Windows network printers without providing credentials each time.smb://workgroup/server/printersharename
smb://ip-address-or-hostname/printersharename
smb://username:password@workgroup/ip-address-or-hostname/printersharename
smb://username:password@ip-address-or-hostname/printersharename
Specifying the Model (printer driver)
Model specifies the model name of the added printer and is used to determine which device driver to associate with the printer. Be certain to specify model correctly, otherwise, if model is not specified, or does not match a driver installed on the client Mac OX X computer, Generic PostScript driver will be selected for the printer, which may result in fewer printing options.
To find the correct model name, take one of these two approaches:
Use Printers & Scanners to identify the model:
- On a Mac OX X computer, open System Preferences > Printers & Scanners.
- Click Add (+) to add a printer.
- When you select a printer, the correct model name appears on the "Use" drop down menu.
Use lpinfo to identify the model
-
On a Mac OX X computer, open the Terminal application.
-
Run the following command to obtain the list of all the models available:
"lpinfo -m" commandIn the output from
lpinfo, the correct model string appears right after *.ppd.gz. For example:Library/Printers/PPDs/Contents/Resources/HP Photosmart C6100 Series Fax.ppd.gz HP Photosmart C6100 series. FaxThe model string is:
HP Photosmart C6100 series. Fax -
Type this in the group policy’s Model field.
Scripts (Login/Logout)
Path
User Configuration > Policies > Centrify Settings > Mac OS X Settings > Scripts (Login/Logout)
Description
Use the User Configuration > Policies > Centrify Settings > Mac OS X Settings > Scripts (Login/Logout) group policies to deploy login and logout scripts that run when an Active Directory user logs on or logs out. When you use these group policies, the login and logout scripts are stored in the Active Directory domain’s system volume (sysvol) and transferred to the Mac computer when the group policies are applied. Login and logout scripts are useful for performing common tasks such as mounting and un-mounting shares.
Specify Login Script (Deprecated)
Path
User Configuration > Policies > Centrify Settings > Mac OS X Settings > Scripts (Login/Logout) > Specify login script
Description
Specify the name of a login script to execute when users log on. You can specify only one file as the login script.
Before enabling this policy, you should create the login script and copy it to the system volume (sysvol) on the domain controller. By default, the login script is stored in the system volume (SYSVOL) on the domain controller in the directory:
\\domain\SYSVOL\domain\Scripts\scriptname
The script path you type in Login script is relative to \\domain\SYSVOL\domain\scripts\. For example, if the domain name is ajax.org and you enter a script name of mlogin.sh, the script that gets executed on the domain controller is:
\\ajax.org\SYSVOL\ajax.org\Scripts\mlogin.sh
You can specify additional relative directories in the path, if needed.
By default, the script runs with the Active Directory user’s permissions. If the script contains commands that require root permission to run, select Run with root user privileges.
Once this group policy is enabled, it takes effect when users log out and log back in.
Specify Logout Script
Path
User Configuration > Policies > Centrify Settings > Mac OS X Settings > Scripts (Login/Logout) > Specify logout script
Description
Specify the name of a logout script to execute when users log out. You can specify only one file as the logout script.
Before enabling this policy, you should create the logout script and copy it to the system volume (SYSVOL) on the domain controller. By default, the logout script is stored in the system volume (SYSVOL) on the domain controller in the following directory:
\\domain\SYSVOL\domain\Scripts\scriptname
The script path you type in Logout script is relative to: \domain\SYSVOL\domain\scripts\.
For example, if the domain name is ajax.org and you enter a script name of mlogout.sh, the script that gets executed on the domain controller is:
\\ajax.org\SYSVOL\ajax.org\Scripts\mlogout.sh
By default, the script runs with the Active Directory user’s permissions. If the script contains commands that require root permission to run, select Run with root user privileges.
Once this group policy is enabled, it takes effect when users log out and log back in.
Specify Multiple Login Scripts
Path
User Configuration > Policies > Centrify Settings > Mac OS X Settings > Scripts (Login/Logout) > Specify multiple login scripts
Description
Specify the names of one or more login scripts to execute when a user logs on. The scripts you specify run simultaneously in no particular order.
This policy is also available as a computer policy. If you specify scripts using both the computer and user policies, the computer scripts are executed first.
Before enabling this policy, you should create the scripts and copy them to the system volume (sysvol) on the domain controller. By default, the login scripts are stored in the system volume (SYSVOL) on the domain controller in the directory:
\\domain\SYSVOL\domain\Scripts
\scriptname1
\scriptname
...
After enabling this policy, click Add and enter the following information:
- __Script:__The name of the script and an optional path, which are relative to
\\domain\SYSVOL\domain\scripts\.
For example, if the domain name is ajax.org and you enter a script name of mlogin.sh, the script that gets executed on the domain controller is:
\ajax.org\SYSVOL\ajax.org\Scripts\mlogin.sh`
You can specify additional relative directories in the path, if needed; for example, if you type submlogin.sh, the file that gets executed is:
\\ajax.org\SYSVOL\ajax.org\Scripts\sub\mlogin.sh
- Parameters: An optional set of arguments to pass to the script.
These arguments are interpreted the same way as in a UNIX shell; that is, space is a delimiter, and backslash is an escape character. You can also use $USER to represent the current user's name. For example:
arg1 arg2 arg3
arg1 'a r g 2' arg3
arg' $USER.
Once this group policy is enabled, it takes effect when users log out and log back in.
Security & Privacy Settings
Path
User Configuration > Policies > Centrify Settings > Mac OS X Settings > Security & Privacy
Description
Use the Security & Privacy group policies to control user security and privacy settings.
Disable Dictation
Path
User Configuration > Policies > Centrify Settings > Mac OS X Settings > Security & Privacy Settings > Disable Dictation
Description
Enable this policy to turn off Dictation in the System Preferences > Keyboard pane.
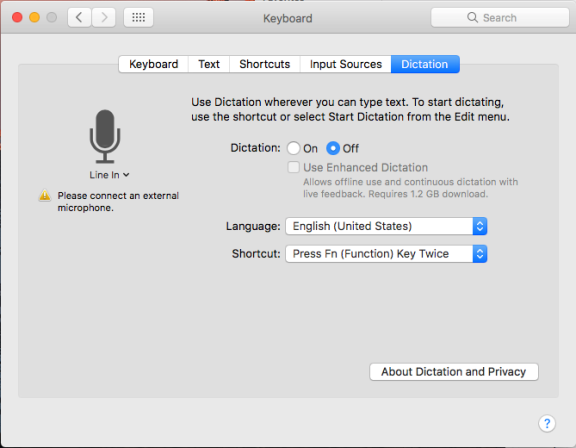
Once enabled, this group policy takes effect dynamically at the next group policy refresh interval.
Require a Password to Wake this Computer from Sleep or Screen Saver (Deprecated)
Path
User Configuration > Policies > Centrify Settings > Mac OS X Settings > Security & Privacy Settings > Require a password to wake this computer from sleep or screen saver
Description
Lock the computer screen when the computer goes into sleep or screen saver mode and requires users to enter a user name and password to unlock the screen.
Enabling this group policy is the same as clicking the Require a password to wake this computer from sleep or screen saver option in the Security system preference.
After this group policy is enabled, it takes effect when the computer is rebooted.
Prohibit Authentication with Expired Password
Path
User Configuration > Policies > Centrify Settings > Mac OS X Settings > Security & Privacy Settings > Prohibit authentication with expired password
Description
Prohibit a user from unlocking the screen if a password change is required while the screen is locked. If a user logs in with a password that must be changed, and the computer goes into sleep or screen saver mode before the user updates the password, the user is locked out. Disabling this policy allows a user to specify the old password to remove the screen lock.
Keychain Policies
Path
User Configuration > Policies > Centrify Settings > Mac OS X Settings > Security & Privacy Settings > Keychain Policies
Description
On OS X 10.11, you can create a keychain protected by a smart card token or a password. Once the Enable smart card protected keychain group policy takes effect, the token-protected keychain can only be unlocked with a PIN when the associated smart card is present. This group policy can be configured to allow users who lose or forget their smart card to continue to log in with a password. In this case, a new password-protected keychain is created to ensure users can continue to log in to their account; however, keychain items are not transferred from the token-protected keychain to the password-protected keychain.
This feature is not supported on OS X 10.10 and earlier.
Enable Protected Keychain
Path
User Configuration > Policies > Centrify Settings > Mac OS X Settings > Security & Privacy Settings > Keychain Policies > Enable protected keychain
Description
Create a new keychain protected by either an asymmetric token stored on a smart card or by a password, depending on the log in type. Enabling this policy requires users to have the smart card present to unlock the token-protected keychain.
When the smart card is renewed it will no longer unlock the protected keychain. There is no way to export a token-protected keychain; you will have to recreate the keychain items in the new token-protected keychain. In addition, if a smart card is lost, there is no way to recover items from the token-protected keychain.
The Set as user default keychain option is selected by default. This option is required to be able to log in with a password after this group policy takes effect. With this option set, the default keychain will be switched based on the login type (smart card login or password login). Deselect this option to leave the existing login keychain as the default keychain.
The Delete the Password protected ‘Login’ Keychain after login option is deselected by default. Select this option to delete the existing password-protected ‘Login’ Keychain after logging in with a smart card, leaving no keychains that can be unlocked without a smart card. This option is required to be able to log in with a password after this group policy takes effect without seeing keychain errors.
Lock Protected Keychain After Number of Minutes of Inactivity
Path
User Configuration > Policies > Centrify Settings > Mac OS X Settings > Security & Privacy Settings > Keychain Policies > Lock protected keychain after number of minutes of inactivity
Description
Lock the protected keychain after a period of inactivity that you specify in minutes.
This policy only works if you have enabled the Enable protected keychain group policy.
This policy takes effect at the next user login using smart card authentication.
Lock Protected Keychain When Sleeping
Path
User Configuration > Policies > Centrify Settings > Mac OS X Settings > Security & Privacy Settings > Keychain Policies > Lock protected keychain when sleeping
Description
Lock the protected keychain when the machine sleeps.
This policy only works if you have enabled the Enable protected keychain group policy.
This policy takes effect at the next user login using smart card authentication.
Allow All Applications to Access The Auto-Enrollment Private Key(S)
Path
User Configuration > Policies > Centrify Settings > Mac OS X Settings > Security & Privacy > Public Key Policies > Allow all applications to access the auto-enrollment private key(s)
Description
Enabling this policy allows all applications to access the auto-enrollment private key(s) in the System keychain.
See Configuring Auto-Enrollment for more information about auto-enrollment keys.
Allow Specific Applications to Access the Auto-Enrollment Private Key(S)
Path
User Configuration > Policies > Centrify Settings > Mac OS X Settings > Security & Privacy > Public Key Policies > Allow specific applications to access the auto-enrollment private key(s)
Description
Enabling this policy allows specified applications to access the auto-enrollment private key(s) in System keychain.
After you enable this policy, click Add to enter the path to the application you want to allow access to the auto-enrollment private key, then click OK. You can click Add again to add additional applications.
For example, to give Google Chrome and Delinea Agent access to the auto-enrollment private key, enter the application path for Google Chrome:
/Applications/Google Chrome.app
Click OK. Then click Add and enter the application path for Delinea Agent:
/Applications/Centrify Agent.app
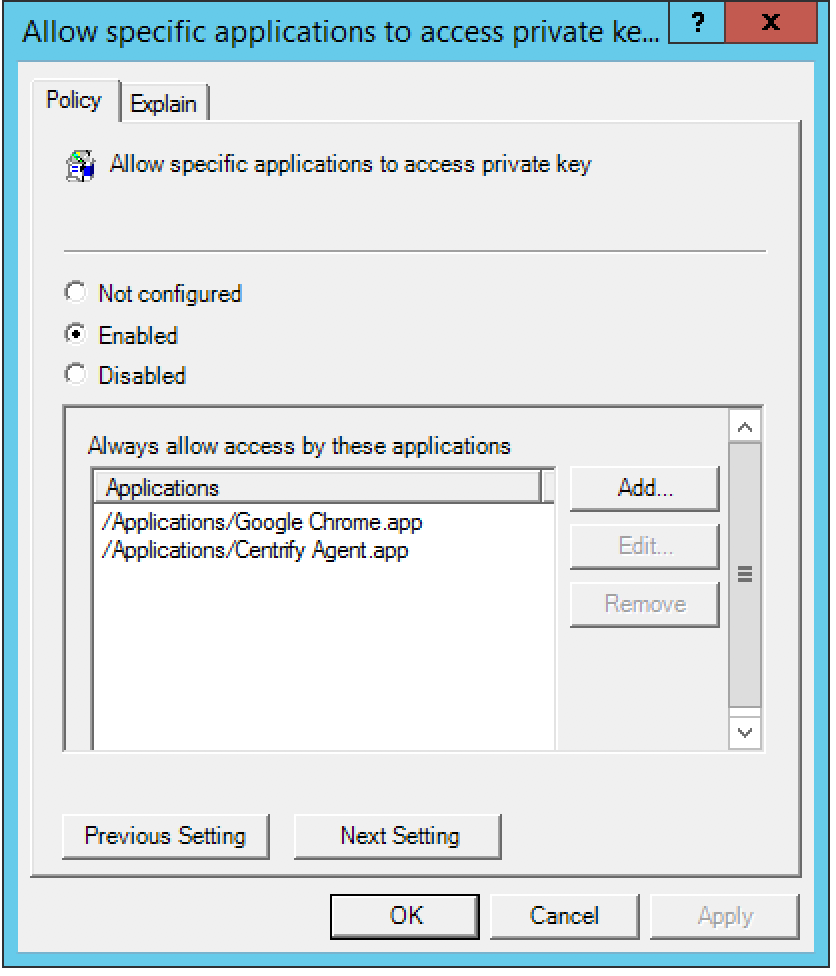
After this group policy is enabled, the list of applications specified in the group policy are added to the access control list of the auto-enrollment private key in system keychain.
See Configuring Auto-Enrollment for more information about auto-enrollment keys.
If the group policy above, Allow All Applications to Access the Auto-enrollment Private Key(s) is enabled, this group policy will be ignored.
Do Not Allow the Private Key(S) To Be Extractable
Path
User Configuration > Policies > Centrify Settings > Mac OS X Settings > Security & Privacy > Public Key Policies > Do not allow private key(s) to be extractable
Description
Enabling this policy prevents exporting the auto-enrollment private key(s).
System Preference Settings
Path
User Configuration > Policies > Centrify Settings > Mac OS X Settings > Security & Privacy Settings > System Preference Settings
Description
Use the User Configuration > Policies > Centrify Settings > Mac OS X Settings > System Preference Settings group policies to specify which preferences are enabled for use in System Preferences for Mac OS X users. Enabling a preference for use does not enable non-admin users to modify that preference. For example, some preferences, such as Startup Disk preferences, require an administrator name and password before a user can modify its settings. Displaying a preference does enable a user to view the preference’s current settings.
By default, no system preference panes are displayed unless explicitly enabled. The group policies in this category correspond to System Preferences you can select for display in the Workgroup Manager. For example:

The user interface for System Preferences Settings differs significantly between different versions of Mac OS X. Therefore, there are separate System Preferences policies for each supported version of Mac OS X. In addition, to support existing installations that configured group policies by using a previous centrifydc_mac_settings template, the Centrify group policies provide a set of legacy preferences settings.
The Use Version Specific Settings group policy below determines whether to use legacy settings or platform-specific system preferences settings. By default (if you do not configure or disable this policy) legacy settings are used.
If you enable this policy, you can then enable platform-specific system preferences settings for each platform in your environment; see the following sections for information on each set of policies:
Use Version Specific Settings
Path
User Configuration > Policies > Centrify Settings > Mac OS X Settings > Security & Privacy Settings > System Preference Settings > Use version specific settings
Description
Enable the use of version-specific System Preferences settings.
If you enable this policy, you can then set platform-specific preferences settings for each platform in your environment. For example, if you have only 10.10 computers, you can enable this policy and then use Mac OS X 10.10 settings. If you have 10.9 and 10.10 computers, enable this policy, and then configure the version-specific policies as appropriate:
- Mac OS X 10.9 Settings
- Mac OS X 10.10 Settings
When a computer joins the domain, Delinea Management Services determines the OS version and applies the appropriate Preferences settings.
If this policy is disabled or not configured, Legacy Settings are used instead of version-specific settings. Likewise, Delinea versions prior to 4.4.2 always use Legacy Settings and ignore this policy setting.
If you configured System Preferences settings with a version of the product prior to 4.4.2, these settings are saved to Legacy Settings when you upgrade to the current version. You can keep or edit these settings as you wish.
Legacy Settings
Path
User Configuration > Policies > Centrify Settings > Mac OS X Settings > Security & Privacy Settings > System Preference Settings > Legacy Settings
Description
When you upgrade from a version of Delinea prior to 4.4.2, your System Preferences settings are saved to Legacy Settings. You can keep or edit the individual legacy system preferences group policy settings as you wish.
| Use this policy | To do this |
|---|---|
| Showing items in the Personal pane of System Preferences | Select the items to display in the Personal pane of System Preferences. |
| Showing items in the Hardware System pane of Preferences | Select the items to display in the Hardware pane of System Preferences. |
| Showing items in the Internet & Network pane of System Preferences | Select the items to display in the Internet & Network pane of System Preferences. |
| Showing items in the System pane of System Preferences | Select the items to display in the System pane of System Preferences. |
| Showing items in the Other pane of System Preferences | Select the items to display in the Other pane of System Preferences. |
| Limit items usage in System Preferences (deprecated) | Limit the usage of items in System Preferences. You must enable this group policy for any of the other group policy settings to take effect. Once this group policy is enabled, it takes effect when users log out and log back in. |
Showing items in the Personal pane of System Preferences
Path
User Configuration > Policies > Centrify Settings > Mac OS X Settings > Security & Privacy Settings > System Preference Settings > Enable System Preferences Pane: Personal
Description
Use the group policies in this category to choose which items to display in the Personal pane of System Preferences.
Enable Appearance
Enable usage of Appearance preferences in the Personal pane of System Preferences.
Once this group policy is enabled, it takes effect when users log out and log back in.
Enable Dashboard & Expose
Enable usage of Dashboard & ExposE preferences in the Personal pane of System Preferences.
Once this group policy is enabled, it takes effect when users log out and log back in.
Enable Desktop & Screen Saver
Enable usage of Desktop & Screen Saver preferences in the Personal pane of System Preferences.
Once this group policy is enabled, it takes effect when users log out and log back in.
Enable Dock
Enable usage of Dock preferences in the Personal pane of System Preferences.
Once this group policy is enabled, it takes effect when users log out and log back in.
Enable International (Language & Text)
Enable usage of International preferences in the Personal pane of System Preferences.
Once this group policy is enabled, it takes effect when users log out and log back in.
Enable Security
Enable usage of Security preferences in the Personal pane of System Preferences.
Once this group policy is enabled, it takes effect when users log out and log back in.
Enable Spotlight
Enable usage of Spotlight preferences in the Personal pane of System Preferences.
Once this group policy is enabled, it takes effect when users log out and log back in.
Showing items in the Hardware System pane of Preferences
Use the group policies in this category to display items in the Hardware pane of System Preferences.
Enable Bluetooth
Enable usage of Bluetooth preferences in the Hardware pane of System Preferences.
Once this group policy is enabled, it takes effect when users log out and log back in.
Enable CDs & DVDs
Enable usage of CDs & DVDs preferences in the Hardware pane of System Preferences.
Once this group policy is enabled, it takes effect when users log out and log back in.
Enable Displays
Enable usage of Displays preferences in the Hardware pane of System Preferences.
Once this group policy is enabled, it takes effect when users log out and log back in.
Enable Energy Saver
Enable usage of Energy Saver preferences in the Hardware pane of System Preferences.
Once this group policy is enabled, it takes effect when users log out and log back in.
Enable Ink
Enable usage of Ink preferences in the Hardware pane of System Preferences.
Once this group policy is enabled, it takes effect when users log out and log back in.
Enable Keyboard & Mouse (Keyboard)
Enable usage of Keyboard & Mouse preferences in the Hardware pane of System Preferences.
Once this group policy is enabled, it takes effect when users log out and log back in.
Enable Mouse
Enable usage of Mouse preferences in the Hardware pane of System Preferences.
Once this group policy is enabled, it takes effect when users log out and log back in.
Enable Print & FAX
Enable usage of Print & FAX preferences in the Hardware pane of System Preferences.
Once this group policy is enabled, it takes effect when users log out and log back in.
Enable Sound
Enable usage of Sound preferences in the Hardware pane of System Preferences.
Once this group policy is enabled, it takes effect when users log out and log back in.
Enable Trackpad
Enable usage of Trackpad preferences in the Hardware pane of System Preferences.
Once this group policy is enabled, it takes effect when users log out and log back in.
Showing Items in the Internet & Network Pane of System Preferences
Path
User Configuration > Policies > Centrify Settings > Mac OS X Settings > Security & Privacy Settings > System Preference Settings > Enable System Preferences Pane: Internet & Network
Description
Use the group policies in this category to display items in the Internet & Network pane of System Preferences.
Enable .Mac (MobileMe)
Enable usage of .Mac preferences in the Internet & Network pane of System Preferences.
Once this group policy is enabled, it takes effect when users log out and log back in.
Enable Fibre Channel
Enable usage of Fibre Channel preferences in the Internet & Network pane of System Preferences.
Once this group policy is enabled, it takes effect when users log out and log back in.
Enable Network
Enable usage of Network preferences in the Internet & Network pane of System Preferences.
Once this group policy is enabled, it takes effect when users log out and log back in.
Enable QuickTime
Enable usage of QuickTime preferences in the Internet & Network pane of System Preferences.
Once this group policy is enabled, it takes effect when users log out and log back in.
Enable Sharing
Enable usage of Sharing preferences in the Internet & Network pane of System Preferences.
Once this group policy is enabled, it takes effect when users log out and log back in.
Showing items in the System pane of System Preferences
Path
User Configuration > Policies > Centrify Settings > Mac OS X Settings > Security & Privacy Settings > System Preference Settings > Enable System Preferences Pane: System
Description
Use the group policies in this category to display items in the System pane of System Preferences.
Enable Accounts
Enable usage of Accounts preferences in the System pane of System Preferences.
Once this group policy is enabled, it takes effect when users log out and log back in.
Enable Classic
Enable usage of Classic preferences in the System pane of System Preferences.
Once this group policy is enabled, it takes effect when users log out and log back in.
Enable Date & Time
Enable usage of Date & Time preferences in the System pane of System Preferences.
Once this group policy is enabled, it takes effect when users log out and log back in.
Enable Parental Controls
Enable usage of Parental Controls preferences in the System pane of System Preferences.
Once this group policy is enabled, it takes effect when users log out and log back in.
Enable Software Update
Enable usage of Software Update preferences in the System pane of System Preferences.
Once this group policy is enabled, it takes effect when users log out and log back in.
Enable Speech
Enable usage of Speech preferences in the System pane of System Preferences.
Once this group policy is enabled, it takes effect when users log out and log back in.
Enable Startup Disk
Enable usage of Startup Disk preferences in the System pane of System Preferences.
Once this group policy is enabled, it takes effect when users log out and log back in.
Enable Time Machine
Enable usage of Time Machine preferences in the System pane of System Preferences.
Once this group policy is enabled, it takes effect when users log out and log back in.
Enable Universal Access
Enable usage of Universal Access preferences in the System pane of System Preferences.
Once this group policy is enabled, it takes effect when users log out and log back in.
Showing Items in the Other Pane of System Preferences
Path
User Configuration > Policies > Centrify Settings > Mac OS X Settings > Security & Privacy Settings > System Preference Settings > Enable System Preferences Pane: Other
Description
Use the group policies in this category to display the items you specify in the Other pane of System Preferences.
Other Preferences Panes
Enable usage of additional preferences panes of System Preferences.
Once this group policy is enabled, it takes effect when users log out and log back in.
System Preferences Mac OS X 10.5 Settings (deprecated)
Path
User Configuration > Policies > Centrify Settings > Mac OS X Settings > Security & Privacy Settings > System Preference Settings > Mac OS X 10.5 Settings
Description
If your environment does not contain Mac OS X 10.5 computers, you can ignore the group policies in this folder.
System Preferences Mac OS X 10.6 Settings (deprecated)
Path
User Configuration > Policies > Centrify Settings > Mac OS X Settings > Security & Privacy Settings > System Preference Settings > Mac OS X 10.6 Settings
Description
If your environment does not contain Mac OS X 10.6 computers, you can ignore the group policies in this folder.
System Preferences Mac OS X 10.7 Settings (deprecated)
Path
User Configuration > Policies > Centrify Settings > Mac OS X Settings > Security & Privacy Settings > System Preference Settings > Mac OS X 10.7 Settings
Description
The Mac OS X 10.7 Settings allow you to configure system preferences policies that apply specifically to Mac OS X 10.7 computers. Because the user interface varies between different versions of Mac OS X, separate policies are provided for each version. See Legacy Settings, above, for older versions of Mac OS X.
If your environment does not contain Mac OS X 10.7 computers, you can ignore these settings.
Limit Items Usage in System Preferences (deprecated)
Path
User Configuration > Policies > Centrify Settings > Mac OS X Settings > Security & Privacy Settings > System Preference Settings > Mac OS X 10.7 Settings > Limit items usage in System Preferences
Description
Limit the usage of items in the System Preferences panel.
Once enabled, this group policy takes effect when users log out and log back in.
Enable System Preferences Panes 10.7 (deprecated)
Path
User Configuration > Policies > Centrify Settings > Mac OS X Settings > Security & Privacy Settings > System Preference Settings > Mac OS X 10.7 Settings > Enable System Preferences Panes
Description
Use Enable built-in System Preferences Panes, below, to select the items to add to the standard System Preferences panes.
Use Enable other System Preferences Panes, below, to add preferences for third-party applications to the Other pane of the System Preferences.
Enable Built-in System Preferences Panes (deprecated)
Path
User Configuration > Policies > Centrify Settings > Mac OS X Settings > Security & Privacy Settings > System Preference Settings > Mac OS X 10.7 Settings > Enable System Preferences Panes > Enable built-in System Preferences Panes
Description
Select items to add to the System Preferences panel.
This policy is only effective if the Limit items usage in System Preferences group policy, above, is enabled. Otherwise this group policy is ignored.
Once enabled, this group policy takes effect when users log out and log back in.
Enable Other System Preferences Panes (deprecated)
Path
User Configuration > Policies > Centrify Settings > Mac OS X Settings > Security & Privacy Settings > System Preference Settings > Mac OS X 10.7 Settings > Enable System Preferences Panes > Enable other System Preferences panes
Description
Define a list of additional items to add to the Other pane of the System Preferences panel.
Preference pane applications are actually collections of files inside a directory (called bundles). Inside the Contents directory of every preference pane application is the info.plist file, and inside that file is the CFBundleIdentifier key that identifies the preference pane application. You need to use the value for this key when adding a preference pane application.
Generally, installed third party preference panes can be found in /System/Library/PreferencePanes, /Library/PreferencePanes or ~/Library/PreferencePanes.
You can find the CFBundleIdentifier key by using the defaults command. For example, to find the value for the QuickTime pane, use the following command in a terminal window:
defaults read /System/Library/PreferencePanes/QuickTime.prefPane /Contents/info CFBundleIdentifier
which returns:
com.apple.preference.quicktime
To display the QuickTime icon in the Other pane of the System Preferences Panel, enable this policy, then click Add and enter com.apple.preference.quicktime.
This policy is effective only if the Limit Items Usage on System Preferences group policy, below, is enabled. Otherwise, this group policy is ignored.
Once enabled, this group policy takes effect when users log out and log back in.
System Preferences Mac OS X 10.8 Settings (deprecated)
Path
User Configuration > Policies > Centrify Settings > Mac OS X Settings > Security & Privacy Settings > System Preference Settings > Mac OS X 10.8 Settings
Description
The Mac OS X 10.8 Settings allow you to configure system preferences policies that apply specifically to Mac OS X 10.8 computers. Because the user interface varies between different versions of Mac OS X, separate policies are provided for each version. See Legacy Settings for older versions of Mac OS X.
If your environment does not contain Mac OS X 10.8 computers, you can ignore these settings.
Limit Items Usage in System Preferences (deprecated)
Path
User Configuration > Policies > Centrify Settings > Mac OS X Settings > Security & Privacy Settings > System Preference Settings > Mac OS X 10.8 Settings > Limit items usage in System Preferences
Description
Limit the usage of items in the System Preferences panel.
Once enabled, this group policy takes effect when users log out and log back in.
Enable System Preferences Panes 10.8 (deprecated)
Path
User Configuration > Policies > Centrify Settings > Mac OS X Settings > Security & Privacy Settings > System Preference Settings > Mac OS X 10.8 Settings > Enable System Preferences Panes
Description
Use Enable Built-in System Preferences Panes, below, to select the items to add to the standard System Preferences panes.
Use Enable Other System Preferences Panes, below, to add preferences for third-party applications to the Other pane of the System Preferences.
Enable Built-in System Preferences Panes (deprecated)
Path
User Configuration > Policies > Centrify Settings > Mac OS X Settings > Security & Privacy Settings > System Preference Settings > Mac OS X 10.8 Settings > Enable System Preferences Panes > Enable built-in System Preferences panes
Description
Select items to add to the System Preferences panel.
This policy is effective only if the Limit Items Usage on System Preferences group policy is enabled. Otherwise, this group policy is ignored.
Once enabled, this group policy takes effect when users log out and log back in.
Enable Other System Preferences Panes (deprecated)
Path
User Configuration > Policies > Centrify Settings > Mac OS X Settings > Security & Privacy Settings > System Preference Settings > Mac OS X 10.8 Settings > Enable System Preferences Panes > Enable other System Preferences panes
Description
Define a list of additional items to add to the Other pane of the System Preferences panel.
Preference pane applications are actually collections of files inside a directory (called bundles). Inside the Contents directory of every preference pane application is the info.plist file, and inside that file is the CFBundleIdentifier key that identifies the preference pane application. You need to use the value for this key when adding a preference pane application.
Generally, installed third party preference panes can be found in /System/Library/PreferencePanes, /Library/PreferencePanes, or ~/Library/PreferencePanes.
You can find the CFBundleIdentifier key by using the defaults command. For example, to find the value for the QuickTime pane, use the following command in a terminal window:
defaults read /System/Library/PreferencePanes/QuickTime.prefPane /Contents/info CFBundleIdentifier
which returns:
com.apple.preference.quicktime
To display the QuickTime icon in the Other pane of the System Preferences Panel, enable this policy, then click Add and enter com.apple.preference.quicktime.
This policy is effective only if the Limit Items Usage on System Preferences group policy, below, is enabled. Otherwise, this group policy is ignored.
Once enabled, this group policy takes effect when users log out and log back in.
System Preferences Mac OS X 10.9 Settings (deprecated)
Path
User Configuration > Policies > Centrify Settings > Mac OS X Settings > Security & Privacy Settings > System Preference Settings > Mac OS X 10.9 Settings
Description
The Mac OS X 10.9 Settings allow you to configure system preferences policies that apply specifically to Mac OS X 10.9 computers. Because the user interface varies between different versions of Mac OS X, separate policies are provided for each version. See Legacy Settings, above, for older versions of Mac OS X.
If your environment does not contain Mac OS X 10.9 computers, you can ignore these settings.
Limit Items Usage in System Preferences (deprecated)
Path
User Configuration > Policies > Centrify Settings > Mac OS X Settings > Security & Privacy Settings > System Preference Settings > Mac OS X 10.9 Settings > Limit items usage in System Preferences
Description
Limit the usage of items in the System Preferences panel.
Once enabled, this group policy takes effect when users log out and log back in.
Enable Built-in System Preferences Panes (deprecated)
Path
User Configuration > Policies > Centrify Settings > Mac OS X Settings > Security & Privacy Settings > System Preference Settings > Mac OS X 10.9 Settings > Enable System Preferences Panes > Enable built-in System Preferences panes
Description
Select items to add to the System Preferences panel.
This policy is effective only if the Limit Items Usage on System Preferences group policy, below, is enabled. Otherwise, this group policy is ignored.
Once enabled, this group policy takes effect when users log out and log back in.
Enable Other System Preferences Panes (deprecated)
Path
User Configuration > Policies > Centrify Settings > Mac OS X Settings > Security & Privacy Settings > System Preference Settings > Mac OS X 10.9 Settings > Enable System Preferences Panes > Enable other System Preferences panes
Description
Define a list of additional items to add to the Other pane of the System Preferences panel.
Preference pane applications are actually collections of files inside a directory (called bundles). Inside the Contents directory of every preference pane application is the info.plist file, and inside that file is the CFBundleIdentifier key that identifies the preference pane application. You need to use the value for this key when adding a preference pane application.
Generally, installed third party preference panes can be found in /System/Library/PreferencePanes, /Library/PreferencePanes or ~/Library/PreferencePanes.
You can find the CFBundleIdentifier key by using the defaults command. For example, to find the value for the QuickTime pane, use the following command in a terminal window:
defaults read /System/Library/PreferencePanes/QuickTime.prefPane /Contents/info CFBundleIdentifier
which returns:
com.apple.preference.quicktime
To display the QuickTime icon in the Other pane of the System Preferences Panel, enable this policy, then click Add and enter com.apple.preference.quicktime.
This policy is effective only if the Limit Items Usage on System Preferences group policy, below, is enabled. Otherwise, this group policy is ignored.
Once enabled, this group policy takes effect when users log out and log back in.
System Preferences Mac OS X 10.10 or Above Settings
Path
User Configuration > Policies > Centrify Settings > Mac OS X Settings > Security & Privacy Settings > System Preference Settings > Mac OS X 10.10 Settings
Description
The Mac OS X 10. 10 or above Settings allow you to configure system preferences policies that apply specifically to Mac OS X 10.10 and above computers. Because the user interface varies between different versions of Mac OS X, separate policies are provided for each version. See Legacy Settings, above, for other versions of Mac OS X.
If your environment does not contain Mac OS X 10.10 or above computers, you can ignore these settings.
Limit Items Usage on System Preferences
Path
User Configuration > Policies > Centrify Settings > Mac OS X Settings > Security & Privacy Settings > System Preference Settings > Mac OS X 10.10 Settings > Limit items usage on System Preferences
Description
Limit the usage of items in the System Preferences panel.
Once enabled, this group policy takes effect when users log out and log back in.
Enable System Preferences Panes 10.10
Path
User Configuration > Policies > Centrify Settings > Mac OS X Settings > Security & Privacy Settings > System Preference Settings > Mac OS X 10.10 Settings > Enable System Preferences Panes
Description
Use Enable other System Preferences Panes, below, to add preferences for third-party applications to the Other pane of the System Preferences.
Enable Built-in System Preferences Panes
Path
User Configuration > Policies > Centrify Settings > Mac OS X Settings > Security & Privacy Settings > System Preference Settings > Mac OS X 10.10 Settings > Enable System Preferences Panes > Enable built-in System Preferences panes
Description
Enable this group policy to enable the built-in System Preferences panes.
Enable or disable usage of items in the built-in System Preferences panes by checking or unchecking boxes corresponding to the items.
This policy is effective only if the Limit Items Usage on System Preferences group policy, above, is enabled. Otherwise, this group policy is ignored.
Once enabled, this group policy takes effect when users log out and log back in.
Enable Other System Preferences Panes
Path
User Configuration > Policies > Centrify Settings > Mac OS X Settings > Security & Privacy Settings > System Preference Settings > Mac OS X 10.10 Settings > Enable System Preferences Panes > Enable other System Preferences panes
Description
Define a list of additional items to add to the Other pane of the System Preferences panel.
Preference pane applications are actually collections of files inside a directory (called bundles). Inside the Contents directory of every preference pane application is the info.plist file, and inside that file is the CFBundleIdentifier key that identifies the preference pane application. You need to use the value for this key when adding a preference pane application.
Generally, installed third party preference panes can be found in /System/Library/PreferencePanes, /Library/PreferencePanes or ~/Library/PreferencePanes.
You can find the CFBundleIdentifier key by using the defaults command. For example, to find the value for the QuickTime pane, use the following command in a terminal window:
defaults read /System/Library/PreferencePanes/QuickTime.prefPane /Contents/info CFBundleIdentifier
which returns:
com.apple.preference.quicktime
To display the QuickTime icon in the Other pane of the System Preferences Panel, enable this policy, then click Add and enter com.apple.preference.quicktime.
This policy is effective only if the Limit Items Usage on System Preferences group policy, above, is enabled. Otherwise, this group policy is ignored.
Once enabled, this group policy takes effect when users log out and log back in.