Security Hardening Guide
Introduction
This document outlines security hardening for securing your Secret Server instance, whether it be installed on a single server or in a multi-clustered environment.
Overview
It is critical to secure your Secret Server implementation. That needs to include a layered approach to security (defense in depth), including the operating system, software updates, physical access, protocols, system settings, backups, and personnel procedures. This section of the guide links to other sections containing more details.
Best Practices
General
-
Keep Windows up-to-date: Microsoft regularly releases security patches that resolve vulnerabilities in Windows operating systems.
-
Backup at least daily: Consider your disaster recovery plan. See Backup and Disaster Recovery.
-
Review system log for errors: Periodically check the system log (Admin > System Log) for recurring errors. Also do so after any upgrades.
-
Whole-disk encryption: Use whole disk encryption, such as BitLocker, with a trusted platform module (TPM) to prevent those with physical access from removing disks to gain access to your Secret Server application by circumventing OS and application authentication.
-
Security Hardening Standards: Consider security hardening standards that apply to either the operating system or applications, such as IIS or Microsoft SQL. Secret Server is compatible with CIS Level 1 and CIS Level 2 hardening and has STIG compatibility.
Attaining full security-hardening standards compatibility is a Delinea priority.
Active Directory
On Active Directory domain controllers, there is a set of unsafe default configurations for LDAP channel binding that allow LDAP clients to communicate with them without ensuring LDAP channel binding and LDAP signing. This can open the controllers to privilege vulnerabilities. See 2020 LDAP channel binding and LDAP signing requirements for Windows for details.
Database
- Limit access to your Secret Server database: When you create your Secret Server database, limit access to as few users as possible. We recommend you disable the "sa" account in the SQL instance that contains Secret Server.
- Limit access to other databases: When you create a database account for SS, you should ensure it only has access to the Secret Server database.
- Use Windows Authentication for database access: Windows authentication is much more secure than SQL authentication. See Choose an Authentication Mode (TechNet article) for details. To use Windows authentication in SS, you need to create a service account. See the Accessing MS SQL Server with IWA for details.
- Limit access to your database backups: Database backups are critical for disaster recovery, but they also carry a risk if someone gains access. The Secret Server database is encrypted, but you should still limit access to ensure maximum security. Limit access to database backups to as few users as possible.
- Don't share a SQL instance with less secure databases: Putting the database on a server with less-secure database instances can expose vulnerabilities. For example, an attacker could use SQL injection on another application to access your private Secret Server database. If you intend to put Secret Server on a shared SQL instance, ensure that the other databases are classified internally as sensitive as Secret Server and have similar security controls in place.
- Review Microsoft's recommendations for SQL security: See the Securing SQL Server article in Microsoft's documentation.
Application Server
- Use SSL (HTTPS): We require using Secure Sockets Layer (SSL) encryption to ensure that all communication between the Web browser and Secret Server is secure. We recommend you install a third-party certificate, domain certificate, or self-signed certificate on your website. For information on creating and installing a self-signed certificate, please see Installing a Self-Signed SSL Certificate.
- Force SSL (HTTPS): Even after you install an SSL certificate, users may still be able to access Secret Server through regular HTTP. To that, enable the "Force HTTPS/SSL" option in Secret Server at Admin > Configuration on the Security tab.
- Limit access to your Secret Server directory. This contains the Secret Server encryption key, as well as the database connection information (these values are encrypted but remember "defense in depth." Try to grant access to as few users as possible).
- Limit logon rights to the application server. Administrators accessing the Application Server directly could attempt to monitor memory in use on the server. Secret Server does several things to protect application memory but the best safeguard is to limit access to the Application Server to as few users as possible.
- Protect your encryption key. The encryption key for Secret Server is contained in the encryption.config file, which resides in your Secret Server directory. This file is obfuscated and encrypted, but "defense in depth" would require limiting access to the file. Using DPAPI to encrypt your encryption.config file is one option. This will use machine-specific encryption to encrypt the file. Make sure you back up the original file before enabling this option. To further protect the file, you can enable EFS encryption. EFS (Encrypting File System) is a Microsoft technology that allows a user or service account to encrypt files with login passwords. For more details, read Protecting Your Encryption Key Using EFS in this same article. The most secure option is to use a Hardware Security Module (HSM) to protect the Secret Server encryption key. For more information, see Hardware Security Modules.
Application Settings
- Use doublelock for your most sensitive secrets: DoubleLock is a feature in Secret Server that allows secrets to be protected with additional AES256 encryption keys. Each user gets their own public and private key set when using doublelock. Their private key is protected by an additional password (user-specific, not a shared password) that each user must enter when using doublelock. DoubleLock protects from situations where you accidentally assign someone to the wrong AD group or an attacker gains full access to both your database and Web server - they still will not be able to access doublelocked secrets. For more information, refer to QuantumLock Overview.
- Secure the local admin account: When you create the first user in SS, it is a privileged admin account that you can use when your domain is down. We recommend that you choose a non-obvious name for this account and protect it with a very strong password. This password should be stored in a physical safe with limited access (there is no need to use this account except in emergencies where other accounts are not working if AD is down or some other reason).
- Review activity reports: It is a good practice to regularly review the activity and permissions reports. This can help find anomalies in secret permissions and login failures.
- Use event subscriptions or SIEM to notify of any security anomalies: Use event subscriptions to send email alerts on various events in the system, and syslog can send events to a SIEM tool for correlation. For example, this could be used to notify administrators if there are failed login attempts or if certain secrets are viewed.
Security Hardening Report
Secret Server contains a built-in security hardening report to provide a basic checklist of recommendations that can improve the security of Secret Server and the data it houses. The items in this report range from common tasks, such as ensuring SSL is configured, to more advanced options like DPAPI encryption of the encryption key. To find this report, click the Reports on the dashboard,and then select the Security Hardening tab.
Figure: Security Harding Report:
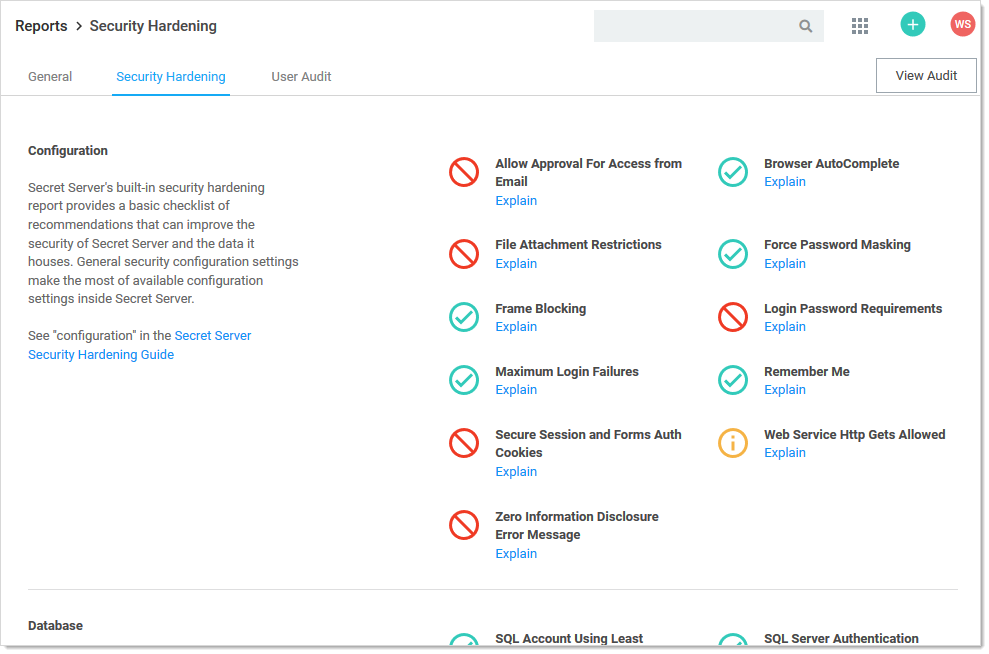
An X denotes a failure, and a checkmark denotes a pass. An exclamation point is a warning. Typically, Secret Server could not detect a setting or all aspects of a check were not completed. For example, TLS 1.0 was disabled but TLS 1.1 was not.
You will find the following items in the report:
Configuration Section
Allow Approval for Access from Email
Recommendation: Off
Allow Approval For Access from Email is a convenience option that allows users to approve or deny a secret access request by clicking a link in the request email sent by Secret Server. Allow Approval From Email does not require a user to authenticate with Secret Server when approving access to a secret. This can be a security concern if the approver's email account becomes compromised, which could allow an attacker to mitigate MFA in some cases to complete an approval. Turn Allow Approval From Email off to get a pass result.
To disable this setting, find the Permission Options section of the Configuration Settings page and disable Allow Approval for Access from Email.
Custom URL
Recommendation: On
The Custom URL sets a definitive URL for Secret Server. Without it, certain features in Secret Server which need to build a link back to the server must construct the link using the host value on the request, which is susceptible to manipulation.
To disable this setting, go to Admin > Security hardening. Under the Security hardening tab, select Custom URL.
File Attachment Restrictions
Recommendation: On
File attachment restrictions allows administrators to configure what kind of file attachments can be uploaded to secrets. This helps protect users from being tricked into downloading a malicious secret attachment. The file extension and maximum file size can be specified, such as:
*.7z, *.bmp, *.ca-bundle, *.cer, *.config, *.crt, *.csr, *.csv, *.dat, *.doc, *.docx, *.gif, *.gz, *.id-rsa, *.jpeg, *.jpg, *.json, *.key, *.lic, *.p7b, *.pcf, *.pdf, *.pem, *.pfx, *.pkey, *.png, *.ppk, *.pub, *.tar, *.tif, *.tiff, *.tpm, *.txt, *.vdx, *.vsd, *.vsdx, *.xls, *.xlsx, *.xml, *.zip
This security check will fail if the file attachment restrictions is not enabled. This check will return warnings if a potentially dangerous file extension is allowed, maximum file size is not specified, or maximum file size is greater than 30 MB.
Go to Admin > Configuration > Security tab > File Restrictions section to change these settings.
Frame Blocking
Recommendation: On
Do not allow Secret Server to be opened in a <iframe> HTML tag on another, potentially malicious, site. This adds the HTTP header X-Frame-Options: DENY. This deters clickjacking and spreading potential XSS vulnerabilities.
Go to Admin > Configuration > Frame Blocking to change this setting.
Force Password Masking
Recommendation: On
Setting: Same
Password masking prevents over the shoulder viewing of your passwords by a casual observer (passwords show as *******). Note the number of asterisks does not relate to the length of the password for added security.
As an administrator, you can force all the secret password fields in the system to be masked when viewed. To do this, enable Force Password Masking on the Configuration Settings page. Only secret fields marked as a password type field on the secret template will be masked. There is also a user preference setting which will force password masking on all secret password fields viewed by the user.
This Mask passwords when viewing Secrets setting is found in the Tools > Preferences section for each user.
Login Password Requirements
Passwords used by local users to log onto Secret Server can be strengthened by requiring a minimum length and using a variety of character sets. We recommend a minimum password length of eight characters. In addition, all character sets (lowercase, uppercase, numbers, and symbols) are required to get a pass result.
Turn on these login password settings on the Local User Passwords tab of the Configuration Settings page.
Maximum Login Failures
Recommendation: Reference the lockout policy for your organization. Most often, this setting will mirror the AD GPO lockout policy.
The maximum number of login failures is the number of attempts that can be made to log into Secret Server as a user before that user's account is locked. A user with the administer users role permission will then be required to unlock the user's account. The maximum failures allowed should be set to five or less to get a pass result.
Change the Maximum Login Failures setting on the Login tab of the Configuration settings.
Remember Me
Recommendation: Off
"Remember Me" is a convenience option that allows users to remain logged onto Secret Server for up for a specific period. This setting can be a security concern because it does not require re-entry of credentials to gain access to Secret Server.
Disable Allow Remember Me on the Login tab of the Configuration page to get a pass result. It must be set to be valid for 1 day or less to not get a fail result.
Secure Session and Forms Auth Cookies
Recommendation: See KBA
Cookies contain potentially sensitive information that can allow users to log onto application. By default, cookies are not marked with the secure attribute. That is, they are transmitted unencrypted when a user accesses Secret Server through HTTP instead of HTTPS.
For more information about how to secure your cookies, see Securing ASP Cookies.
Web Service Http Gets Allowed
Recommendation: Off
Web service HTTP get requests are allowed. Allowing HTTP GET requests allows REST-style calls to many Secret Server Web service methods. This can be a security concern because simply clicking a link to the Web service, created by a malicious user, would cause it to be executed.
Disable Allow HTTP Get under the Security tab of the Configuration settings to pass.
Zero Information Disclosure Error Message
Recommendation: On
Replace all error messages with a custom "contact your admin" message. Error messages can be very helpful when diagnosing installation and configuration issues. However, having errors displayed to a potential attacker can provide him or her with the critical information they need to perform a successful attack.
To hide error messages from the end user, add the ZeroInformationDisclosureMessage application setting to the web-appSettings.config file. This file is located in directory containing the Secret Server application files. Add the key below to this file in between the <appSettings> tags. The contents of that tag is displayed as a message that appears to the user whenever an error occurs in the system. For example:
<add key="ZeroInformationDisclosureMessage" value="An error occurred in the application. Please contact your administrator." />
Database Section
SQL Account Using Least Permissions
Use the fewest Secret Server permissions as possible in the SQL Account used to access the database. We recommend using a least permission approach where the account only has dbOwner. See SQL Server 2016 Standard Edition Installation.
SQL Server Authentication Password Strength and Username
Recommendation: Change settings as needed
SQL Server authentication requires a username and a strong password. Strong passwords are eight characters or longer and contain lowercase and uppercase letters, numbers, and symbols. In addition, the SQL Server authentication username should not be obvious.
You can change the credentials of a local SQL account through SQL Server Management Studio, where the Secret Server database is located. The SQL Server authentication credentials used by the application can then be changed by going to the installer installer.aspx page and changing them on step three. Using Windows authentication to authenticate to SQL Server is allowed.
For details about creating or modifying a SQL account for Secret Server, see the Installation Guide.
Windows Authentication to Database
Recommendation: Configure
Windows authentication takes advantage of Windows security to provide secure authentication to SQL Server. The SQL Server authentication options can be changed by going to the installer (installer.aspx) and changing them.
Environment Section
Application Pool Identity
Recommendation: Check configuration
The Application Pool identity appears to be a member of the administrators group on the system. This puts the system at risk by giving more access than necessary.
Check the identity of the application pool used by Secret Server in IIS. The Application Pool should be configured to use a service account and not be given unrestricted access to the server or domain.
DPAPI or HSM Encryption of Encryption Key
Recommendation: On
Encrypt your Secret Server encryption key, and limit decryption to that same server. Data Protection API (DPAPI) is an encryption library that is built into Windows operating systems. It allows encryption of data and configuration files based on the machine key. Enabling DPAPI Encryption in Secret Server protects the Secret Server encryption key by using DPAPI, so even getting access to the Secret Server encryption key is not enough to be useful—the machine key is required. If you enable this option, back up your encryption key first, as a DPAPI encrypted file can only be used by the machine it was encrypted on.
To enable DPAPI encryption, to to Admin > Configuration > Security tab and click the Encrypt Key Using DPAPI button.
SSL Section
Require SMTP SSL
Recommendation: On
SMTP SSL is required to ensure that all communication between Secret Server and the email server is encrypted. Enable the "Use SSL" option in Secret Server to get a pass result.
Go to Admin > Configuration > Email tab > Use SSL to enable the setting.
Require SSL
Recommendation: On
Only use SSL (HTTPS) for Secret Server access. Secure Sockets Layer (SSL) is required to ensure that all communication between the Web browser and Secret Server is encrypted. To do so, you need an SSL certificate. You may use an existing wildcard certificate, create your own domain certificate, or purchase a third-party SSL certificate for the Secret Server website. For testing, you can use a self-signed certificate. See Securing ASP Cookies for more information.
Once the SSL certificate is installed, enable Force HTTPS/SSL on the Security tab of the Configuration page to force users to only access Secret Server over HTTPS and to receive a pass in the report.
SSL/TLS Hash
Recommendation: Confirm or remediate
Check the digest algorithm of the certificate. If the algorithm is SHA1, this check returns a warning because SHA1 is being phased out. If the digest algorithm is MD2, MD4, or MD5, the check will fail because they are not secure. SHA256, SHA384, and SHA512 will pass. This check fails if Secret Server cannot be loaded over HTTPS.
Example warning:
"The digest algorithm is sha1RSA, which is considered weak. The algorithm is being phased out and should be replaced with a better algorithm when it comes time to renew the SSL certificate."
Go to the browser's certificate information when logged onto Secret Server. This is usually a button next to the URL text box.
SSL/TLS Key
Recommendation: Confirm or remediate
Check the key size of the HTTPS certificate used. If it is RSA or DSA, the key must be at least 2048-bit to pass. If the signature algorithm of the certificate is ECDSA, the key size must be at least 256-bit to pass. If the algorithm of the certificate is unknown, the result shows "unknown. This check fails if Secret Server cannot be loaded over HTTPS.
Go to the browser's certificate information when logged onto Secret Server. This is usually a button next to the URL text box.
SSL/TLS Protocols
Recommendation: Confirm or remediate
Check for legacy SSL or TLS protocols, which should not be used in a secure environment. If the server accepts SSLv2 or SSLv3 connections, this check will fail. SSLv2 is not considered secure for data transport, and SSLv3 is vulnerable to the POODLE attack. If this server does not support TLSv1.1 or TLSv1.2, this check will give a warning because they are recommended. The SSL certificate used may affect what protocols can be used, even if they are enabled. This check will fail if Secret Server cannot be loaded over HTTPS.
Example warning:
"The server supports the accepts SSLv2 or SSLv3 connections protocol, which are weak. Consider disabling these protocols."
Using HTTP Strict Transport Security
HTTP Strict Transport Security (HSTS) is an additional security layer for SSL. HSTS allows Secret Server, Password Reset Server, or Group Management Server to inform browsers that it should only be accessible over HTTPS. With this setting enabled, visitors are automatically redirected by their browser to the HTTPS-enabled site.
When the Force HTTPS/SSL option in enabled on the Security tab of the Configuration page, the Enable HSTS check box will be displayed. After the option is turned on, you can click Advanced to specify the maximum age in seconds for how long the policy should be in effect before re-evaluating. The default value is 31,540,000 seconds (a year)—the amount required to enable the checkmark, which assumes the site should never be accessed without TLS or SSL.
For details about this, see Securing Traffic with HTTP Strict Transport Security.
Security Settings Not in the Hardening Report
Apply TLS Certificate Chain Policy and Error Auditing
Recommendation: Confirm or remediate
Add audits for TLS certificate validation. Auditing will apply to all Active Directory domains using LDAPS and Syslog using TLS. Certificate policy options, including ignoring certificate revocation failures, apply to syslog using TLS only. The default is the most strict so the certificate chain policy may need to be updated. TLS errors will be logged to Security Audit Log found on the Administration page.
Disable the Admin >Configuration > Security tab > Apply TLS Certificate Chain Policy and Error Auditing setting.
TLS errors are logged to the Security Audit log at Admin > See All > Security Audit Log.
Enable FIPS Compliance
Recommendation: Off
Only allow FIPS-compliant encryption schemes. FIPS (Federal Information Processing Standards) is a set of standards for government entities. It covers many things, including encryption. For businesses, FIPS can be counter productive because it restricts them from using newer or improved existing encryption methods. In addition to enabling this setting, several other tasks are required to meet this standard, including enabling it for Windows itself. For more information, see Enabling FIPS Compliance for details.
Go to Admin > Configuration > Security tab > FIPS Compliance to change this setting.
Key Rotation
Recommendation: Review KBA
Secret key rotation changes out the encryption key for secret data and re-encrypts that data with a new key. This helps you to meet compliance requirements mandating that encryption keys are changed on a regular basis. See Secret Key Rotation.
Two-Factor Authentication
Users must authenticate to Secret Server at least once using either local Secret Server credentials or their Active Directory credentials. In addition, you can protect Secret Server by enabling two-factor authentication (2FA). 2FA is an additional security layer, such as a text message PIN code sent to your smart phone. The following options are supported by Secret Server for 2FA:
SAML
Secret Server supports the Security Assertions Markup Language (SAML), which provides a more centralized method of adding 2FA to the Secret Server log on. Please see the Configuring SAML Single Sign-on.
Using email for 2FA means that after authenticating with their password, the user receives an email containing a one-time PIN code to enter. For this to work, an SMTP server must be configured in Secret Server and each user must have a valid email address associated with their account. For Active Directory users, the email address will be synced automatically from their domain account.
Check user email addresses at Admin > Users.
Soft Tokens
Soft tokens using the Time-based One-time Password (TOTP) algorithm, such as Google Authenticator and Microsoft Authenticator, are supported by Secret Server 2FA. Users are prompted to enter a token displayed on their mobile device each time they log onto Secret Server. The time-based token changes on a regular interval (such as 30 seconds).
RADIUS
One option is to use a Remote Authentication Dial-In User Service (RADIUS)-compliant device, such as an RSA or CryptoCard token, as the second form of authentication. The user is prompted to enter his or her RADIUS password after initial authentication is done with their Secret Server or AD password.
To set this up, you first need to configure Secret Server to integrate with your RADIUS server, and then you can enable it for individual users or for by domain.
See Enabling RADIUS Two-Factor Authentication for details.
Duo Security
Using this method requires that you have an active account for Duo Security. Duo Security provides several options for 2FA. The API hostname, integration key, and secret key values are required for Secret Server to authenticate Duo users.
See for details.
Enabling Two-Factor Authentication
Enabling for Users
To enable two-factor authentication for a user or several users at once, select Users from the Admin menu and then select the users in the grid. Use the bulk operation drop-down menu to choose the type of authentication to enable.
Enabling per Domain
Two-factor authentication can also be enabled per domain if you are syncing users from Active Directory. To do so, select Active Directory from the Admin menu and then click Edit Domains. Click the domain name and then click Advanced (not required) to reveal the Auto-Enable Two Factor for New Users setting. Select this checkbox and click Save and Validate.
Roles
Secret Server uses role-based access control, which allows administrative and user capabilities to be partitioned by role. This can allow for granular control over which areas of the application a user has access to, for example, allowing someone the rights to manage licenses and view reports in Secret Server but nothing else.
Controlling Access to Features Using Roles
Limiting Role Access to the Export Permission
Exporting secrets from your Secret Server as text is very helpful for meeting regulations in certain industries (secrets can then be printed to paper and locked in a physical safe). It can also be used as another disaster recovery option, but access to exporting data from the Secret Server should be tightly controlled. You could create a separate role with just the export permission for anyone needing to export secrets.
Unlimited Administration Mode
Unlimited administration mode allows any role with the "unlimited administrator permission" to see all secrets in the Secret Server. This mode is very helpful for recovering passwords in emergencies or when staff are terminated. You can tightly control access to this feature by splitting out the role permissions for "administer configuration unlimited admin" and "unlimited administrator" into two different roles. This allows you to create the "two-key effect" for access to the mode. See Using Two Roles for Access to Unlimited Administration Mode, below, for details.
Limiting Role Access to Secret Templates
Anyone with access to modify your secret templates can change the definitions of the data being stored, and this access should be tightly controlled. Your secret templates are unlikely to need changing once you have defined them, so limiting access to a select number of individuals is typically sufficient.
Monitoring Roles with Event Subscriptions
Another option when protecting roles is to configure event subscriptions to notify appropriate staff in the event that Roles are changed or assigned. Event subscriptions are email alerts that can be sent to users, groups or specific email addresses, based on different events in Secret Server. There are also events available around the "unlimited administrator" role to further protect it from misuse.
Using Two Roles for Access to Unlimited Administration Mode
We recommend determining which role permissions should or should not be combined for users before assigning roles and allowing users access to the application. Part of that is planning access to the "unlimited administration" mode. Users with the "administer configuration unlimited admin" role permission can enable that mode. Once the system is in the mode, users with the "unlimited administrator" role permission can view all secrets in Secret Server and access all configuration settings. So a user with both permissions can enable the "unlimited administration" mode and then view all the secrets or make any configuration change.
To prevent a single person from having that much access, the two role permissions should be given to two different roles and only those roles, and nobody should have access to both of the roles. That enforces accountability and requires the cooperation of two people to enter "unlimited administration" mode.
A solution is to create the two roles, each containing one of the permissions, and then take those two permissions out of the day-to-day administrator role and any other roles besides the two. You can then assign either one of those roles to trusted people with no single person having both roles.
Thus, the access procedure is:
-
User A with the role with the "administer configuration unlimited admin" permission puts the system into "unlimited administration" mode. Not having the correct role, user A cannot make any changes requiring the "unlimited administrator" permission.
-
User B with the role with the "unlimited administrator" permission performs any configuration or accesses secrets only available to that role.
-
When User B is finished, user A takes the system out of "unlimited administration" mode.
-
User B can no longer make any changes requiring the "unlimited administrator" permission because roles with that permission can only be accessed in "unlimited administration" mode. User A cannot make any changes either because User A does not a the role with the "unlimited administrator" permission.
Additional safeguards included:
- Enabling or disabling "unlimited administration" mode is audited, and a comment should be provided each time it is enabled.
- When "unlimited administration" mode is enabled, a banner appears at the top of every Secret Server page notifying users that their secrets can currently be viewed by an unlimited administrator.
- Event subscription notifications should be set up to send an email to a specified user, group of users, or other email address whenever "unlimited administration" mode is enabled or disabled.
- All actions that are normally audited, such as secret views, edits, or permissions changes, are still audited while "unlimited administration" mode is enabled.
Encryption
DPAPI Encryption
Overview
The Data Protection API (DPAPI) is an option that provides an additional layer of security for the Secret Server encryption key. The Secret Server encryption key is contained within a file that is decrypted and used by the application to encrypt or decrypt the sensitive data that is stored in the Secret Server database. Using the DPAPI option in Secret Server ensures that the encryption key file is also encrypted with a key that only Windows knows and is only be usable on same server it was encrypted on. Anybody trying to configure Secret Server on another server using that DPAPI-encrypted key is blocked from doing so.
encryption.config, should be backed up and stored in a secure location before turning on DPAPI encryption. This allows you to restore a backup of the application on another server in a DR scenario. The file is in the Secret Server application directory.Enabling and Disabling DPAPI
To turn on DPAPI encryption of the file, select Configuration from the Admin menu. Select the Security tab, click Encrypt Key Using DPAPI, and then type your password and acknowledge the warning before clicking Confirm. To decrypt the key, navigate to the same tab and click Decrypt Key to not Use DPAPI.
Using Clustering with DPAPI
You can use DPAPI while clustering is enabled for Secret Server, however there are a few things to take into consideration:
- Backup the encryption key before using this option, otherwise disaster recovery could prove impossible, should the server fail.
- You must initially transfer the un-encrypted key that DPAPI will encrypt to each Secret Server node. Secret Server
- You must enable DPAPI for Secret Server by accessing each server locally (browse to Secret Server while on the server it is installed on, and then enable DPAPI encryption).
- During upgrades, to avoid turning off DPAPI, you can copy all files over to secondary nodes except for
database.configandencryption.config.
For more information about clustering Secret Server, see Setting up Clustering (KBA).
Protecting Your Encryption Key Using EFS
Encrypting File System (EFS) is a Microsoft technology that allows a user to encrypt files with their password. This means that only the user who encrypted the file will be able to access it, even if it is assigned to other users. If an administrator resets the password on this account and the account does not change its own password, then the file is not recoverable.
You can use EFS to protect your Secret Server encryption key. This allows only a single service account to access the file, and no other user can read the key unless they know the service account password. Below are the steps for encrypting your encryption.config and database.config files with EFS:
-
Backup your
encryption.configanddatabase.configfiles to a secure location. This is very important for DR recovery purposes.Important: This step is critical—If you lose access to your service account or the server fails, you will be unable to recover your secrets without these backup files.
-
Create a new service account or select an existing one. The service account should initially have privileges to log on a computer.
-
If you have already installed Secret Server and are using Windows authentication for database access, make sure the service account has access to the database.
-
Run the Secret Server application pool as this service account. See Running the IIS Application Pool As a Service Account .
-
Give the service account full access to your Secret Server directory through Windows Explorer if it does not have it already.
-
Log on your server as the service account.
-
For both the
encryption.configanddatabase.config files(this instruction uses the former):-
Locate the
encryption.configfile in your Secret Server directory (usuallyC:\inetpub\wwwroot\SecretServer). -
Right-click the file and select Properties.
-
Click the General tab.
-
Click the Advanced button.
-
Click to select the Encrypt contents to secure data check box.
-
Click the OK button.
-
Click the Apply button.
-
If prompted, select the Encrypt the file only option.
-
Click the OK button.
-
-
Log out of Windows and log back in as an administrator.
-
Confirm that the application still works by performing an IIS Reset (
IISResetcommand at the command prompt) or recycling the application pool. -
Ensure you you can still log in and view your secrets.
SSL (TLS) and HSTS
We strongly recommend employing SSL (TLS) for Secret Server. Taking SSL a step further, Secret Server also supports HTTP Strict Transport Security (HSTS). HSTS is supported by modern browsers and tells the browser that a site is only accessible by SSL with a valid certificate, period. Even if there is a man-in-the-middle attack with a trusted, but different, SSL certificate, the browser will reject the SSL certificate. Consequently, this setting is very useful for protecting against forged SSL certificates or man-in-the-middle attacks.
For more information about configuring SSL certificates, see the SSL Certificates. You can view additional information about HSTS in Securing with HTTP Strict Transport Security (HSTS).
SSH Key Validation
Host SSH Key verification is supported for use with heartbeat, proxied launchers, password changers, and discovery. Host SSH key verification can help ensure that the machine you are connecting to is a trusted host. Host SSH key verification will not pass credentials to the target machine unless the public key digest matches the SHA1 digest that Secret Server has on file. This helps prevent man-in-the-middle attacks.
Mapping an SHA1 Digest to Secrets
To configure host SSH key verification:
-
Navigate to Secret Templates from the Admin menu.
-
And add a field for the host's SSH key digest.
-
Click Configure Extended Mappings.
-
Add a Server SSH Key mapping to your newly created SSH key digest field.
-
On your secrets, add the SSH key digest of the hosts to your digest field. Verification takes effect the next time you connect to the host.
Validating SHA1 Digests for Unix Account Discovery
To validate SHA1 server digests for Unix account discovery, create a file named KeyDigests.txt in the root of the Secret Server website. Each line should contain an IP address or other computer identifier, a comma, and the SHA1 digest, for example:
192.168.1.5,7E:24:0D:E7:4F:B1:ED:08:FA:08:D3:80:63:F6:A6:A9:14:62:A8:15 apollo,7A:25:AB:38:3C:DD:32:D1:EA:86:6E:1C:A8:C8:37:8C:A6:48:F9:7B
When the file exists and has data, all scanned machines must match one of the SHA1 hashes in the file before scanning. Any computers that do not match will still show up on the "Discovery Network View" page, but authenticated scanning will not take place. That is, no credentials will be passed to the machine, and accounts will not be retrieved from the machine.
Disabling IIS HTTP Headers
Introduction
This section describes plugging some potential, minor but significant, information leaks by the Secret Server Web server. Web applications, such as Secret Server, may unintentionally disclose information about their underlying technologies through headers, error messages, version numbers, or other identifying information. An attacker can use that information to research vulnerabilities in those technologies to attack the application to breach the system.
Procedure
First, hide the IIS version. The HTTP header "X-Powered-By" reveals the version of IIS used on the server. To stop this, remove the header:
-
Open the IIS Manager.
-
In the Connections tree, select the website that Secret Server is running under.
-
Click the HTTP Response Headers button on the right. The HTTP Response Headers panel appears.
-
Click to select the X-Powered-By HTTP header.
-
Click the Remove button in the Actions panel. The header disappears.
Second, hide the ASP.NET version. The HTTP header "X-ASPNET-VERSION" reveals the version of ASP.NET being used by the Secret Server application pool. To stop this, remove the header:
-
Open the
web.configfile for Secret Server, which is located in the root directory for the website. -
Inside the
<system.web>tag, add the tag<httpRuntime enableVersionHeader="false"/>. -
Save the file.
Third, hide the server type. The header line Server: Microsoft-HTTPAPI/2.0 is added to the header by the .NET framework. To remove that information, you must update the Windows Registry:
-
Open the Windows Registry Editor.
-
Navigate to
Computer\HKEY_LOCAL_MACHINE\SYSTEM\CurrentControlSet\Services\HTTP\Parameters. -
Change the
DisableServerHeader(REG_DWORD type) registry key from0to1.
Adjusting CORS Policy Headers
By default, Secret Server only allows Cross-Origin Resource Sharing (CORS) to unauthenticated resources. CORS allows a restricted resource on a Web page to be requested from a different domain from that resource. To adjust this behavior, either hardening (such as blocking all CORS calls) or relaxing it, follow these instructions:
-
In the Secret Server installation folder, open the
web-appsettings.configfile in a text editor. -
In the appSettings section add:
<add key="UseWebConfigCORS" value="true"></add> -
Save the file.
-
In the same folder, also open the
web.configfile in the text editor. -
In the system.webServer/httpProtocol/customHeaders section, add:
<add name="Access-Control-Allow-Origin" value="[customer URL here]" /><add name="Access-Control-Allow-Headers" value="Content-Type" /><add name="Access-Control-Allow-Methods" value="GET, POST, PUT, DELETE, OPTIONS" /> -
Save the file.