Introduction to Hyper-scalable Privileged Access Service
The Delinea Hyper-scalable Privileged Access Service (Hyper-scalable PAS) deployment model is an on-site solution where you provide your own servers as part of the infrastructure solution. The infrastructure you choose can be either an internal protected network, a private cloud, or a public cloud instance.
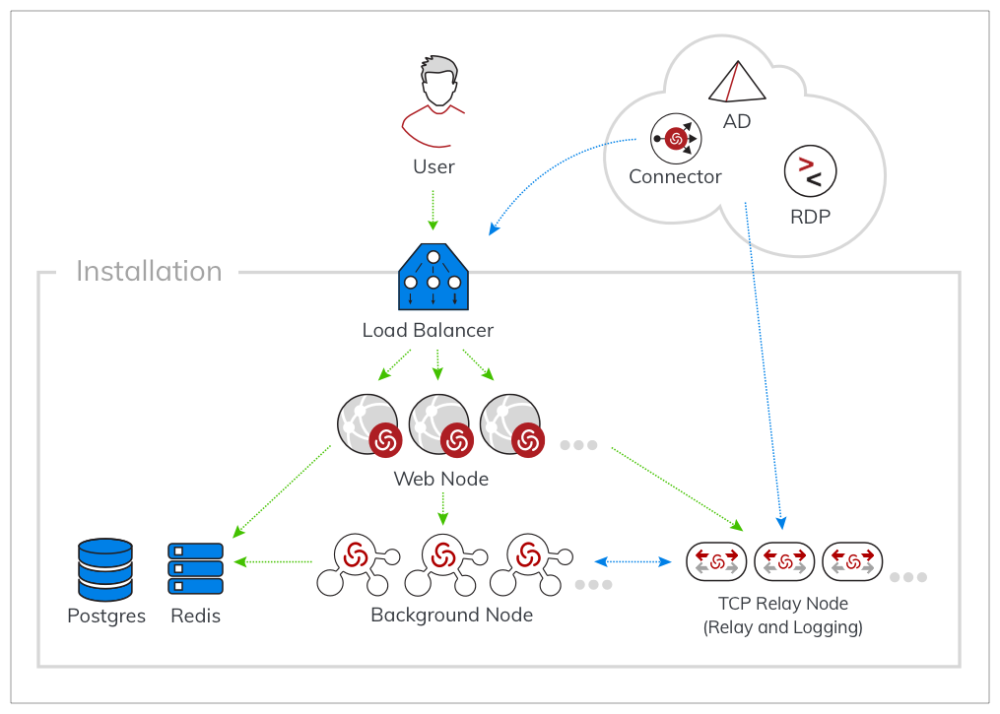
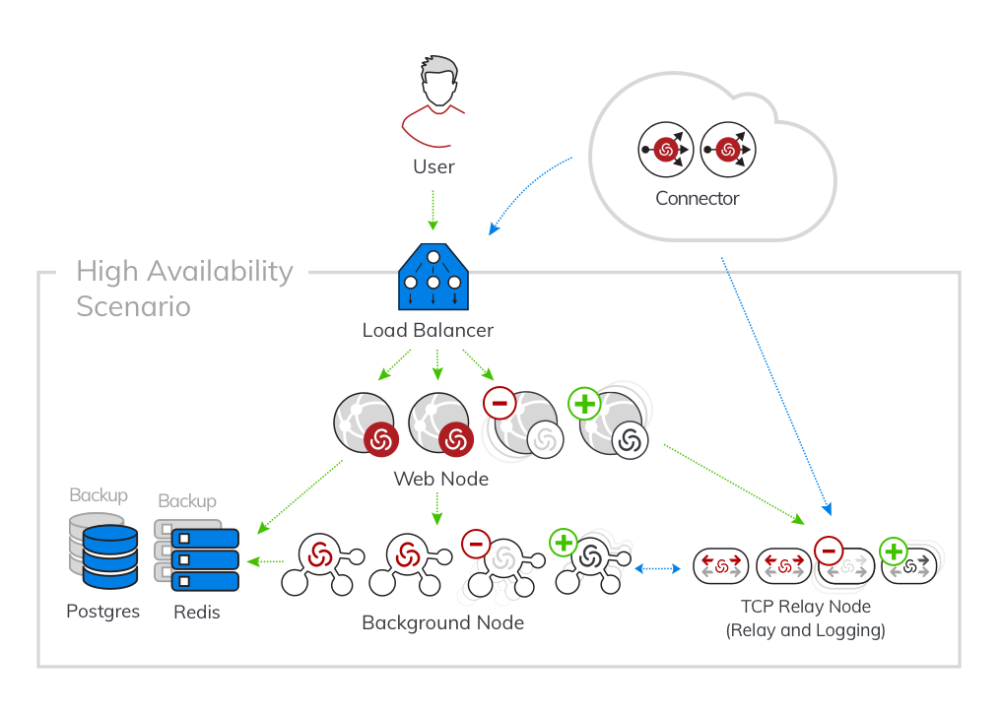
Hyper-scalable PAS uses a scalable approach; each installation includes an unlimited number of Web, Background, and optionally TCP Relay (Relay and Logging) nodes running Privileged Access Service software on a Windows Server operating system. These nodes must be able to communicate with each other and the following additional components that make up the installation (for specific component requirements, see Prerequisites):
- Cache server (Redis)
- Database server (PostgreSQL)
- Load Balancer
Additionally, outside of the cluster, a Management node is required to manage the cluster.
See the following for a run time overview of the Hyper-scalable PAS.
Installation Concepts
This installation and configuration guide describes how to install, upgrade, and configure the Hyper-scalable PAS as a solution in a high availability (HA) environment. An installation is the configuration for a specific hostname and certificate that define the site enabled by this Delinea PAS deployment. After you install Hyper-scalable PAS, you use the Admin Portal to add, manage, and access the resources, domains, and databases and the corresponding accounts within the Privileged Access Service. The following concepts provide some context that can be helpful in understanding the overall installation process. For an overview of the installation, see Installing Hyper-scalable PAS.
-
Cluster Site Installation
A cluster installation/site is defined as the configuration of nodes with the Hyper-scalable PAS software package installed. Each installation/site requires a single hostname and certificate to be defined for that particular site. For example, pas.yourcompany.com indicates a particular site installation, with one hostname, matching host certificate, and database server, while company.acme.com would be a different site installation with a different database server and a different host certificate. To create an installation, you need to install and deploy the Hyper-scalable PAS software to the Management, Web, Background, and TCP Relay nodes. During installation you create the deployment package that allows you to easily deploy to specific nodes.
-
Deployment
A Hyper-scalable PAS Deployment is the specific version of the software and configuration used to create node instances. This is created and packaged using Centrify-PAS-NewDeployment. That package is then used to create new nodes, which are associated with that specific Deployment (see the next section, Deployment Instance.
-
Deployment Instance
A Hyper-scalable PAS deployment instance is a node on a server created using a Deployment package, for example by calling Centrify-PAS-Deploy-WebNode. In addition to Web and Background nodes, you can also deploy the Hyper-scalable PAS software two types of TCP Relay nodes: Logging node and a Relay node.
High Availability and Scale
The Hyper-scalable PAS gives you the ability to easily add additional Web and Background nodes to make it a scalable, high availability solution. Generally your solution should include two or more Web, Background, and optionally TCP Relay nodes. For more information, see Scaling and High Availability.
The following additional components that make up your Hyper-scalable PAS solution will also need to be sized to meet your scalability and high availability needs:
- Cache (Redis)
- Database (PostgreSQL)
- Load balancer
- Networking and power infrastructures
- Connector
The following shows how high availability works in Hyper-scalable PAS.
Backup and Disaster Recovery
To ensure uninterrupted service in the event of a major system failure, we recommend maintaining a back up of your configuration and database instances. Maintaining these backups helps to ensure fastest recovery from a system failure. For more information on disaster recovery, see Backup and Disaster Recovery.
Migrating from PostgreSQL 10/11 to PostgreSQL 14
Updating from PostgreSQL 10 or 11 to PostgreSQL 14 will require the PLV8 extensions to be removed as the PLV8 extensions do not support PostgreSQL 14.
The following steps will walk through how to upgrade from PostgreSQL 10 or 11 to PostgreSQL 14 along with the steps to remove any PLV8 extensions in the PostgreSQL 10/11 database.
-
Check that the PAS web app is online.
-
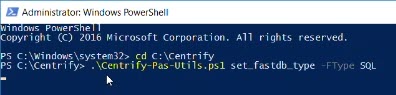
Then in Windows PowerShell change the FastDB type to SQL. To do that execute the following as an admin:
cd C:\Centrify.\Centrify-Pas-Utils.ps1 set_fastdb_type -FType SQL
After the above has been executed, you will receive a notice stating:
Set FastDB Type result: @success=True;
This indicates that the FastDB type will successfully change into SQL. -
Open the PGAdmin program.
-
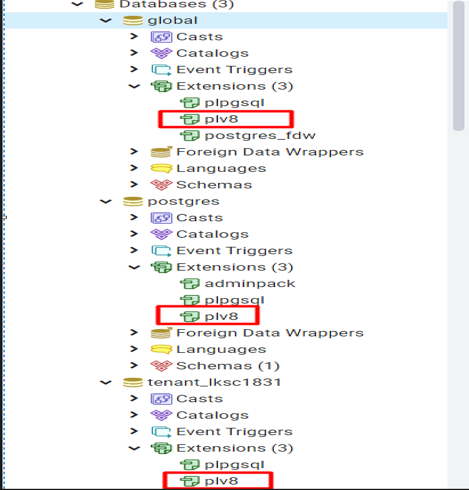
Select the Servers drop down menu by selecting the arrow on the left-hand side. Select the Databases drop down menu. The PLV8 extension will need to be deleted from all databases.
-
Open each database's Extension drop down menu to see which ones have PLV8.

- Right-click plv8 under the database you are deleting it from. Click Delete/Drop.
- Click OK when the Drop Extensions? pop up appears.
- Repeat these steps until PLV8 is removed from all databases in PGAdmin.
-
-
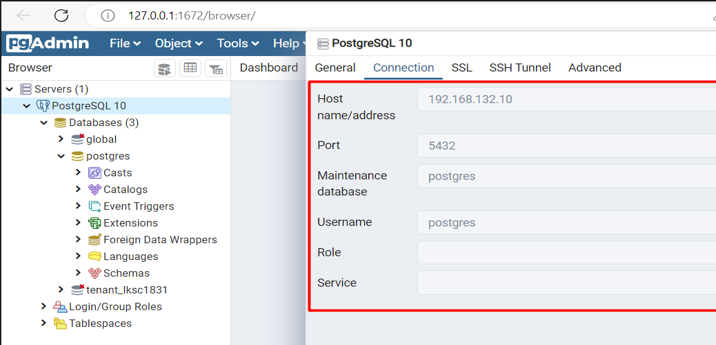
In PGAdmin under the Servers drop down menu, right-click PostgresSQL 10. Click Properties.
-
Select the Connection page. Write down the connection parameters of the PG10/11 server to reuse them for the PG14 server.

-
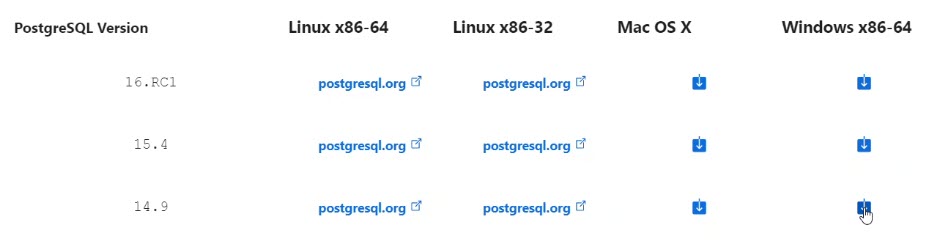
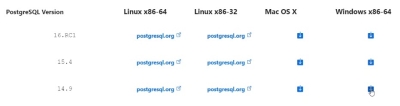
Download and install PostgresSQL14 here:
https://www.enterprisedb.com/downloads/postgres-postgresql-downloads-
Download PostgreSQL 14.9 by selecting the blue box with a downward arrow under Windows z86-64 or under Mac OS X.
-
After PostgreSQL14 has successfully downloaded, open File Explorer on your computer and select the Downloads file. Open the new PostgreSQL 14.9 folder and select Yes when prompted to allow the app to make changes on your device.
-
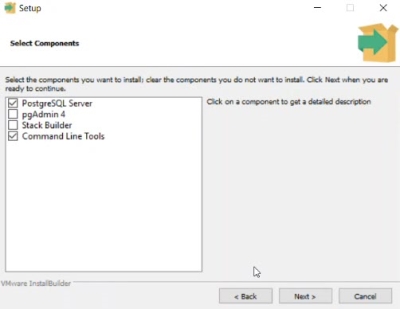
A Setup page will pop up, click Next through the Installation Directory page. Then on the Select Components page install PostgreSQL Server and Command Line Tools.
Make sure you unselect pgAdmin 4 and Stack Builder before clicking Next.
-
Click Next. On the Data Directory page, click Next.
-
Add your password to the Password page, then click Next.
It is best to use the same password you used for PostgreSQL 10.
-
Click Next through the following pages:
-
Port
-
Advanced Options
-
Pre Installation Summary
-
Ready to Install
-
-
Select Finish after Setup has finished installing.
-
-
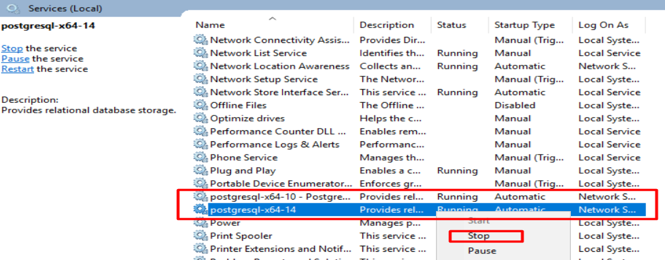
Open theServices app and stop PostgreSQL10 and PostgresSQL14 services by right-clicking on them and selecting Stop.

-
Adjust the authentication on PG10 and PG14 by opening the Command Prompt app.
-
Open Notepad within the app.
-
Select File and then select Open. Then open:
C:\Program Files\PostgreSQL\10\data\pg_hba.conffolder for PG10 -
Record the existing method for
# IPv6 local connectionsand temporarily change that method to:trust.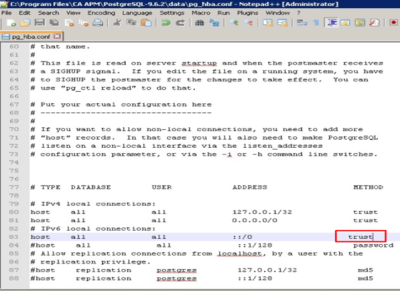
-
Save.
-
Open:
C:\Program Files\PostgreSQL\14\data\pg_hba.confRepeat these steps for PG14.
-
-
Add a new local user to PostgreSQL by opening Computer Management.
-
Select Local Users and Groups, right-click the Users folder and select New User.
-
For username use:
postgres.Unselect the User must change password at next logon box. Then select the Password never expires box.
-
Use the same password used for PostgresSQL14. Then select Create.
If Windows doesn't allow you to create a new user because the password doesn't comply with the password security policy follow this document: https://www.wintips.org/how-to-disable-password-complexity-requirements-on-server-2016/
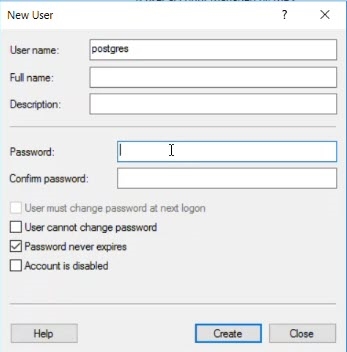
-
Select Close. Then the PostgreSQL user should appear under the Users folder.
-
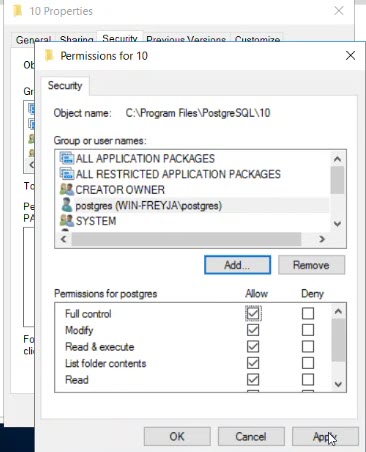
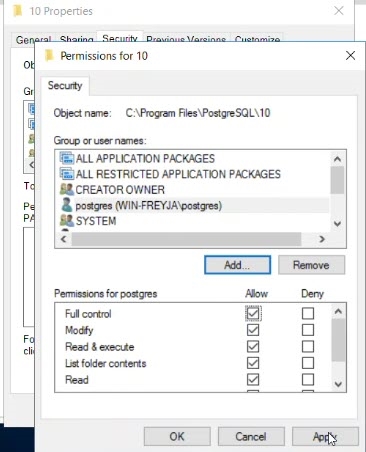
Grant full control to the following folders by navigating to File Explorer and searching for the below folders:
-
C:\Program Files\PostgreSQL\10 -
C:\Program Files\PostgreSQL\10\data -
C:\Program Files\PostgreSQL\14 -
C:\Program Files\PostgreSQL\14\data
-
-
Right-click the first folder and select Properties.
-
The Properties page will appear, select Security and then click Edit.
-
Click Add then click Locations and select Computer Name and click OK.
-
Click Advanced and click Find Now and select the PostgreSQL user. Then click OK.
-
Select the PostgreSQL user and under Permission for postgres select the Allow box to the right of Full Control.Then click Apply.
-
Repeat these steps for all 4 folders.
-
Run:
RUNAS /USER:postgres "CMD.EXE"Click OK.
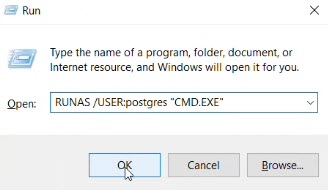
-
Enter the password for PostgreSQL to login as the PostgreSQL user.
-
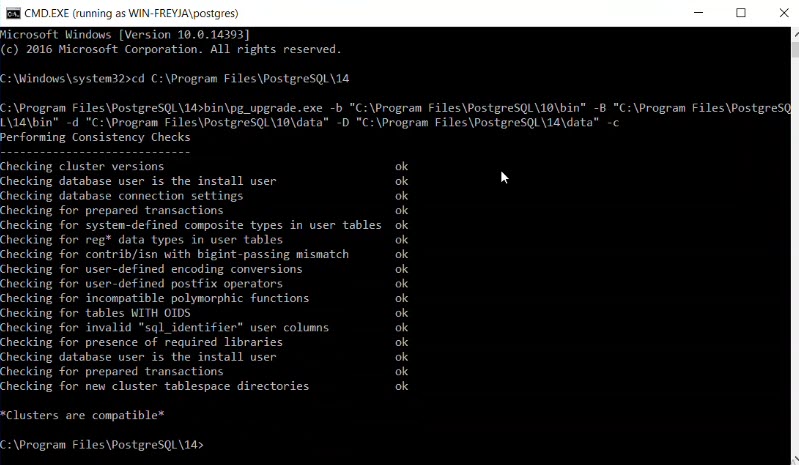
To run a
db_upgradecheck, change to the PG14 directory by adding:cd C:\Program Files\PostgreSQL\14. -
Add the following to run the
db_upgradecheck:bin\pg_upgrade.exe -b "C:\Program Files\PostgreSQL\10\bin" -B "C:\Program Files\PostgreSQL\14\bin" -d "C:\Program Files\PostgreSQL\10\data" -D "C:\Program Files\PostgreSQL\14\data" -c -
All checks should come back as '
ok' showing that the migration from PG10/11 to PG14 will be successful.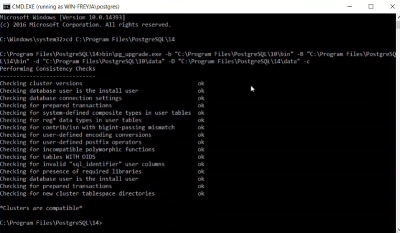
-
Run the upgrade using the following:
bin\pg_upgrade.exe -b "C:\Program Files\PostgreSQL\10\bin" -B "C:\Program Files\PostgreSQL\14\bin" -d "C:\Program Files\PostgreSQL\10\data" -D "C:\Program Files\PostgreSQL\14\data" -
After the upgrade has completed set the PG10
pg_hba.confback to it's original method instead oftrustin:C:\Program Files\PostgreSQL\10\data\pg_hba.conf.(See Step 8 for reference).
-
Replace both pg_hba.conf and postgresql.conf in:
Files\PostgreSQL\14\datawith the files from:
C:\Program Files\PostgreSQL\10\data.You can make copies of the pg_hba.conf and postgresql.conf in
Files\PostgreSQL\14\databefore you replace them in case you should need to reference them later on. If you do this, copy and paste the two files in PG14 to a new location.-
Open the folder:
C:\Program Files\PostgreSQL\10\data.Select both pg_hba.conf and postgresql.conf and copy them.
-
Navigate to the folder:
Files\PostgreSQL\14\data.Paste the copied files into the PG14 folder.
-
Select Replace the files in the destination.
-
-
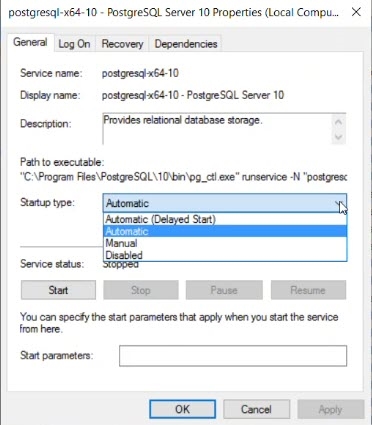
Set the Startup type to Disabled for the PG 10 service.
-
Go to the Services application.
-
Right-click PostgreSQL 10. Click Properties.
-
Change the Startup type from Automatic to Disabled.
-
Click Apply then click OK.
-
-
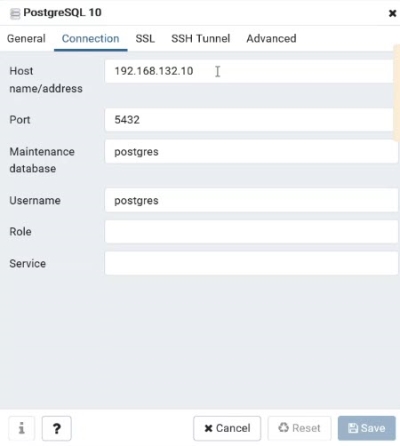
Using PGAdmin, replace the connection settings for the PG14 server to a disconnected state with values of the PG10 server.
-
Open the PGAdmin application.
-
Open the Servers drop down menu and right-click PostgreSQL10.
-
Click Properties. This will open the PostfreSQL10 window, then click Connection.
-
Write down the connection settings for PG10.
-
Then navigate to the Connection page for PostgreSQL14 by repeating the above steps.
-
Replace PostgreSQL14's connection settings with the settings copied from PostgreSQL10.
-
Click Save.
-
-
Start the PostgresSQL14 service and check the connection to Pg14 database server with PGAdmin.
-
In the Services application, right-click postgres 14 and click Start.
-
Open PGAdmin, click the drop down menu for Servers and click PostgreSQL14.
-
Enter the password and click OK. A green Server connected icon will appear in your screens lower right corner.
-
-
Go to:
https://pas.my.centrify-dev.netLog in to confirm that the migration from PG10/11 to PG14 was successful.