Installing Hyper-scalable PAS
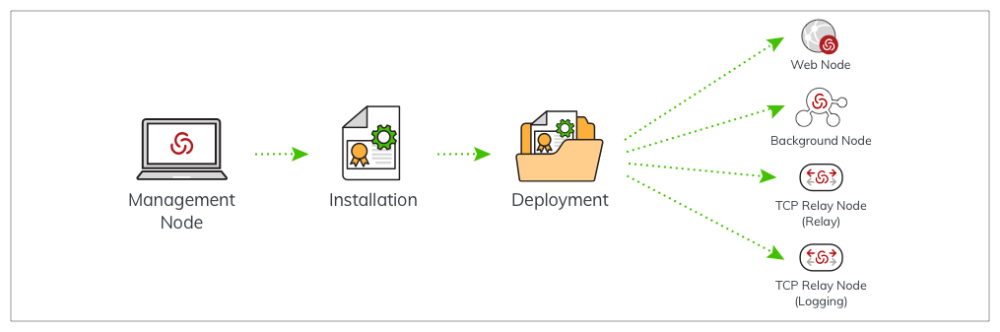
As a solution that you manage, the Hyper-scalable PAS replicates the infrastructure provided by the Privileged Access Service using your own servers. The installation procedures described in this section install the necessary software on Windows Servers to configure them for the following:
- Management node
- Web node
- Background node
- TCP Relay node (for relay)
- TCP Relay node (for logging)
You may choose from two installation scenarios:
- Minimum installation suitable for evaluation only
- Multiple server installation suitable for production
Minimum Installation for Evaluation Only
Before you Install
Before you install the Delinea Hyper-scalable PAS software, ensure you have the following (refer to Prerequisites for details).
-
A license key
-
(Optional) Host certificate from a trusted certificate authority, issued for the hostname that you will access Hyper-scalable PAS through. For evaluation purposes, you can use an automatically generated certificate.
Wildcard certificates can be used.
-
Windows server for your configuration
-
(Optional) Redis server
-
(Optional) PostgreSQL-compatible database with all required extensions installed. If you do not have a suitable database to use, one can be installed for you as part of the installation process.
-
Data connection information for the following:
- Redis: server hostname, server port (default is 6379), SSL
- (Optional) Database: user name, password, server hostname, server port (default is 5432). This is only required if your existing setup uses a database.
- Hostname: this is the name of the Installation and must match the hostname used on the certificate
-
(Required for some services) Connector.
Not all services require a Connector. See the Privileged Access Service online help and see Installing the Connector to determine if your configuration requires a connector.
Multiple Server Installation Suitable for Production
The scripts provided for installation have embedded help, which you can view
using the Get-Help command; for example, from the script directory type,
Get-Help .\Centrify-PAS-NewDeployment.ps1. More detailed help about the
parameters is available using the -detail flag. For example, Get-Help .\Centrify-PAS-NewDeployment.ps1 -detail. Additional command output, useful for
debugging or watching progress, is available using the -verbose switch.
All examples in this section, use pas.corpnet.com to refer to the Hyper-scalable PAS hostname.
Before you Install
Before you install the CentrifyHyper-scalable PAS software, ensure you have the following:
-
A license key
-
Host certificate from a trusted certificate authority issued for the hostname that you will access Hyper-scalable PAS through.
Wildcard certificates can be used. <
-
Windows server for your configuration Prerequisites for this bullet and the three that follow)
-
Redis server
-
Load balancer
-
PostgreSQL-compatible database with all required extensions installed
-
Data connection information for the following:
- Redis: server hostname, server port (default is 6379), SSL
- Database: user name, password, server hostname, server port (default is 5432).
- Hostname: this is the name of the Installation and must match the hostname used on the certificate
-
Computer designated for the Connector, if applicable. (Not all services require a Connector.) See the Privileged Access Serviceonline help and see Installing the Connector to determine if your configuration requires a connector.
Installing Using the Installer PowerShell Script
The following is an overview of the steps, organized into phases, required to install Hyper-scalable Privileged Access Service. Detailed procedures of each phase are described in subsequent sections.
Phase 1: Installing the Management Node
-
Download / copy the Hyper-scalable PAS zip package from Delinea to the Windows server you have designated to be the Management node.
You will need the following software components from the zip package:
install.ps1CentrifyPlatform-[Build.Number].zip
-
Create the Management Node
To create the Management node, open an elevated PowerShell session and run the install.ps1 script. This expands and installs the
CentrifyPlatform-[Build.Number].zip. Once completed, the necessary scripts are available on the Management node for installation and deployment.The command can receive an optional target parameter, which indicates where to install the deployment. The default value is
C:\centrify.Change to the target directory (
C:\centrifyor as specified on the install command line) for all subsequent Management node commands.
Phase 2: Creating a new Installation
-
Create a new installation using the
Centrify-PAS-NewInstallation.ps1commandon the Management node. This will do the following:
- Creates the configuration file
- Verifies the configuration inputs
- Checks for the Redis and database servers
- Initializes the database
- Checks for the required database extensions
Phase 3: Creating a Deployment Package
-
Create your deployment package using the
Centrify-PAS-NewDeployment.ps1command on the Management node.You can enter a unique Deployment ID using the
-IDparameter; otherwise a GUID is used as the Deployment ID.
Phase 4: Deploying Hyper-scalable PAS software to Web, Background, and TCP Relay Nodes
-
Copy the Deployment Package from the
installations\<hostname>\Deploymentssubdirectory, to target systems.Once copied, uncompress the package and run the extractedCentrify-PAS-Deploy.ps1command with the node type as the parameter for each node installation. For example:.\Centrify-PAS-Deploy.ps1 -BackgroundNodeThe command can receive the
InstallPathparameter, which indicates where to install the deployment. The default value isC:\CentrifyNode.Install the logging node first, if applicable, and then at least one Web node, Background node and TCP Relay node per site installation.
Phase 5: Activating the Deployment
-
From the Management node, activate the deployment using the
Centrify-PAS-SetActiveDeployment.ps1command. -
Pass in the Deployment ID that you either set as a parameter or received as output from the
Centrify-PAS-NewDeployment.ps1script. -
From the Management node, you can run the command
Centrify-PAS-NodeListbefore activating the deployment, to verify the installation and to ensure the nodes are recognized. This should show all of the deployed nodes with an Inactive status. If you runCentrify-PAS-NodeListagain (after activating your deployment), you should see that the Web and Background node status is now Active.The scripts provided for this installation support the PowerShell switch
-verbosewhich enables you to view additional data about the command.
Phase 1: Installing the Management Node

To install the Hyper-scalable PAS, the first step is to
create the Management node. Download the Hyper-scalable PAS software
package to the computer designated as the Management node and then run the
Hyper-scalable PAS installer (install.ps1). The software package contains a
directory structure with the following items:
- Documentation (PDF)
-
CentrifyPlatform-[Build.Number].zip (contains the Hyper-scalable PAS
installation package)
install.ps1(expands and installs theCentrifyPlatform-[Build.Number].zipfile)
To Install the Management Node
-
On the Management node, log in as a user with administrator rights.
-
Download the Hyper-scalable PAS software package from Delinea onto the Management node.
-
Open a PowerShell session in elevated (
RunAs Administrator) mode.All PowerShell sessions must be elevated; that is
RunAs Administratormode. -
If the installer package is a single zip file, expand it (
Expand-Archivein PowerShell, or your preferred unzipping tool). -
At the PowerShell prompt, type
.\install.ps1to set up PowerShell cmdlets and tooling on the Management node for cluster installation, management, and deployments.
See the additional parameters below.
| Parameter | Description |
|---|---|
| [-target <String>] | Type in the location for the installation (for example, C:\ Centripas; if the target is not included the default is C:\centrify). |
Type Get-help .\install.ps1 -detail to get information on parameters and
switches.
-
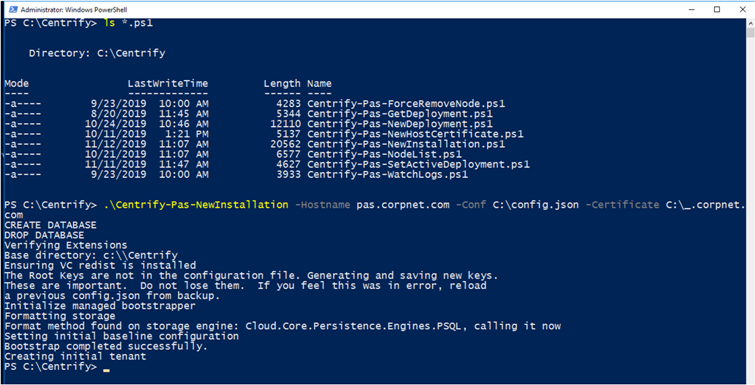
Once installed the following scripts are available in the specified target
directory:
Centrify-PAS-ForceRemoveNode.ps1Centrify-PAS-GetDeployment.ps1Centrify-PAS-ModifyInstallation.ps1Centrify-PAS-NewDeployment.ps1Centrify-PAS-NewInstallation.ps1Centrify-PAS-NodeList.ps1Centrify-PAS-SetActiveDeployment.ps1Centrify-PAS-WatchLogs.ps1
Phase 2: Creating a New Installation
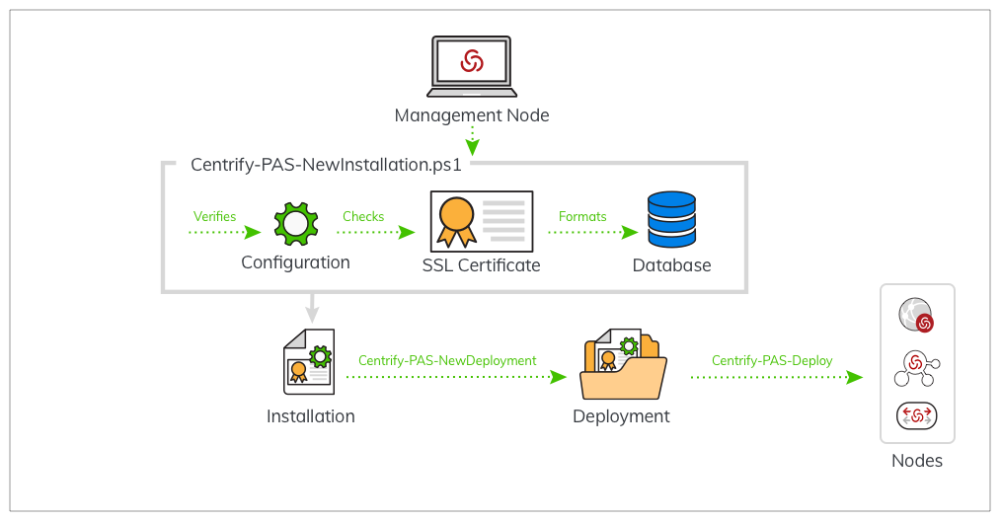
After creating the Management node, use the Centrify-PAS-NewInstallation.ps1 script, available on the Management node, to create a new Installation. An Installation is an instance of a cluster (all resources, nodes, configuration information, that together provide a single cluster), operating with a single hostname (for example, pas.corpnet.com). The number of systems that comprise the cluster depends on your environment (for minimum requirements, see Prerequisites.
Creating a new Installation requires a dedicated database; this is specified in the configuration or parameters. Each installation must have its own database on a dedicated PostgreSQL server.
The Centrify-PAS-NewInstallation.ps1 script
- Creates a directory to hold the generated installation data (in
<Centrify PAS Directory>\installations). -
Creates a configuration in a config subdirectory (inside the installations
directory for this installation). The command parameters are passed as
individual parameters or configured in a prepared file.
-
Verifies the configuration inputs (makes sure the hostname resolves to the
DNS, checks for the database and Redis servers, that the database
credentials work, and that the proper database extensions are installed).
-
Verifies that the database does not have a current installation; if it does,
the installation fails. To override this, either delete the database or use
the
-overrideswitch (note you cannot recover your data after using theoverride switch).
- Initializes the database (this destroys any data in the database).
- Accepts the installation license key.
To Create a New Installation
-
If you are not already logged in to the Management node, log in as a user with administrator rights.
-
At an elevated PowerShell prompt, run
.\Centrify-PAS-NewInstallation.ps1.The script options can be provided on the command line. For example:
Copy.\Centrify-PAS-NewInstallation.ps1
-Hostname pas.corpnet.com -Certificate C:\corpnet.com.p12 -DBUser centrifyAccount -DBPassword secretCode -DBServer postgres.corpnet -RedisServer cache.corpnet -AdministratorName PASAdmin -AdministratorPassword EvenM0reS3cret -AdministratorEmail pasadmin@corpnet.com -CompanyName Corpnet -LicenseKey 234KL43Type
Get-help .\Centrify-PAS-NewInstallation.ps1 -detailto get information on the command and parameters, or see Centrify-PAS-NewInstallation.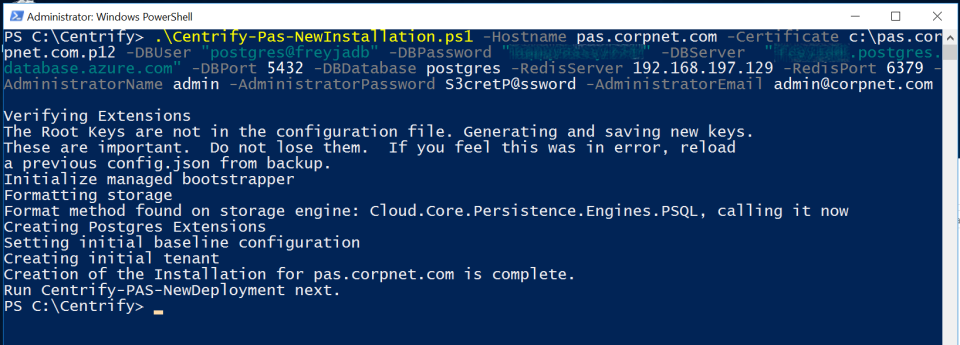
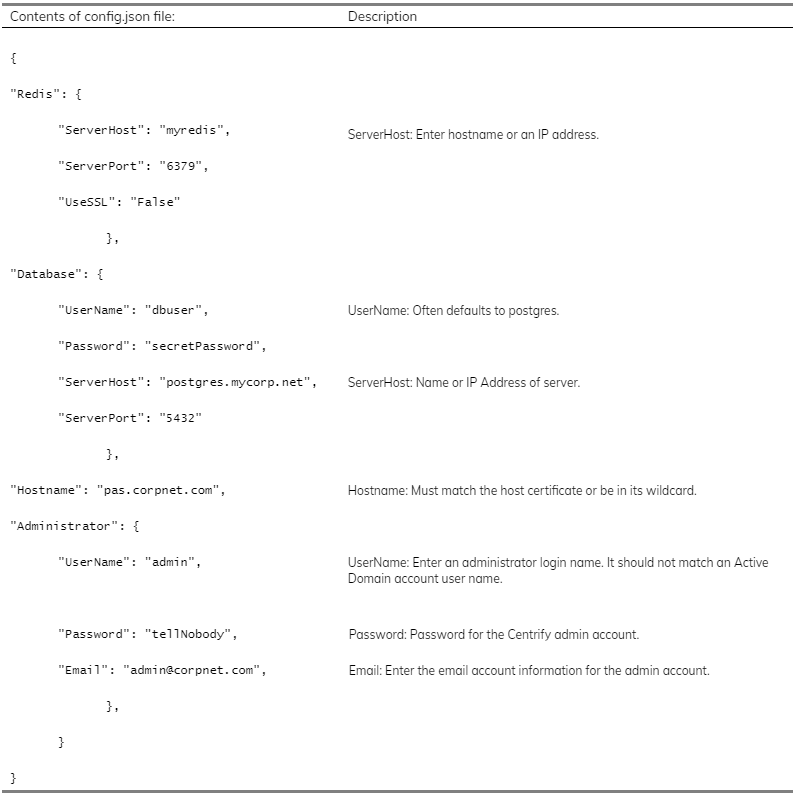
You can also pass configuration parameters via config.json file. If you use this method, you need to populate the config.json file with the required data prior to running the script, see Configuration File.
If the command is successful, a zip file is created and available in the installations directory (
\Installations\Config\<hostname>.zip) on the Management node. -
Copy the newly-created configuration directory to a safe and secure location.
The configuration directory contains the generated certificates and keys for your installation, so it is important that you do not lose the contents.
Phase 3: Creating a Deployment Package
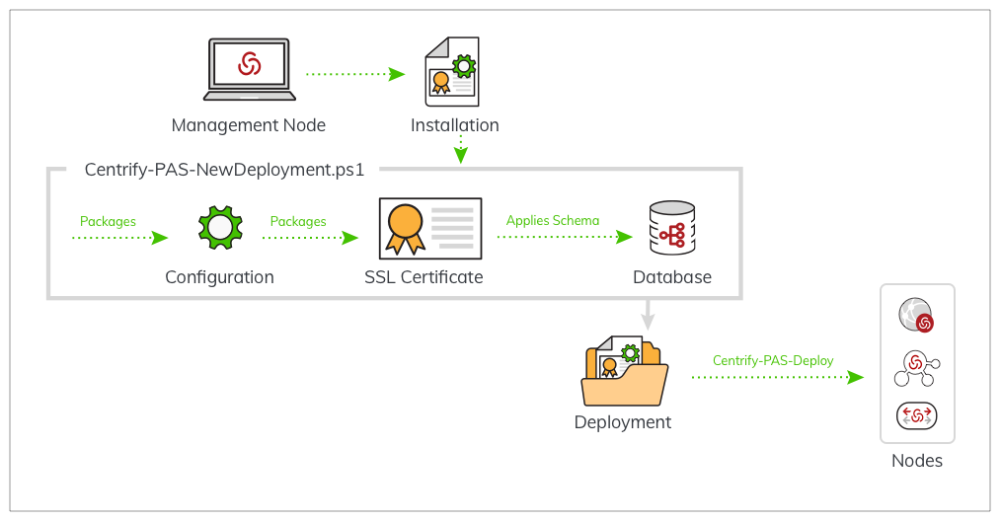
Once an Installation is defined, use the Centrify-PAS-NewDeployment.ps1 to
create a Deployment package (a .zip file) that you can distribute to cluster
nodes (Web nodes, Background nodes, and TCP Relay nodes). The
Centrify-PAS-NewDeployment.ps1 script updates the database schema and creates a
Deployment in a new folder under the Installations<hostname>\Deployments
directory on the Management node, with the current date and the Deployment ID
(as specified or as a GUID). Inside that directory is a single file called
<Deployment ID>.zip that includes everything needed to create Web, Background,
and TCP Relay nodes, including the configuration and certificate data.
An Installation must be created (see Phase 2: Creating a New Installation above prior to running the deployment package script.
To Create a Deployment Package
-
If you are not already logged in to the Management node, log in as a user with administrator rights.
-
Change to the target directory and at the PowerShell prompt, type
Centrify-PAS-NewDeployment.ps1 [-Hostname][[-ID]]. See the following example:.\Centrify-PAS-NewDeployment.ps1 -Hostname pas.corpnet.com -ID NewDeploy1Type
Get-help .\Centrify-PAS-NewDeployment.ps1 -detailto get information on the command and parameters or see Centrality-PAS-NewDeployment.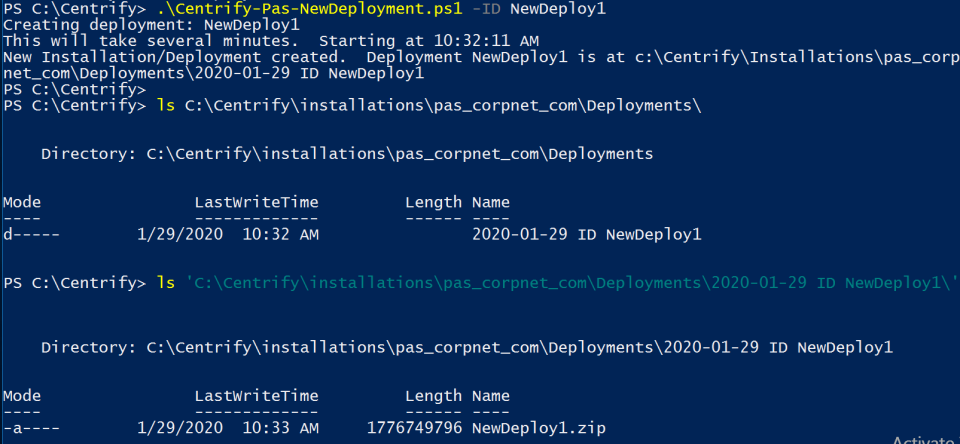
-
Once complete the following file is available in the
...\installations\<hostname>\Deployments\<date-DeploymentID>\directory:<deployment_id>.zip
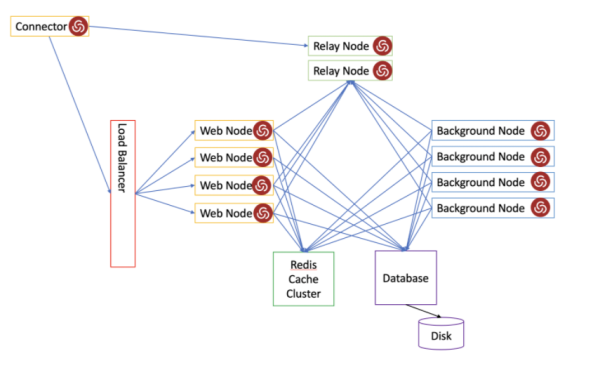
Phase 4: Deploying Hyper-scalable PAS Software to Web, Background, and TCP Relay Nodes
After you complete the steps in previous sections, you copy the Deployment file
(<deployment_id>.zip) from the Management node to each target node (Web,
Background, TCP Relay) and then run Centrify-PAS-Deploy.ps1 to build each node.
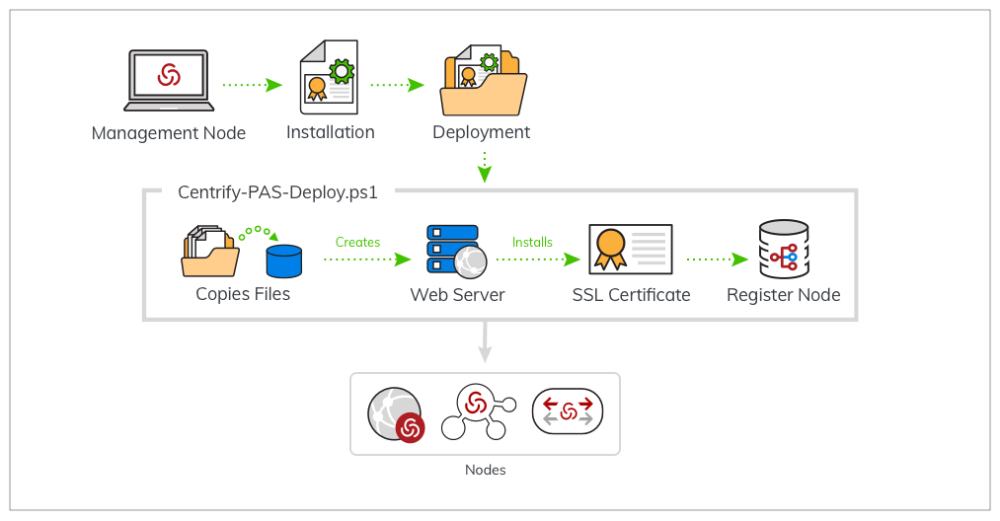
The illustration above depicts the deployment process. The deployment process is
the same for each node with the exception of the command node type parameter.
When deploying (via Centrify-PAS-Deploy.ps1) a new Deployment, in addition to
Web and Background nodes, you can also deploy two types of TCP Relay nodes:
Logging node and the regular Relay node.
Delinea strongly recommends you install the Logging node first (if applicable), allowing the Web and Background nodes to see and log in to it.
To Install Each Node
You need to perform these procedures for each node (Web, Background, TCP Relay, and Logging node) in the Installation.
-
Copy the deployment file,
<deployment_id>.zip, from the Management node to the target node (the Windows servers designated as a Web, Background, TCP Relay, or Logging nodes).The
<deployment_id>.zipfile is created in\installations\<hostname>\Deployments\<date-DeploymentID>\when you create the deployment package. See To Create a Deployment Package. -
On the target node, unzip the
<deployment id>.zipfile using the Expand-Archive commandlet or your preferred utility. -
On the target node, run the
Centrify-PAS-Deploy.ps1script with the appropriate parameter for the desired node type (see Centrify-PAS-Deploy for a list of parameters).Delinea strongly recommends you install the Logging node first (if applicable), to allow the Web and Background nodes to see and log in to it.
The command can receive the InstallPath parameter, which indicates where to install the deployment. The default value is
C:\CentrifyNode.For example, to create a Background node you enter:
.\Centrify-PAS-Deploy.ps1 -BackgroundNodeType
Get-help .\Centrify-PAS-Deploy.ps1 -detailto get information on the command and parameters, or see Centrify-PAS-Deploy.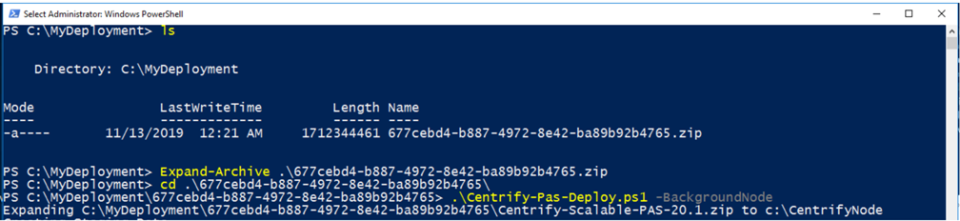
Phase 5: Activating the Deployment
There are two steps to activating a new Deployment. From the Management node:
-
Ensure that the load balancer can send traffic to the Web nodes.
Note that Web nodes fail the health check until they are set to active.
-
Activate new nodes (Web and Background) by switching to the new Deployment ID.
When the Web node deployment is completed, add the new Web nodes to the target
list of your load balancer. The health check URI is /health/check. Verify that
the hostname resolves to the load balancer on your DNS, and then you are ready
to activate the deployment so that it can service requests.
The Background nodes should have the same Deployment ID, but the load balancer only points at Web nodes.
When creating a new deployment, a new Deployment ID is created or assigned. Once
the deployment is created, new nodes can be created, but those nodes won't
respond to traffic until the load balancer points to the new Web nodes, and the
new Deployment is set to Active. To activate inactive nodes, you run the
.\Centrify-PAS-SetActiveDeployment.ps1 script from the Management node,
specifying the desired Deployment ID.
At this point, any nodes in a previous Deployment ID are inactive and show as unhealthy or down in your load balancer, while the new nodes with matching Deployment IDs are active and show as healthy or up. Depending on the load balancer settings there may be a delay.
Hyper-scalable PAS does not support deactivating and then
reactivating a deployment directly. Whenever a node is deactivated via
Centrify-PAS-SetActiveDeployment, it must be rebooted before reactivating it.
To Activate the Deployment
-
From the Management node, type the following to set the Deployment to active:
Centrify-PAS-SetActiveDeployment.ps1 [-Hostname] <String> [-ID] <String>Type
Get-help .\Centrify-PAS-SetActiveDeployment.ps1 -detailto get information on the command and parameters or see Centrify-PAS-SetActiveDeployment. -
Once the installation is complete, you can start using the Privileged Access Service.
Configuration File
During installation and deployment of Hyper-scalable PAS, you populate a
configuration file with installation details using a JSON formatted file
(config.json). The Centrify-PAS-NewInstallation.ps1requires this information during installation (see Phase 2: Creating a New Installation above.
To automate the process, you can add the information to config.json file
yourself. Using this method, you enter the data directly into the config.json
file prior to running the Centrify-PAS-NewInstallation.ps1 script. The file is
stored in the installations\Config\hostname subdirectory. Ensure you back up
the configuration directory to a safe and secure location, as this has the
generated certificates and keys for your installation.
The following is an example of using the config.json to pass parameters in the
Centrify-PAS-NewInstallation.ps1 script.
You must provide the following information for the config.json file:
- Redis: server hostname, server port (default is 6379)
-
Database: user name, password, server hostname, server port (default is
5432)
-
Hostname: this is the name of the installation and must match the hostname
used on the certificate
Sample config.json File
To Update Log locations Using config.json
Default log locations are already set, therefore you only need change the config.json if you want to change the default log locations.
Before running Create-Pas-NewDeployment, update the logging section. For example:
"Logging":  {
    "CloudFolder":"C:\\CentrifyLogs\\Cloud",
    "LintFolder":"C:\\CentrifyLogs\\Lint",
    "AnalyticsFolder":"C:\\CentrifyLogs\\Analytics",
    "RelayFolder":"C:\\CentrifyLogs\\Relay"
}
Hyper-scalable PAS Sizing Guidelines
The Hyper-scalable PAS platform has many features and use-cases. This page provides a baseline guide to use as a starting point.
Larger or smaller setups can be extrapolated from this guide.
The following key use cases have been tested and observed.
Testing is an ongoing process and specifications may need to be adjusted on a case-by-case basis.
| Use case | Description |
|---|---|
| Cloud Agent | - Back-channel traffic impact on TCPRelay, web, and background nodes |
| - Password management / reconciliation traffic | |
| PAS | - RDP web and native session traffic |
| - SSH web and native session traffic | |
| - Password management / reconciliation traffic |
On-premise Example
Below is a configuration for an on-premise Hyper-scalable PAS using VMware vSphere consisting of the following machines:
| Name | Specifications | Server |
|---|---|---|
| 2x Connector node 4 core | 16GB RAM | Windows Server 2016 |
| 2x TCPRelay nodes 4 core | 16GB RAM | Windows Server 2016 |
| 2x Worker nodes 4 core | 16GB RAM | Windows Server 2016 |
| 3x Web nodes 4 core | 16GB RAM | Windows Server 2016 |
| Logger node 2 core | 16GB RAM | Windows Server 2016 |
| Management node 2 core | 8GB RAM | Windows Server 2016 |
| PostgreSQL DB 8 core | 32GB RAM | Centos 7, PostgreSQL 10.14 single node |
| Redis cache 8 core | 32GB RAM | Centos 7, Redis 6.0.8-1 single node |
Capabilities
This configuration is capable of the following concurrent sessions:
-
50 (medium traffic) RDP web sessions
Traffic was simulated by running the task manager which generates RDP traffic via periodic screen updates.
-
350 (low-medium traffic) SSH sessions
Traffic was simulated by running top, which generates SSH traffic via periodical screen updates.
-
1000 - 1500 Cloud Agents (depending on activity)
Traffic was simulated using an internal tool.
When using this example as a basis, keep in mind:
-
All of these numbers can be serviced via a single connector but we recommend
having more than one for redundancy.
-
(Optional) Connectors may be configured to provide only specific services
to isolate traffic / load.
-
(Optional) TCPRelays may also be configured to provide a dedicated
BackChannel communications for Cloud Agent.
-
This example does not generate any consequential load on:
- PostgreSQL database
- Redis load. Latency was measured to be:
- Minimum: 0 ms
- Maximum: 1 ms (spiked up to 2-3 ms during agent enroll)
- Average: .05 ms
- Resource impact. See Load impact section below for use-case specifics.
Load Impact
The primary load on a Hyper-scalable PAS system is on the web nodes and primarily affects the CPU and RAM resources. This is due to external communications which require the web nodes, such as:
- Web browser UI
- REST
- Agents
- Data requiring backend (worker node)
The second critical component are the connectors. All web and direct session access without the Portal is directed through the connector machine. This load is primarily seen as total network traffic throughput and the number of concurrently open network sockets.
The TCPRelay load is seen as total network traffic throughput and the number of concurrently open network sockets. The CPU and RAM utilization will be very low.
There is no significant load on PostgreSQL or Redis.
Comparable Environments
Below is a comparable Amazon EC2 instance: Other machine requirements can be extrapolated from these baselines.
| Name | AWS EC2 instance | vSphere |
|---|---|---|
| Management node | t2.large | 2 core 8 GB RAM |
| Logger node | t3.xlarge | 4 core 16 GB RAM |
| PostgreSQL | db.r4.2xlarge | 8 core 32 GB RAM |
| Redis | cache.r4.large | No direct comparison but you can use the PostgreSQL instance as a baseline. |
| TCPRelay nodes | t3.xlarge | 4 core 16 GB RAM |
| Web nodes | t3.xlarge | 4 core 16 GB RAM |
| Worker nodes | t3.xlarge | 4 core 16 GB RAM |
| Connector nodes | t3.xlarge | 4 core 16 GB RAM |
The information in a sample setup only. You may require sizing adjustments based on your specific setup.
Cloud Agent
Cloud Agent generates a negligible load on Hyper-scalable PAS from login and MFA operations. The Cloud Agent has a back-channel communication path with Hyper-scalable PAS that enables Delinea to provide features such as:
-
Agent-assisted account reconciliation
-
Workflow
-
On demand provisioning
-
HealthCheck
This back-channel does not require customers to open additional ports. It provides a mechanism for various Platform components to invoke remote functionality on the Clients.
The Cloud Agent will register itself via the back-channel by default during the enrollment process or agent start-up.
The default settings are configurable.
Once the Cloud agent registration is complete, back-channel traffic may be generated for the following reasons:
- Periodic HealthCheck (configurable) every hour per agent
cinfo -Hwill perform a HealthCheck- Feature management capability
- Password reconciliation capability
On shutdown, the Cloud Agent unregisters itself from the back-channel.
These operations do not inherently constitute a large amount of traffic or load. However, when multiplied by a large number of enrolled Cloud Agents, this can present occasional spikes in the back-channel traffic, which can affect performance.
For example, the following may create a large spike in BackChannel registration traffic:
-
An automated / orchestrated provisioning of a large number of machine instances within a short period of time
-
Auto-enrolling Cloud Agents.
TCPRelays can be configured to be dedicated for Cloud Agent use only.
Privileged Access Service
RDP and SSH access via a web browser is a key feature of Hyper-scalable PAS. This system was able to support:
- 50 RDP web sessions
- 350+ SSH web sessions