Configuring a Web Server Certificate for PAS
To create a web server certificate for your Delinea PAS environment, perform
the following steps:
-
Create a web server certificate template with an exportable private key.
-
Generate a wildcard certificate for your web servers (*.domain.com).
-
Export the certificate plus the private key into a file.
To Create a Web Server Certificate Template with an Exportable Private Key
To create a web server certificate template to allow exporting for private keys,
perform the following steps:
-
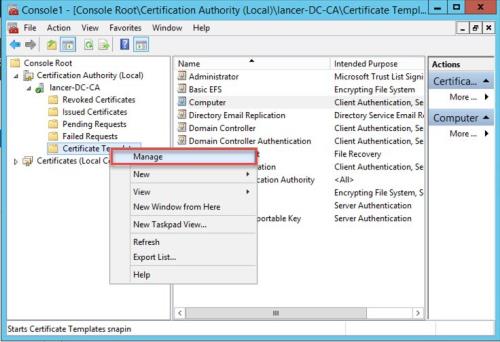
In your domain’s Certification Authority (CA), open the Certification
Authority program and expand the CA. -
Right-click Certificate Templates and select Manage. This opens the
Certificate Templates console.
-
Manage Certificate Templates
-
Scroll down and right click the Web Server template and select
Duplicate Template This opens the new certificate template window.
-

-
Duplicate Template
-
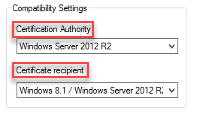
Navigate to the Compatibility Settings tab:
-
For the Certification Authority field, select Windows Server 2012
R2 or higher. -
For the Certificate Recipient fields, select Windows 8.1/ Windows
Server 2012 R2 or higher.
-
-
-
Certificate Authority and Recipient
-
Navigate to the General tab > Template display name and set it to
“Web Server with Exportable Key” (no quotes). -
Navigate to the Request Handling tab and check the checkbox “Allow the
private key to be exported.”
-

-
Allow Private Key Export
-
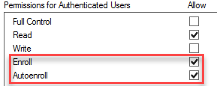
Navigate to the Security tab. Here, authenticated users are highlighted.
In the lower pane, check the boxes for Enroll and AutoEnroll.
-
-
Enroll and AutoEnroll
-
Click OK. This will save this new Certificate Template and close the
Certificate Templates Window. -
Back in the Certification Authority console, right click Certificate
Templates > New > Certificate Templates to Issue. This opens the
Enable Certificate Templates window. -
Scroll down to Web Server with Exportable Key and click OK. The
modified template is now ready for use through group policy. -
Close the Certification Authority console.
To Generate a Web Server Certificate for the Delinea Privileged Access Service Installation
-
In the server where you’re going to install Delinea Privileged Access
Service, open the mmc.exe program. -
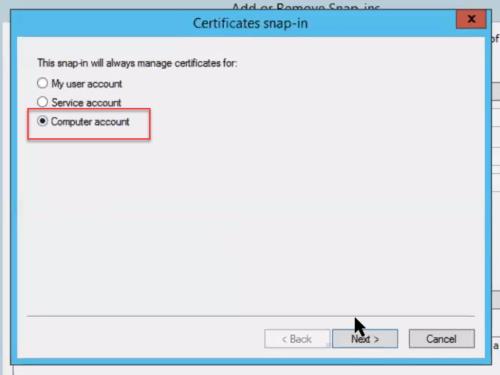
In the MMC program, navigate to File > Add/Remove Snap-ins add the
Certificates (Computer) snap-in and click Add.
-

-
Add Certificate Snap
-
For Certificates snap-in, choose Computer account and click Next.
-
-
Computer Account
-
For the Select computer screen, keep all default and click Finish
and then click OK. -
Navigate back to the console, and under Console Root, right-click
Personal > All Tasks > Request New Certificate. Click Next on
the Certificate Enrollment screen. On the Select Certificate
Enrollment Policy screen, ensure you have Active Directory Enrollment
Policy and click Next.
-

-
Active Directory Enrollment Policy
-
For Request Certificate, click the checkbox for Web Server with
Exportable Key and click the hyperlink directly beneath the selection
entitled More information is required to enroll for this certificate.
Click here to configure settings.
-

-
Click here to configure settings
-
Navigate to Subject, for Subject name, choose Common name. For
Value enter the name of the server where you’re going to install
Delinea PAS and click Add.If you are installing Hyper-Scalable PAS across multiple
servers, provide the FQDN of your PAS installation (example:
vault.mydomain.com).
-
For Alternative name, choose DNS and then there are two options:
-
Enter *.<your-domain.com> if your web server names will be changing
with each upgrade. You will use this option if you are creating new web
server machines with each upgrade. -
Enter the FQDN list of each web server in your cluster if you have a
fixed set of web servers that will remain the same after each upgrade.
This upgrade process would involve uninstalling the current version on
each web server, installing the upgraded package, and keeping the same
machine.
-
-
Click OK and then Enroll. You should see success.
-
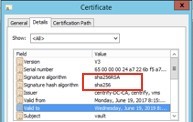
In the Certificates snap-in, navigate to Personal > Certificates
and double-click the generated certificate. Navigate to the Details tab,
and verify that the algorithm is SHA256 (if you followed the steps in the
section above). Scroll down to Subject Alternative name, and verify that
the DNS name is *.<your-domain.com>.
-
-
Subject Alternative name
-
Keep the Certificates snap-in open for the export process.
To Export the Certificate with the Private Key
-
Under Personal > Certificates, right click the Delinea (or the
name of the server) Certificate and select Export. -
On the welcome page click Next.
-
On the Export Private Key screen, select Yes, export the private key and
click Next. -
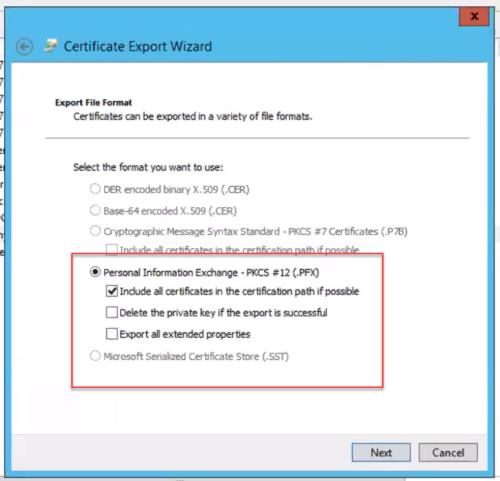
For Export File Format, keep default (Personal Information Exchange -
PKCS # 12 (.PFX)) and click Next.
-
-
Export File Format
-
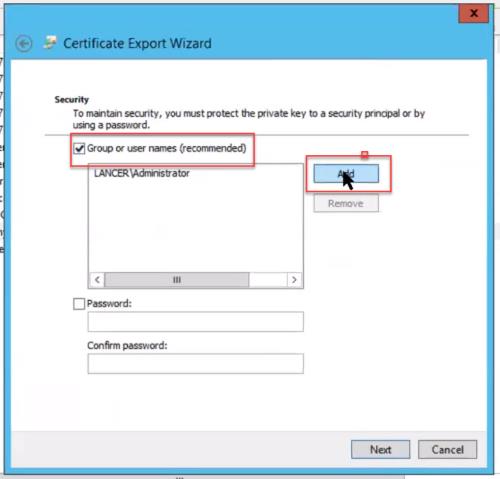
For the Security screen, click the checkbox Group or user names
(recommended).
-
-
Group or user names
-
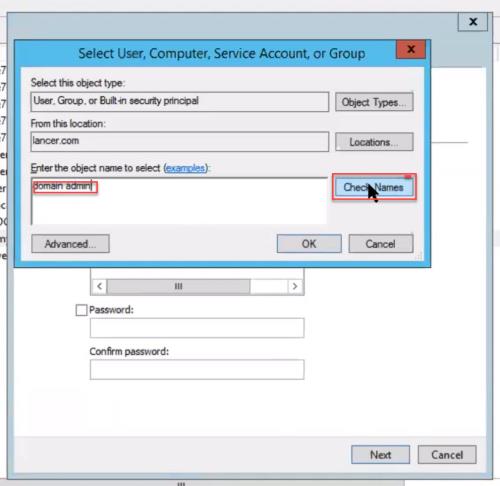
Click Add. For the Select User, Computer, Service Account, or Group
screen, in the field Enter the object name to select (examples) enter
domain admin and click Check Names: -
-
Select User, Computer, Service Account, or Group
-
Click OK and click Next.
-
For File to Export, name the file and click Save.
-
Click Next. Make a note of this location, you’ll need it during setup (example: c:\company\company.pfx).
-
Lastly, for the Completing the Certificate Export Wizard screen, click
Finish. You will see a screen pop up stating the export was successful.
Click OK.
You will provide this file when asked to supply the web server certificate
for your installation.