How to Install a Connector
The Delinea Connector is a multipurpose software that enables secure communication between your internal network and Privileged Access Service.
You install the Delinea Connector for the following purposes:
-
If you are authenticating Delinea Directory users by using their Active Directory or LDAP account or if you are adding resources and shared accounts to Privileged Access Service.
-
Install additional Delinea Connectors for load balancing and failover.
-
To integrate your Active Directory/LDAP service with Privileged Access Service, you need to install at least one connector on your network inside of the firewall.
You can install more than one connector for your organization to support fail-over and load balancing. You might also want to install more than one connector if you are using multiple Privileged Access Service services. In most cases, you should install two connectors in a production environment. Delinea determines which connector to use by monitoring connector health and making a random selection with a bias toward healthy connectors.
Industry best practice recommends that you do not install the connector on the same server as the domain controller. Domain controllers are single-purpose systems.
Delinea recommends How to Auto-update Connector Software to keep up-to-date with the current version of the connector; however, we understand that in some environments it might not be possible to update software that has gone into production environments. Therefore, Delinea connector installations are supported up to the last two previous versions.
Overall Requirements
To install and configure Delinea Connector you need the following:
| Item | Description |
|---|---|
| Privileged Access Service Management Suite installer | This program installs the connector, Active Directory/LDAP and group policy console extensions, and the Delinea Connector Configuration Program. To get the installer, you open Admin Portal, click Settings, Network, Delinea Connectors, and Add connector. Repeat this procedure every time you install a connector to ensure you get the latest version of the connector. |
| Host computer joined to the domain controller | You install the Centrify Connector on a Windows computer to establish the communications link between the Privileged Access Service and Active Directory domain controller. If you are referencing accounts in an Active Directory tree or forest, the connector can be joined to any domain controller in the tree (it does not need to be the root). In addition, that domain controller must have two-way, transitive trust relationships with the other domain controllers. See Supporting User Authentication for Multiple Domains for details. This computer must be in your internal network and meet or exceed the following requirements: - For the latest version of supported Windows Servers, see the Centrify PAS release notes at PAS and Cloud Suite Release Notes. All running 64-bit with 8 GB of memory, of which 4 GB should be available for connector cache functions. - Has Internet access so that it can access the Privileged Access Service. - Has a DigiCert Global Root CA certificate installed in the Local Machine Trusted Certificate root authorities store. - Microsoft .NET version 4.8 or later; if it isn’t already installed, the installer installs it for you. - Be a server or server-like computer that is always running and accessible. |
| Permissions on the connector machine | To install the Delinea Connector, you need to be the local administrator on the Delinea Connector machine. See Installation and Service Account Privilege Requirements for more permissions requirements. |
| Firewall and external IP address requirements | See Firewall and External IP Address Requirements |
| Execute VBScript | The server must be able to execute VBScript during the installation. |
| Web proxy server (optional) |
Installation and Service Account Privilege Requirements
Installing the connector requires file installation (running the installer.exe file) and registration (running ProxyUI.exe for the first time). File installation requires local administrative permissions on the connector machine because you need to copy files to Program Files, set up Windows service, modify registry, etc. Registration also requires local administrative permissions because you need to write the settings to registry. However, additional permissions may be required depending on what you want to do.
| Services | Required Rights and Privileges |
|---|---|
| Synchronize deleted objects in Active Directory with Privileged Access Service | When you delete users in Active Directory and want this deletion synchronized with Privileged Access Service, you have two options: - You must be the domain administrator of the Active Directory domain for the relevant deleted objects container. If you are deleting users in multiple domains, make sure that you are the domain administrator for all those domains. - Delegate read permissions to the service account for the deleted objects container in the corresponding domain. If you do not take one of the above actions, users deleted in Active Directory will be listed on the Users page in Admin Portal until you manually delete them. However, they will not have access to any Privileged Access Service functionalities. See How to Delete User Accounts for more information on deleting Active Directory accounts. |
| Register the connector as an Active Directory proxy (for example, only for App Gateway) | If you want to register a connector as an Active Directory proxy, you need to have Read permissions to the Active Directory server. |
| Register the connector in your Privileged Access Service account |
All Active Directory accounts are members of the built-in Authenticated Users group. By default, members of the Authenticated Users group have list and read permissions on most Active Directory objects. The specific permissions vary for different object types and Active Directory versions.
You can also install the Delinea Connector on non-Active Directory computers. In this case, you can use local (i.e. non-Active Directory) accounts.
Permissions Required for Alternate Accounts and Organizational Units
You can run the connector service as an Active Directory service account instead of as a Local System account. The account you select must have all of the required permissions. For example, if you run as a specific Active Directory service account, the account must be a member of the local administrators group, and you must confirm that it has at least read permission to the container that has Privileged Access Service user accounts and Active Directory Groups used as members of Roles.
You should not run a Windows service with an Active Directory built-in account or an Active Directory user account.
You must verify that the relevant accounts have permission to read Active Directory users and groups as if authentication would work. Each time role permissions are reassessed, the Connector tries to resolve the Active Directory groups mapped to any role in which the Active Directory user is potentially a member.
The host computer must also have read access to the container or organizational unit (OU) that stores the user accounts. Without read access, the connector cannot authenticate the user. Domain computers have this permission by default; however, the connector host may not. This most often occurs in multi-forest or multi-domain setups and can occur even when two-way trust is already defined. You can tell when this occurs—the connector log would show the error message, "unable to locate forest or user object."
In this case, you need to give the Local System account read access permission to the containers or organizational units.
To set the Read access permission to the user account container or organizational unit:
-
Open Active Directory Users and Computers, select the user account container, and open the Properties.
-
Select the Security tab and then click Add to add the user account you are using to run the connector service. Click OK after you add the user account.
-
Click the user account in Group or User Names and click the Allow box for the Read permission.
-
Click OK.
Any user or group that has been given permission to read and write the LockoutTime attribute for an OU or other container can unlock user accounts that reside in that container. See https://support.microsoft.com/en-us/kb/294952 to delegate the right to unlock locked user accounts to a particular group or user in Active Directory.
Password reset requires you to delegate a group of users to have the ability to reset passwords for another subset of users in a particular OU. See Password Reset Permissions for information on delegating password reset permissions.
Installing a Delinea Connector
Once you install the Centrify Connector you may integrate your Active Directory/LDAP service with Privileged Access Service. The connector allows you to, among other things, provide AD and LDAP based authentication to Privileged Access Service, RADIUS connectivity as well as RDP and SSH gateways to connect to systems.
Industry best practice recommends that you do not install the connector on the same server as the domain controller. Domain controllers are single-purpose systems. To install the connector, you must first get the Privileged Access Service Management Suite package then run the installation wizard.
Before You Begin
Before you install the connector, you must create a new role and assign that role the right to register and administer the connectors. To do this, do the following:
-
Create a new role: Access > Roles (add a role).
-
Name the role Connector Administrator. The purpose of this role is to create and manage the addition of connectors to the system.
-
On the Administrative Rights tab, add the right to Register and Administer Connectors and click Save.
-
-
Navigate to Access > Users and create a new cloud user by clicking Add User. Name this user connectoradmin. Add the email address, display name, password, and click Create User.
-
Navigate back to Access > Roles and click the Connector Administrator role. Go to the Member tab and add the user connectoradmin to the Connector Administrator role and click Add.
The above steps must be completed before you proceed to installing the connector.
Installing a Connector on a Host Computer
-
Download the Delinea Connector installer:
-
Log in to the host computer with an account that has sufficient Delinea Connector permissions to install the connector.
-
Open the Admin Portal.
-
In the navigation pane, click Downloads and search for "Delinea Connector" or scroll down to see the connector file.
-
Next to the Delinea Connector file, click Download to download a zip file.
-
Extract the zip file and then run the installer program Centrify-Connector-Installer-<version>.exe.
-
-
Click Yes to continue if the User Account Control warning displays.
-
Click Next on the Welcome page. Review the End User Software License and Services Agreement, accept the terms of agreement, then click Next.
-
Select the components to install, then click Next.
The default is to install all components. Use the description on the installation UI determine what you want to install. -
Click Install > Finish to open a second installation wizard. This second installation wizard initiates the connection between Active Directory and your Privileged Access Service tenant.
-
Click Next on the Welcome page.
-
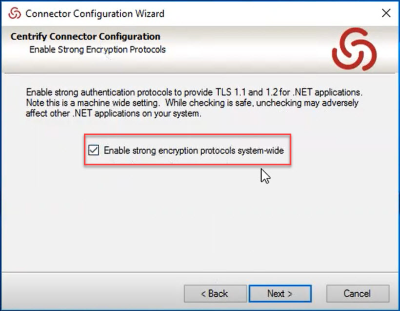
You will next see the Delinea Connector Configuration wizard that allows you to set strong encryption protocols system-wide. The checkbox Enable strong encryption protocols system-wide is checked by default. Click Next.
-
Next, enter the Tenant URL:
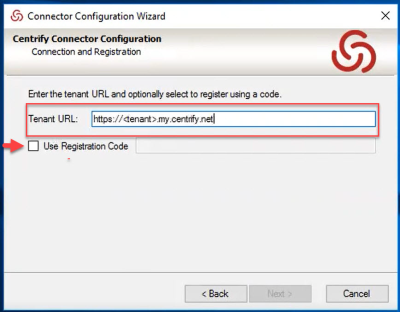
and you can either:
-
proceed to MFA, or
-
you can choose to use a registration code. If you use a registration code, you bypass the MFA process. You do this by clicking the Use Registration Code checkbox. To obtain a registration code, you must obtain one from the Registration Codes utility in the Admin Portal as follows.
-
Navigate to the Admin Portal > Settings > Network > Registration Codes.
-
Here, you can add and manage connector registration codes.
For more information on managing connector registration codes, see Using Connector Registration Codes
-
-
If you have not used a registration code, you proceed to MFA and then step 13. If you used a registration code, you proceed with step 13.
-
Click Next unless you are using a web proxy server to connect to Privileged Access Service. If you are using a web proxy service, select the associated check box and specify the IP address, port, user name, and password to use.
-
Specify the monitored domains and relevant credentials to synchronize deleted objects in Active Directory/LDAP with Privileged Access Service, then click Next.
When you delete users in Active Directory and want this deletion synchronized with Privileged Access Service, you have two options:
-
You must be the domain administrator of the Active Directory domain for the relevant deleted objects container. If you are deleting users in multiple domains, make sure that you are the domain administrator for all those domains.
-
Delegate read permissions to the service account for the deleted objects container in the corresponding domain.
If you do not take one of the above actions, users deleted in Active Directory will be listed on the Users page in Admin Portal until you manually delete them. However, they will not have access to any Privileged Access Service functionalities. The configuration wizard performs several tests to ensure connectivity.
-
-
Click Finish to complete the configuration and open the connector configuration panel, which displays the status of the connection and your customer ID.
If you are not authorized to retrieve a registration code, you will receive an error stating that. -
Click Delinea Connector to view or change any of the default settings.
-
Click Close.


After you have installed and configured at least one connector, you can use either Admin Portal or your default browser to log on to Privileged Access Service. The next time you log on and see the welcome page, select Don’t show this to me again, then click Close.
The column headings in Admin Portal associated with each connector indicate the following:
| Column Header | Indicates |
|---|---|
| Delinea Connector | The name of the computer |
| Forest | The domain name for the domain controller to which the connector is joined. |
| Version | The version of the connector software. You can configure the connector to update automatically—see How to Auto-update Connector Software |
| Last ping | The last time the Privileged Access Service successfully pinged the connector. |
| Hostname | The DNS short name. You can also enter a fully qualified domain name to the IE local intranet zone. See Enabling IWA Service on the Connector to change this name. |
| Enabled Services | AD Proxy -- Displays if the Active Directory proxy service is enabled on the connector. If enabled, it means you use the Active Directory proxy service to authenticate Privileged Access Service users who have Active Directory accounts. LDAP Proxy -- Displays if the LDAP proxy service is enabled on the connector. If enabled, it means you use the LDAP proxy service to authenticate Privileged Access Service users who have LDAP accounts. App Gateway -- Displays if the App Gateway service is enabled on the connector. The App Gateway service provides remote access and single sign on to web applications provided by internal web servers (see Applications . RADIUS Client -- Displays if the connector is enabled for use as a RADIUS client. RADIUS Server -- Displays if the connector is enabled for use as a RADIUS server for customers who support RADIUS authentication. RDP Service -- Displays if the connector is enabled for remote desktop sessions using the remote desktop protocol (RDP) clients for access to target systems. SSH Service-- Displays if the connector is enabled for secure shell sessions using SSH clients for access to target systems. Web Server (IWA) -- Displays if the connector is configured to accept an Integrated Windows authentication (IWA) connection as sufficient authentication for users with Active Directory accounts. IWA is not available to Privileged Access Service account users. |
| Status | Active indicates that the Privileged Access Service can communicate with the connector. Inactive indicates that Privileged Access Service cannot communicate with the connector. |
Installing a Connector from the Command Line
You can install a connector from a Windows or Windows PowerShell command line with the following command:
.\Cloud-Mgmt-Suite-version-win64.exe /quiet
Where version refers to the version of the Connector that you download from the Admin Portal.
Configuring a Connector from the Command Line
After you have installed the connector, you can configure the connector from the command line, if desired.
To configure the connector from the command line:
- Make sure that the connector is installed.
-
Run the Centrify.Cloud.ProxyRegisterCli.exe using one of the following formats:
- Centrify.Cloud.ProxyRegisterCli.exe url=URL regcode=REGCODE
- Centrify.Cloud.ProxyRegisterCli.exe url+RUL user=USERNAME pass=PASSWORD
- Centrify.Cloud.ProxyRegisterCli.Exe url=URL bearer=BEARER
Where:
REGCODE is a valid connector registration code.
USERNAME and PASSWORD are the user name and password of an admin user.
This user must be able to login without MFA (Must be able to login with password only).
This user must have admin rights to register connectors.
BEARER is a valid user token.
URL is your tenant URL. For example, https://acme.my.centrify.net.
Using Connector Registration Codes
You can add and manage connector registration codes in the Admin Portal. You can add, modify, and delete connector registration codes. Additionally, you can easily download the Delinea Connector by clicking the download Delinea Connector link on the right-hand side of the page.
To add a connector registration code
In the Admin Portal, navigate to Settings > Network > Registration Codes. Click Add.Enter a name for the code. You can also set code expiration and registration max (maximum number of connectors that can be registered using that code) for the code(s) you are adding.

Once added, you can select an existing code, right-click and retrieve, modify, or delete a registration code.