Enabling Client-Based Login
Client-based login is a way that you can use the Cloud Client to log in to other systems that you have registered in Privileged Access Service. There are two main components to enabling client-based login:
- Grant client-based login permission (also called the AgentAuth permission) to the desired user accounts or roles.
- Enable the client-based login feature (also called the AgentAuth feature) when you enroll a system with the Cloud Client.
Below is some information about how client-based login differs on Windows and Linux systems, and then how to enable client-based login.
About Client-based Login on Windows
The first time that you log in to a Windows system using client-based login, the service creates a new, local user that corresponds to your Privileged Access Service account if your account is a Delinea Directory or a federated account. Each time that you log in this way the service rotates the password to a random string of 32 characters. If your account is based in Active Directory, the service does not create a local account for you; you log in with your Active Directory credentials.
The service also assigns this user to local groups according to local group mapping rules that you have configured. Any changes that you make to the local group mapping configurations take effect the next time the user logs in. If an affected user is currently logged in when you make the changes, the changes take effect after the user logs out and logs in again.
This local user operates as a background user and does not show up in any lists of local users inside of Privileged Access Service; you can see this local user in the Local Users and Groups on Windows. This local account stays provisioned until you uninstall the client.
Removing the Windows Local Account
You can choose to remove this local Windows user account when the session terminates; the setting is Removing local accounts upon session termination - Windows only. Removing the local account helps fulfill compliance requirements and also helps facilitate just-in-time (JIT) privilege elevation with ephemeral account provisioning, in conjunction with local group mapping and the client-based login (Agent Auth) workflow.
In general, administrators configure client-based login with local group mapping as follows:
- Enable the Agent Auth Workflow in a policy that applies to all systems, a set, or the individual system
- Map the user's role to the Administrators group
- Enable the setting to remove local account in a policy that applies to the desired scope
Here's an example of how the process of just-in-time privilege elevation works; this example involves a user named Kayla who needs to run some administrator scripts on a Windows system:
The administrators have already enabled the Agent Auth feature on the Windows system. They have specified that the service will delete the local Windows account upon session termination; they have specified this using a policy.
For more information, see the following topics:
- Installing and Using the Cloud Client for Windows.
- Enabling the AgentAuth feature and Granting the AgentAuth Permission
- Using Agent Auth workflow
-
Kayla requests and receives permission to log in to the designated Windows system:
- She logs in to the Admin Portal and navigates to the desired Windows system.
- She follows the Agent Auth workflow to request permission to access a particular Windows system.
- Her manager approves the request and grants Kayla permission for 1 hour.
-
Kayla logs in to the designated Windows system successfully.
Upon login, the service creates a local admin account and provisions it into the Administrators group based on the local group mapping (configured by the administrator).
-
She performs the necessary work on the Windows system.
-
Kayla logs out of the designated Windows system.
The service deletes the local Windows account that was created in Step 3 and revokes all access for that account. The user will need to request login permissions when needed.
About Client-Based Login on Linux
The first time that you log in to a Linux system using client-based login, the PAM and NSS modules for the Cloud Client handle the authentication and group membership of your account. The service does not create a local user account. If desired, you can modify any default Linux user configuration settings under Settings > Enrollment > Linux Settings.
Enabling the AgentAuth feature and Granting the AgentAuth Permission
To enable client-based login for a system and a user or role
-
Enroll the computer in the Privileged Access Service and enable the AgentAuth feature.
In the Cloud Client for Windows installer, you can enable all features by not entering anything in the Optional Parameters section. Or, you can enter AgentAuth as a parameter to only enable client-based login.
If you're using the cenroll command either on Windows or Linux, you can include either of the following options to enable either just the client-based login or all features:
\--features AgentAuth\--features AllYou can also enable Cloud Client features in the Admin Portal. For details, see Enabling Client Features.
For details about Cloud Client commands and options, see Using Cloud Client Commands.
-
Log on to the Privileged Access Service.
-
Click Resources > Systems, then click the computer you registered to display its details.
-
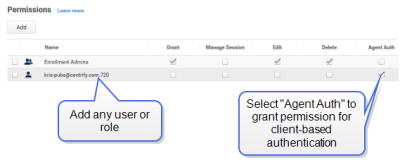
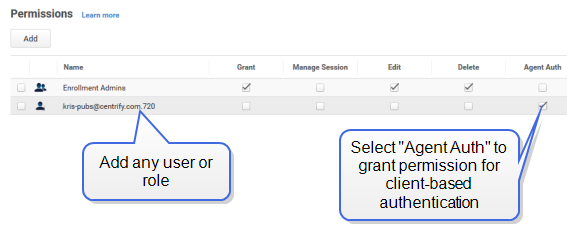
Click Permissions.
-
Click Add, if necessary, to find and select the user account or role, then select Agent Auth.
For example, if you want to add client-based login for the user kris-pubs@acme.com.720 on this computer, you would add the user to the list of accounts that have permission on the system then select the Agent Auth permission.
 You can configure client-based login for a specific system or a set of systems.
 -
Click Save.
Adding a Role for Client-Based Login
To simplify the process of authorizing users, however, you can add one or more roles specifically for client-based login. You can then specify the appropriate roles during registration to immediately grant role members access to the system.
Preparing a role for authentication is particularly useful If you are automating the deployment of virtual machine instances using a script. By specifying one or more roles in the script using the --agentauth option, you can ensure users can log on immediately after the system is successfully registered.
For example, an automation script might include a command similar to the following to register a computer in the Privileged Access Service and enable members of the Authorized Accounts role to log on:
sudo cenroll --tenant abc1234.my.centrify.net--code A1BC2345-D6E7-89F0-G123-HIJK4LM5N67P --features all --agentauth “Authorized Accounts”
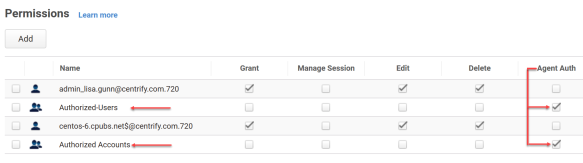
For example, if the computer you registered was centos-6.cpubs.net and you specified Authorized-Users and Authorized Accounts as the roles than can have members authenticated, the system would automatically add these roles to the system with the Agent Auth permission set.
The role you use for client-based login does not require any special administrative rights.
Logging on for the First Time
Users who are authorized to log on to computers where the Cloud Client for Linux is installed with the client-based authentication, must use their full account name the first time they log on. For example, Active Directory users should log on using user-name@domain format. Privileged Access Service users should log on with a valid suffix for their Privileged Access Service instance. For example, if the suffix you use for the Privileged Access Service instance is acme.com, the first time you log on you would use user-name@acme.com.